Search the Community
Showing results for tags 'SideFx'.
-
These are some basic ideas that I used when creating the Saliva for movies like Hellboy (2019) and Manikarnika: Queen of Jhansi (2019). The main goal was to be able to Art Direct everything anytime as there were over 14 shots where the Supervisor and Director had very specific notes. Visit my blog for more articles on Houdini Blog: https://sharanvaswani93.wixsite.com/s... Email: sharan.vaswani93@gmail.com
-
Getting closer to a new surreal idea I had in mind for a long time...Walls with Eyes! Here is my initial test for a small section of the wall. hoping to add in more detail and deformations to the rig the wall skin rig. I made the entire model and rig process combined into a single HDA. May need to optimize the HDA further to speed up things. Instead of using deformers to the bend the grids I started off with using curves and a combination of ray intersects and vex to create the eyelids, after creating the initial shape I was able to skin the curves using the Skin SOP, this gave me more control on how I can design the character, without worrying about intersection polygons and normals. The curves also acted as representatives for each loop on the wall and so I was able to control them in wrangles through multiple technics in vex.
-
LookAt Setup in SOPs, VEX, VOPs. Having used the Houdini default tools several times, I wanted to achieve the same effect in SOPs. Here is a detailed post to understand better how the LookAt works and how it can be used in creative ways https://www.sharanvaswani.com/single-post/2020/09/27/Using-VEX-and-SOPs-to-make-a-LookAt-Setup
-
Hi, I am Procedural Generative Artist. I am specialized in Procedural Asset Creation. I can create 3D assets for Games/Movies/3D Printing. My works have been featured in Several Websites. I am also able to create FX. You can see my reel below. I am looking for any kind of work. You can see my projects in pamirbal.com olcaytopamirbal@gmail.com

-
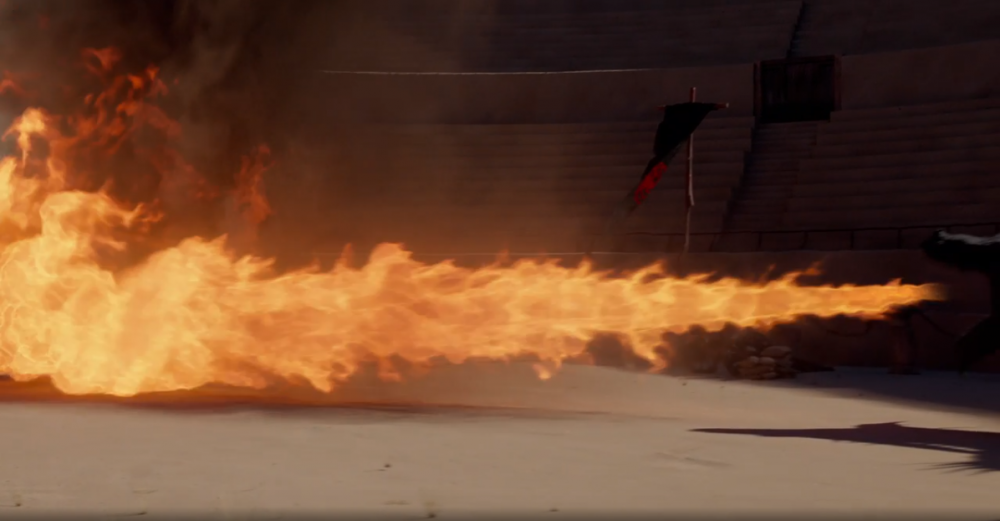
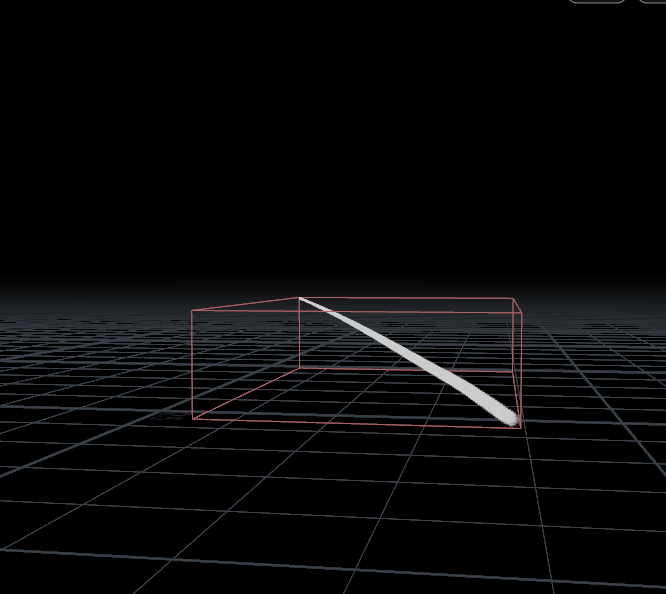
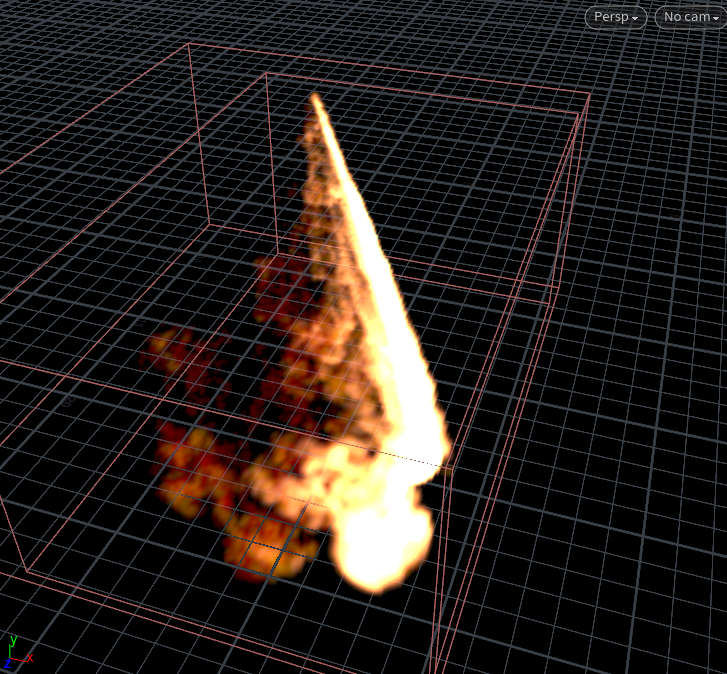
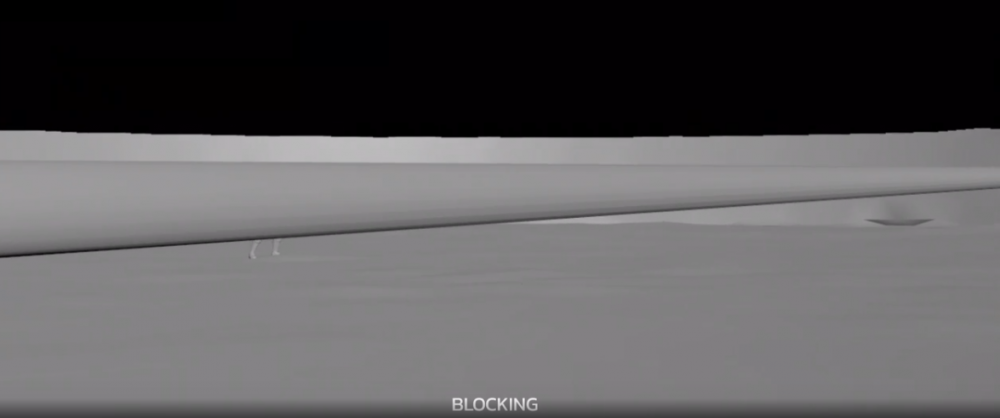
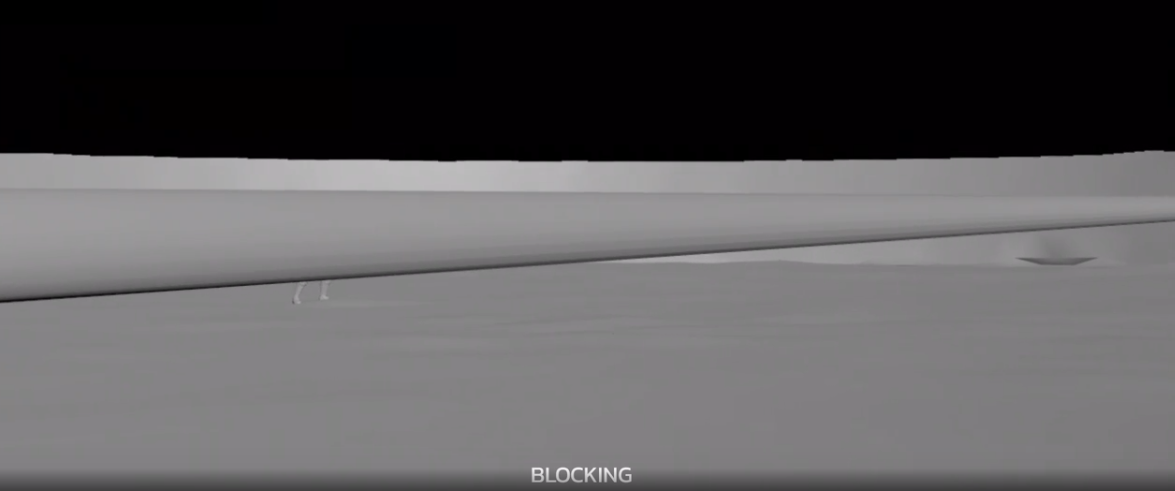
Hello All , iam trying to create a dragon fire but i have some issue with the pyrosolver 1) Its creating a trails like fire 2)how to bring the shape of the reference that i had added in this post(need some insight) 3)what is blocking in pyro Min substep 4 Max substep 8 Global Substep 1 Dragon_Breathe_Shot_07_v029.hip rebelway_competition_sc007_F994_F1090_dragon_fxflame.abc
-
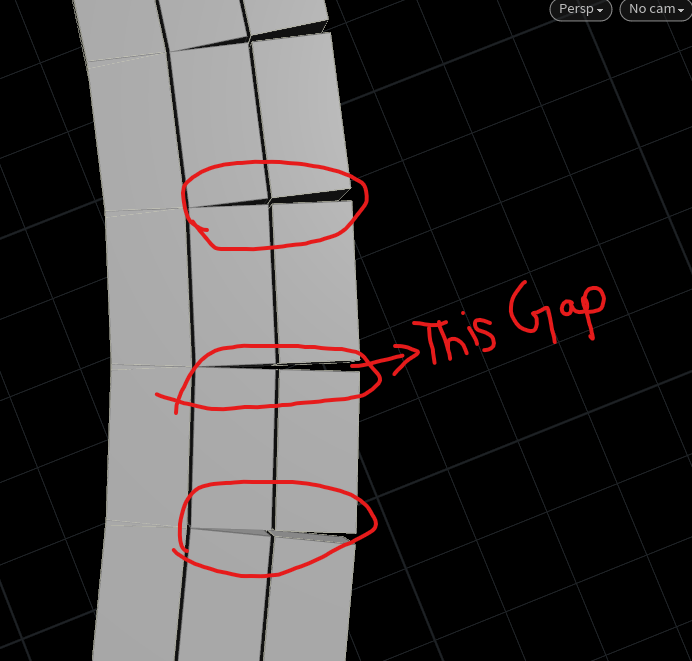
hello all, iam just dong a wall tool but i found that if my line is in curve shape i might get some gaps in-between the bricks. is there any way to fix these thing and i also found that some of the bricks are intersecting with each other. it will be a issue while doing RBD. is there any way to fix these things

-
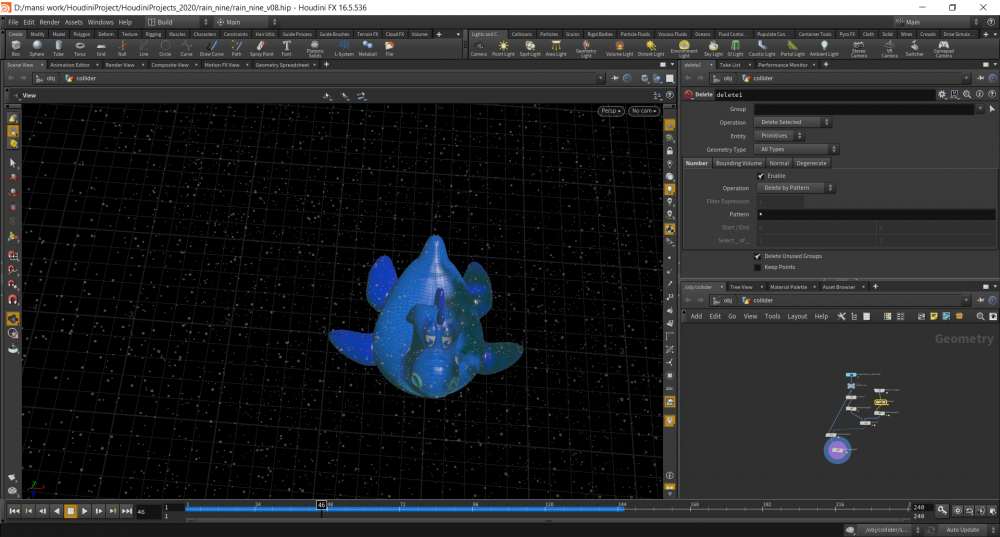
Hi, I am trying to get my model wet by rain. But wetmap is not visible on the object completely. It just shows up on the half body like the only half of the body is getting wet. I have attached my file Thank you rain_nine_v08.hip
-
Hey all, I’m looking to receive some advice on a simulation I’m working on. My aim is to set up two fluid simulations following their own curve which leads to them both colliding and mixing together. What would be the best approach? Hope this makes sense! Thanks I’m advance.
-
How do I copy a Line to the same direction as the randomized Normal direction of the Grid? I attached the hipfile. Please confirm it and tell me. sample2.hiplc
-
Hey folks, I started with Houdini very recently and I wanna focus on fx at first. So after trying with the Shelf tools I wanted to stylize my sims. I looked around the web and followed tutorials on a particle based pyro sim (I wanna do an explosion). The problem is, the pyro sim won't work with my PoP really well. I considered that my particles are too fast maybe and added substeps. But that didn't work out either and I don't know how to fix this thing. I hope you could understand my issue. Help would be much appreciated :^) Impact explosion.hipnc
-
Hello! When is Houdini 18.5 due?
-
Hello all, I've been trying an effect where a character runs into the water. As soon as the character starts moving and colliding with water little spheres or maybe bubbles start emitting and I don't know why. Below I have attached my hip. file and a screenshot of my exact problem. man_water_run_v11.hip
.thumb.png.ae56a2aee89fd7e8c221b084172225d7.png)
-
Hi, I created a little obj and mtl importer for Houdini, Objilla. It creates materials, assigns colors, textures, transparency and does some other cool stuff. Check it out on Gumroad, thanks ! https://gumroad.com/l/YLJkR
-
I wanted to share a music video that I directed with a bunch of CGI that I did in Houdini and rendered with Redshift. The concept is based on the idea of a future where a sort of Turing test is administered to humans as opposed to the other way around. Most of the compositing was done as a combination of Aftereffects, Fusion and Resolve. We shot the footage against green screen and then created all of the CGI assets for the environment through a mix of modeling and kit bashing. There is a brief behind-the-scenes video link in the description. I hope you enjoy watching it as much as I enjoyed making it!
-
Hey guys, after exploring most sides of Houdini, I'm surprisingly trying to settle on Procedural Modeling as my main focus :D I know it's a bit weird since it's not Houdini's strongest tool, but before Houdini, I have tried Modeling in Maya and Cinema 4D and failed, but with Houdini, it seems so logical and straight forward to my mind. I'm trying to get a job as a 3D Modeller using Houdini here in my country (Egypt), and i need some professional expert advice from you guys on some points regarding the market and Modeling in general (worldwide not just a specific country): 1- Is Houdini used widely in Modeling in the market or not yet? and why? and how much is Procedural Modeling popular nowadays in Games and Film as well? 2- I dunno much about texturing and I'm planning to learn a texturing software besides Houdini, so far I'm choosing Substance Painter, do you guys have any advice regarding this part? 3- Is Mantra good enough for me? Or do i have to dive into other renderers later? 4- How to constantly learn and upgrade myself in the right path? What else to learn? If you can give me advice from your professional experience, that would be great. 5- Any other advice you could give me is welcome, even abstract ideas, anything really. 6- One last thing There are different ways to approach Modeling in Houdini, i know that all methods are correct, but as a professional, do each one have like a standard method to approaching weird curves and irregular shapes efficiently? or you mix and match different approaches? Do you usually do low polygons baring in mind to subdivide the whole thing in the end or you can just model it all high quality from the beginning? I mean, how do you think and set your mindset before starting your work? :D Sorry for the long long post, appreciate your help guys. EDIT: I'm not a newbie who wants to explore Houdini, I'm already familiar with it and with all the resources available and I spent some time learning it. I'm seeking professional advice from experts because I'm applying for Modeling Jobs these days and i have 0 working experience in 3D.
-
Hi everyone! I am a VFX Artist who just recently graduated from 3dsense Media School who specialises in a wide range of skillsets Below is a Vimeo link to my showreel as well as my submission to The Rookies! Do feel free to drop me a message, thank you! Contact me and check my channels: sulaimanwar18@gmail.com https://linkedin.com/in/sulaimanwar/ https://www.artstation.com/sulaimanwar =================================== https://vimeo.com/325603170 https://www.therookies.co/entries/427 FinalProject10.mov
-
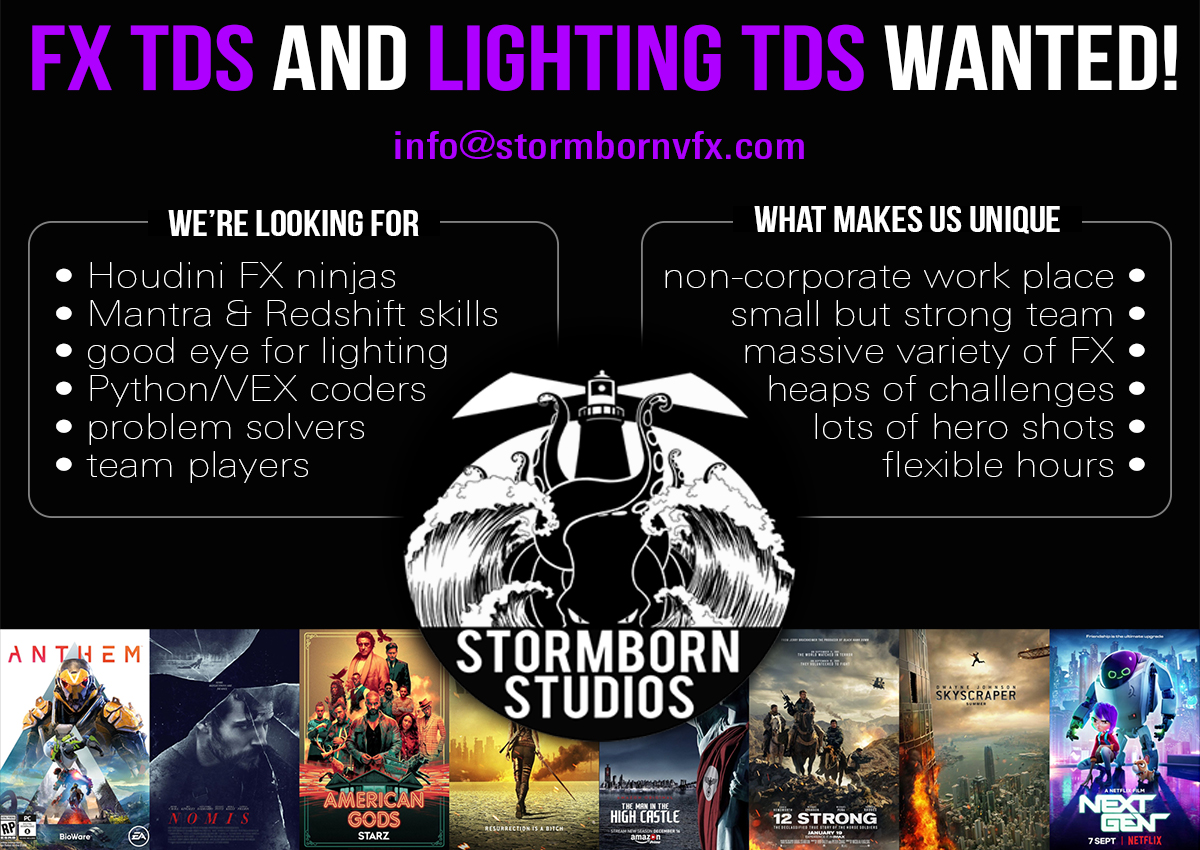
Hey guys I interviewed Manuel Tausch (FX TD/co founder of Stormborn Studios) for FX World. The interview went live today. Here's the link! http://fxworld.tv/interview-with-manuel-tausch-pt-1/
-
 The Vancouver Houdini User group is happy to host this years Houdini Users meetup mixer at Siggraph 2018. Please come and join us and fellow artists for a beer and nibbles, at Craft Beer Market (www.craftbeermarket.ca) on Monday 13th August from 7pm. You don't need a Siggraph pass but you do need to register to attend via this handy Everbrite link. We look forward to welcoming you all to Vancouver and Siggraph with a cool beverage, some Sidefx merchandise and the chance to win 200 Grid Market credits for online render time. The event has been made possible by the support of the following sponsors: Sidefx, Zerply.com, DNEG, MPC, and GridMarkets. We look forward to seeing you there Ed Lee Social Admin Vancouver Houdini User group
 -
lightning_test.hipnc Hello everybody, I am new to Houdini and am eager to learn more every day. I started with some lightning effects and got stuck where I wanted to create a slider for its growth. If the lighting develops it should start with the main branch. As soon as it reaches the first secondary branch, the secondary branch should start developing as well as the main branch should continue with its develpoment and so on. In my file you will see a rudimentary version - (I needed to take out a lot of nodes to get a proper overview again) - of the lightning so far. My idea about how to procede was as following: Have a carve sop for the main branching, the secondary branching as well as the third branching. Paste the relative parameters of the "second u" channel of the main branching into the channel of the secondary and third branching and subtract an offset, which would be the distance of the basepoints from one branching to the basepoints of the following branching. For that I merged the basepoint groups, added a sort sop to bring the point numbers in order, then added an add sop to connect the points. If this had worked, I would have created a distance attribute for me to know the offset. But what I probably need is a wrangle sop in order to specify that I only want to connect the points from the same branches in order to measure the distance between for example basepoints2 and basepoints3. The animated seed of the scattered basepoints will probably make it more complicated since it changes the oder of the point number as well from the sort sop. Maybe I am completely on the wrong track and there is another - maybe even less complicated - way of doing this, so I would be happy about all responses. If you've got any ideas on how I could do this, especially how I can write it out in a wrangle node, I would appreciate all help I can get.
-
HOUDINI FX- RENASCENCE PROGRAM PROMO VIDEO: Welcome, soldier! Are you ready to demolish buildings, flood cities or maybe, making a stadium sprout from the underground? These are just some of the things that you will be able to learn in Houdini FX Renascence Program. At Houdini FX Renascence Program, we train you to face any FX project successfully. We have tried our best to offer you the best material. This course has been meticulously structured to take your FX skills to the next level so that you will be able to find a job in a top VFX studio in the future or maybe, become a successful FX freelancer. Our commitment, as an online school, is to offer the best learning experience in the market. Therefore, all our content is available in English and Spanish. HOW IT WORKS This course will be delivered via video only. We will work on weekly projects, so will have to meet the assigned challenges. Keep in mind that these assignments will make up interesting material for your «Demo Reel». Likewise, we will give you access to the Facebook support group, where you can interact with your instructor and classmates. The course is divided into 4 modules: MODULE I The Awakening (8 weeks) We will start by explaining how to take your first steps in the software. The content is highly optimized to get you familiar with Houdini in a dynamic and productive way. We won’t talk about every menu or button; all this information will be explained on-the-go, along with the training. Our priority is to make you feel comfortable from the start. You will find out about the main nodes in Houdini, you will learn to move around the interface and we will teach you how to control points and particles (points, pops and grains). At the end of this module, you will be able to create simulations of rain, sand, snow, perspiration, sparks, ashes, confetti, fireworks, bubbles, and much more. This is not a lighting and rendering course, but we will teach you everything you need to submit your project with a perfect final look. MODULE II Fire Inception (8 weeks) Explosions, fire, smoke, clouds … everything you have been waiting for! This module is full of action. We will focus on learning to emit and control volumes, using of one of the most powerful solvers in Houdini, i.e., “Pyrosolver”. You will learn different methods to accelerate your simulations, always working as quickly and efficiently as possible. We will teach you how to create shaders that will make your simulation look realistic. Recycle! Every setup created during these 8 weeks, can be reused to create new scenes. MODULE III Rise of the Fallen (8 weeks) You will become a weapon of mass destruction! You will learn to perform different types of fractures and we will provide you with all the tools to control and choreograph your simulations. In this third module, you will put together everything you have learned so far to create complex scenes using particles and volume. Breaking objects, demolishing buildings or splitting a land into two lots, are just some of the challenges you will face here! MODULE IV Deep Dive (8 weeks) We will have to put out the fire after the chaos… This is the final module of the course, and here you will learn to work with FLIP, which is the Houdini’s solver to create liquids. You will recreate infinite oceans and simulate water. You will learn how to create foam, bubble and spray passes. Finally, we will teach you how to deal with the different viscosities to get simulations of blood, chocolate, honey, yogurt, caramel, etc. APPLY TO THE RENASCENCE PROGRAM NOW AND GET 25% OFF!* 399$ 299$ http://houdini.training/
-
Link to tutoial -> https://gum.co/imSYS In this comprehensive stand alone tutorial we will go over how to set up scene-scale clustered pyro simulations and blend them together post-simulation to make it appear as if it is one large simulation. This process will lower simulation time, allow for higher resolutions, and be more efficient when saving to disk because there are fewer voxels. This process will also optimize large scale pyro scenes, so that simulations are only calculated where absolutely necessary and blend them together so that it appears as if it is the same volume. This tutorial comes with all digital assets, a documented and fully set up file as well as a starter file for following the tutorials along the same as I work through them. An intermediate tutorial for those looking to speed up their pyro workflow, learn some VEX and create massive sims. Includes a documented scene file and all digital assets! Hope to see everyone leveraging these optimizations in the future to create massive simulations and squeeze in those extra few iterations before deadlines! You can reach me at trzankofx@gmail.com for questions or comments.
-
- 1
-

-
- smoke houdini fire
- optimizations
- (and 12 more)
-
In this tutorial we will go over how to set up optimized pyro clustering with oriented DOP containers in Houdini given a piece of geometry moving through a scene. This process will lower simulation time and be more efficient when saving to disk because there are fewer voxels. Link to Tutorial -> https://gum.co/TqUNR We first go over how to get things set up quick and easy and in the second half of the tutorial we make further optimizations using VEX. We'll look at how to rewrite cluster points to do exactly what we need it to, which includes rewriting the resample sop using VEX. An intermediate tutorial for those looking to speed up their pyro workflow and learn some VEX. Includes the scene file! Hope to see everyone leveraging these optimizations in the future and squeezing in those extra few iterations before deadline! You can reach me at trzankofx@gmail.com for questions or comments.
-
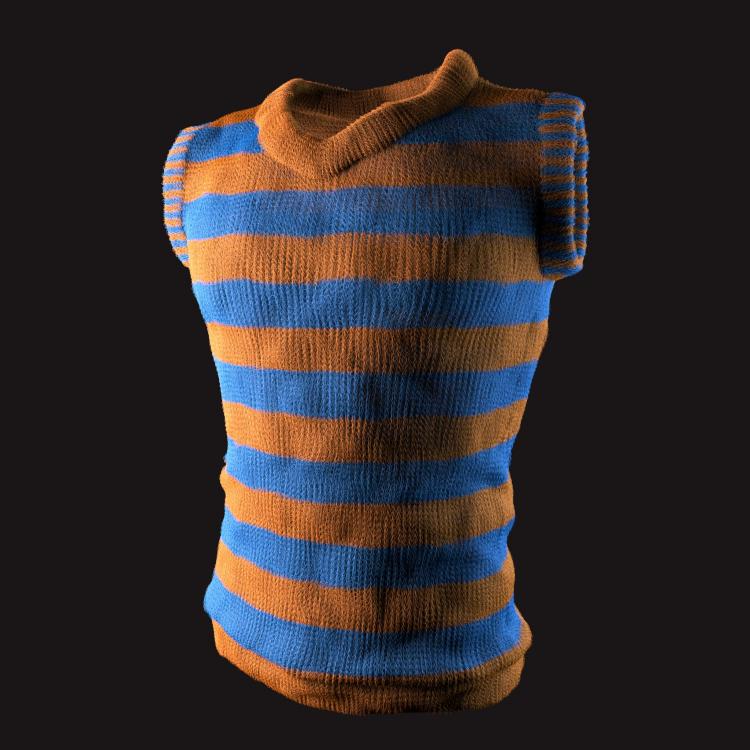
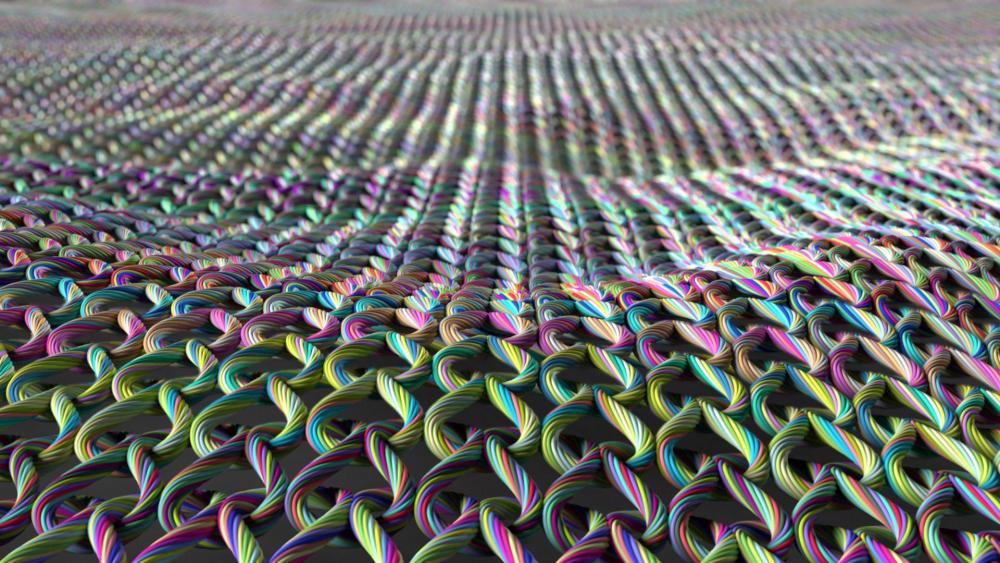
Turkish Houdini artist Alican Görgeç is producing amazing knitting work - using SideFX Houdini! If you'd like to find out more about his technique, you can read our new Gridmarkets artist profile: http://www.gridmarkets.com/alican-gorgec.html
-
 Hello everyone! Our new GridMarketsFeatured Houdini Artist is Ehsan Parizi. Learn why he dedicates time to personal projects and discover his colourful Houdini growth patterns! We hope you enjoy the new feature! Have a great week, Patricia and the GridMarkets Team
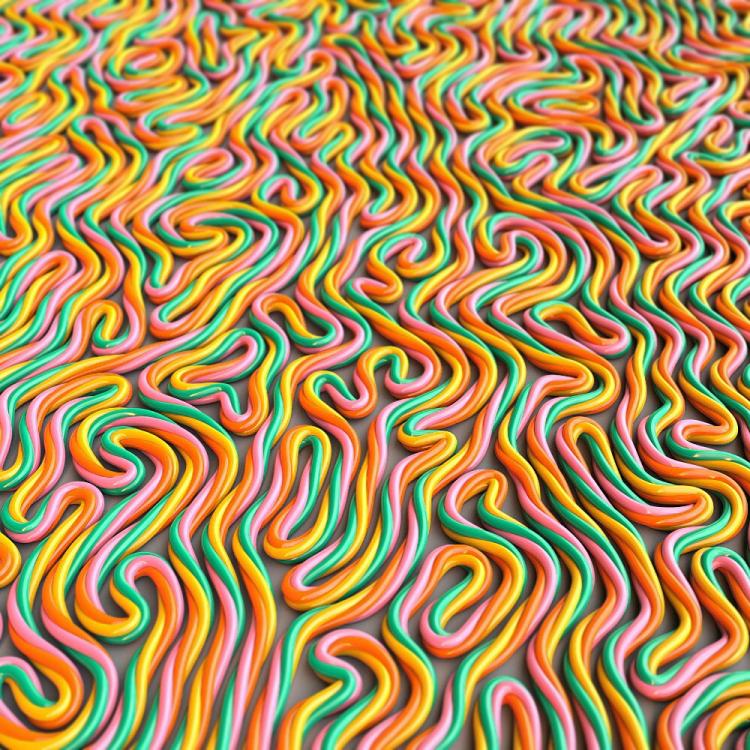


.png.de944acfe58f9491c0faf8b64c7dc0a7.png)