Search the Community
Showing results for tags 'guides'.
Found 9 results
-
I imported my xgen descriptions as alembic curves to houdini and i'm trying to use these curves for the simulation. I did select the Use external Geometry in the guide groom node's basic tab but they are not doing what i want them to do. I basically want to simulate this curves from my t pose character to animated character. How can i do it?
-
Hey guys, I am currently working on a small groom, but in my hair gen node the hairs either dont get generated or if they will not follow my guides. Working with Houdini 19.0.383 and also attached my file. Would be very thankful if someone can figure out why it is not working! groom.hipnc
-
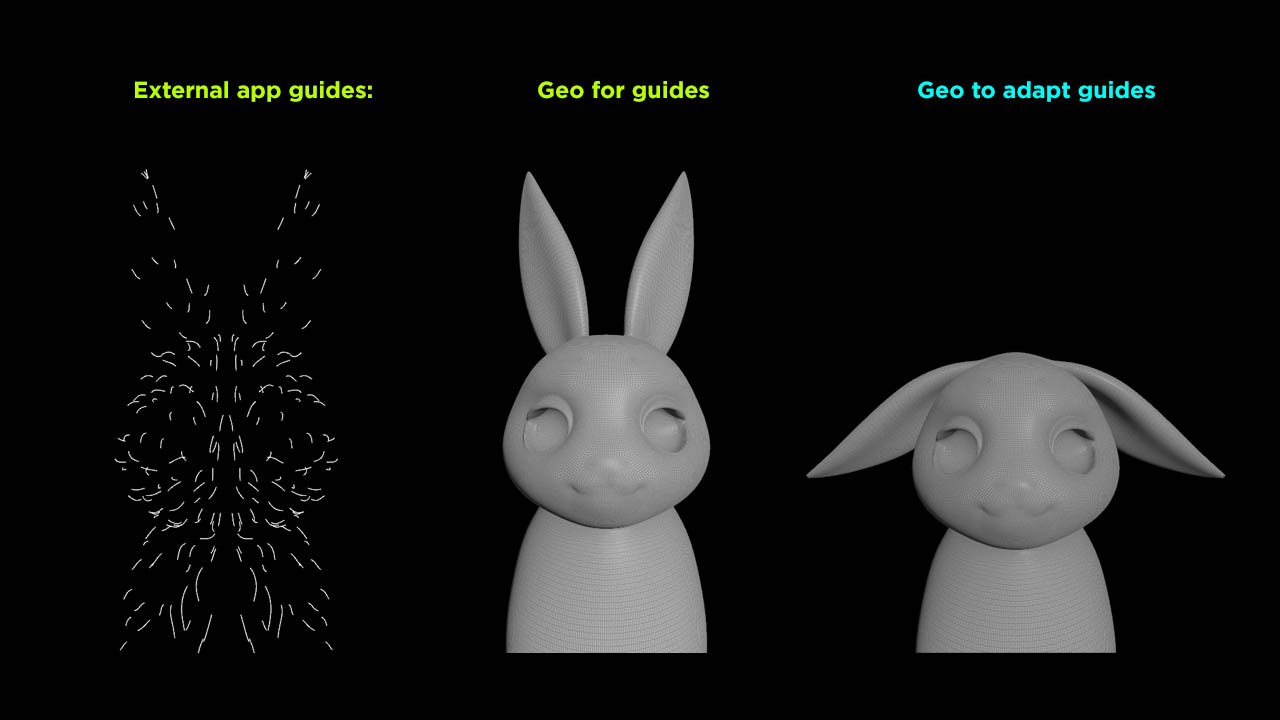
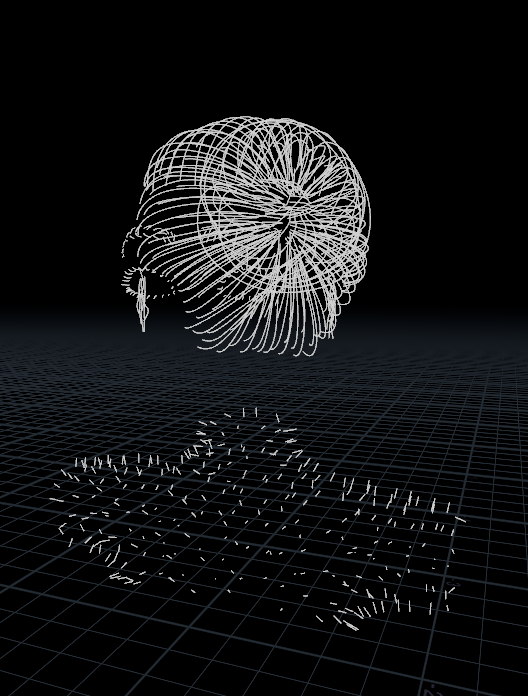
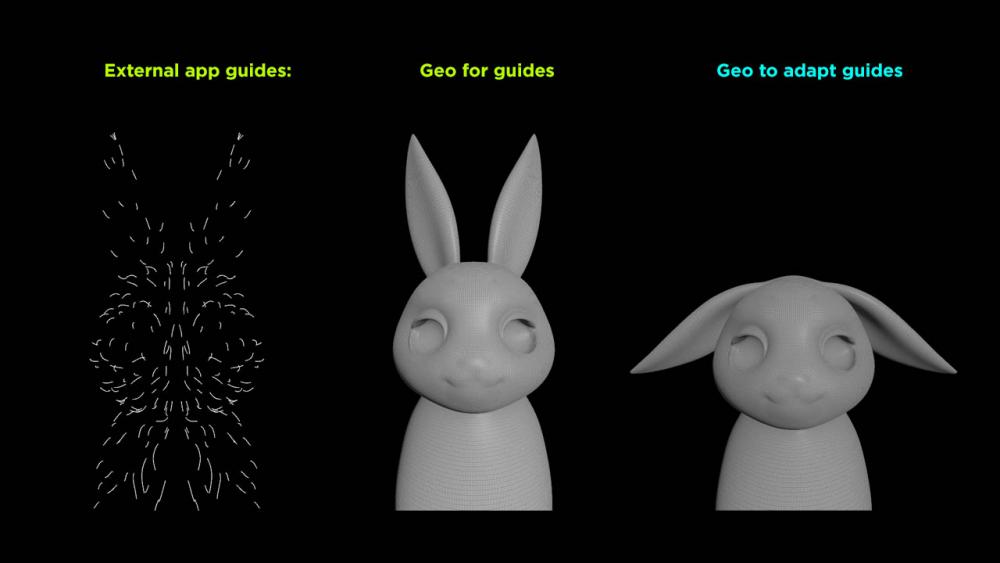
Hey magicians, Is there any way to adapt external fur guides to another geometry? attached is a pic explaining what I need to do. One method that could work is animate the 2 shapes with blend shapes? but I'm trying to avoid animation since I need to generate thousands of these. Any thoughts? Thanks!
-
Hey all, I have some guide hairs in vellum and my orient (point-)attribute which is generated using the guide deform sop is "flipping" (sign changes on orient vector components). This causes the guides to freak out during simulation, showing randomly changing length, jittering and weird behaviour etc. Knowing that vellum needs a stable orient attribute to produce stable sim results, I tried to delete that orient attribute coming from the guide deform sop and instead let it be calculated on the vellum constraint node using "compute missing orientation". The values are somewhat the same and somewhat also different, but I also see some "flipping" orientation values from frame to frame on some guides. If I disable the orient attribute on the guide deform sop (create orient attribute off) and on the vellum constraints sop (compute missing orientation off), I assumed no orient is calculated for my guides, but to my surprise, I still have an orient attribute present after the vellum constraints sop. The even bigger surprise was, that this orient attribute produced a totally stable sim. This left me rather confused, and I hope you guys can maybe shed some light on whats going on here. Why is my orient attribute flipping, how can this be prevented, and what (where) is the best way to calculate a stable orient attribute? I unfortunately can't provide a hip-file showing the issue cause my current project is under NDA, but I still hope you guys can make some sense of what I say. I am using Houdini 18.5.392. Thanks in advance and all the best, Scratch
-
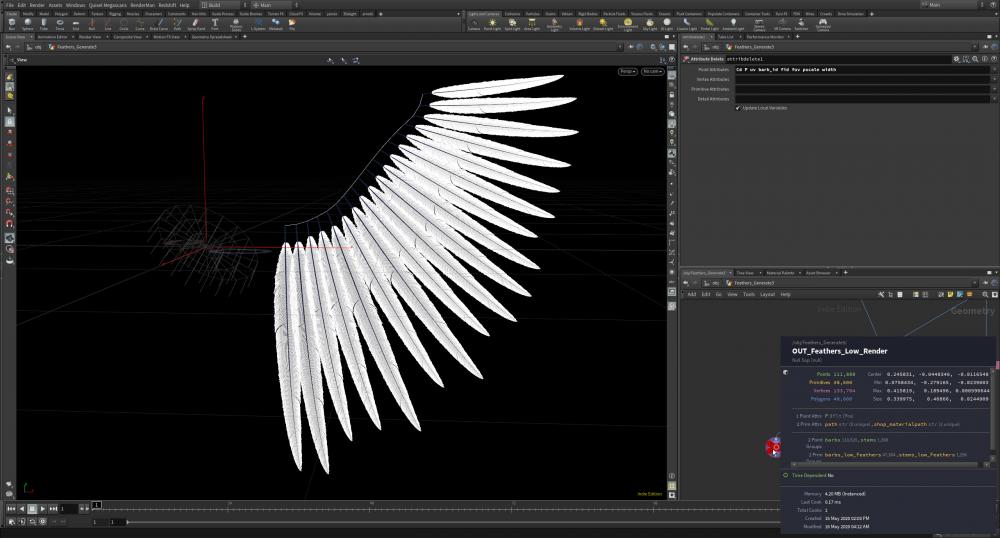
Hey Guys i need your help. I created a Guided Groom for a little wing i worked on and now i want to export mylowres planes and my hires Curves from Houdini to Maya The Problem is that Maya can't load my Feather Curves correctly without loading a million hours and ive a lot of problems with my alembic export. Its important for me to find a way because the animator i worked with only works with Maya and im not good in animating. Many Thanks for all the tips you can give me Ps: in the picture below you can see my curves unconverted as polygon curves and thats only the Main feathers of the Wing
-
Hey guys, I'm still fairly new to Houdini and I am trying to make a hair sim for a character on a short film I'm on. I have created my groom on a static mesh of the character and I want to transfer it to the animated mesh. I've imported an alembic cache from Maya, matched topologies with the static mesh, cached that matched mesh out, then brought it back in. I want to transfer the guides to this newly cached mesh, but when I use the guide transfer node, it creates multiple instances of my groom and scatters them around the space. I have also tried the vellum constraint option "attach to geometry" with only the root points selected, hoping the rest of the curves will follow but only the root points moved. Not only that, but they didn't spread across the mesh to their correct position. At this point, I'm not really sure what to do anymore. Any recommendations are welcome. I can attach the file too but I'm not sure if that would be much use since you would need the cache files too.
-
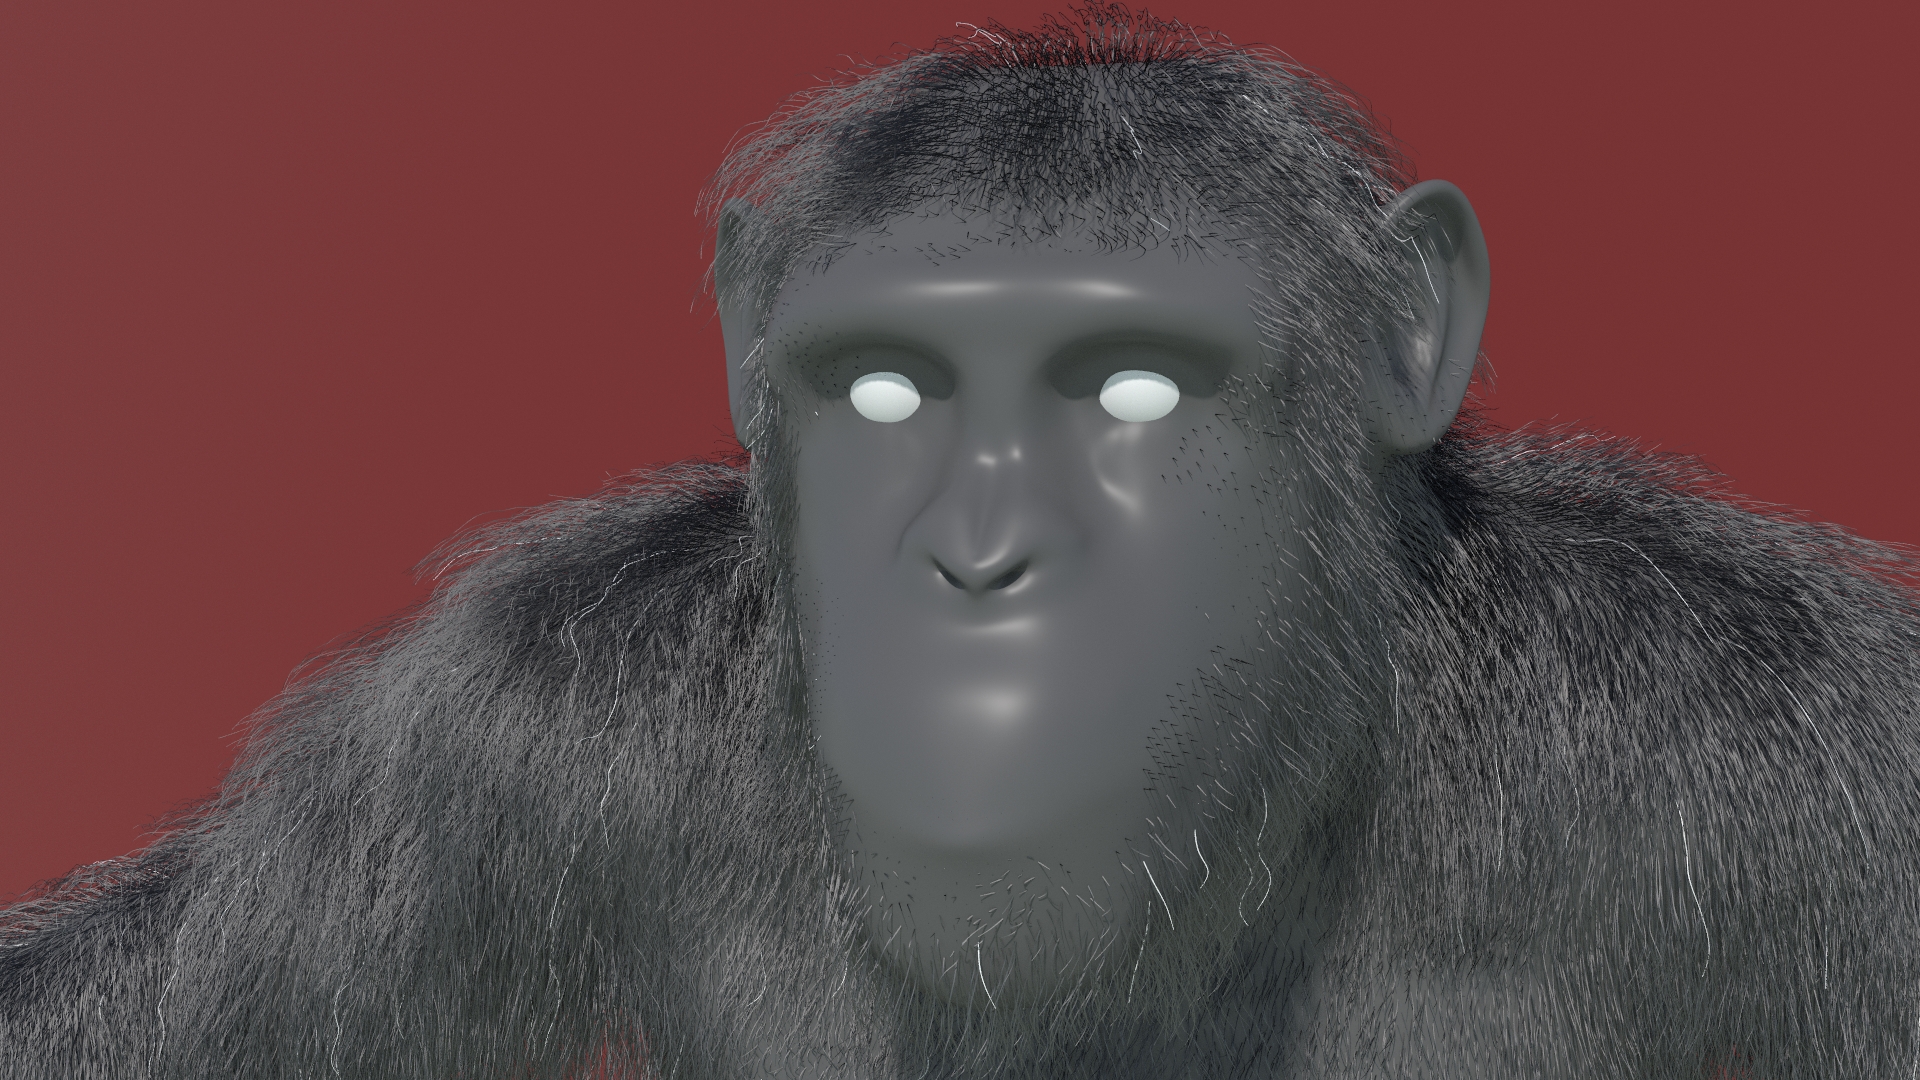
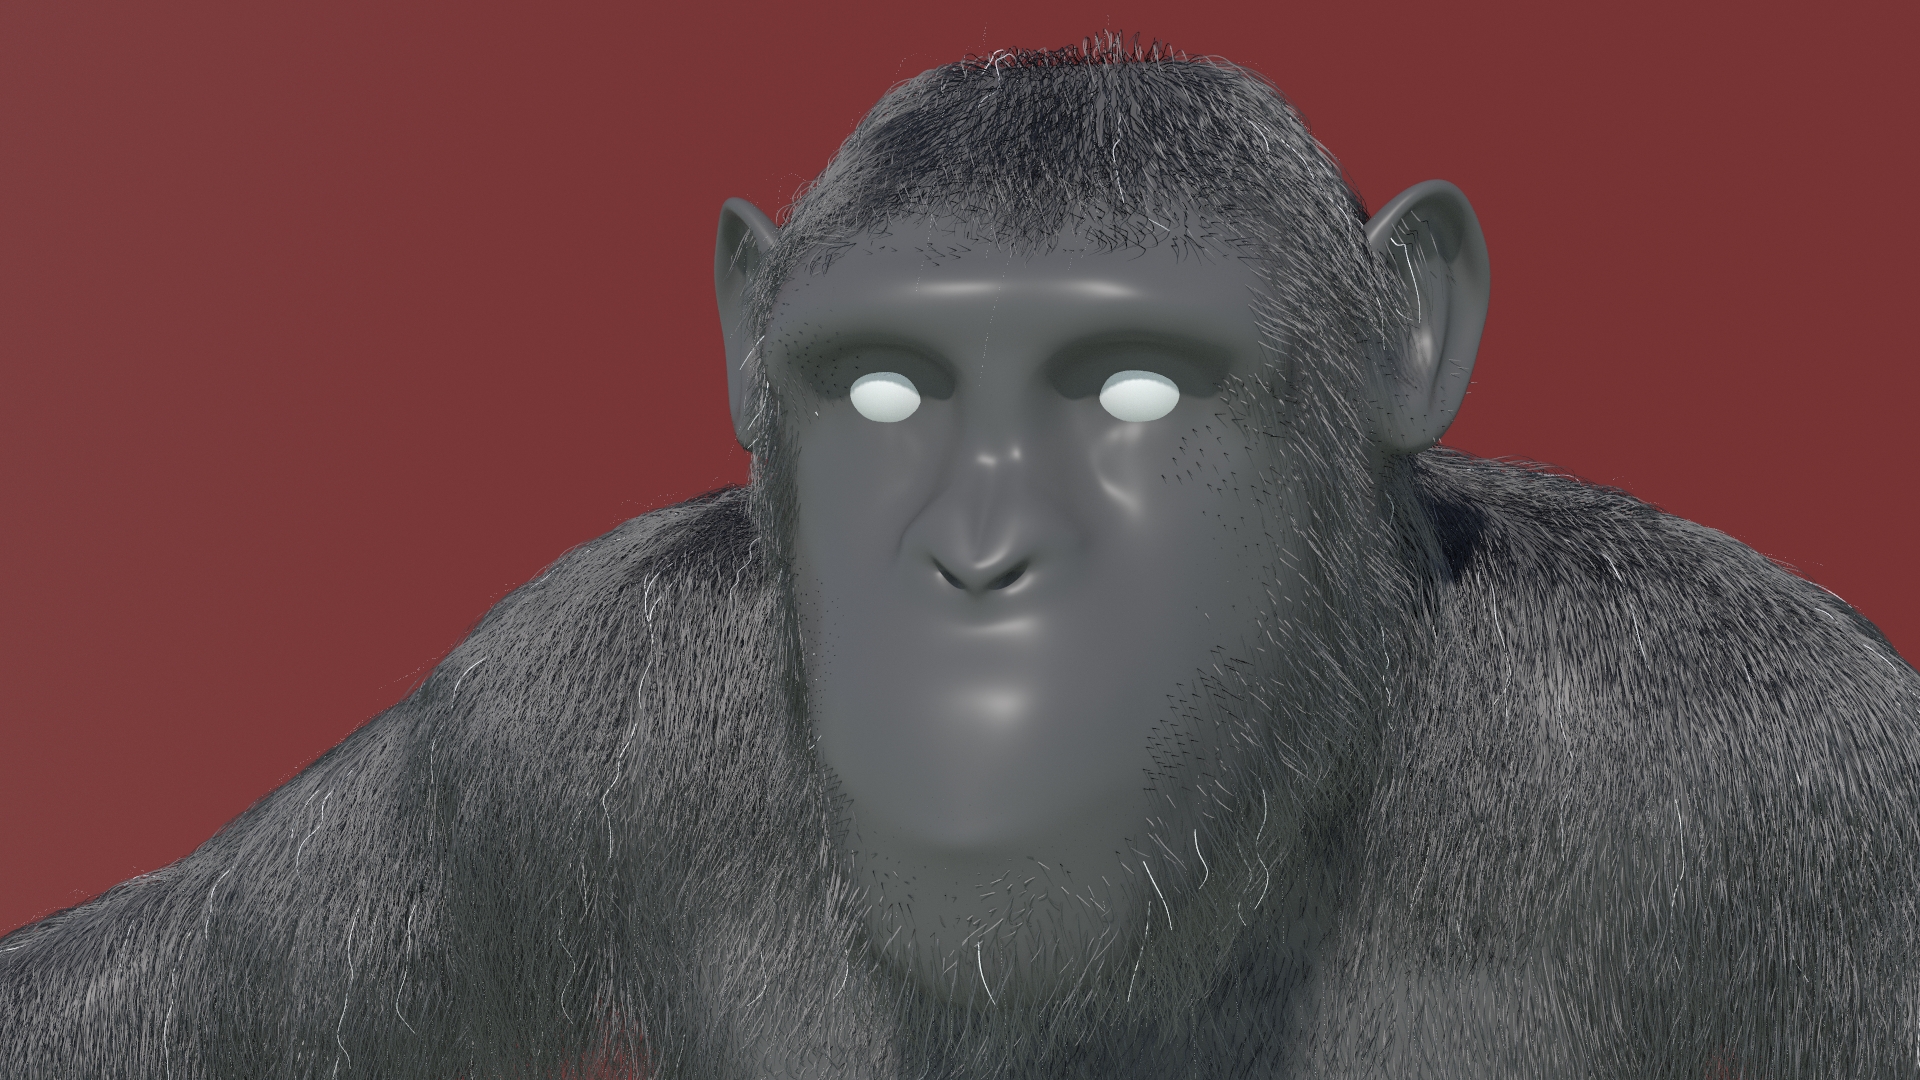
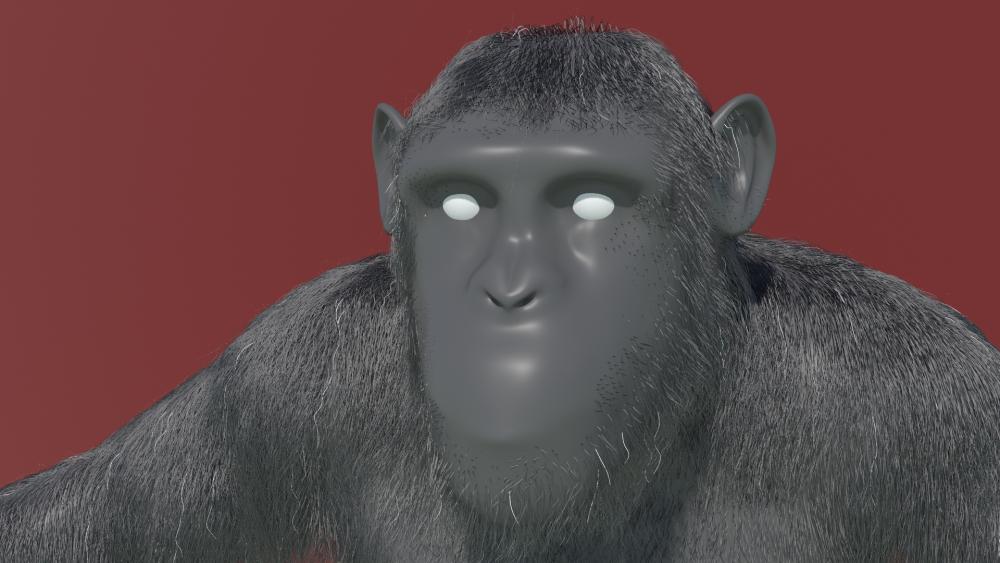
Hi all, I created a vellum fur simulation for my chimpanzee that simulates the guides perfectly. But when I render, the actual fur, especially the longer hairs, are wiggling like crazy. It is especially noticeable thanks to the white hairs I have. As far as I know, I have no wind forces activated. I've looked around and tried many different renders with different sim parameters but the same always happens. If anyone could take a look I'd be grateful. I'm attaching the project with some renders so you can see the problem. I deleted things like textures and sim cache to keep the file size smaller, creating the cache is quite quick anyway. If anyone has any questions about the setup just let me know. Thanks in advance ~Tomas
-
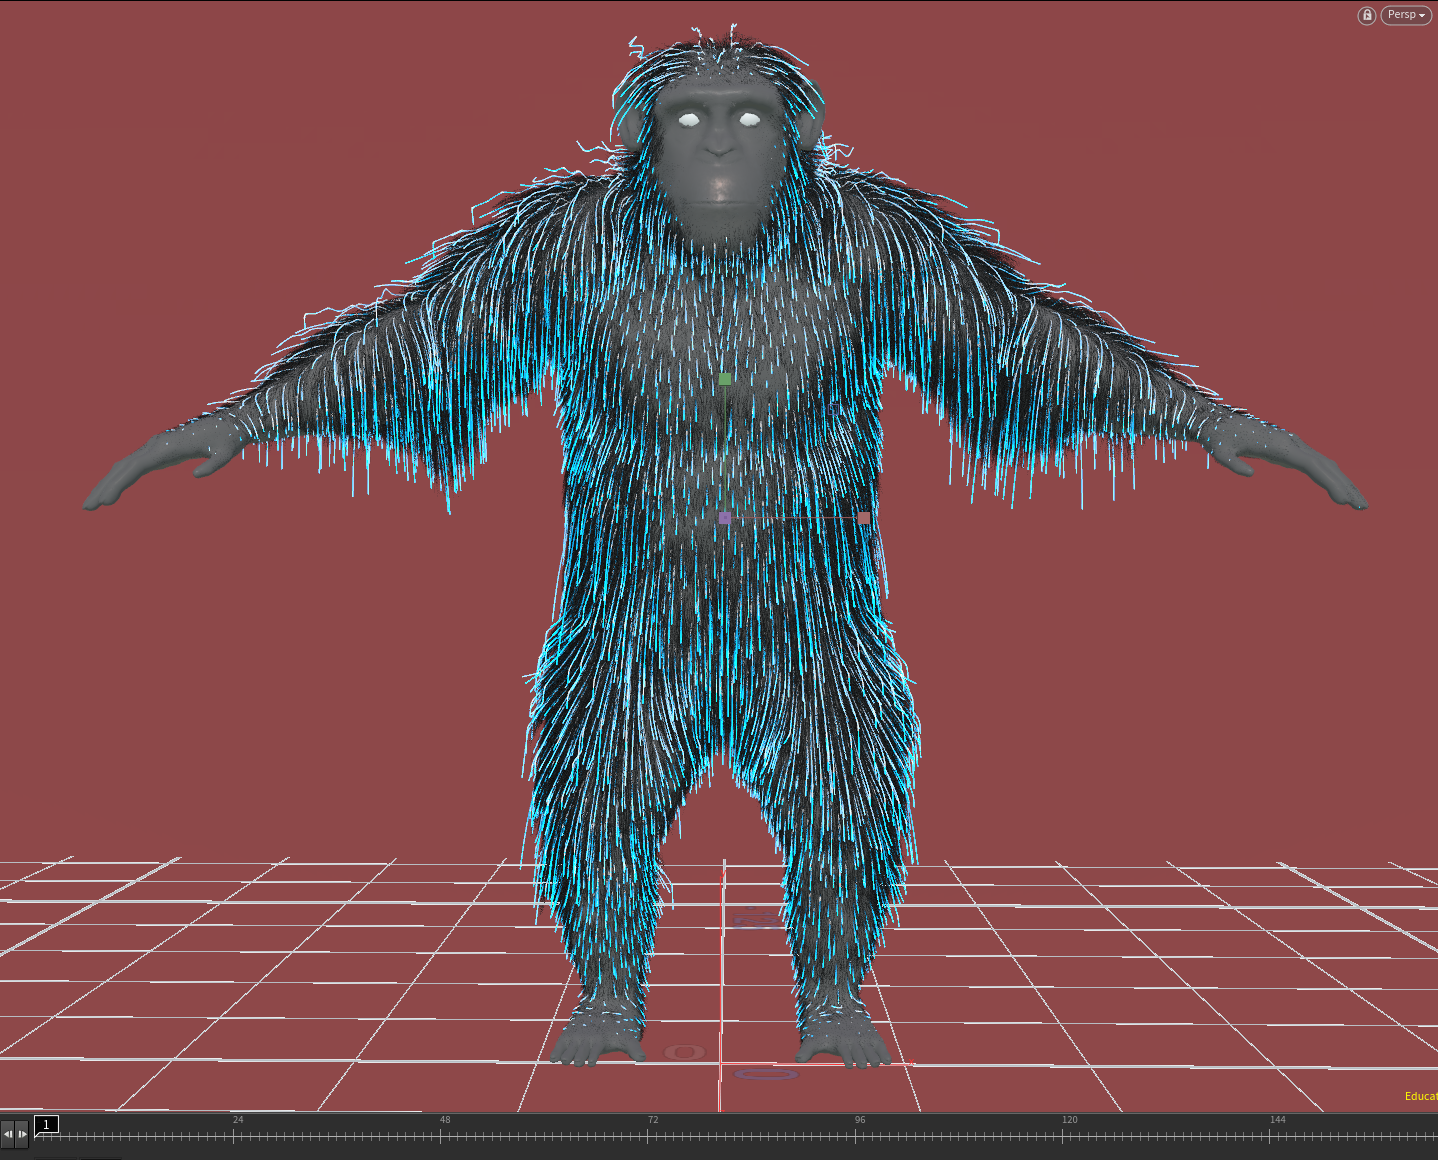
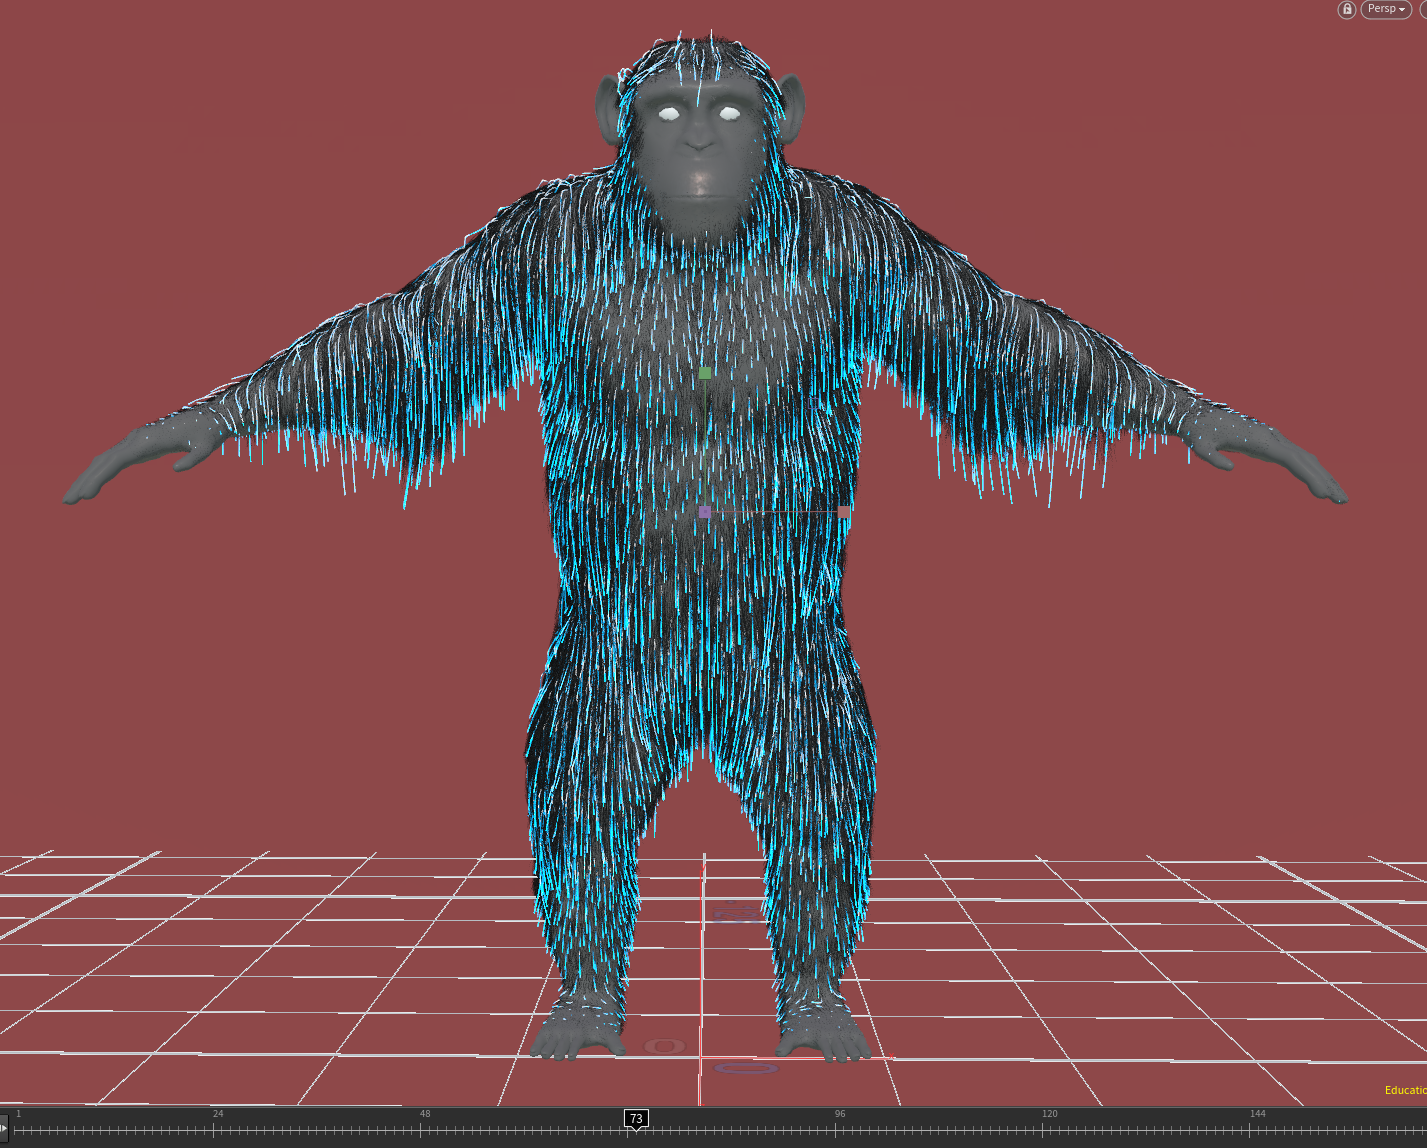
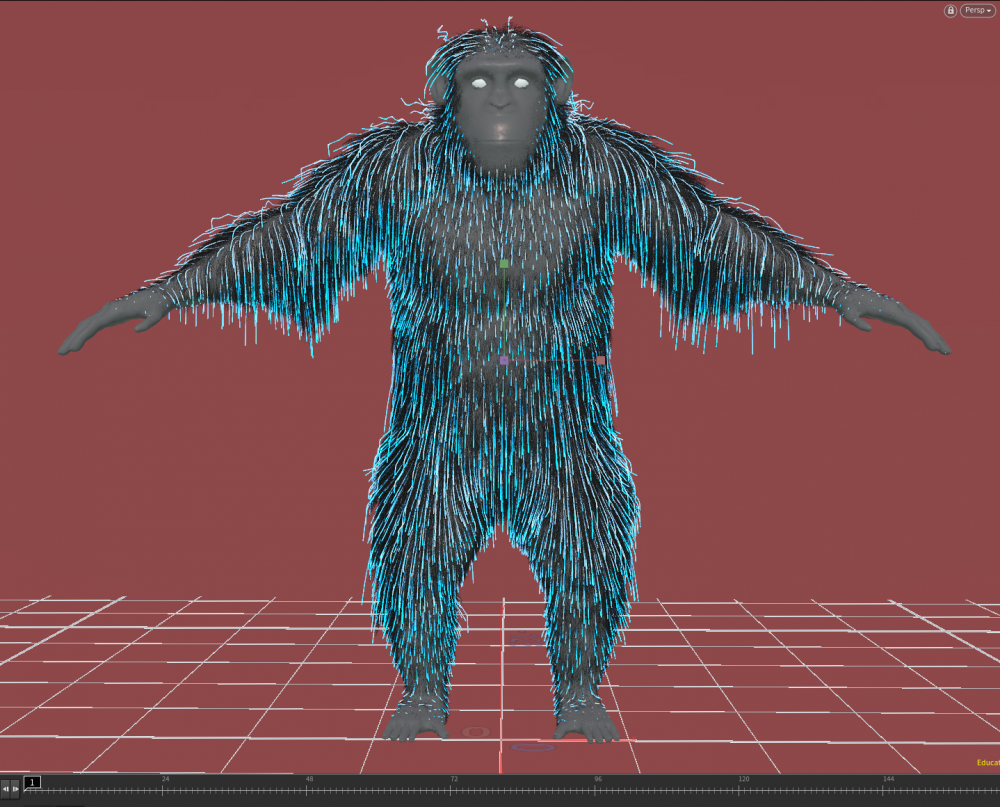
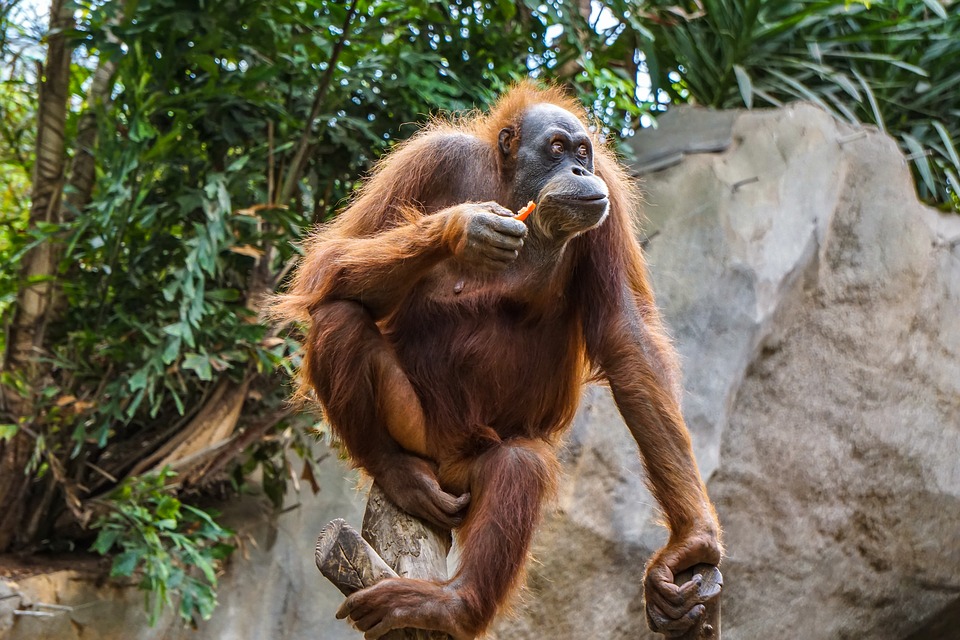
Hi everyone, my name is Tomás and I'm new to the forum. I'm creating a fur sim for a chimpanzee using the Guide Simulate node with the Vellum solver. The chimpanzee will later be animated. The sim works fine but I can't find a way to make it keep its wild messy look. The guides do keep their shape (bend, guideinit, etc) because I increased the constraint iterations and the bend stiffness. But I can't find a way to make the hairs keep their direction. In other words, once the gravity affects the guides they all go too down. So I want a way to keep the original shape of the hair a bit more. I could tone down gravity or the mass of the guides but that would make it look as if it's underwater or something once I animate the chimpanzee. Increasing the constraint iterations to a ridiculous value would maybe fix this but at a high cost to sim time, same for stubsteps. Increasing Bend Stiffness to billions and billions doesn't seem to help either. Obviously, I don't want the hair to be hard as rock. I want it to behave this way because it's light, strong and covered in dust and sweat, if that makes sense. It's also important to note I committed the noobie mistake of not resizing my mesh after exporting from Maya which works with different centimeters instead of meters. Meaning my monkey was more than 100 meters tall. I believe I already fixed this by going to preferences>Hip file options but I did this after creating the simulation so I'm not entirely sure if everything was resized correctly. Attached are 5 images: the guides at frame 1, the guides at frame 73 (3 seconds into the sim), a render of the fur at frame 1 (the way I like it), a render of the fur at frame 73 (the way I dislike it) and a reference image for the sort of hair I'm aiming for. I also added the project folder. ApeODForce.zip Thanks in advance!


-
Hi all, Im fairly fresh to the houdini fur tool set (Houdini 15), im coming over from shave / yeti. I have fur setup on a creature no probs but im stuck with a few simple things that I cant seem to find a simple answer for. 1) Guide Hairs Guide hairs work a little differently in houdini to what im used to in terms of dynamics, one thing I cant work out is how to lock or "bake" a groom down using guide hairs for non dynamic response. For example I have a creature that I have groomed, when I translate the character's base mesh or have the base mesh deform the guide's remain at the origin? I would expect them to follow without having to add dynamics, Is there a way I can create a groom using guides and have it stick to a mesh thats translated and or deformed without the use of dynamics? 2) Scale Im unsure as to how to handle scale with the fur tools, our pipeline will bake down scale into the animation mesh so I have no scale information. In my case, one creature is being instanced out multiple times using the same fur setup however they are all at different scales Thanks guys! really appreciate any help I can get.