Search the Community
Showing results for tags 'hair'.
-
Hi guys, I'm looking to get the best way to realise this kind of pic in a realistic way.. My scene is not bad but begin to be heavy.. maybe an other way?. https://www.istockphoto.com/fr/photo/cheveux-sous-microscope-gm497686734-79258025 Thank you for help Cheveux.hip
-
 Hi everyone, I am attempting to use the Hair Card Generate node to make a bunch of body feathers for a bird. They generate fine from the GuideGroom, and they will move with my animated mesh when plugged into the GuideDeform, however I have noticed that they are changing per frame. Not all of them, maybe 5-10% of them are changing position per frame and I can't find a solution to it. From what I can find on the documentation the cards are being generated by clusters inside the node, but even if i make my own clusters that stick to the mesh and do not change per frame the hair cards are still changing. I have attached a simple setup that shows what is going on. Hopefully it is something simple I have overlooked cheers! hairCards.hipnc hairCards.hipnc
 -
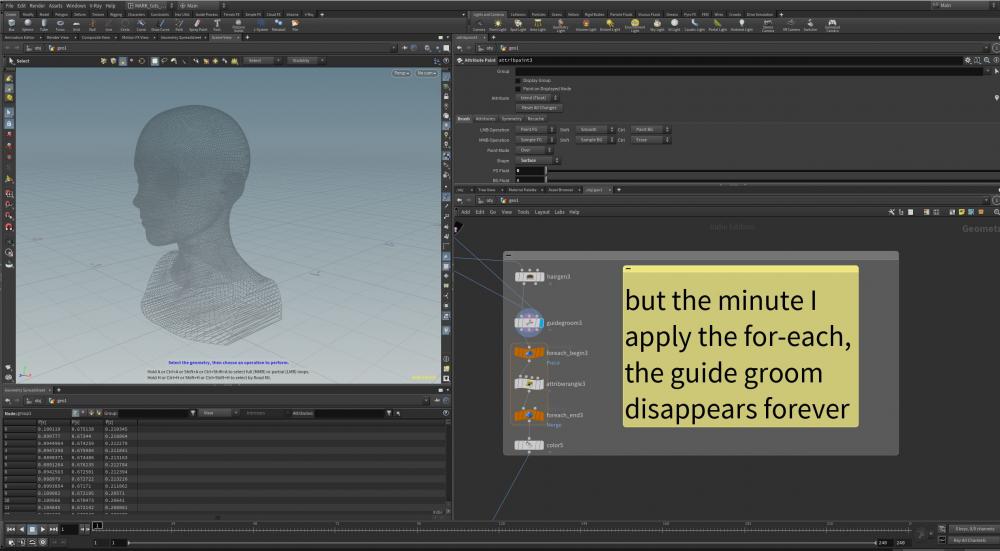
Hullo-- I have a problem with the guide groom node while working with hair. (I'm using H19.) I'm working through Rohan Dalvi's Hairy Houdini course, and he adds ramped color to the hair with an attribute wrangle in a for-loop--which is straightforward enough. The problem is that copying that for-loop from one section of hair/one guide groom to the other breaks the guide groom--the hair all disappears. Making a new for-each loop takes no time, but the bigger problem is that once I go back upstream to the guide groom, all hair has disappeared--something not working downstream appears to retroactively break it. What is happening? I've reset the viewport, I've reopened the file, none of that works. If I reset the guide groom it reappears, and I can brush it, and it even appears to work at the end of the for-loop that applies the color, but the minute I go back upstream and highlight it again, all the hair has disappeared. Is the H19 guide groom just super-buggy? I'm on 19.0.455 (I think that's the latest one with V-Ray, hence not the latest version, but far from the earliest.) I'm running Windows 10, although I don't think that matters.

-
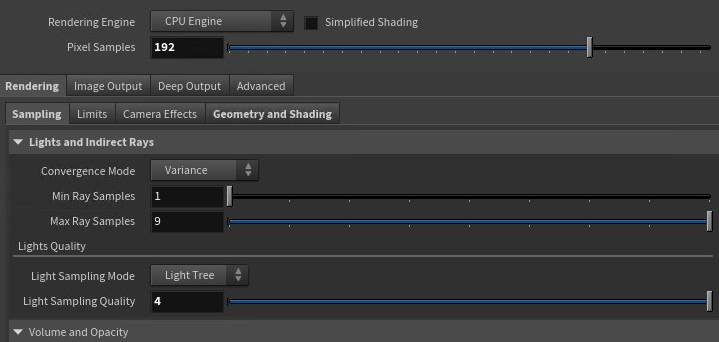
Hi all, I have a Karma hair question. I'm using Hair Shader and a hdri light plus area light. What parameters may I have to tweak to get rid of noise? Now I have those parameters: Pixel Samples 192 Min Ray Samples 1 Max Ray Samples 9 Light Sampling Quality 4 The rest as default I tried Pixel Samples 256 and Max Ray Samples 32 but rendertime escalates drastically, also rendered at higher resolution with lower samples. Is there any parameter I'm missing or any more optimized way? Thanks in advance
-
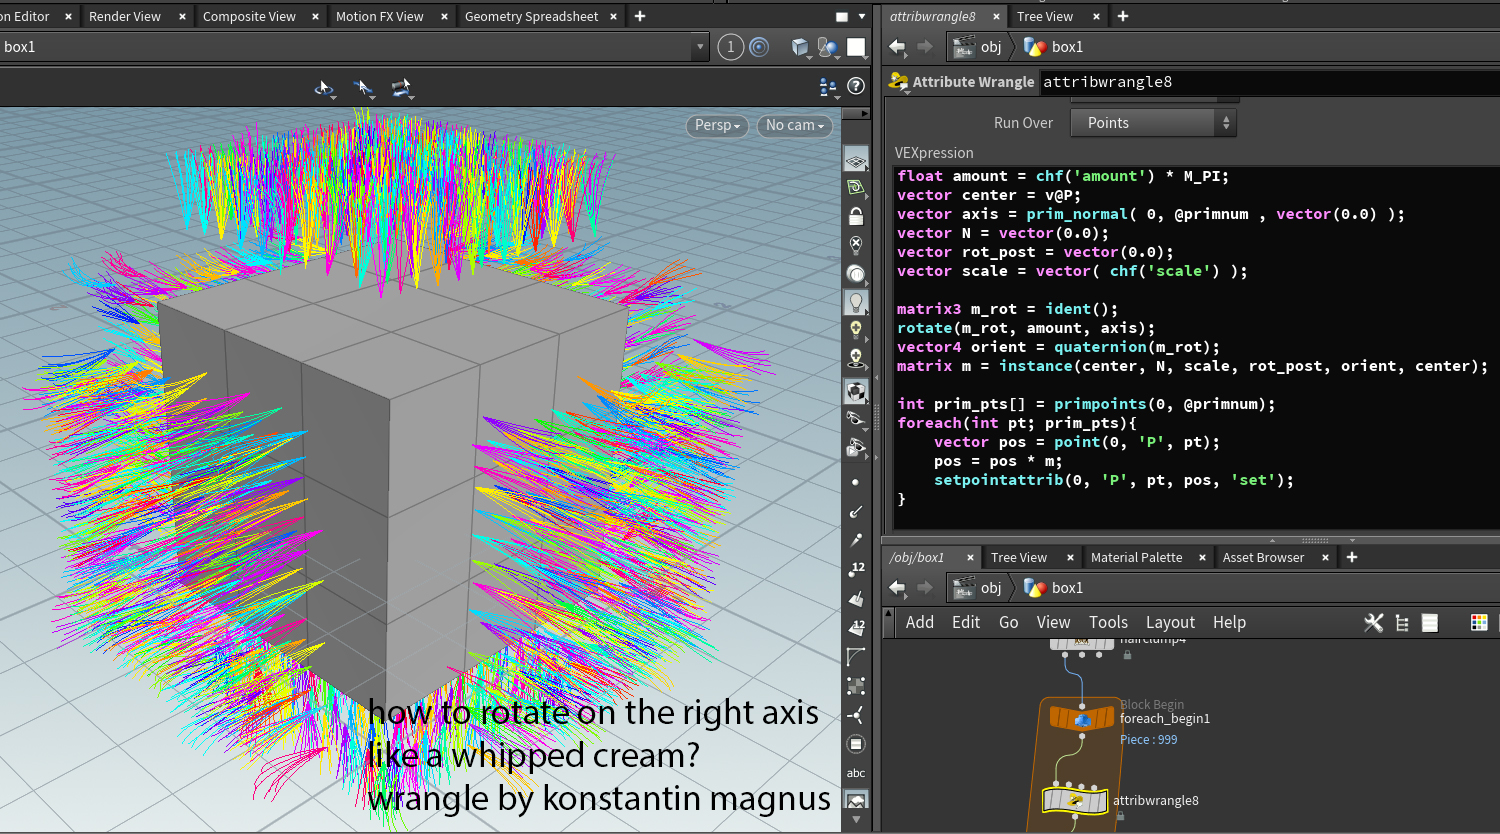
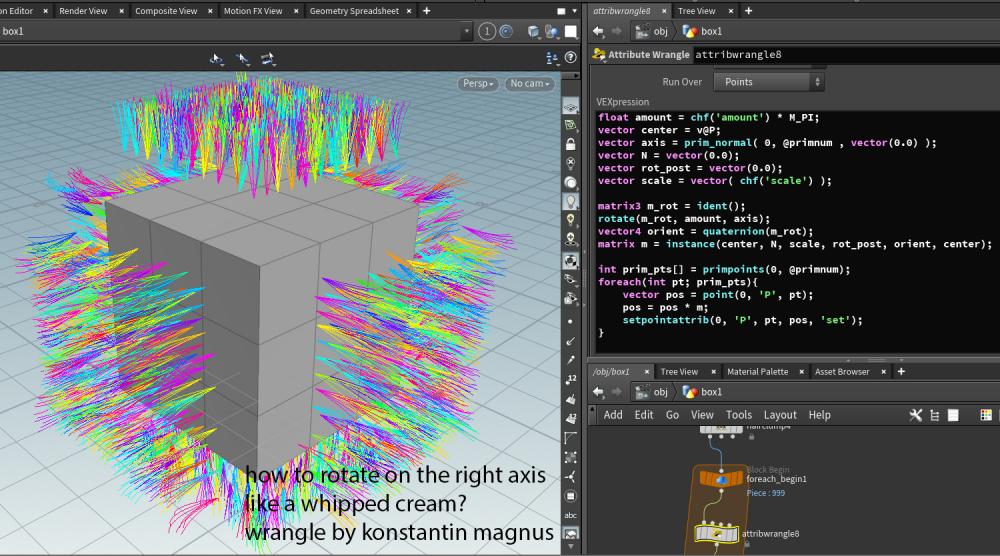
Hi ! I'm trying to rotate clumps using vex, I'm new into Houdini closest I could get is using this vex code from konstantin magnus on "how to rotate faces along Normal?" topic, but the clump rotates on the wrong axis =( I want achieve the results in this video at 17:32 (Hair FX in Houdini - GDC 2017 Talk) where Saber Jlassi does some really great twists on the clumps. https://vimeo.com/sabervfx/hairfx#t=1054s Here is the file scene ! ClumpStudies.hipnc
-
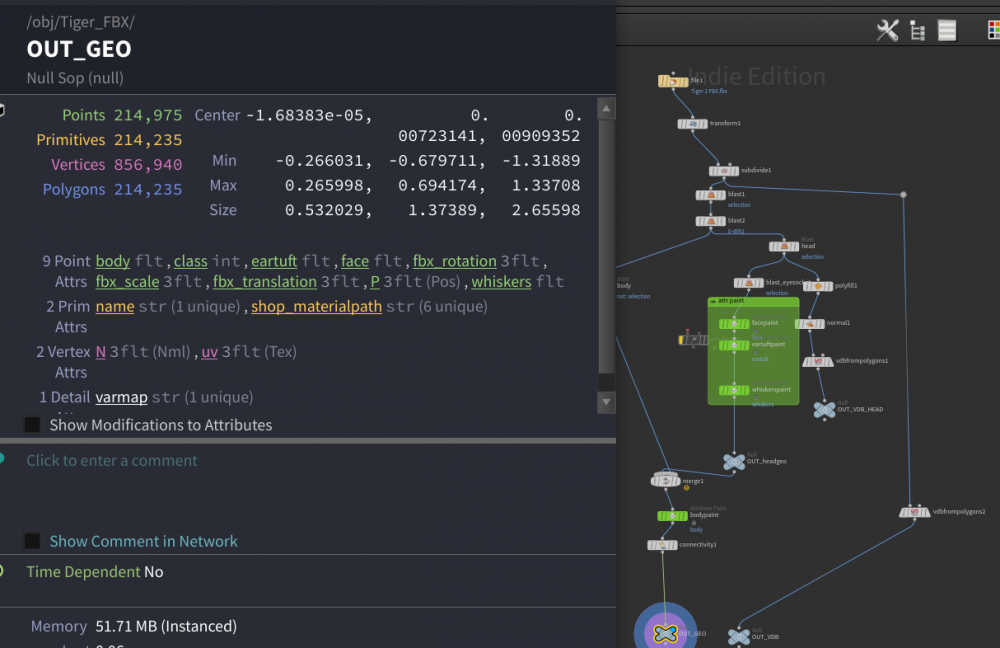
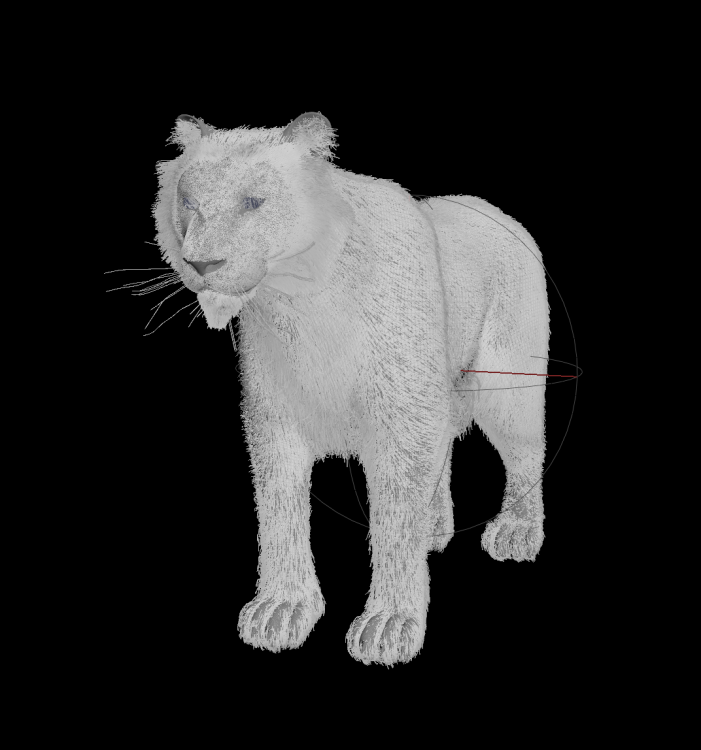
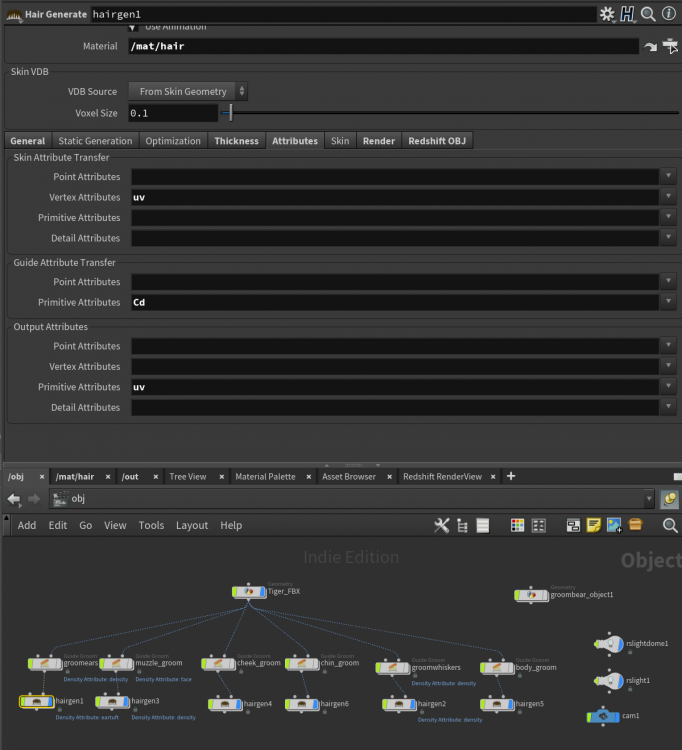
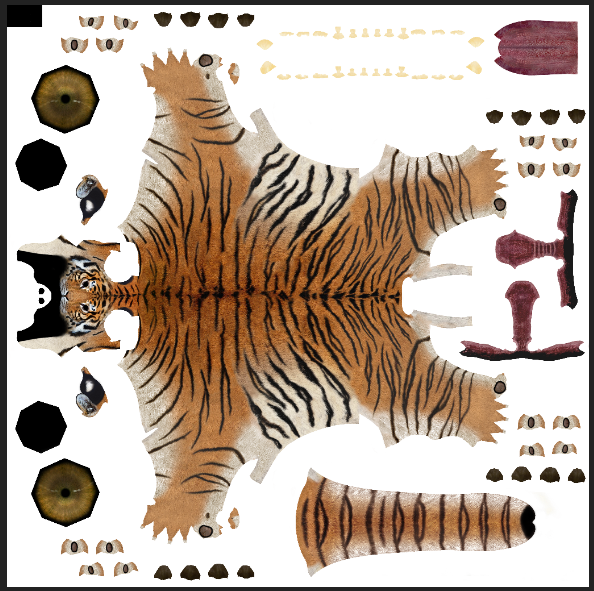
I'm trying to apply this tiger's UV'd texture to fur/hair. I'm going round in circles and sure i'm being stupid, grooming is new to me. Any pointers appreciated:) Rendering w redshift.
-
Hey guys, I am currently working on a small groom, but in my hair gen node the hairs either dont get generated or if they will not follow my guides. Working with Houdini 19.0.383 and also attached my file. Would be very thankful if someone can figure out why it is not working! groom.hipnc
-
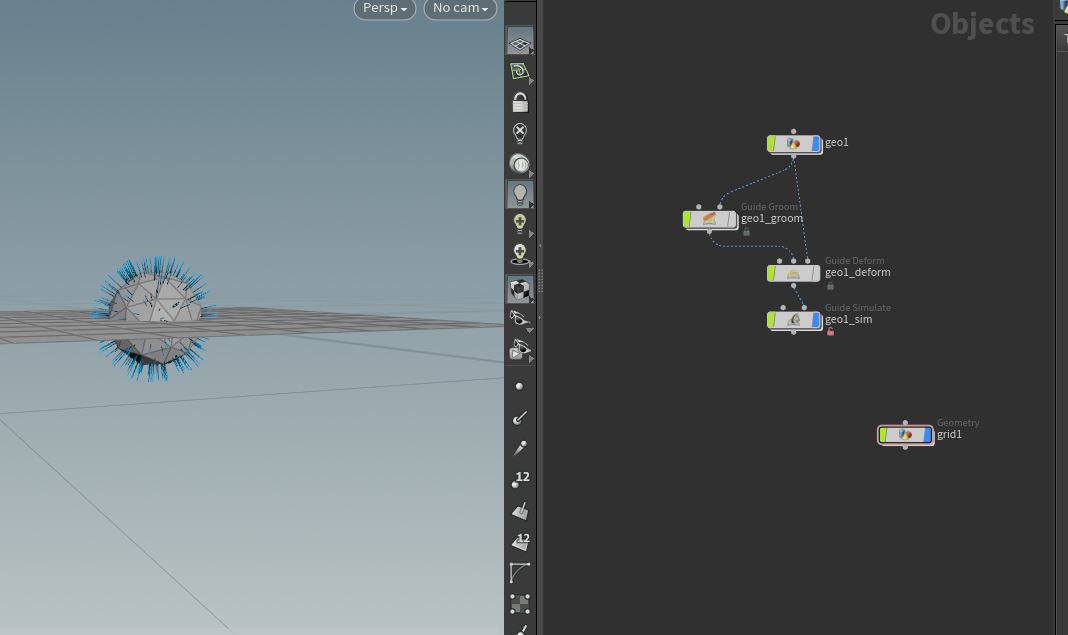
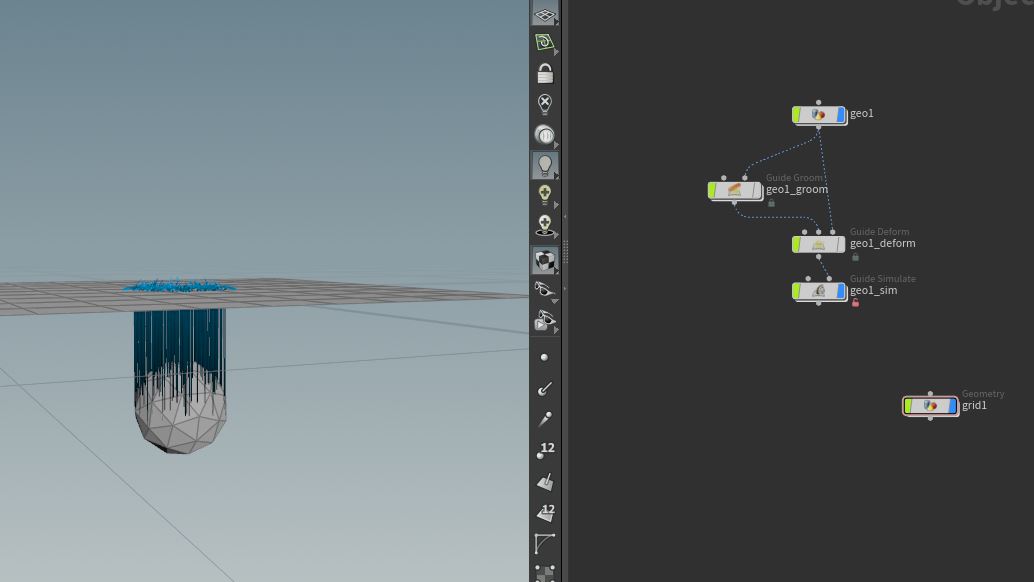
Hi, Anyone knows a good way to deform groom using sim curves? as guidegroom deform doesn`t seem to work for me and pointdeform has some other issues. Do I really have to sim low res curves and then apply hairgen for full res? Problem is that i have my groom done already and want to sim approx 10% of curves and only the long ones and deform my groom by those curves. Obviously I can`t acces Furtility, so is there any other good way using Houdini to do it? Thanks Here is the simple example of what I`m talking about: groomDeform.hip

-
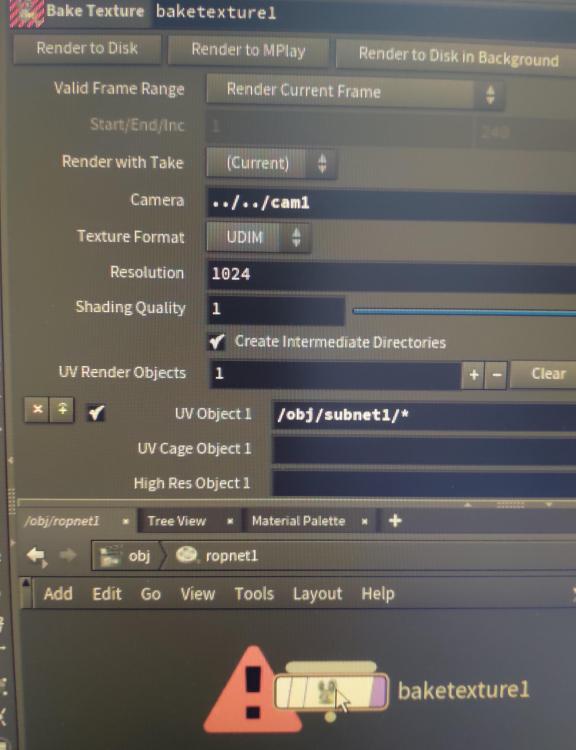
I’m trying to bake texture using both “bake texture” and “games baker” nodes, a simple Geometry as the LOW RES / Uv object and a hairgen node as the HIGH Res Object, but all my results fail to capture any colors from hair (base color) although the normals seem to be right. How do I properly bake the hair shader to the texture? PS: I already tried to disable lighting.

-
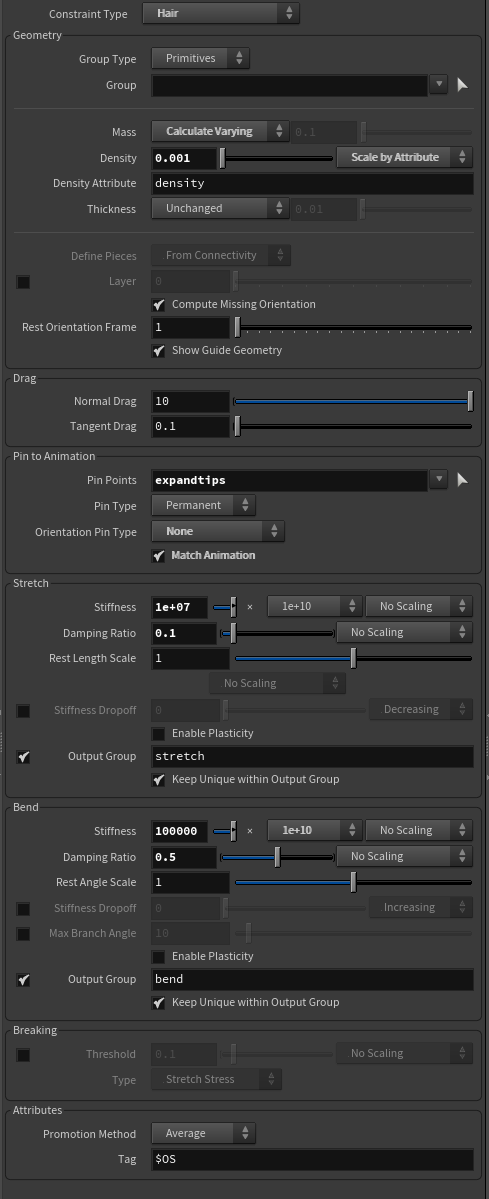
 Hi Doing a vellum coiled cable sim and while I'm happy with the feel of it I've noticed I have some spinning close to pinned points, instead of bending. Is there a way to avoid this? Video shows the sweeped curve and then it shows the group used as pinned. phone_coil_cable_spin.mp4 I've noticed that vellum does not transform the input geo attributes (am I missing something?) so instead I used a point deform to preserve the sweep's orientation. Works well for most of the curve but not great on the tips. All constrains are super stiff so the coil shape can be maintained, so this could be the cause of the geo not bending but twisting. Still I wasn't expecting that twist. The Settings I'm using on Constrain and the Solver are below. Let me know if there's something to consider to avoid this behavior or to have Vellum transform input attributes. Thanks.
-
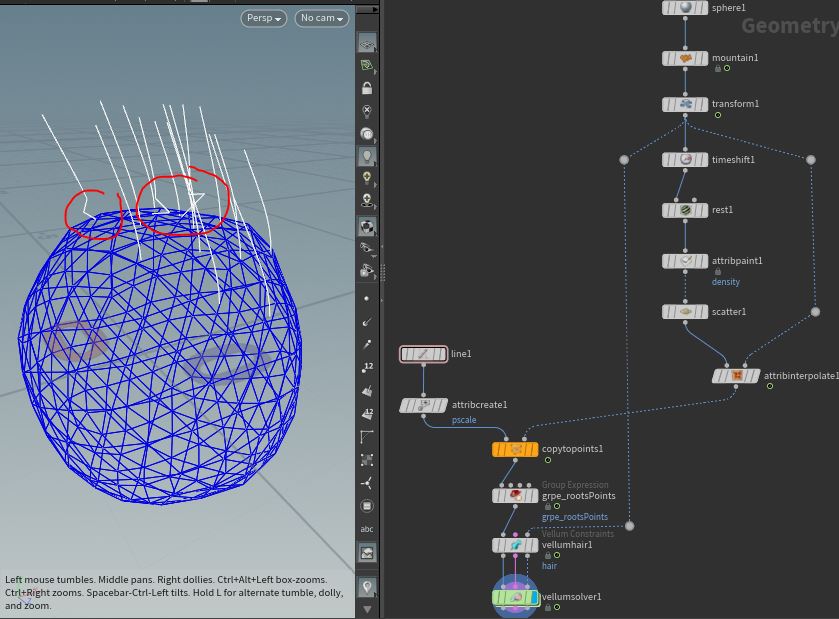
Hello, i need a little help : I have a moving object with a scatter on it to create hair from these points. Theses hairs are stick with "pin points" and "match animation". And I would like to have hair collision with the object. But if I put this object on the collision input, there is a kind of artefact to these roots points. So what could be the solution to avoid this problem that is probably coming from pining AND colliding at the same time. I'd like to keep the pin system (no "attach to geometry"). Any idear ? Thanks
-
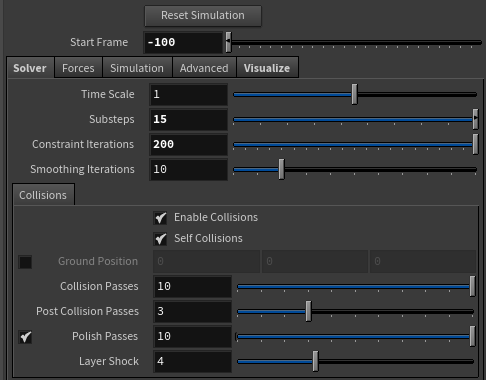
Hi All, Struggling with my Vellum sim. Have a relatively simple sim that is some fabric suspended on wires. Hair constraint handles the wires, applied to wire Group, pinned to static elements Cloth constraint handles the fabric, applied to mesh Group, no pinned geo Glue constraint applied to all geo Edge length scale parameter on my geo is quite small / shouldn't cause issues Any advice on why my sim kinda works but doesn't keep points at the end of the wire and mesh in the same position? Thanks
-
Hey folks, any ideas how to setup hair braids? Or how to braid hair? thx in advance
-
Hi! I am trying to build up a thin layer of static wool over the geometry. Is there an easy way to do this, and bake it? Thanx.
-
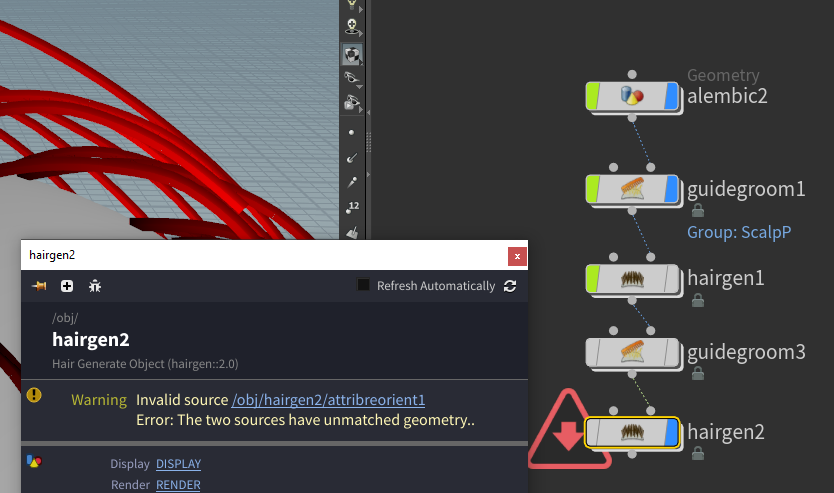
I would like to control Hair guides using a few hair guides. So, generated hair from the Guidegroom node, and converted these hairs to new guides using the second guidegroom3 node. However, when I try to add a second hairgen2 node, I've got the warning message : The two sources have unmatched geometry
-
Hi there, im working on a project, making fur on an animal. Im affraid the topology of geometry that i got from an other artist will change over time. I do not find the way to transform the guides at least to the other geometry. Is there any solution out there? im using H18 thanks Balazs
-
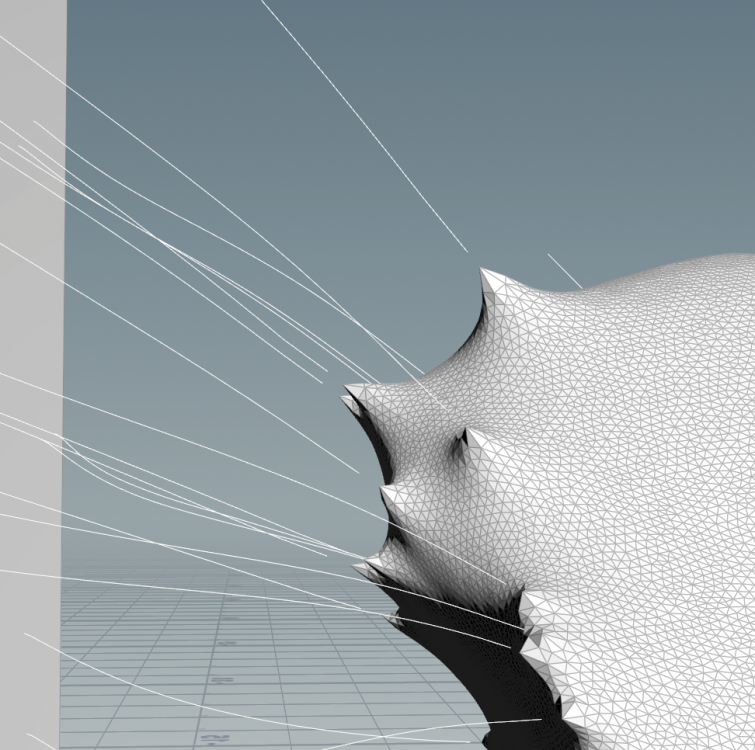
Hi, I am trying to do a hair/fur sim. The issue begins when the curves interact/collide or go inside the collision object. I have created a simple example file belowvellumHair_Colision_Issue.hip, where the animated sphere with hair, goes down the grid and the hair curves get stuck to it in its surface . Is there a way, I can get the curves to detach at certain stretch distance and get it back to this original shape ? Please have a look at the files below, if I am not clear. Thanks in advance for your help
-
Hi Houdini Magiciens Anyone know how i can do that ? I know how made tendril /anemone with hair but i don't find the way to made collisions like in this vidéo. It seems like cloth. Thanks a lot for your help !
-
Hello there ! So, I'm currently working out how to add a fur system to an animated alembic file imported (animated in) Maya. This is to debunk the workflow we'll be using on my graduation project, and all rigging and animation will be done on Maya, but grooming (including sim) on Houdini. So far, I've got a basic boucing sphere to test things out exported from Maya both as a simple .OBJ for the static mesh, and an animated .abc (alembic) of the same sphere. The setup seems to be "working", but somehow, the hairgen and deformer both seems to generate on each individual faces of the animated sphere, when it doesn't on the static mesh. Is there something specific to do with an imported alembic for the hair system to work properly with it ? I would appreciate any advice ! Thanks.
-

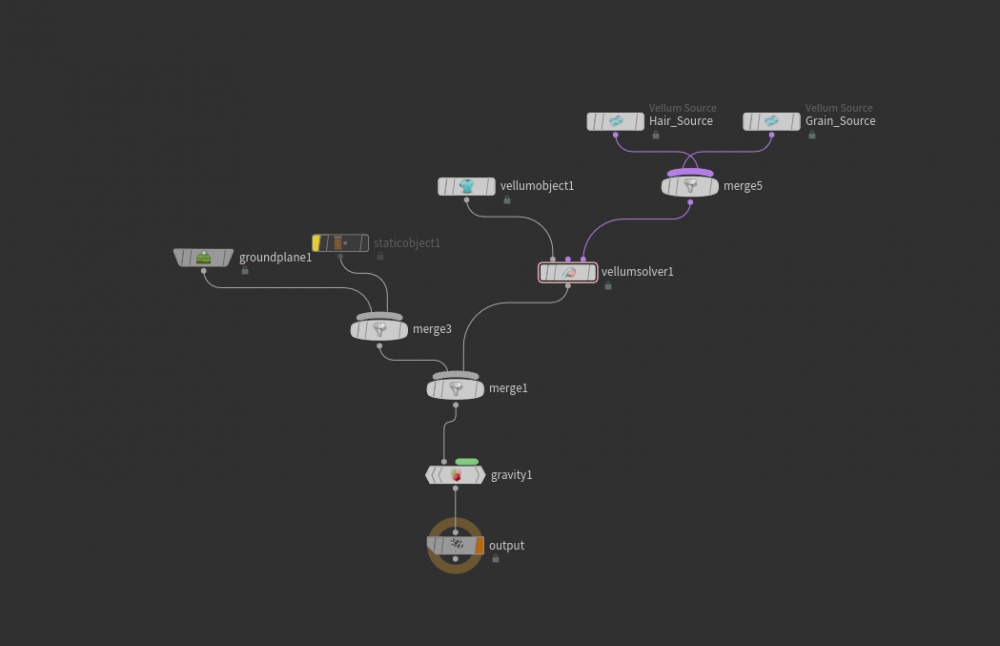
[Solved] How to get interaction between Vellum Hair and Grain
underscoreus posted a topic in Effects
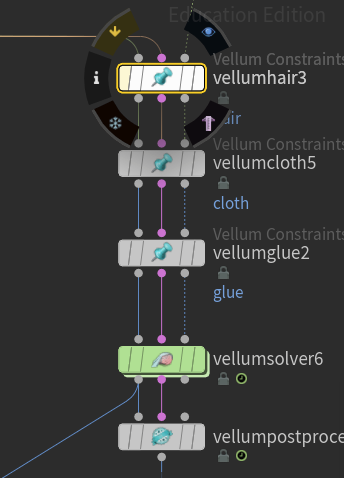
Howdy folks! I've recently started looking into Vellum and I am currently trying to create interaction/collision between Vellum grains and Vellum Hair however it does not seem to come as easy as interaction between grains and cloth. I've used the same setup that worked with my grains and cloth example to make this setup however as mentioned above so far I've had no luck in making it work. I am sure that there is something very basic that I am missing here but I can't seem to find it. Any ideas? Screenshots of the setup(Sorry for less than optimal/clean node layout): Scene file as well as base model too if you'd rather dig into it. Vellum_Hair_Grain_Test.zip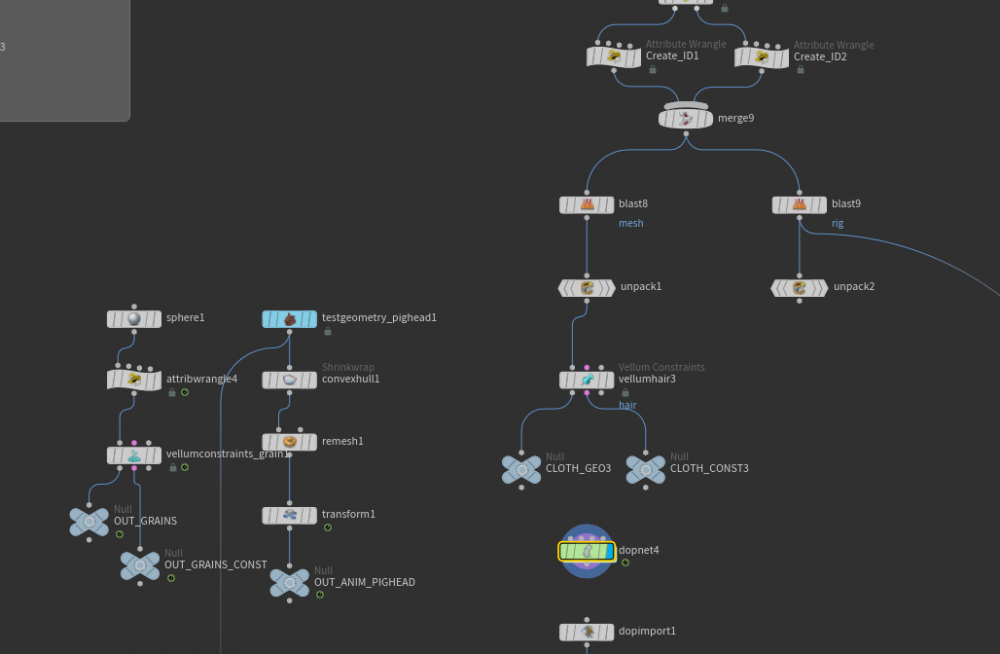
-
Hi I've been working on a personal project to learn some grooming simulation with houdini, but I can't make it work on my animated wolf. The wires just broke when they have to be simulating properly, I've tried a lot of things but nothing seems to work for me. If you know any solution please reply, I will be waiting for any type of information, thanks. hairtest_problem.hipnc lobito.abc
-
Hey magicians, I'm having some issues adding vellum hair to a moving geo. I tried using hair generate, and a for each loop to pin point 0, but for any reason the hairs go crazy. Simulated mesh also has static points (used point deform), so not sure what is causing this. I also tried scattering points on the animated mesh, but hairgen doesn't work when I select "per point", is this a bug in 18.0.416? I have normals on the points, but nothing appear. I believe I solved similar before using hairgen on scattered points. I also selected "match animation", when is not selected, hairs fall correctly, but when I try to make follow the moving points, constraints seems to go crazy: Any thoughts? Thanks!
-
I'm having a hard time getting the "Hair Generate" node of my geometry to be projected in its UV when using the "Bake Texture" node. The error presented is that there was no normals and UV map for OUT_GROOM when I tried with the settings of the image (geometry and hair are inside subnet1). I already tried on a "Geometry" node to use the "Object Merge" to bring the geometry and the hair together, and this works so that at least I can project something on the UV. Still, that way I can't apply a material like the "Hair Shader" to the "Object Merge" of the hair, the hair always stays white. No surface base color is showing.
-
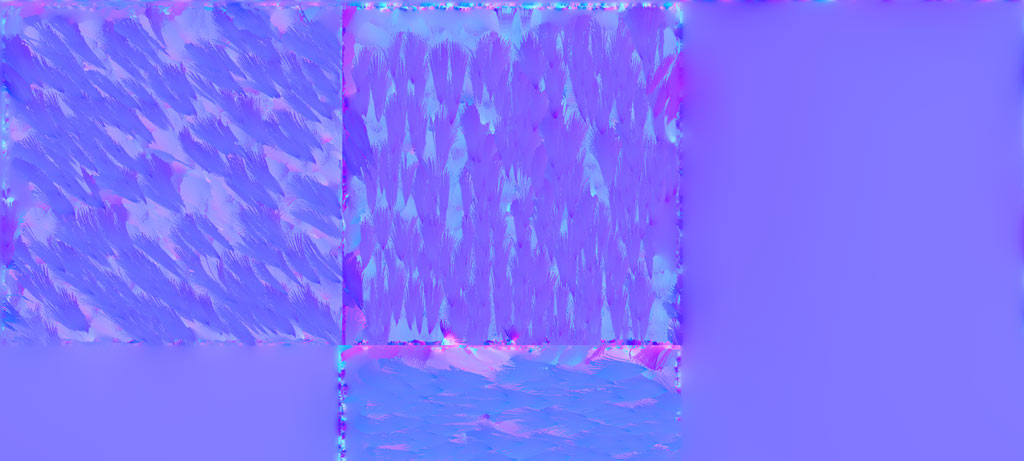
Hi, I'm trying to make some thick tubes with vellum hair. Later with redshift i'll render the splines as tubes. So far everything works, but when i specify the thickness of the hair, i realize that the actual collisions are not as thick as i want. If i activate the visualization, they look as they should in the first frame, but as soon i start the simualtion the thickness collision shrinks down, so when i render the splines with my desired thickness, there are intersections. Can you help me with this one? Thanks! They look properly in the first frame They look like this after simulation has started
-
Hi, I have some issues with Vellum Hair. With the Attach to Geometry constraint I can't found with wich attribut vellum activates the breaking. I would like to break my constraint when my points turn red. I don't want to deactivate the constraint on each point simultanitly. I have try to use a Vex Expression in the Vellum Constraint Property but I can't control the Breakthreshold attribut per points. Do you know any way to do this ? Thanks Hair_vellum_TO_DEBUG.hip