cmymc
-
Posts
7 -
Joined
-
Last visited
Recent Profile Visitors
1,275 profile views

cmymc's Achievements
")
Newbie (1/14)
0
Reputation
-
Hi all, Suppose I have a box object B and a sphere object S inside a subnet T. When I alter Translate/Rotate/Scale data of T, B and S will inherit T's transform automatically, without having to wire subnet inputs to B and S. Now I create a null object N and wire it to T's input. Then if I alter Translate/Rotate/Scale data of N, B and S stay where they were as if they ignore N's transform. I want B and S to follow N's transform, as if I altered T's transform data directly. However, since I won't be sure how many objects will be contained in T, nor do I know whether there will be nested subnets inside T, I don't want to hard wire inputs to those object nodes one by one. Which settings can I play with? Cheers, cmymc
-
Hello there, Let's say that I keyed tx of obj1 to 0 at frame 1 and 10 at frame 24, with the default bezier() as interpolation function. Now I want to map tx of obj1 to ty of obj2, with all those keyframes untouched but change the interpolation function to linear(), however I haven't found out a way to do this. Any ideas? Cheers, cmymc
-
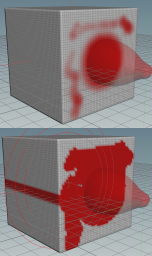
Hello there, I was doing some experiments with muscle/metaball capturing. And I ran into such a situation that the result of Capture Layer Paint (the upper snapshot) and Capture Mirror (the lower snapshot) don't match. It seems that all the points painted with opacity > 0 are scaled up to opacity 1 but I don't know why. I've attached my .hipnc file if that can help you solve my issue. Cheers. untitled.hipnc
-
How to fix my construction plane in perspective view?
cmymc replied to cmymc's topic in General Houdini Questions
Yes that solves my issue. Thank you. -
Hello there, I don't know what happened to my construction plane in perspective view. But somehow I have figured out how to duplicate this weird behaviour. 1. Create a new hip file. 2. Turn off construction plane and save. 3. Re-open that hip file. 4. And the construction plane in perspective view gets in such weird position. Have any of you ever run into this issue? How did you fix it?
-
Hello there, I'm wondering whether I can create a realistic muscle rig using Auto Rig. Setting the Deform Type parameter to muscles doesn't give the result as I expected. Those muscles created seem to be one-to-one replacement to bones, which are way too far from realistic. So I'm thinking of doing the following steps. a) Create an Auto Rig using bones as Deform Type. Manually create some realistic muscles, parented to the joint hooks from the animation rig. c) Append a CaptureMetaball node to the skin, and use the shelf tool 'Add Muscle to Solution'. However I'm not sure whether it is allowed to append a CaptureMetaball node after an ordinary Capture node, also how to mirror muscles from one side to another, along with their hooks mirrored. (The mirrored part created by the Mirror Shelf Tool won't be updated if I tweak the corresponding part on another side later.) Please give me some advices.
-
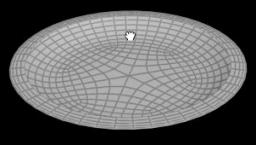
The attached picture is a screenshot from a Digital-Tutor tutorial. For modeling a plate shaped object like the one in the picture, I'll use a curve SOP combined with a revolve SOP. But I don't think I could create such topology with curve and revolve. This topology looks much like a result from retopology, however I don't think ZBrush's ZRemesher can give neat results on hard surfaces. I also tried the remesh SOP in Houdini but that seems to be based on triangle polygons instead of quad polygons. Anyone could tell me how is such topology created?