mestela
-
Posts
775 -
Joined
-
Last visited
-
Days Won
81


mestela's Achievements
")


-
Exporting FBX with dynamic textures/materials
mestela replied to mbrajsa's topic in General Houdini Questions
Bit of history, bit of context, apologies in advance for the rambling... Houdini tries to unify the concept of rendering, be it rendering images, or 'rendering' geometry to disk, or 'rendering' a simulation, its all just 'rendering'. Any time you see a 'save to disk' button, that node will likely have 'rop' in its name, short for 'render operator'. The rop context ( or /out ) in houdini is a way to control rop node execution, the idea being that you might need to first render some geometry, then render a simulation cache, then render foreground and background images, then render a comp. Rops lets you chain all those together. Rops also gives you the choice of native nodes within its own network, or a remote control called a 'fetch' that will click that 'save to disk' button in a rop node anywhere else in your scene, like the fbx node you have. A core assumption with rops however is that you're working frame sequences. In your case this is tricky, as you don't want to process a sequence of frames, but a collection of objects. The traditional workaround was to pretend your objects were a sequence of frames somehow. So you might wire all your objects into a switch node, make the switch be controlled by $F, so that when rops renders the timeline, each frame gets a different piece of geometry. This might work for you, but I've had issues in the past where the fbx rop itself expects to be saving an animation sequence into a single file, it gets confused. Tops, or Task Operators, is a more recent addition to Houdini, and is a more generalised context for managing processes. Tops does allow you to work on collections of objects directly, as well as fetch to other rop nodes in your scene. It's what I'd use here. Right, history lesson over! I have a couple of examples and notes you might find useful: https://www.tokeru.com/cgwiki/HoudiniTops#Export_RBD_fracture_pieces_to_seperate_fbx_files https://www.tokeru.com/cgwiki/HoudiniTops#Tops_and_Rop_FBX_animation_output (edit) Ah, forgot to actually answer your questions: Is there a way/node to export a piece of geometry as an ".fbx" without the need to tap "Save to Disk", as when using the "ROP FBX Output" node? Yes, use tops or rops (i'd use tops) How to export the geometry as an ".fbx" so that it actually exports the material correctly as well, meaning that, once imported in Blender, it actually displays in the same way it can be seen in the Houdini rendering? You'll need to play with this. Fbx is an oddball format that is half proprietary, half assumed standard in games, all the dccs support it slightly differently. Last I checked fbx is supposed to only support its own specific fbx material format, but no-one seems to care. I think if you create your materials using the standard houdini principled shader, that gets translated by the fbx rop into one of those basic fbx materials that supports simple texture slots, but then I don't know if blender's fbx importer will read it. There's also a fbx material type lurking in shops, the really old shader context of houdini, but I'd be amazed if the fbx rop is aware of it or would understand it. Is there a way to export a geometry as an ".obj" + ".mtl" combo? From what I've read and seen, this doesn't seem to be something Houdini supports. Pretty sure you can't. -
I got some very useful extra info on this, I wrote it up and expanded the hip: https://www.tokeru.com/cgwiki/HoudiniVellum#Animated_crumple
-
Yeah strange, this almost seems like a bug to me. The other method I assumed would work is a vellum rest blend limited to only the bend constraints, but that also just sits there and refuses to do anything. I kindasorta got something working with a pop wrangle updating restlength directly, but it's way more fiddly than I'd expect. Took some notes from Junichiro's tutorial on curve folding, few other things, but there must be an easier method than this. vellum_paper_crumple_through_grad.hip
-
For mechanical animation: KineFX or "Classic" constraints?
mestela replied to ShkYo30's topic in Animation & Rigging
You can do this sorta stuff with fbik and constraints: https://www.sidefx.com/forum/topic/86702/#post-374592 -
Could also simply be a viewport bug. Houdini's viewport is notoriously buggy with packed prims, especially with colours. Sometimes it'll display, sometimes it wont. You can try appending an unpack to see if the colour is there, if so you can swear, log a bug with sidefx, know thats how you do it from now on. It should render properly with mantra/karma, and can be made to work with mild effort with other renderers.
-
Click the little XYZ button at the end of the 'element size' parameter, it splits the single scale control into 3.
- 2 replies
-
- 1
-

-
- attribute noise
- scale
- (and 1 more)
-
Please upload a hip, easier to help that way.
-
I've not used the secondary motion stuff much, but my understanding is that its more for applying the motion of one joint to another joint, eg neck rotation to floppy years, or spine rotation to a belly jiggle. What you've got here is more about lagging/overshooting all the angle values on all the joints, so I think you need to go to chops for this. Attached an example setup, its fun to play with. kinefx_overshoot_curve_me.hiplc
-
You're up in the object context. See in the lower right panel, it says 'objects' in its top right corner, while the video says 'geometry'? Double click on grid1 to dive inside that node, so that you can do geometry operations. The video has also made the tree view visible. On the left hand side of the interface, left of the magnet icons, is a tiny dotted region with super small triangles above and below it. Click on one of the triangles to reveal the tree view that is stowed there.
-
The houdini equivalent would be to write a lens shader. Paul wrote a nice tutorial about how he used this to create the imposter lens shader: https://www.sidefx.com/tutorials/lens-shaders-for-gamedev/
-
Yeah, needs some adjusting, but it works. rbd_animated_force.hip
-
Avoided the chops question, but sorta emulated the vibe with an attribute noise and some remapping of values. extrude_animate_noise.hip
-
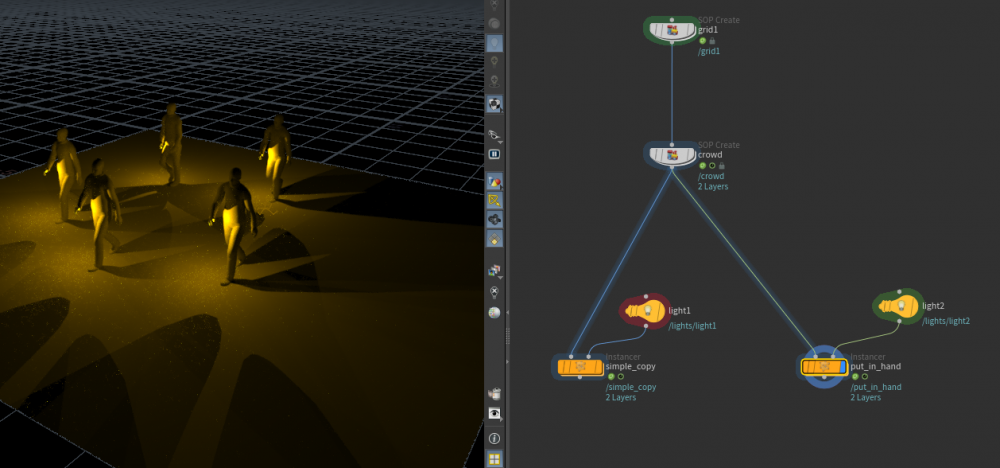
Or lops? I wager its all a bit bleeding edge, so you'd wanna test a lot before pushing into production, but this is all the kinda stuff lops is meant to be good at. lops_crowd_lights.hip

-
Has that link been moved? I get an error when I click that url.
-
R.click on the blendtransforms node in vops, vex/vop options -> view vex code. Scan through until you see an include line, there's this: #include <kinefx.h> Drop that into your wrangle, you should have blendtransforms() available. If you go find that file on disk (it'll be buried in $HFS somewhere), you can see all the functions defined in that include.