Search the Community
Showing results for tags 'kinefx'.
-
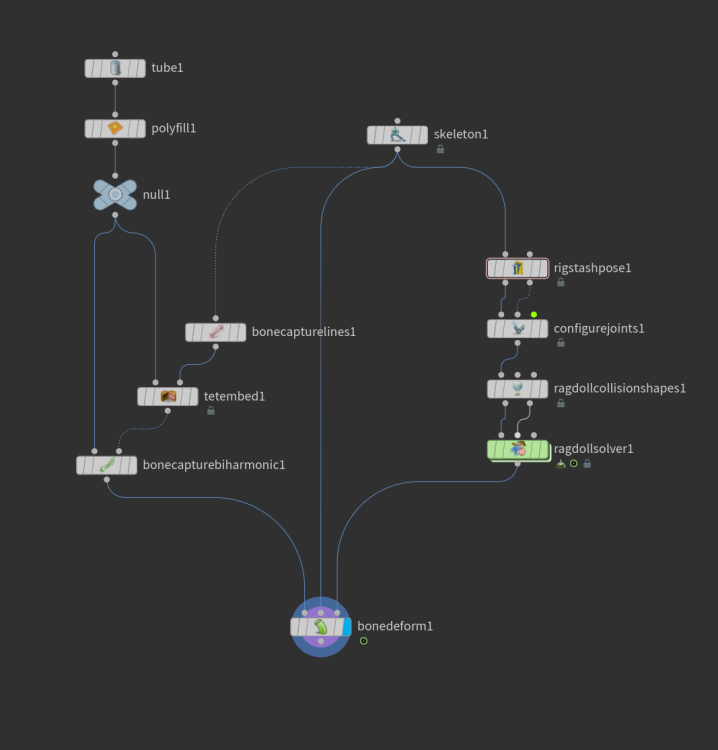
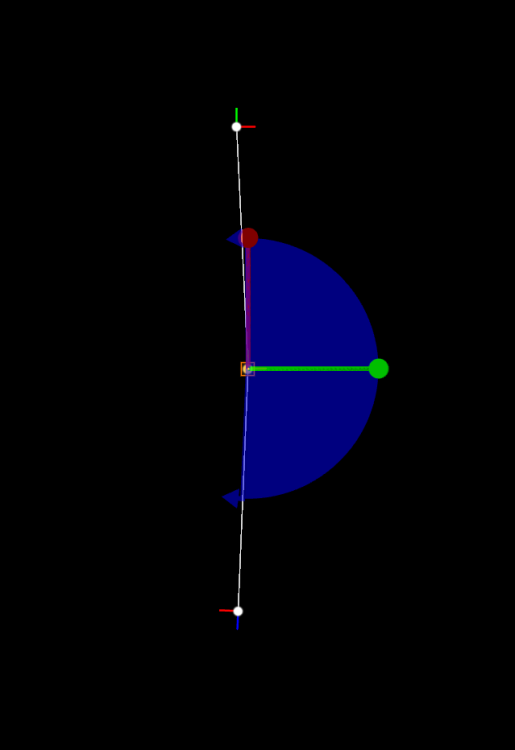
Hey guys! I'm trying to learn the best workflow for Ragdoll simulations. I have a very basic knowledge on KineFX so I believe it's best to start with the simplest scene possible. Here's what I have now: Simple_Bones_0201.hip It works!! But I don't know how to work with it properly. First of all, is this the best workflow for this? Edit: the following topics are all solved - It looks like there's an "automatic" way to configure the joints limits using a motion clip. I tried a couple things but it didn't worked as I expected - There's also an automatic way to create the collision shapes This is the only joint limit I set up, but it doesn't work as I expected. I was expecting the joint to rotate only inside the blue limits, but it does the other way around (as you can see in the animation). Can anyone explain what's going on? This is it for now. Any tips would be amazing, even not related to my doubts Scene file is attached Thank you
-
 hey there. i have this kinefx animation and want to simulate some vellum cloth between the moving bars. so far so good but the bars are rotated on the first frame and i am not able to glue the cloth pieces and the bars together. when the bars stick out straight on the first frame its no problem but i can´t solve it when they are rotated the way they are. tried solving it with a bone deform and some vellum pre sim stuff/ vellum drape but with no success. maybe some one has a moment to take a look into the hip file. thanks in advance! Mobile.hiplc
.thumb.png.a98fc354104f75b415acaf80cb18ba6d.png)
-
Hello, I'm in the process of building my own crowd pipeline and one of the things that's really giving me a headache(matrix math isn't my strong area) is doing some raw retargeting where it's just a one to one offset from a clip to a new rig (with same naming convention and base skel structure). I've nearly cracked it but the final orientation is off causing the joints when converted into a motion clip and applied to the agent to not be orientated towards the child joint due to the transform offset node messing with the final orientation and i've ran out of ideas on how to correctly fix it. Here's an example file I made of the best result i've gotten so far, I've provided 2 agents, one is a very drastic case which I would probably retarget using Full Body IK but it's easier to see the issues with it compared to the other agent I've provided which is much closer in proportion to the original clip. retarget_example_help.hip
-
I have a simple helicopter rig where I animate the rotation of the rotor blade. On frame 1, the value is 0, and on frame 60, it's 52000. https://i.imgur.com/hepgoiG.png Everything works correctly in Houdini. However, when I import it via FBX character import into 3ds Max, Maya, or back into Houdini using Filmbox FBX (it doesn't matter), the result is the same. The animation values do not start from 0 to 52000 but from 0 to 9520. If I animate the keys differently, for example, using 64354 on frame 60, the values will be different but still not matching. https://i.imgur.com/4bNjeue.png https://i.imgur.com/SbQVOo1.png I tried manually setting the keys and baking them, but the result is still incorrect. Everything else in the rig works correctly. I also created a rig using just a box and rotated it using rigpose, but the result is also incorrect. It seems that the issue lies either in the export process or with how the rigpose animation works with larger values. I need the rotation value data to set up motion blur in 3ds Max. Additionally, in another shot, there is slow motion, and it's important for all values to match correctly so that I don't have to animate the rotor blades separately in 3ds Max. Interestingly, the blade's position matches after the export, but the actual value decreases in some unknown logic - https://i.imgur.com/LWFtDbM.gif Before the export, in the second frame, the value is 881.356. Afterward, it becomes 161.356 (which is 360 + 360 + 161.356). It reduces by a full 2 rotations. In the fourth frame, before the export, the value is 2644.07, and after, it's 484.068. At this point, I can't see any logic behind it.
-
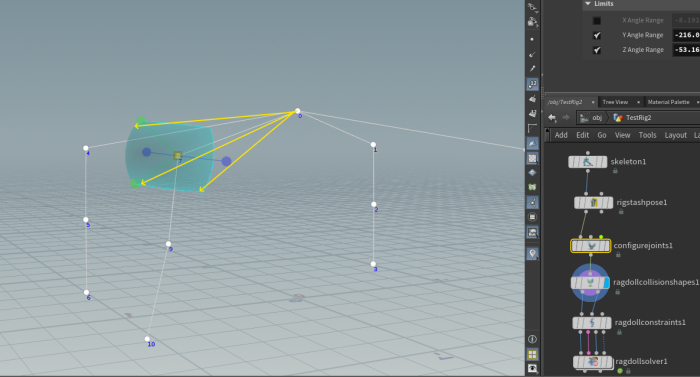
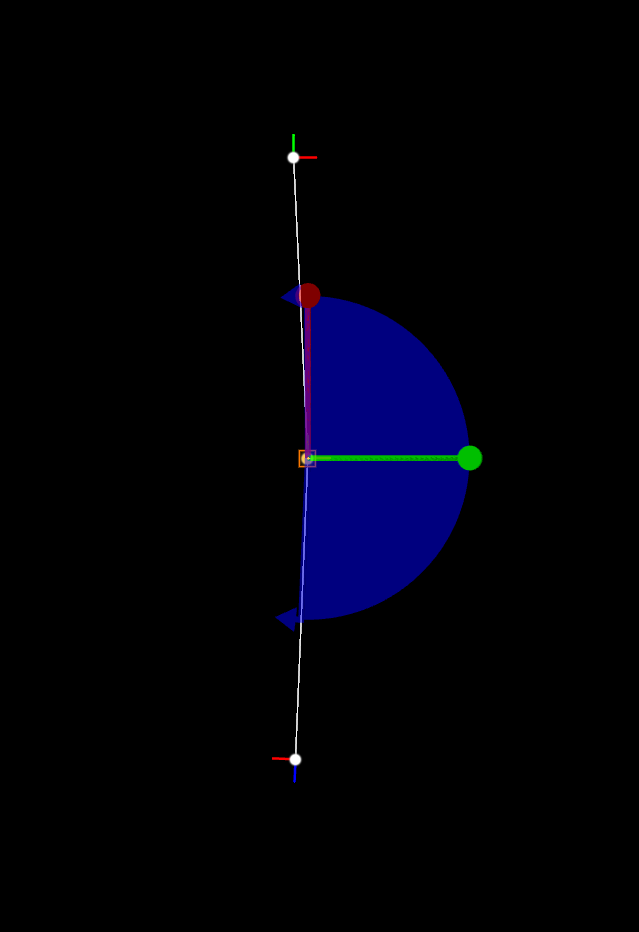
 Hello there! When I click "Bone1", Ragdoll collision shapes adds a collision node to point0. The same happens when I click Bone2, Bone3 or Bone4. How do I add collisions to Bone1 .. Bone4? Should I click respective joints 4, 7, 1 and 8? But that does not seem right. The node configure joints is similarly puzzling. Does the image bellow mean that the Bone1 will move only in the cone displayed by the sphere? I've noted in a yellow color valid positions that I imagine.
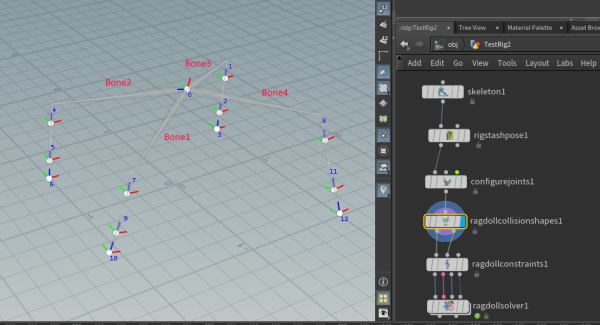
-
I've merged 2 skeletons together but I must have missed something because when I import to C4D the hands are in the complete wrong place in world space. Thought if I edited the path attribute it would fix the hierarchy, but it did not. Works fine in Houdini. What am I missing? RigTemp.zip
-
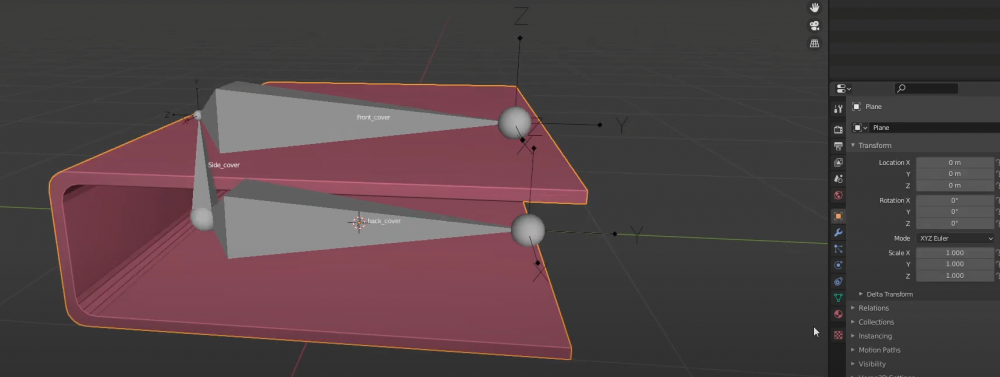
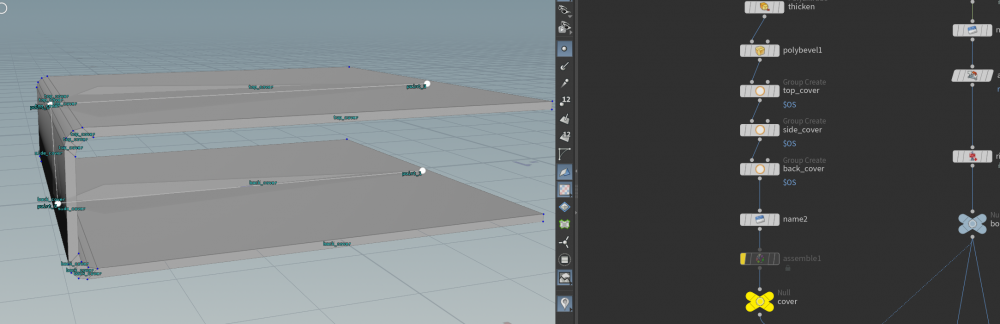
Hey everyone, I'm trying to update an old-bone setup to kinefx workflow and I'm a bit stumbled! (To me this seems like a fairly basic setup, yet unusually complicated so I might be missing something) Step 1: Comparing Blender to Kinefx, and bringing over that workflow to Houdini: Here is a screenshot of a cover-rig in blender, (and here are the steps Cover rig ) Step 2: (Houdini Version) PROBLEM: I have 3 ways to rig this that I know of, I could do a captured packed geo but then I'd lose the deformation of the edges like the blender example, so that won't work. Option 2, I can do a capture by Harmonic using tetembed or tet conform.. but I have to paint my weights and can't seem to link 'top cover bone,' to 'top cover mesh,' like you can with Blender. And lastly, we can use capture by proximity which always works but you have to fiddle with the tolerance and the result is not clean as the Houdini system is guessing an approximation. What is the proper workflow for this? book_cover.hiplc
-
Hi there, I'm merging two FBX skeletons together and I'm wondering what the best way is to unify their vastly different "Name" and "Path" attributes so I can export to other packages painlessly. Thank you
-
Hi! Corgi the Bentley. Personal artwork. Everything done by me, and blendshapes helped Roman Zabludovsky. Houdini, KineFx, Stock houdini tools for groom, Vellum for sim, Karma for rendering. Originally inspired by works of Vipin Jacob, Eric Guillon and the mood of JB Vendamme portfolio. Personal research of Houdini pipeline here, and 1st full-scale work made on Linux smiley (after all my life on Win) With help & strong support from Roman Zabludovsky, Andrey Belichenko. hi.balbobia@gmail.com — for contact.
-
- 3
-

-
- team
- freelancer
- (and 8 more)
-
i have a walking cycle motionclip and a head turn motionclip. How can i have a walking cycle with the tun head animation applied? I just want to apply the head animation from the 'head turn' to the walking cycle essentially. must be pretty obvious but i am quite new at this and struggling with the basics
-
I am working on a simple Kine FX rig and would like to control the tail of an animal by keyframes of a single bone. The animation of the first bone should be transferred to the other bones with a time delay. I have tried to transfer the techniques shown here to my rig: https://www.tokeru.com/cgwiki/index.php?title=HoudiniChops#Stagger_and_offset_bones but unfortunately, I fail to import the channels of the rigpose Node to a Chops Network and link all the rotation values there. Does anyone have a tip for me on how best to go about this?
-
 Is it possible to stabilize Mocap data with Kinefx? I have a dirty mocap that floats off the ground place I tried to use Stabize joint to no success, are there any methods to fix this issue... I have watched some tutorials but none really covered this aspect of cleanup... any help would be much appreciated. Thank you.
 -
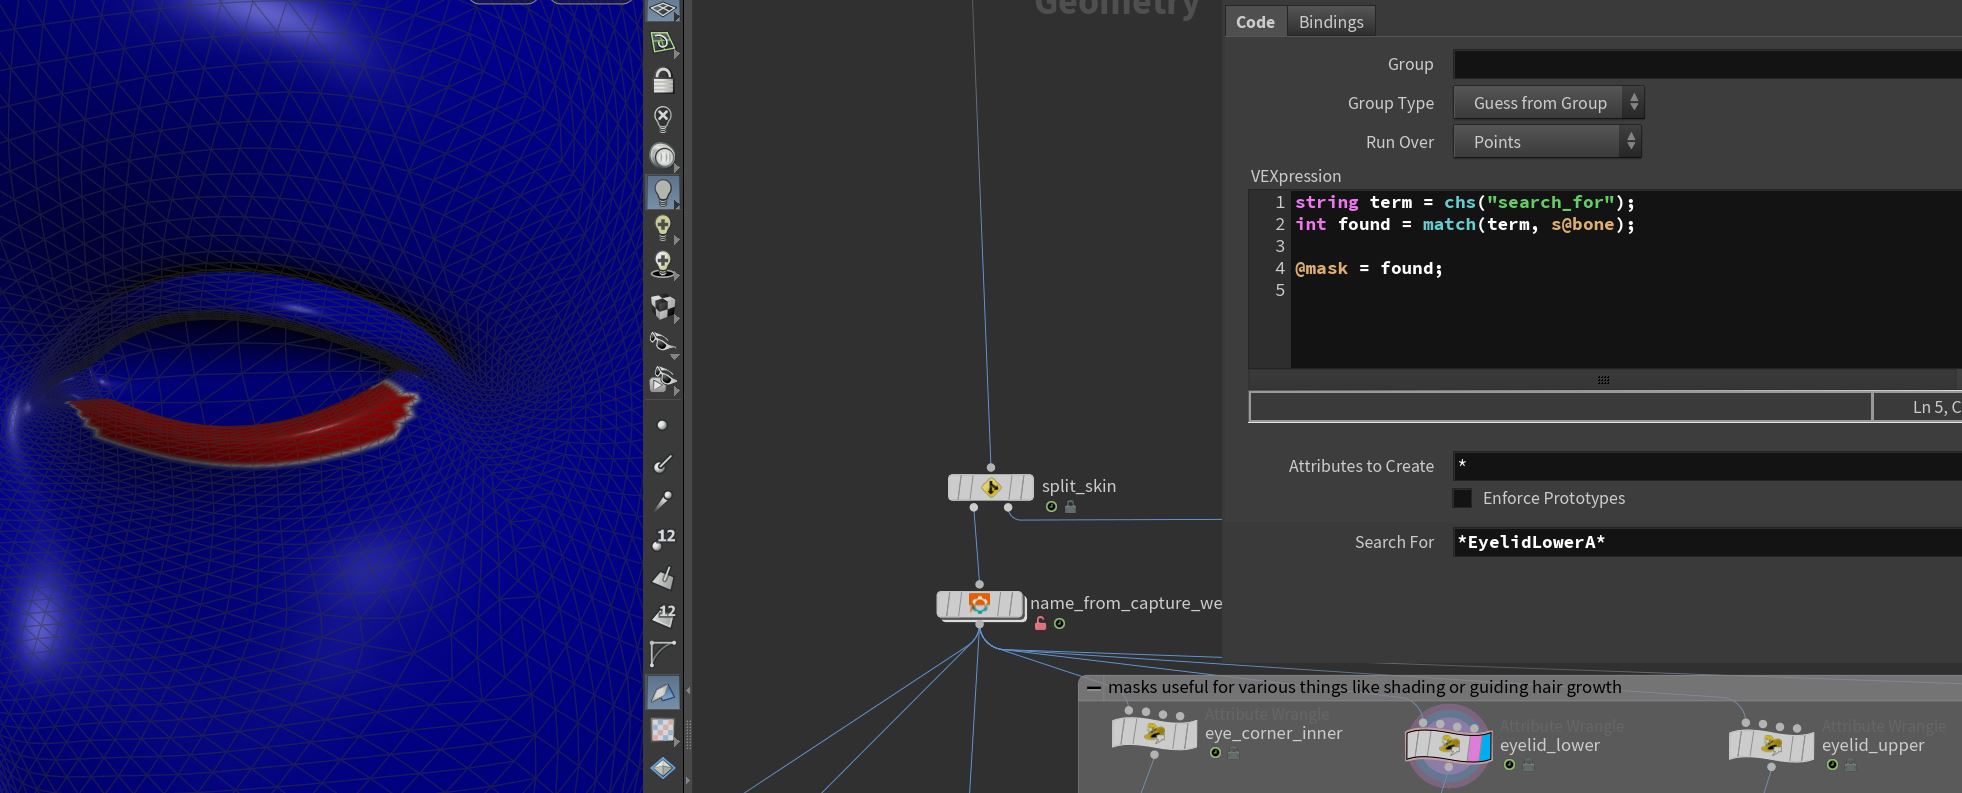
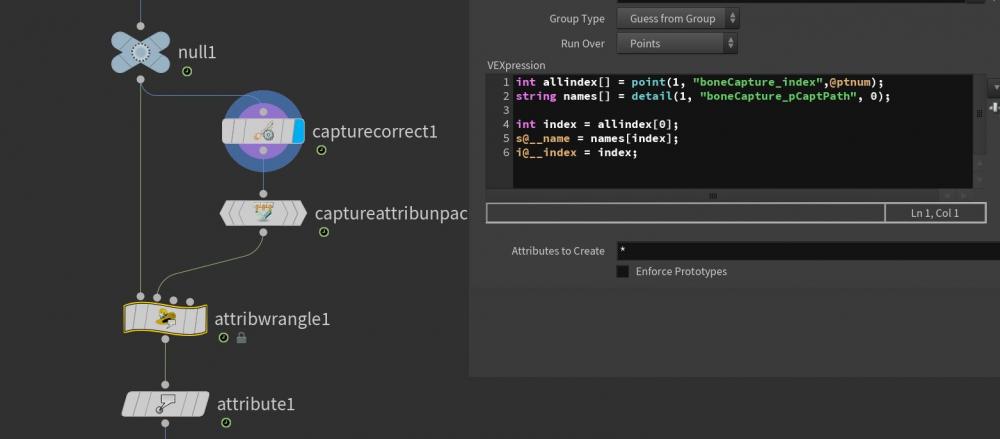
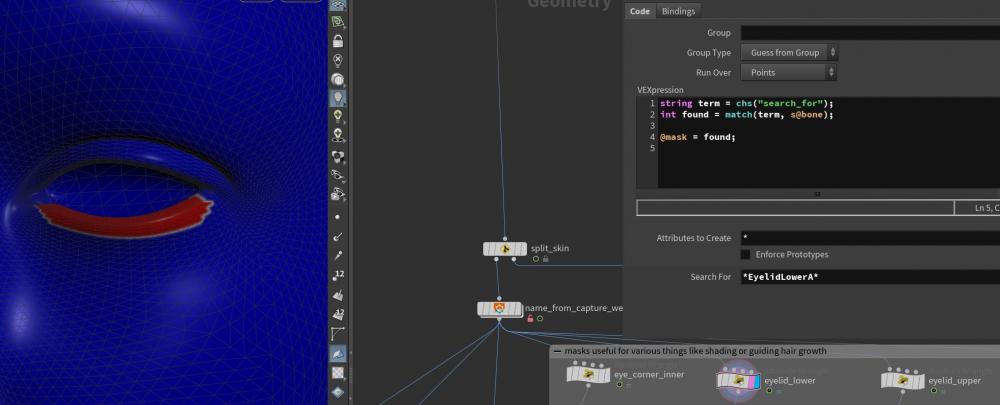
Hi all, I'm working with a character .fbx imported from another package, and need to extract the painted weights for a specific bone to a point attribute to use as a mask. Right now i'm using the labs Name from Capture Weight node, which unpacks the weights and saves the name of the bone that has the highest influence on a point to string attribute by just returning the first entry. Then I use the following vex to do a search for a particular bone(s) in that string attribute, something like "eyelidLower*": string term = chs("search_for"); int found = match(term, s@bone); @mask = found; that returns 1 for all the points that match the term so i can a linear mask, but I want to return and sum the actual weights - is this possible? Many thanks
-
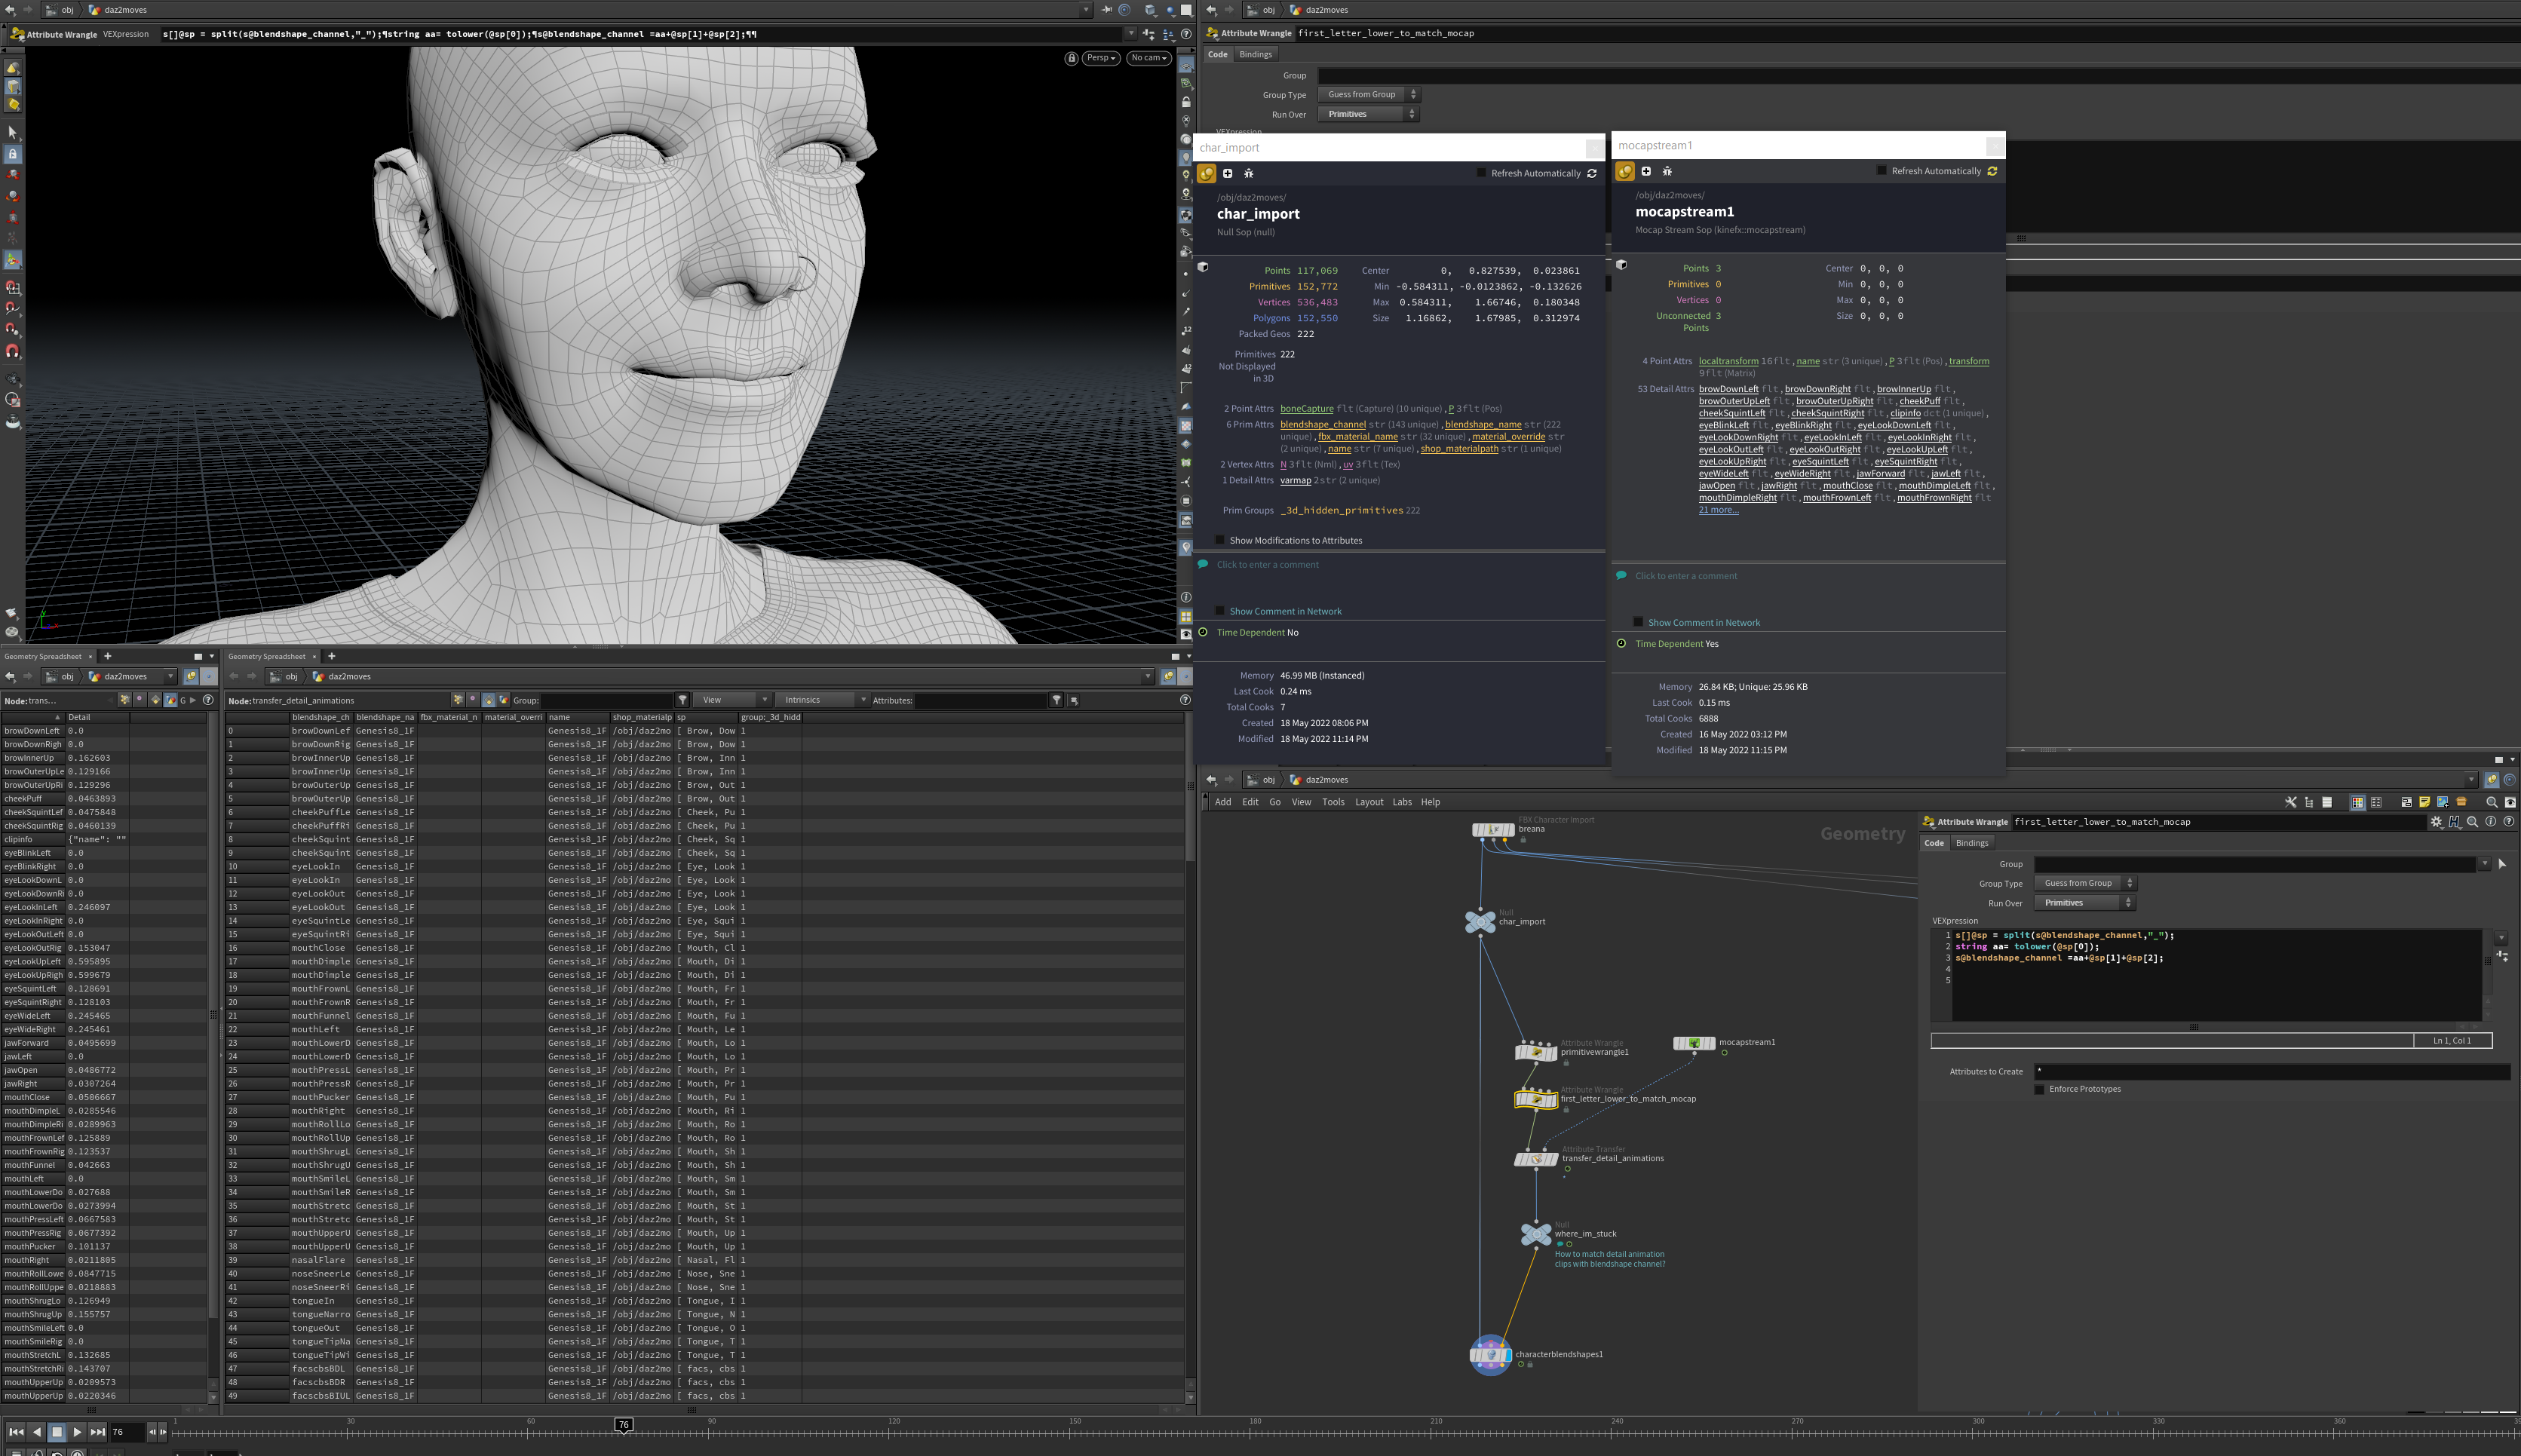
 Hey all, I'm trying to match the animated detail attrib from the mocap stream to the blendshapes in the mesh via the characterblendshapes. I've managed some vex to match some of the channel names. Is there some sort of wrangle that would match the detail attrib to the blendshape? Or am I missing a step? Thanks in advance, this is my first time messing with blendshapes in this way.
-
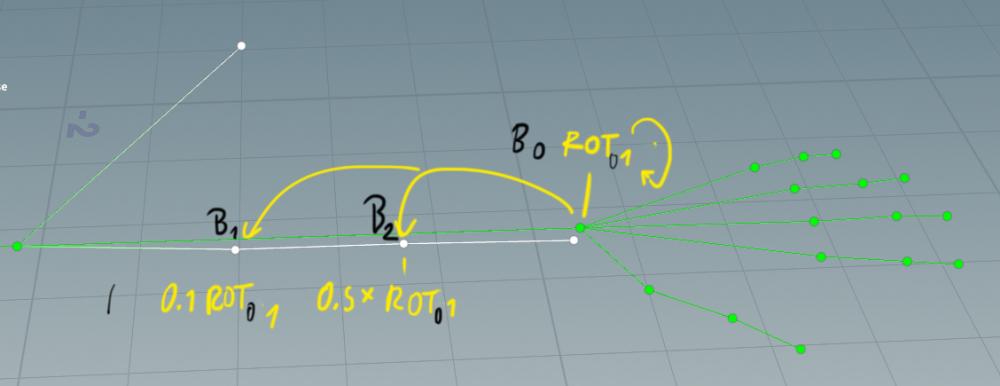
Hi , I'm doing this arm Rig, I need to transfer the wrist rotation around it's axis to the rotation of two other bones that are parent to the forearm(white Line), I'm trying to do this in the rig VOP I need to get the ROT 0 Value(The rotation perpendicular to the axis form the wrist to the forearm), I try to much time to find the right nodes, some ideda to hunt for this value would be awesome. with that Value I'll by able to do the rest with the get and set points. if there is other Vex or Sop KINEFX way of doing.. anything that can get me going on this problem , thanks!..
-
 Hi all, Is there a way I can use a shelf tool python script to select a joint in the rig tree window pane when I have a rig pose SOP selected?
 -
Hi, Let's say I have an Fbx imported animation , this animation has the capture pose and also the animation itself, But the animation doesn't have any T pose in it, so I can't do a proper use of the Rigmatch node, since I need to connect the animation to it as is supposed to. wich route should I take in this case to retarget?? is there something that can be done since I already have the T pose , I imagine placing it into a frame in the animation(How?) or there is another better solution?. ...I keep looking and found the solution at the docs : https://www.sidefx.com/docs/houdini/character/kinefx/retargeting.html
-
 Greetings, How can I select multiple bones(KineFX) and rotate each of them in the local X-axis in a procedural way? What I mean is I can select them in 'rig_pose' manually one by one, but in my case there are several hundred bones to select and rotate. I hope that this could be automated. Also, another related thing that confuses me: if I select a bone(KineFX) in 'rig_pose' and rotate it in the X-axis in local space, the rotation (in the properties) appears in global space, so instead of(x:30, y:0, z:0) (which will be the same for all of the bones), it is different for each bone. So I have no idea how to automate this as well.
 -
Hi new to kinefx and mocap, can't get my character to go for some reason- the arms get all crossed up. Would love some help with this. I want to bind/retarget the character to the t-pose in the first frame of the animation but then loop through the rest of the anim without that frame- can't figure out what my node setup should look like for that. File attached, thanks so much Retarg_Help.zip
-
i have an animated quadruped rig with some feet sliding issues. I am trying to use the stabilize joints SOP but i don't have goal or twist control. How can i generate those? geo.FBX rig.hip walk.FBX
-
I'm trying to make a walk cycle in Houdini using a KineFX rig, and was wondering if there was a way to copy certain keyframes, and paste the mirrored pose onto the other side of the rig. I think blender has a function like this, where you can copy a pose, then paste the flipped version of the pose.
-
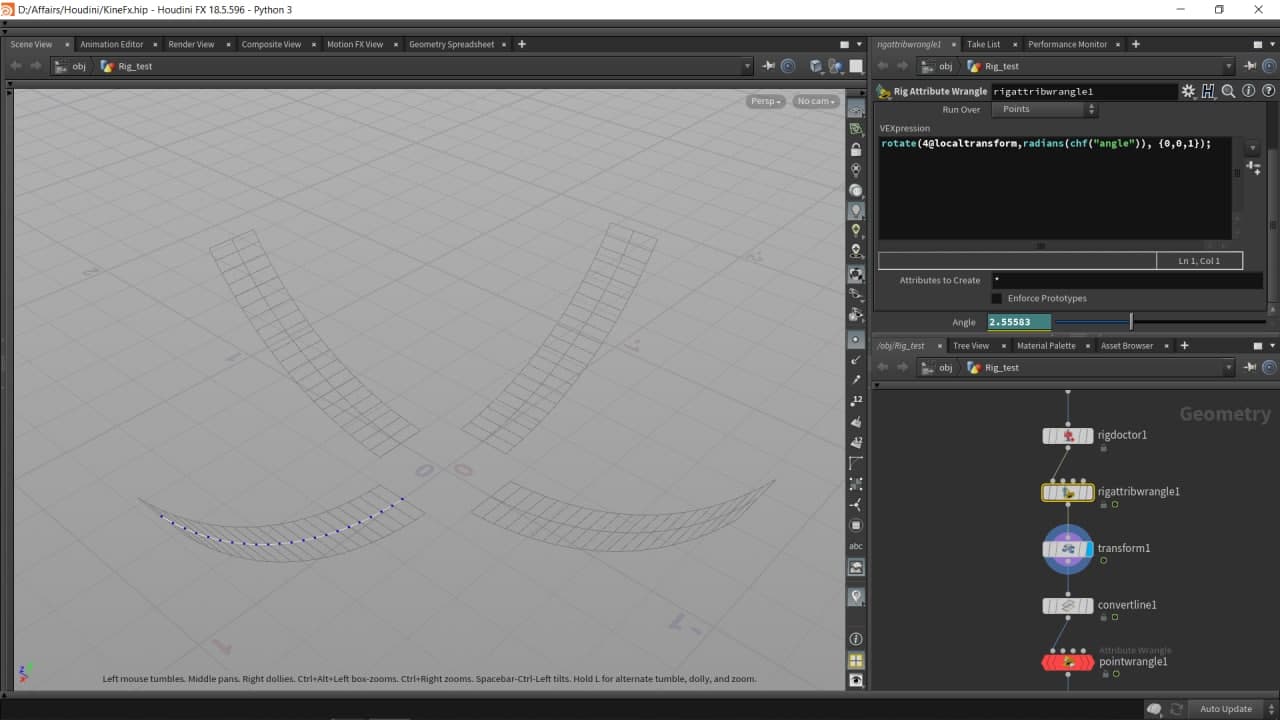
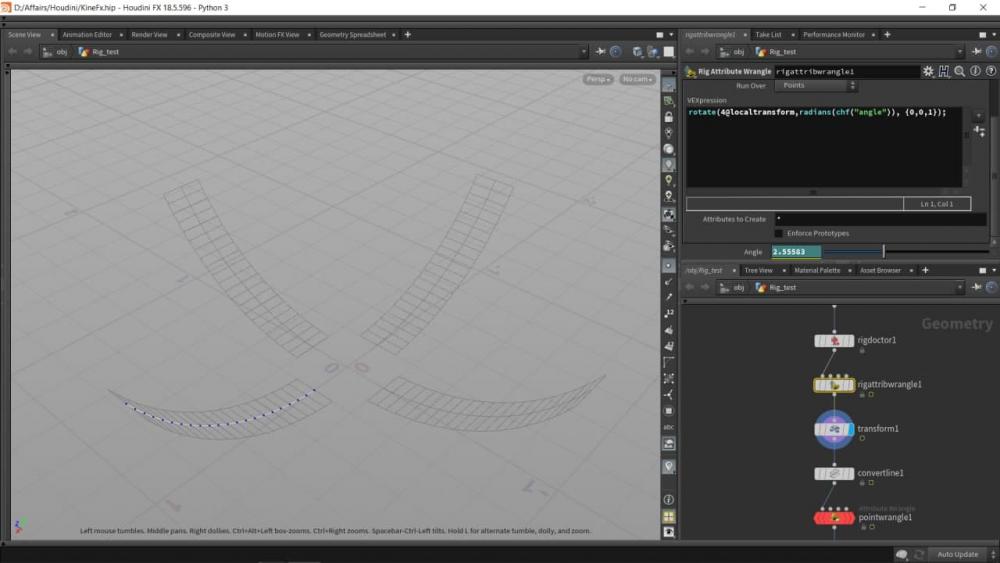
Hi. I have basic polyline. Turned into the rig with RigDoctor and animated via Rig Wrangle. I would like to export animation to fbx beacause as far as I understood in order to export fbx animation one needs to use rig system. But nothing works(((. Second question is how to export to fbx copy to points animation. In general I wasn't expecting exorting fbx animation to be so complex. Thanks in advance
-
Hi, has anyone been able to successfully match the Mocap skeletons from the CMU database to a Mixamo skeleton? I've been trying for days overall, trying all sorts of combinations and tutorials but I end up with twisted skeletons and arms all over the place. I think it has something to do with the CMU skeletons having their shoulders inside on top of the next points wheras the Mixamo ones are in normal shoulder positions, but using rig match pose nodes to move the points around hasn't helped here. Have watched a lot of tutorials multiple times including the ones by Parker Coleman on Youtube which are great, as well as a few official SideFX ones, and I've learned a bit about Kinefx in all this but not enough to get there. Thank you.
-
 Hi guys, I have a rigged character and two motion clips. Now by using KineFX I want to apply the motion clip "A", to the lower part of the body, and the motion clip "B" to the upper part of it. Is it possible? I watched several tutorials but I couldn't find what I need... Thanks for helping.
 -
Hello all, I try to make a centipede rig that is based on this tutorial from side fx https://www.sidefx.com/gallery/kinefx-spider/ But rather than having only one point for the hip, I have a curve that I copied the pair of legs, so I have multiple hips, everything works perfect except the animation part that he passes the rig from a rig attribute node and then from a transform from path to set point transform, I tried for each loops, I tried wildcards, I tried to run the vop in points and detail, but nothing seems to work for multiple pair of legs, is there a way to pass to set point transform each one of the legs? Thanks a lot

.png.cbca1f7c8081ff652533be919b8947ad.png)