Search the Community
Showing results for tags 'vellum'.
-
Hi, I would like to know how to achieve and animate something like this in the first video https://www.behance.net/gallery/175765483/LOEHR-x-Spot-Studio? (Screenshot of what I am talking about below) In regard to 1/ which grain properties to adjust 2/ How to achieve clustering some grains as you can see on top - are these separate vellum grain objects set to different seperation rates? 3/ Would be nice to know how you guys go on about optimizing your grain sims.. I run an 12core i9 and it is struggling even with 200K points Much appreciated.

-
Could someone please advise on how to achieve the fluid motion seen in Ziva muscles within Houdini? I've attached a video demonstrating Ziva muscles sliding smoothly while maintaining volume. However, in Houdini, the muscles don't slide smoothly, lose volume, and develop wrinkles. I've attempted to implement sliding constraints between muscles, but this only exacerbates the issue with more wrinkles and vibrations. How can I resolve this? Currently, I'm using sliding constraints between muscles and bones, but when applied to the tissue mesh, it lacks detail regardless of mesh tightness. In contrast, Ziva muscles display all details effortlessly without any adjustments to tissue settings. How can I replicate this fluid motion in Houdini's muscles? Ziva_Muscles.mp4 Houdini_Muscles_1.mp4
-
Hello! I'm following this tutorial: and have been getting similar results up until around 22:10, when my simulation behaves entirely differently. My worm just goes flying. I've messed around with the values in the set_force attribute wrangle inside the sop solver, but can't seem to get anything like what he is. Obviously it's working to some extent, because a force is being created. I'm pretty sure I did everything the same as him... can anybody help me out? Here's my file:Larva2.hipnc
-
Hi guys, I hope you can help me with setting up this vellum inflation scene... Basically, I have animated a sphere expanding and used the rest blend node inside the vellum solver to inflate the sphere. What I would like to achieve is an interaction where the vellum inflation sim interacts with a rigid body 'plinth' that it is initially sitting on rather than it just being a static collider object. I have tried using the vellum shape match constraint for this behaviour but have found it tends to deform the shape which is not ideal. Preferably, I would like to know if it is possible to use RBD dynamics inside of a DOP network and have that interact with the inflating vellum sim... The entire sim would also sit inside of a static container too as the plan is to squash the vellum soft body against the walls of the container. Any help on this would be really appreciated. Thanks! Vellum_Rigid_Body_Interaction.hiplc
-
Houdini FFX Collection Get it here: Gumroad: https://davidtorno.gumroad.com/l/ffxcollection FFX Collection is a collection of scene builds and techniques for the intermediate users of Houdini. Those looking for quick setups, wanting to get more familiar with VEX use cases, and wanting to get started in Karma and Material X. This collection of “presets” as it were showcases a variety of topics within Houdini. Builds include FLIP, RBD, Vellum, POP, Pyro Solver, SOPs, LOPs, TOPs, Karma, and Material X. All renders use 100% fully procedurally generated textures created with Material X noises. The only exceptions are the test geometry textures which are directly read from their HDA embeded jpg textures. The HDA is a simple drop down list of all fifty builds, of which you choose the one you want and click “Build It” to have the tool generate the entire build for you. By default there is Network box organization to help understand the flow and processes that are occuring. Additionally there are annotated tips, and helpful explainer sticky notes to help inform an techniques used. These annotations are also optional and can be turned off before building the network. For those wanting to dive straight into everything there is to offer, there is a “Build All” button to create all 50 builds. This option will have each build turned off by default, so as to not overload your machine with too many items trying to cook. All builds involve various techniques and useful information. Each “category” is defined by the primary method used for the solution used. Be that by SOP nodes directly, VEX code, VOPs network, or even by simulation type like Vellum, Flip, RBD, or Pyro. Vellum does have a few builds under the VEX category as well. Builds include: FLIP Attraction To Curve Shape FLIP Fill Solid Object FLIP Melt Object FLIP Object Surface Advoidance ForEach Incriment Point Count Per Curve ForEach Poly Reduce Pieces By Volume Attrib ForEach Stacking Random Cubes PyroSolver Geometry Ripples PyroSolver Pyro Color Change Over Time PyroSolver Pyro Color From Texture RBD Activate Pieces RBD Apply Proxy Sim To HiRes Source RBD Attraction To Curve Shape RBD SOP Emit Every X Frames RBD V W Constrained Axis SOPs 8Bit SOPs Cull Random Curve Segments SOPs Dissolve Curve SOPs Dissolve Geo SOPs Echo Curve SOPs Post Shrink RBD Pieces Over Time SOPs Stone Path Vellum Animate Restscale Via Attrib Vellum Basic Fluid Cloth Two Way Coupling Vellum Cloth Flows Along Curve Vellum Define Cloth Ripping Vellum Flag In Wind Vellum Inject Geo Over Time Vellum Paper Whirlwind Vellum Spheres Expanding In Box VEX Blend Mask VEX Cull Back Faces VEX Custom Guides For Vellum Hairs VEX Falloff Radius Around Curve VEX Geo Look At Target VEX Geometry Ripples VEX Guided Infection VEX Per Poly Transform Via Particle Proximity VEX Per Prim Rotation Around Edge VEX Repeat Ramp Values VEX Ring Waves With Falloff VEX Rotating Grid Tiles VEX Sin Cos VEX Sliding Points Along Curve VEX Vellum Dangling Cables VEX Vellum Sim Forces From SOPs VEX Vellum Source Emission Instancing VEX Voronoi Fracture Animated VOP Blend Mask VOP Orientation Along Curve
-
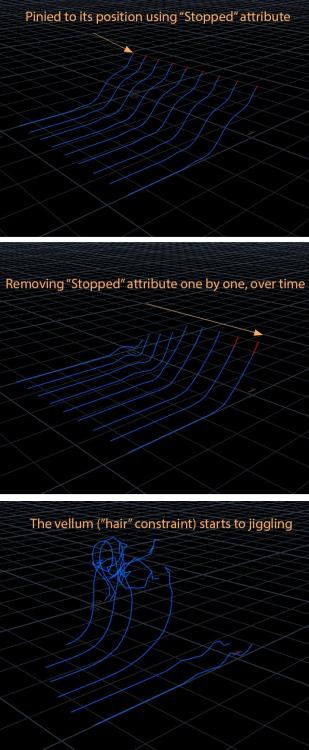
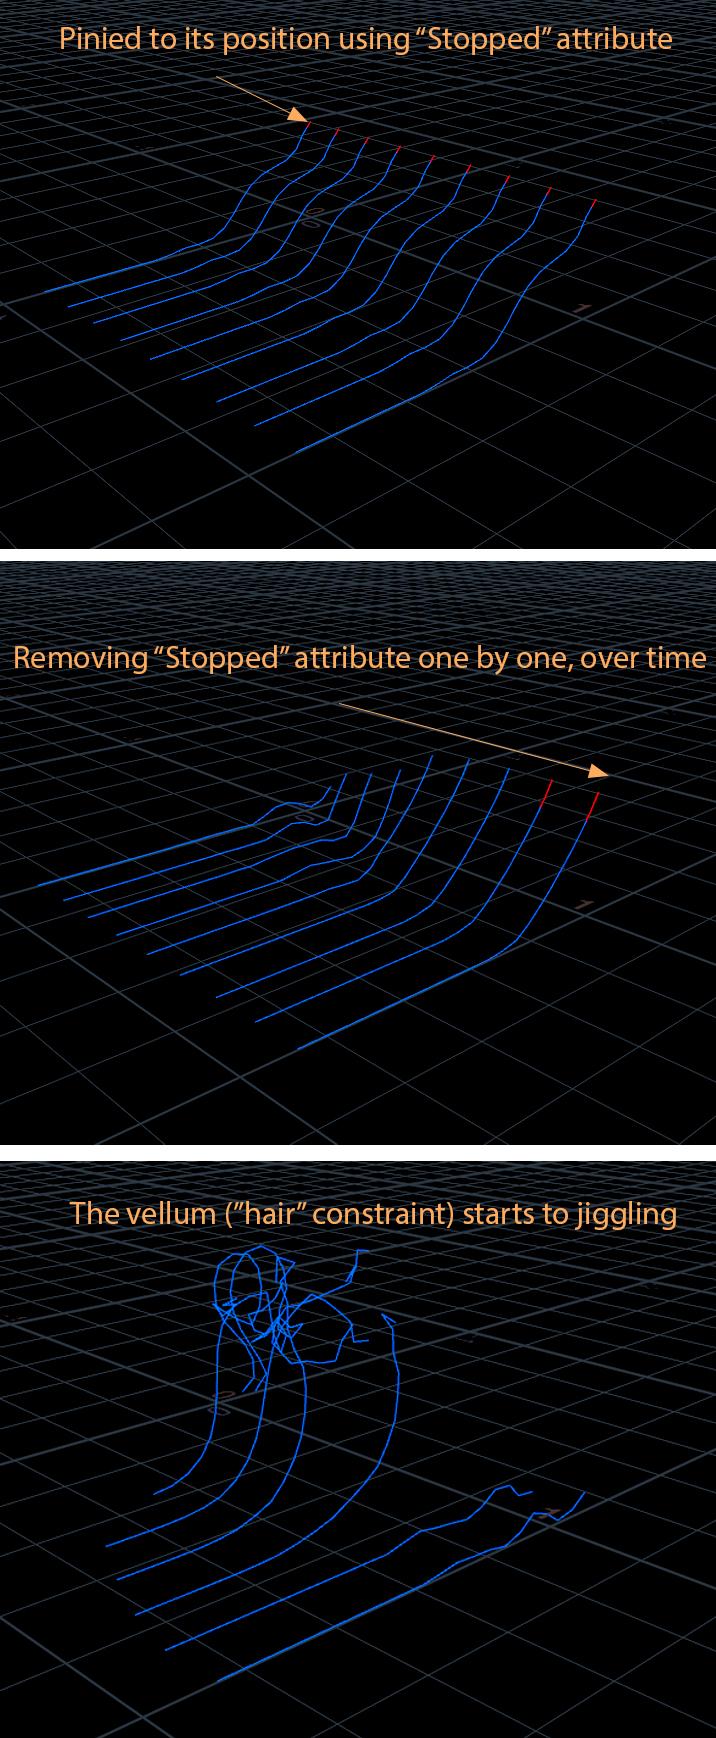
Hi guys In a vellum simulation, I want to un-pin objects over time, using an attribute (I set "stopped=1" on selected points). So I tried to transfer the "stopped=0" attribute, using an "SOP Solver", inside the DOPs. Everything is okay, but in the future, I need more sub-steps, and by increasing the sub-step (to 2 or more), the vellum objects start to jiggle. How can I fix it? Thanks for helping Vellum_Hairs_01.hip
-
Hi guys! I have a super simple question (I hope at least). I am using two different geometries and merging them together as cloth to dopnet. Inside the dopnet, I want to define different behavior (sturuts stiffness) for each geometry. It, unfortunately, doesn't respond, though. I just created very simple testing scene, so u can check properly what I am trying to achieve here. Can anyone help me with that issue, please? Thanks a lot, guys. dopnet_issue.hipnc
-
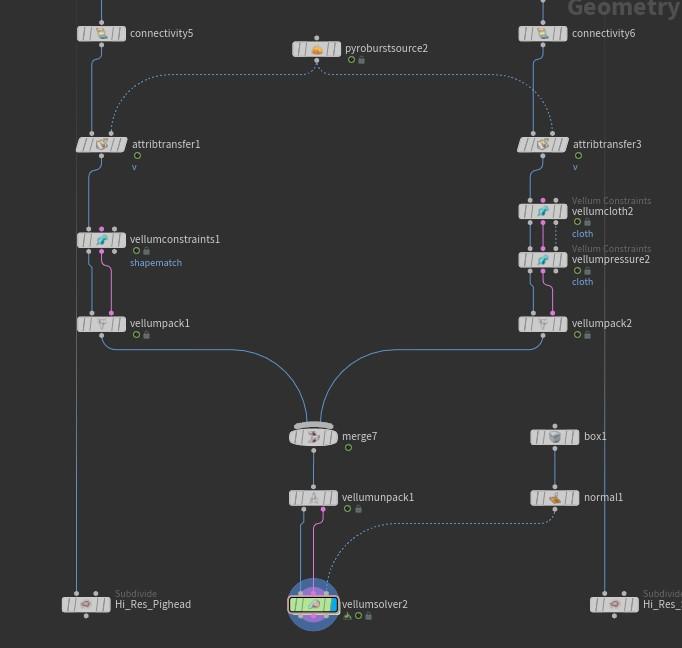
 Hi everyone! I've been playing with vellum and mange to run a simulation with 2 objects of different states, where the pig head is a hard solid object using vellum shape match and a squab which is a softer object using the vellum configure balloon. I simulated both low res geos using vellum pack/unpack through a single vellum solver. I know I would need to use extract transform on the low res pig head since it is suppose to emulate a hard/solid object. Whereas I would need to use point deform for the squab to transfer the vellum sim deformations from the low res geo to the high res squab geo. The part I'm trying to figure out is, how can I replace the high res pig head and squab back to their respective low res counterparts? Where should I be using the name attribute in my sim and how do I reference it back at the end? I've attached a hip file for reference. Low res to hi res Vellum Sim.hip Thanks in advance and am grateful for any help with this. Notes: I've noticed that the orient attribute is zeroed out in the vellum sim. I'm using MOPS replicate to create the instances of the pig head and squab.
-
Hi everyone! Houdini noob here. Hopefully i can get some help hehe i know this is the forum of Houdini pros. Thank you so much in advance for any help/guidance you can give. I'm trying to make some vellum cloth floating, but i want to do an animation where it just loops floating. This is what i tried. It's practically working fine BUT after i use Labs make loop some parts of the geometry starts intercepting it self, i guess it kind of makes sense, but i was wondering if there's any way to prevent this from happening or there's is different way of achieving this that doesn't produce that problem? Thank you so much!! fingers crossed hehe there's a hip attached in case it's helpful Cloth Test3.hiplc
-
 hey there. i have this kinefx animation and want to simulate some vellum cloth between the moving bars. so far so good but the bars are rotated on the first frame and i am not able to glue the cloth pieces and the bars together. when the bars stick out straight on the first frame its no problem but i can´t solve it when they are rotated the way they are. tried solving it with a bone deform and some vellum pre sim stuff/ vellum drape but with no success. maybe some one has a moment to take a look into the hip file. thanks in advance! Mobile.hiplc
.thumb.png.a98fc354104f75b415acaf80cb18ba6d.png)
-
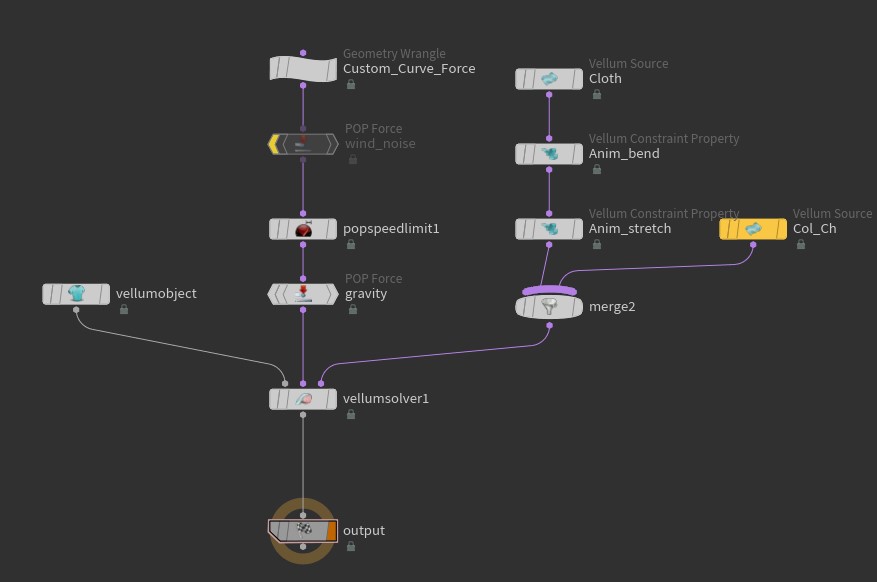
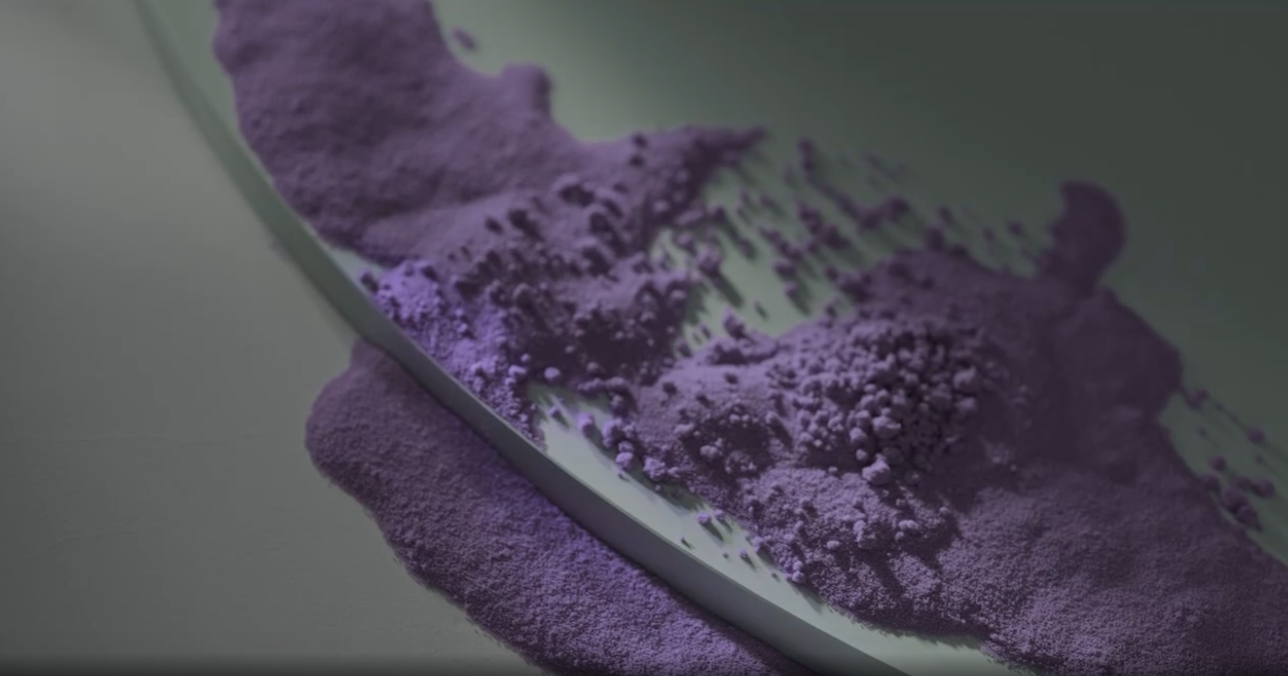
My popular Custom Velocity Forces class just got UPGRADED! Previous students enrolled should already see the updates now. For new students you can enroll here: Learn more Thanks for the all the support everyone! Updated promo video for the class:
-
- 1
-

-
- positional vector
- directional vector
- (and 15 more)
-
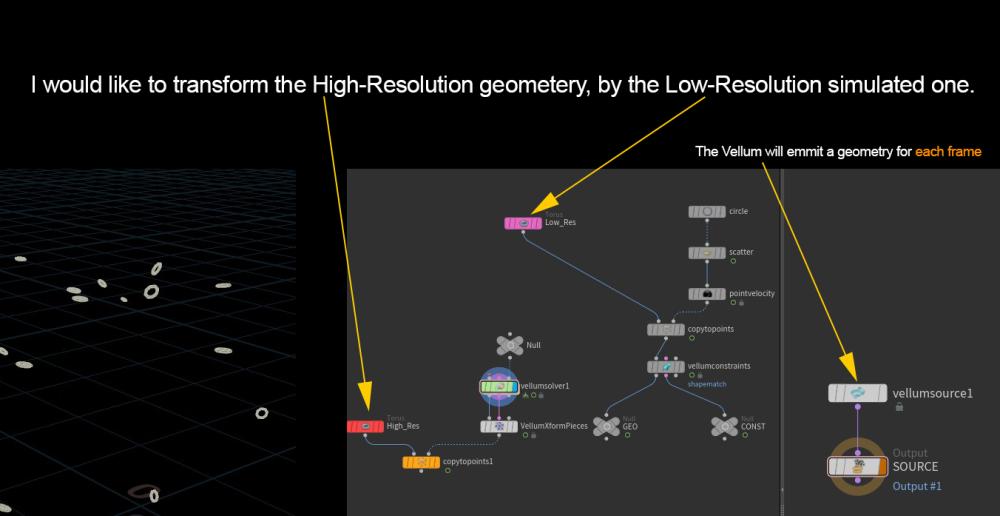
Hi guys, In a Vellum simulation, I would like to transform my High-Res geometries, by extracting the transform (centroid) from the Low-Res ones, so I tried to use the "Vellum Tranform Pieces" but it doesen't works properly. The thing is, its a continues (for each frame) emitting simulation. How can I fix it? Thanks for helping. Vellum_Low_to_High-Res.hip
-
Please let me know when I use lab file cache nodes for vellum simulation, why my vertex counts change? Also, How can I use vellum i/o cache in tops so that it automatically caches all my vellum caches?
-
 Hi guys, Vellum solver has some visualization modes. How can I create an attribute based on one of them, for say “Stretch Distance” ? Thanks for helping Vellum visualization.hip
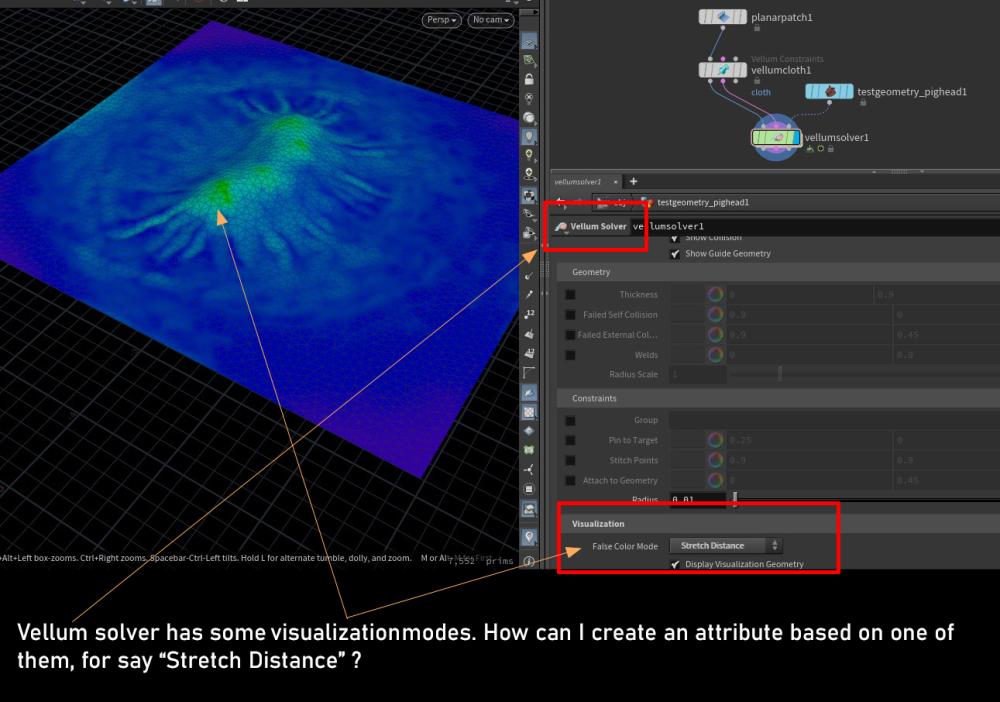
-
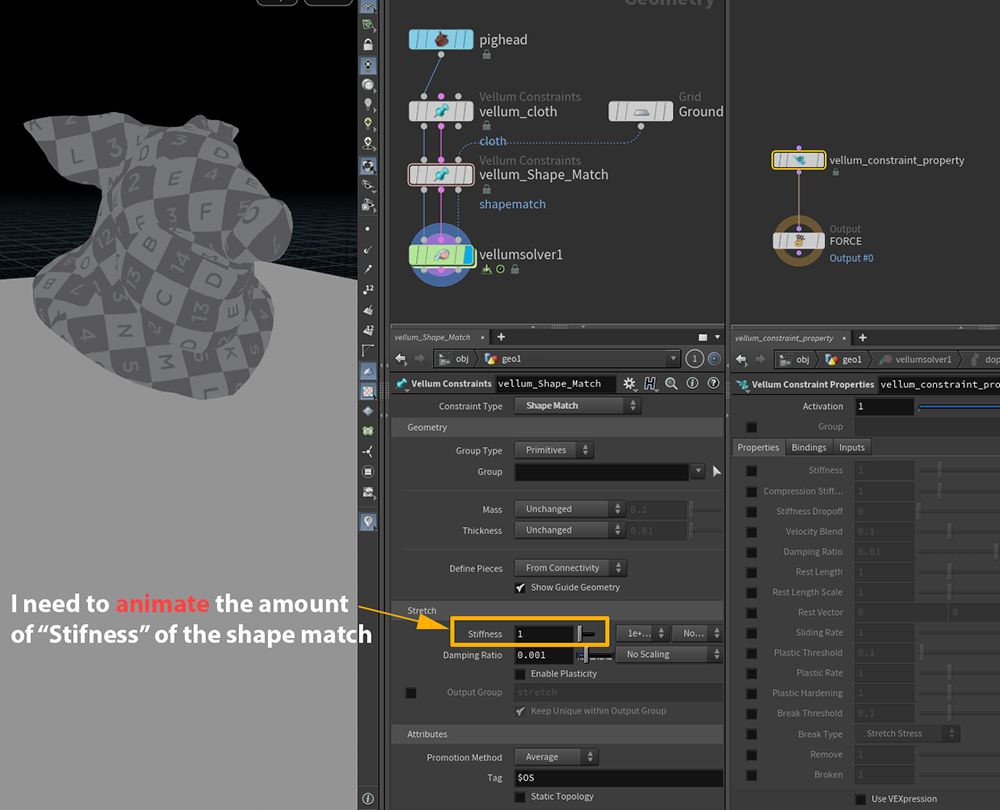
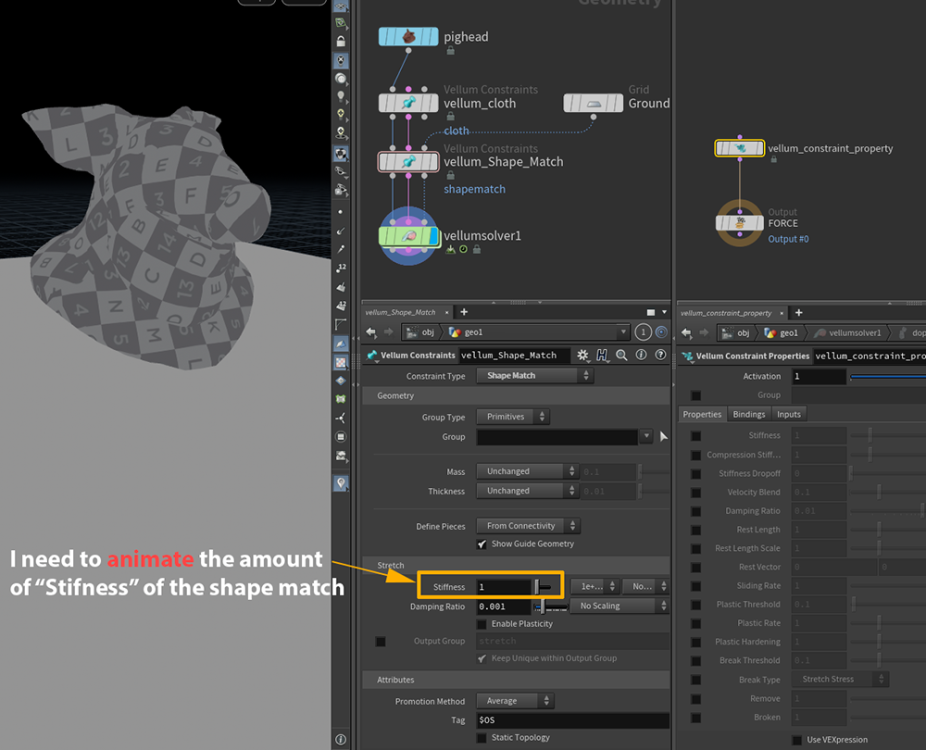
Hi guys, I need to animate the amount of the "shape match" constraint property. I know that it must be done inside the solver's dynamic network, using the Vellum Constraint Properties, but I don't know how Thanks for helping. Vellum_ShapeMatch.hip
-
 If I connect a shape match vellum object to a cloth (I use glue constraints), it loses its rigid nature and starts deforming, there's any way to prevent this? Untitled.mp4
 -
Hi everyone, Do you have any idea why is this weird jump happening in this super simple example? I mix the position in the dopnet, and the jump is happening when I animate the timescale. The particles somehow got pushed back. vellum_jump.hiplc

-
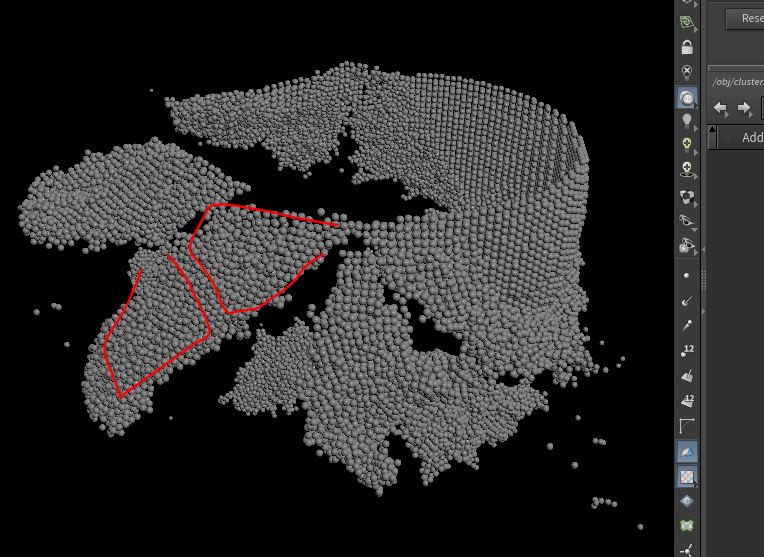
Hey guys, I hope you are well, could you help me with something? I'm trying to create a fracture of an object with vellum grains, I'm using clusters to create the pieces that I want to break and a mask with mops to trigger the simulation, but I would like to increase the amount of cluster over the simulation time, is it possible with cluster attribute? for example, I would like it to break into large parts first, a few frames ahead, break smaller parts, and then smaller ones, and so on until it turns to dust Thanks a lot if anyone can give me some tips. I added a hipfile here thank you! clusters_v1.hiplc
-
Hey magicians, I'm trying to achieve a similar vellum sim like this, haven't installed H17 yet since I use Marvelous for cloth but this one will be hard on MD, any thoughts on how to approach this with vellum? Here's the reference: Thanks!
-
Embroidery running normal to curved surface?
hellbydante posted a topic in General Houdini Questions
Hi everyone, I was following a tutorial for an embroidery animation and I was trying to see how it could be adapted to run normal to a curved surface instead. I was able to get away with using point deform to manipulate the animation on a wavy surface. I am unsure how to multiply the normal inside the point VOP to get the spline animating normal to the curved surface (shown below). Not sure if adding normals using the point SOP before the ray SOP helps. I've attached the .hip file for reference. Would be immensely grateful for any help or guidance. Thanks! Embroidery.hiplc

-
Would vellum be the best way to approach a ball of jelly smashing through another, larger ball of jelly, and coming out the other side? With some pieces of each jelly ball stretching for a bit where connected as the smaller balls exits and flies away. or flip sim? Thanks.
-
Hello. This is a question for Paul's best tutorial series. I would like to set up a Vellum and Falloff mechanism extracted from a GIF, but I have tried and tried without success and wonder how to accomplish this. I will upload a file in the process of using MOPS in case you are interested. Thank you in advance. vellumfalloff_failed.hiplc
-

Copying geometry to vellum string (making rope)
nomojosh posted a topic in General Houdini Questions
Hi, I'm trying to sim lots of rope on a ship and although I can simply use polywire, I'd like to try and keep the original model's rope geometry. Is there a way to use path deform or point deform to achieve this result? I've had some success with point deform, but I think it was more luck and not really a robust workflow. I've attached a simple scene of some vellum string in a breeze and an alembic file of some rope. As you can see the rope is horribly distorted. Any help or ideas would be greatly appreciated! Thanks Rope.zip -
https://youtu.be/QR3CjAw_1PI This is the reference. preview.mov I'm creating a Vellum simulation. The scarf is released from the neck and flies to cover the camera. I'm using Custom force setup from another particle aura fx. It use Curve direction force and Curve suction force. But the suction force makes scarf gather and twist in the midde of curve. Before I noticed it, I worked with the following intentions. I keyframed the Stretch Rest Length to make the scarf spread wide enough to cover the entire camera, And i also keyframed Bend Stiffness to get rid of the scarf twisting. Stretch Rest Length makes scarf wider, but there is no spreading force, so there is no dramatic change. And Bend Stiffess doesn't improve the twist Rather, It makes short wrinkles in the longitudinal direction and long wrinkles in the narrow direction. and this is weird. I think the fundamental problem is Curve suction force. But without Curve suction force, you can't make it fly in the right direction of the curve. How can I make the scarf to be wide and not twisted? Vellum_Scraf_v04.hip preview.mov


.png.cbca1f7c8081ff652533be919b8947ad.png)