

Morbid
-
Posts
25 -
Joined
-
Last visited
-
Days Won
1
Recent Profile Visitors
2,890 profile views


Morbid's Achievements
")
Newbie (1/14)
2
Reputation
-
Very nice dude, impressive! I also used Florian Witzel's video as inspiration.
-
I did this with the Look At VEX node which results in a 3x3 rotation matrix. Then I compute the distance between a point and the curve points which then determine the strength of the rotation, resulting in the progress of the wave. I hope I explained it clear enough. And sorry for the late reaction.
-
Ocean Wave Tool: Ocean Interaction Tool: Used in my graduation project found here: Cheers, Maykel
-
Very nice Kim! The system of painting the damage is impressive.
-
That method should work, but I especially wanted it to do with dynamic fracturing instead of pre-fracturing! If I don't get it to work correctly soon than I will use your method for sure, thnx.
-
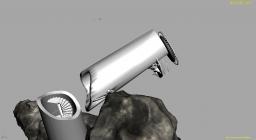
Hi everybody, I working on a project were I have to collapse a lighthouse. I'm am trying to combine dynamic fracturing with a glued object but I cannot get it to work. I now have the main tower, upper part (an rbd object) with several objects glued to it. Once the tower hits the rock (see screenshot) all other objects fall of, but I want them still to stick to the tower. I tried a very high glue setting and also -1 which should cause them to never break but this doesn't work. If I pre-fracture and turn the main tower upper part into an glue object the dynamic voronoi fracture doesn't seem to work anymore. Any suggestions are welcome. Maykel
-
Ok but how would I get accurate foam emission if I use displacement shaders? Is it possible to get the height and curvature information out of a deformation shader to use in a pop network?
-
Works perfect! Thnx.
-
Hello everyone, I'm working on my graduation project which includes a few shots with a large scale ocean. At the moment I'm getting familiar with HOT, creating foam particles, etc. I'm doing this on small grids to test, but it already takes a lot of time to cook. I'm afraid how this is going to be on a large scale ocean which I need at the end. With large scale I mean that you can see the horizon. Can someone give any advice on how to approach this? I don't have access to a render farm so it has to be done on one pc. I'm using the non-commercial version. Cheers, Maykel
-
I Followed the Autorig tutorial... and now I'm confused.
Morbid replied to amazingjay's topic in Animation & Rigging
Yes, that's right. I would give the hip file with the 2 nodes and the mesh file. Make the geometry path relative. -
I Followed the Autorig tutorial... and now I'm confused.
Morbid replied to amazingjay's topic in Animation & Rigging
You should end up with 3 nodes, not with 4. If you defined a mesh in the biped auto rig then the deform_rig should contain the mesh that is going to be deformed by the bones. The deform_rig node contains the skin geo node which has the CaptureLayerPaint node to paint the weights. -
Thnx. Overlooked that parameter. It works now.
-
Not working for me. Thnx, I forgot the timeshift. Tried it now with timeshift but still there are points jumping. I've added the file so you can take a look. Play frame 100 to 150, there it is most obvious. jumping_scatter.rar
-
Hi everybody, I have a skinned character and I'm scattering some points onto a certain area of the character. When I play the animation of the character some points jump to a different place on the area. I'm using the points for hairs. - I tried scattering before the deformation of the character - I tried using a lattice to deform the points with the character - I tried using the area attribute in the scatter sop All methods got me the same result but still points are jumping. Even if I use the Fur sop there are hairs jumping. Any idea on how to solve the jumping points issue? Thanks
-
For a project I need a few subtle animations, so I do not need a complex rig. I decided to use the biped autorig feature in houdini. So far so good, I'm weight painting the character now and I bumped into a problem, I have misplaced the shoulder joint a little. Back in the autorig setup I modified the placement of the shoulder joint, then modified the existing rig with the autorig setup tool. Now that I have done that all the rig controls (move, rotate) are disabled. My animation and weight painting information is still there but I cannot make any new animation or modify the existing animation because everything is disabled. How can I enable the rig controls again?

