Popular Post Kardonn Posted September 24, 2015 Popular Post Share Posted September 24, 2015 Hey all, I don't see a ton of animated character type work being done in Houdini/Mantra, so figured it would be fun to post this. Still a ways to go here, super WIP. Upgrade character poses and lighting (eye glint in wrong spot, etc), upgrade the ENTIRE environment (especially the FG which I slapped together in 30 mins last night). Going to get detailed and cute with it, scattering in little flowers, curly grass, button mushrooms, etc. Main goal is for the materials, lighting, rendering, and compositing to be as physically accurate as possible, opening the door to a very 'filmic' grading process. Cheers! 12 Quote Link to comment Share on other sites More sharing options...
goldleaf Posted September 25, 2015 Share Posted September 25, 2015 Very nice! Is it "only" lit and rendered with Houdini/Mantra, or what other parts of the project use Houdini? Nice! Quote Link to comment Share on other sites More sharing options...
Kardonn Posted September 25, 2015 Author Share Posted September 25, 2015 Yeah, the characters and models are made in Maya or any package of choice really, and rigged + animated in Maya. Then Houdini is the backbone for combining it all together. Creating all the fur/hair, creating the vegetation layouts, shading, lighting. Basically using Houdini for everything it really can be. Quote Link to comment Share on other sites More sharing options...
abvfx Posted September 25, 2015 Share Posted September 25, 2015 Great look/feel. I would be interested to hear about your lighting setup. What is your preferred method of scattering with SSS? Single/Multi? Do you have an attenuation map etc? This past week i have been doing a lot of tweaking in that area and interested to know others experiences with it. Are you going with geo fur or actual fur? (I cant really tell in the shot), Looking forward to seeing more. Quote Link to comment Share on other sites More sharing options...
old school Posted September 25, 2015 Share Posted September 25, 2015 Loving the look. Nice lighting/exposure levels. Nice bright and playful. I really like it. Eyes: In every character pipeline I've seen the eyes are excluded from most if not all lights direct reflection in the scene and then have their own parented light to place the spec where you want it. Use area lights these days. Options for grid, disk. Have an image mask to add custom shaping of the light reflection. Eyes generally lie outside of the normal lighting pipeline just to get that control. Eye light rig HDA parented to the head is quite normal to see. It's a bit tricky to get the parenting right. You want to inherit P but R, you may just want rx and rz. Have to try the various options. Quote Link to comment Share on other sites More sharing options...
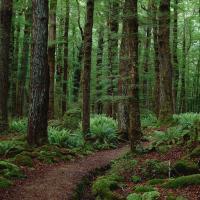
Kardonn Posted September 25, 2015 Author Share Posted September 25, 2015 (edited) @abfx Lighting set up is pretty simple actually since my main goal (for outdoor stuff anyway) is just physical accuracy. Envlight with HDR for the sky, Hlight (sun mode with 0.5 shadow angle) for the sun. On the ground in the HDR capture, there's usually a shadow from the camera's mount and operator, so then what I can do is get in there and start to measure the data in the sunlight, and in the shadows facing away from the sun to avoid 'reflection pollution' much as possible in the samples. Then it's a whole process involving making a Grid and a Sphere to cast shadows onto it, making a shader for them and lining it up with the shadows on the HDR image. Once the area on the Grid in the Sphere's shadow is a near perfect color and intensity match to the photographer's shadow in the HDR, you can then begin to solve for the sun. I line up an Hlight sun with the clippy and bad sun in 99.999% of HDR captures, and then dial in its intensity and tint until the sunlight portions of the Grid match the sunlit portions next to the photographer's shadow in the HDR. Once that's done, I have a Sphere and a Grid with a material that perfectly matches the ground in the plate in shadowed sections, and I have a sun that then makes that material perfectly match the ground in the plate in the sunlit sections. It sounds really confusing to write out like this, but it's a nice little technique that's maybe worth a quick video demo some day. Short of perfectly scientifically captured HDRIs with ND3 filters and all sorts of color solves for the filter tints etc., it's the best I can do to have a near perfect sun/sky model. -- For SSS I tend to roll with only the Multi Scatter enabled when dealing with skin. I prefer its softer look, feels more 'right' to my eyes. The peach fuzz helps a ton to soften the skin and integrate it all together too. Here's a quick test I did a little while back using that Infinite head scan model: https://i.imgur.com/aTY4eLP.jpg -- The fur is just being done with curves in the same way that the Houdini Fur OTL works. I branched off theirs into a new one, but it's the same basic idea under the hood. Ditto with the hair shaders; they all began life as the standard SESI fur shader, and then just been adding to that to get richer strand variation, as well as a 3rd reflection call that's a blend between the "diffuse" and the "reflection". @old school Totally agreed on the eye light rig stuff. I've got some work ahead to get that all into shape...I'm actually even thinking of doing it with envlights linked to the eyes and nothing else. Edited September 25, 2015 by Kardonn 3 Quote Link to comment Share on other sites More sharing options...
abvfx Posted September 26, 2015 Share Posted September 26, 2015 Thanks for the response. As for the SSS. I only used to use the Multi Scatter too. Had lots of xray style problems with single SSS. But recently i have trying to just make it work and understand it better. Single SSS really gives models that "fleshy" feel. I haven't posted any examples of it yet, but i will be sure to do so. Keep up the great work. Quote Link to comment Share on other sites More sharing options...
Diego A Grimaldi Posted October 1, 2015 Share Posted October 1, 2015 Great work and feel Quote Link to comment Share on other sites More sharing options...
Kardonn Posted October 4, 2015 Author Share Posted October 4, 2015 All done and delivered now! Lost some of the photographic feel of it I think...but that's always bound to happen somewhere in between client notes (more saturated, need eye glints, need dad in focus, etc), and the fact that all the layers had to be separated out to hand off for finishing in Photoshop. When it was all layered in Nuke and treated like a proper "VFX shot" a lot of nice blending between elements was happening thanks to various lens corruption techniques I like to use in compositing. Can't do that sadly if standalone layers need to get exported. Also in a perfect world of course I'd go back and do a better eyebrow groom instead of having them be painted on in PS. Overall though very happy with the final: 6 Quote Link to comment Share on other sites More sharing options...
Diego A Grimaldi Posted October 5, 2015 Share Posted October 5, 2015 Turned out quite amazing, maybe a little too much light ray on the left, but then again...you gotta do what the client says Quote Link to comment Share on other sites More sharing options...
Kardonn Posted October 5, 2015 Author Share Posted October 5, 2015 Yeah and I'd love to have the dad a little more out of focus too so that the blur size on the BG makes more sense...just get a more proper blur working over all. Quote Link to comment Share on other sites More sharing options...
Kardonn Posted October 7, 2015 Author Share Posted October 7, 2015 (edited) Here's a look at Peter (the dad) in a shot with his latest shaders, various fur networks, and some simple lighting. The peach fuzz and the clothing fuzz seem a bit long and maybe a bit heavy handed right now...but in motion they read really well and help soften up rim lights really really nicely, so I don't think I should really mess with them too too much. Might opt for shorter and more dense though. The overall softness and tangibility of the surfaces is something that's really important to me, and these fur systems help tie it all together. All lights have their shadow mask set to "* ^*fuzz*" to keep that effect as light on render times as possible. He needs a mask painted for his grey hairs too, get them more along the sides of his head than the top...like me! Also I think I'd like to read the hairs better, it almost seems to turn into a volume in places, and I don't love that. Edited October 7, 2015 by Kardonn Quote Link to comment Share on other sites More sharing options...
Kardonn Posted October 11, 2015 Author Share Posted October 11, 2015 Here's a quick lookdev test for one of the kids: 1 Quote Link to comment Share on other sites More sharing options...
Diego A Grimaldi Posted October 11, 2015 Share Posted October 11, 2015 Great work Quote Link to comment Share on other sites More sharing options...
Kardonn Posted October 16, 2015 Author Share Posted October 16, 2015 One more character! Quote Link to comment Share on other sites More sharing options...
Kardonn Posted October 20, 2015 Author Share Posted October 20, 2015 One more for good measure... 1 Quote Link to comment Share on other sites More sharing options...
Kardonn Posted November 2, 2015 Author Share Posted November 2, 2015 (edited) Here's a shot from the living room set. Still have a lot to sort through for photo mapping though...the Disney based materials in use on this project don't behave properly with the SESI GI_Light, which makes the bounce light wildly inaccurate and really bright compared to what it should be. Right now this is a total hack where I'm deriving the "RAW GI" in Nuke by dividing my GI_Light pass by the diffuse tex inputs, applying a tonemap to curve it into place, then multiplying by the diffuse inputs again. It kinda works, but I'm not thrilled with it. So I'm rebuilding the Disney shader with faked microfacet calculations. From my tests it looks nearly identical to Disney, but it photon maps properly. Lookdev/materials aren't finished yet on this asset, so there's quite a few things with just a solid color applied still. Edited November 2, 2015 by Kardonn Quote Link to comment Share on other sites More sharing options...
anim Posted November 2, 2015 Share Posted November 2, 2015 ...the Disney based materials in use on this project don't behave properly with the SESI GI_Light, which makes the bounce light wildly inaccurate and really bright compared to what it should be. ... Principled Shader in H15 is not very physical and doesn't preserve energy if you are using non-metallic reflection or coat so I wouldn't be surprised if that's the reason for your problems but your images look really beautiful, great work Quote Link to comment Share on other sites More sharing options...
Kardonn Posted November 3, 2015 Author Share Posted November 3, 2015 Principled Shader in H15 is not very physical and doesn't preserve energy if you are using non-metallic reflection or coat so I wouldn't be surprised if that's the reason for your problems but your images look really beautiful, great work Yeah I'm actually still in H14 with this because I've got a kind of 'ubershader' wrapper I'd built up around Wolfwood's Disney BSDF work. It conserves energy properly on the edges, but lately I've been thinking of getting rid of that cause I feel like the Schlick/Smyth darkening ends up feeling too dark on a lot of surfaces. Kind of thinking I like the look of Disney's diffuse, even though it can technically return more than 1 energy if your diffuse albedo is 1.0 (I think you'll get 1.08 on glancing angles in a blast furnace). Since a diffuse albedo of 1.0 is impossible in real life anyway though I think I'm cool with what they've done, it has a great look to it. Very vibrant and soft. Quote Link to comment Share on other sites More sharing options...
Kardonn Posted November 8, 2015 Author Share Posted November 8, 2015 Some nice progress with the pack shot. Need to refine some of the blendshapes so the spoon isn't clipping the margarine, but very happy with the frames so far. 2 Quote Link to comment Share on other sites More sharing options...
Recommended Posts
Join the conversation
You can post now and register later. If you have an account, sign in now to post with your account.
Note: Your post will require moderator approval before it will be visible.