ChristopherC
-
Posts
84 -
Joined
-
Last visited
-
Days Won
2
Recent Profile Visitors
2,919 profile views


ChristopherC's Achievements
")
Newbie (1/14)
16
Reputation
-
Hello! In case you haven't seen, a new HDA was posted on the Think Procedural Discord server to procedurally grow and art direct ivies, it looks pretty cool! Ivy Taming 1.0 for Houdini Documentation
-
Volume sourcing with reoriented simulation container
ChristopherC replied to ChristopherC's topic in Effects
I gave another go at manually building the transformation matrix from the position data and this it worked out, not too sure why it didn't in the first place. See the node '/obj/geo1/dopnet1/source_vorticles' for the fix. reorient-simulation-container.hiplc- 6 replies
-
- 2
-

-
- simulation
- container
- (and 2 more)
-
Volume sourcing with reoriented simulation container
ChristopherC replied to ChristopherC's topic in Effects
I'm having another issue with this scene. I'd like to set-up some vorticles but can't figure out how to make them to play nicely with the position data. In the attached scene, the vorticles are being sourced and are advected over time, as expected, but they have no influence on the smoke simulation. I believe this is because the vorticles are defined in world space while the simulation space has been modified through the Point Position DOP. Alas, when setting the 'Position Data Path' from the 'gasvorticlegeometry1' node to '../Position', things are breaking in the SOP Solver DOP named 'source_vorticles'—the vorticles are sourced properly but the vorticles merged from the previous frames through the DOP Import SOP go all over the place. I tried playing around with parameters like `SOP Output is in Simulation Space', to manually build the transformation matrix from the position data to then apply it in the SOP Solver DOP, and whatnot, but to no avail. Any idea of what needs to be done to get this setup working? reorient-simulation-container.hiplc -
Volume sourcing with reoriented simulation container
ChristopherC replied to ChristopherC's topic in Effects
Cool! It's still hackier than what I hoped for but it's a good alternative! I think I'm going to wrap your approach into a custom Source Volume DOP digital asset, and that'll be it. Thanks! -
Volume sourcing with reoriented simulation container
ChristopherC replied to ChristopherC's topic in Effects
Thanks for the tips! I already know about clustering but my sim really has no need for clustering (it's nothing like a smoke trail with sparse areas), the only unused voxels come from the container not being aligned properly, and so I was imagining that reorienting a container was a standard practice? A proper alignment would even help the Gas Resize Fluid Dynamic DOP to possibly grow in 1 dimension instead of most likely 2 or 3 dimensions otherwise. ... aaand, as a bonus, the volume slices become much more helpful when aligned to the natural flow of the smoke! -
Hi everyone! Let's say that I have some smoke shooting in one direction. I would like to have the orientation of the simulation container aligned to that direction to try reducing the number of unused voxels. To do that, I'm using a Point Position DOP and all is fine until I try to source my volumes. In the SOP context, the velocity definitely goes into the direction that I want but, when imported into DOP, it looks like it's being interpretend as being in a space local to the one defined by the Point Position DOP. In other words, it doesn't go anymore in the direction that I'd like to. I fixed that by doing an inverse rotation on the source volumes before they're being imported in DOP but it looks a bit hacky. Is there a better way? See attached scene. Cheers! reorient-simulation-container.hiplc
-
Getting different renders than others
ChristopherC replied to ChristopherC's topic in General Houdini Questions
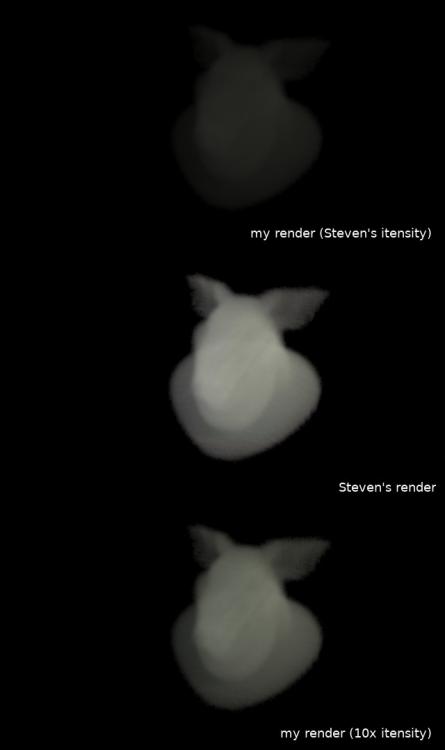
Okay, I think I found what's going on. Steven said in a Vimeo's comment that he's using Houdini 15.5 but in fact his `_HIP_SAVEVERSION` variable is pointing to 14.0 and, starting with Houdini 15.0, lights now default to physically correct attenuation. Disabling the attenuation produces the same renders as in his tutorial. Good to know that my Houdini doesn't misbehave, phew! -
ChristopherC changed their profile photo
-
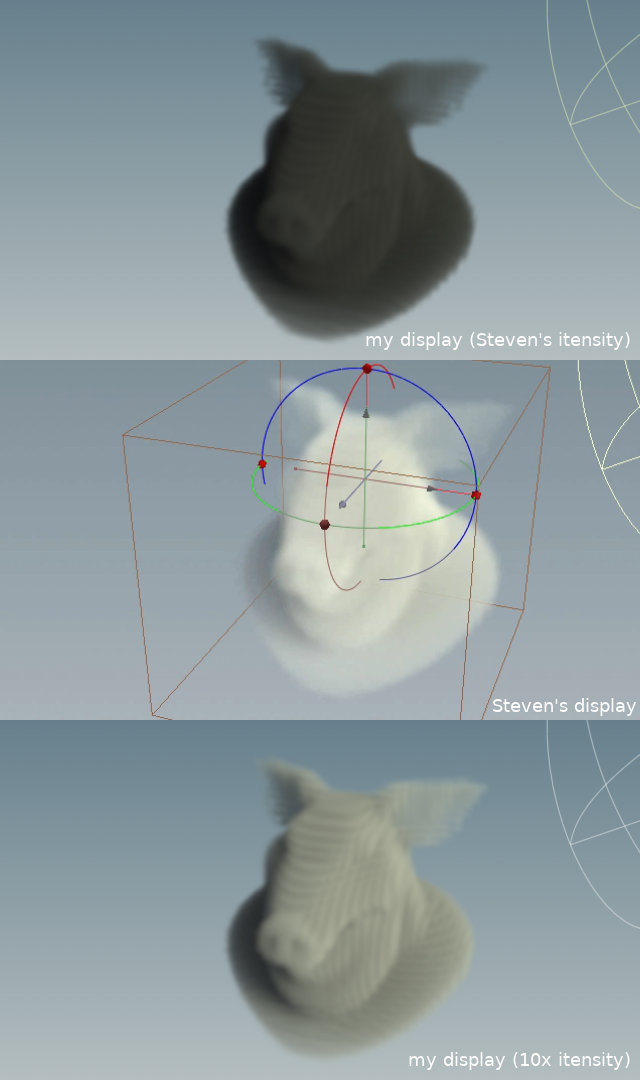
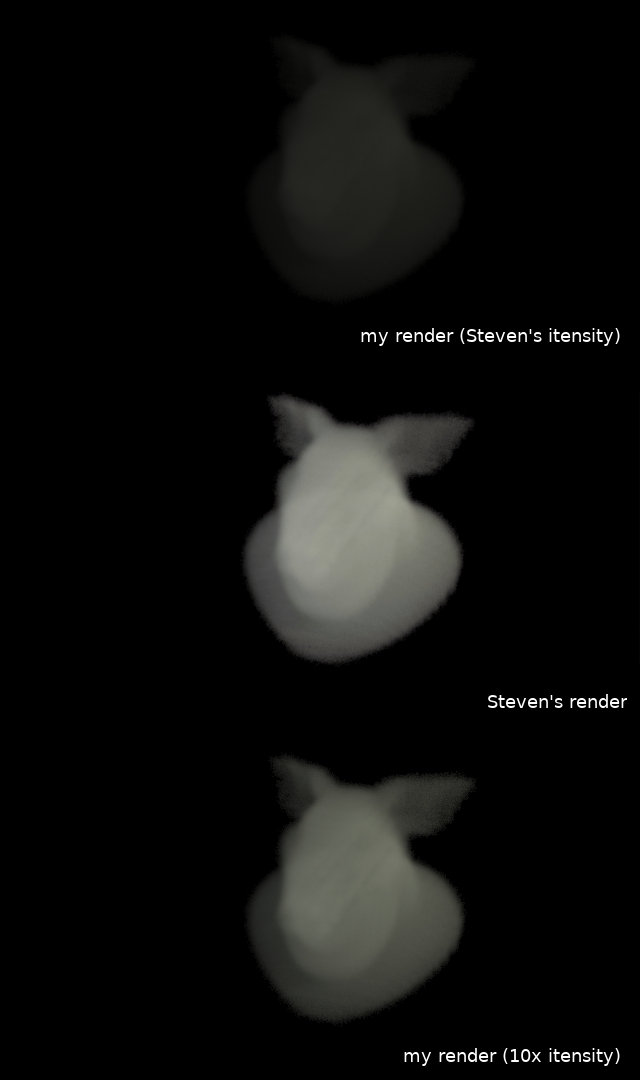
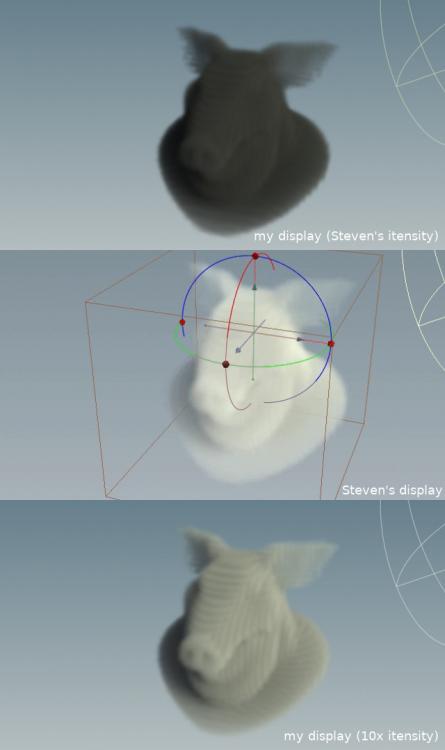
Hey gang! Some display-related things seemed a bit off on my old laptop (MacBook Pro with no dedicated GPU) so I upgraded to a new laptop (Dell XPS 9560, Ubuntu 17.10), installed Houdini 16.5 Indie with vanilla preferences, and decided to check if my results would conform to other people. For that, I picked Steven Knipping's free introductory tutorial to volumes and rendering, and followed the instructions up to the end of the 2nd chapter (at the 15:15 mark). I tried to recreate the exact same scene (including his parameter values) but noticed two differences anyways: - the volume shading in my viewport is much darker—but it could be understandable with different GPUs - the Mantra rendering is also much darker, and that I really do not understand. To get a closer result to Steven's, I need to multiply the intensity of both key and fill lights by 10, as seen below. I thought that maybe something changed in Houdini 16 or 16.5 (he is using 15.5 in his tutorial), so I also installed 15.5 Indie (again with vanilla preferences) but ended up seeing the same results. So the questions are: - what's going on? - what kind of result do you get when displaying/rendering the scene attached? 001.hiplc
-
I think that these accuracies are due to the display becoming a bit jittery when you zoom in too much in the view, and don't represent the actual data. In fact, since the `VoiceSplit` crashes, I did manually create `Constant` nodes to still be able to explain the process, and these nodes have perfectly round values since floating points can exactly represent such small integral values. But if you display one of them and zoom enough in the view, it will also show some inaccuracy.
-
Hello! It's been a while but if I remember correctly I ended up doing it outside of CHOP much more efficiently. As an exercise, I've just had another look at solving the problem in CHOP and found a not so perfect solution that I've attached. For some reasons, if you look at the 'diff' node you will see some small variations (-0.02 to 0.02 range) from the expected result. I don't know where this is coming from though. Maybe a weird interpolation algorithm used by the `Stretch` CHOP node? chop_interpolate.hipnc
-
Holes in geometry after Voronoi Fracture
ChristopherC replied to ChristopherC's topic in General Houdini Questions
For information, I did receive an answer from SESI's support team stating that the input geometry contains non-planar faces, which is not Voronoi-friendly. Applying a Divide SOP as suggested did solve the issue. -
Holes in geometry after Voronoi Fracture
ChristopherC replied to ChristopherC's topic in General Houdini Questions
Thanks for following this up Dimitri! For this effect I'm quite happy with what the shapes that the voronoi is outputting so I think I'll stick with that. As for the resulting holes, the more it goes, the more I also believe that this might be a bug. In doubt, I have submitted a bug report, let's see. Cheers! -
Holes in geometry after Voronoi Fracture
ChristopherC replied to ChristopherC's topic in General Houdini Questions
Grrrmblblbl, I'm pretty sure that I did attach a hip file! Well, that's fixed now, sorry about that and thanks for looking into it! holes_after_voronoi.hipnc -
Hello, I'm trying to get a more interesting fracture look by applying a turbulent noise before the Voronoi Fracture node but I end up having holes in the geometry. Is there anything wrong with this workflow? How can I get it to work? I've been trying to fix this as a post-process step but no luck so far at finding a good logic for it. Cheers!
-
Aaah, I think that I saw these RGB ramps somewhere already. Good to know! Also thanks for sharing this paper! The blackbody shader is quite well described by Sony. It's probably only an illusion but at first glance its basic implementation seems to be easy enough. I'm wondering if this is how Houdini's Pyro Blackbody VEX node (used by the pyro shader) also works? And if so, why does it gives me such a yellowish color in my case? It looks like it's not remapping the colors onto the temperature field, even though I've just done more tests to try to fix this. Weta refers to the blackbody radiation through the paper NFJ02 which looks quite technical but making searches on Google based around the “NFJ02” keyword yields results with some more fire-related papers. Might find some good ones in the lot! What's sure is that I've got a lot of reading for the next time!