riviera
-
Posts
41 -
Joined
-
Last visited
-
Days Won
1
Recent Profile Visitors
5,558 profile views


riviera's Achievements
")
Newbie (1/14)
4
Reputation
-

help qLib Plugin Installation?
riviera replied to Funk_Wagnalls's topic in General Houdini Questions
Hey man -- I think these very same instructions are described in the README file for qLib. Btw, please don't use the version 0.2.5, it's _very_ old -- use the "dev branch" thing. cheers -
seems like delta mush is all the rage these days -- https://vimeo.com/103717638
-
That's a cool idea... Although I was aware of the "reference geometry" input of the Edit SOP, I always felt that there should be something similar, but more general-purpose, in terms of "surface space" editing. So, having this in qLib scratches more than one itch, so to speak. (I couldn't have guessed that it could be done using a simple Edit SOP, though ) What you can find right now in qLib: - there's a gallery item ("Point Wrangle: delta mush utility"), which is a PointWrangle SOP preset, containing the necessary math for converting to/from "surface space" (or whatever you'd like to call it) - gallery items for smoothing/relaxing geometry (a pointcloud- and a topology-based one), and there's a Smooth Points qL SOP that wraps it all up in a single node - a "Displace by Delta qL SOP", implementing delta mush as a single node Having a single-node delta mush is fast (all is packed inside a single VEX block), but we're also planning to have a capture/deform pair implemented (to allow for more in-between trickery), as this is pose-based deformation territory, where many interesting things can happen. --- Yes, the actual math behind delta mush is pretty easy. It is not the math, but the effort it took that matters, though -- the time they took experimenting and (production-) testing, and concluding "hey, this works!" This is what we all got from it, not just the deformer math.
-
Hi -- I got really curious and ran my first very simple tests: https://vimeo.com/95335273 https://vimeo.com/95336414 (vimeo is still processing them but hopefully they'll work ) One probably couldn't get simpler than I did: every random 4th (or 2nd) emitted particle is "air" instead of water (so I'm basically emitting a water/air mixture). Even with this simpleton setup, the results look much nicer. (Fliptank tests also looked promising. I'm planning to do a cgi re-creation of Prometheus' title sequence waterfall scene for some time now, and this technique seems like a must-have for that...)
-
Very nice! Cheers! (Also, the function you use, hou.ui.createDialog() doesn't seem to be documented anywhere in the 13.0 docs, so your code is extra useful...)
-
There is a subtle but important difference. There are probably better L-system experts than me, but hopefully I won't spread misinformation here... First thing to know is that (at least this is what I concluded) for each letter in the generated L-system string, Houdini seems to store the number of iteration when the letter is added to the final string. So Houdini knows when each letter was generated. Now, the difference between g and t is that one refers to this stored iteration value, the other refers to the current iteration value (I don't recall which is which, though). I ran into this when I wanted to build a tree, where for the first few iterations only the trunk was created -- with letters in it that started to grow branches after a given generation count (so instead of growing a tree with shorter branches at the top, I wanted equal-length ones, hopefully I'm making some sense here...). In other words, I wrote a rule to expand the branch letters after the L-system ran for say 10 iterations (that allowed only the trunk to grow.) It could be done using one of the letters (g/t) but not the other. Don't remember which but it takes only 2 tries to find out. L-systems can be mind-bending, and there are some features that not even documented or just hinted in the docs. (I really wouldn't like to spread stupidity, though, so please anyone correct me if I'm wrong. This was quite some time ago.) cheers, imre
-
You're welcome, no big deal. In the meantime I took a look at this OnCreated.py -- here's my take on it, a minimalistic version, just by node type. I found that although on SOP level one is better careful about coloring, it can be quite the opposite on the OBJ level (probably because there's much less node types to choose from). Right now I find very helpful to color objects, lights and cameras differently. (This might change, though ) cheers OnCreated_py.zip
-
I recently tried to do a fuse on a 60mil points point cloud to get rid of duplicates, and after running on one thread for ~15 mins it started to eat up all 64gigs (!) memory of my work machine. So it can be risky with heavy geometry. Perhaps the process could be speeded up by a VEX-pointcloud preprocessing that finds duplicate points and group them. The run the Fuse SOP only on that group.
-
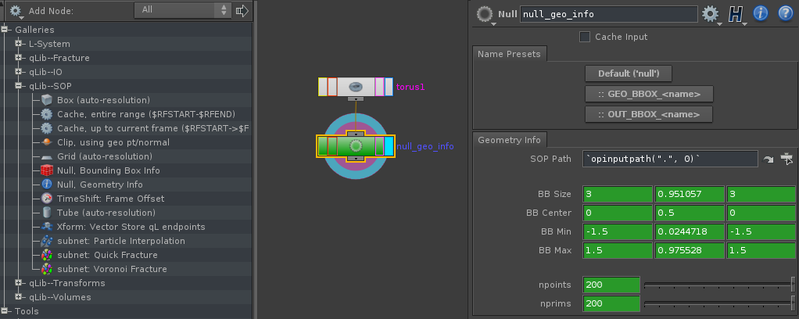
As an opportunity for another shameless plug, qLib comes with galleries that are basically regular Houdini nodes with some similarly customized interfaces. This is a regular Null SOP that provides information about its input geometry (also has auto-naming buttons). You can link those bounding box parameters on the Null to initial boundaries of a pyro sim to have a really fitting initial container, for example. ...or you can just go really nuts and roll an "align geometry" operator from a single Transform SOP: https://www.facebook...598018626898592 Very useful. (Although not strictly color-coding, but at least it's user interface-related )

-
I know I'm going to lose lots of $$$-s, but I'll tell it for free You can add buttons as spare parameters (Edit Parameter Interface...), then use a one-liner callback script (python) like: hou.pwd().setName("DISPLAY"); hou.pwd().setColor(hou.Color((0,.4,1))); hou.pwd().setDisplayFlag(True); [/CODE] or [CODE] hou.pwd().setName("RENDER"); hou.pwd().setColor(hou.Color((.4,.2,.6))); hou.pwd().setRenderFlag(True); [/CODE] or [CODE] hou.pwd().setColor(hou.Color((.8,.8,.8))); hou.pwd().setName("OUT"); hou.pwd().setRenderFlag(True); hou.pwd().setDisplayFlag(True); [/CODE] This is for DISPLAY, RENDER and OUT, accordingly. Once you added all buttons of your liking, you save the parameters as defaults ("Save as Permanent Defaults"). I have quite a few operators where I added some extra interface for convenience (for example my Object Merge SOP has a button which auto-names the SOP based on the name of the geometry that is merged). cheers
-
How to follow particles on motion curve?
riviera replied to Greenfish's topic in General Houdini Questions
https://www.facebook.com/photo.php?fbid=538053919561730 https://www.facebook.com/photo.php?fbid=538567726177016 cheers -
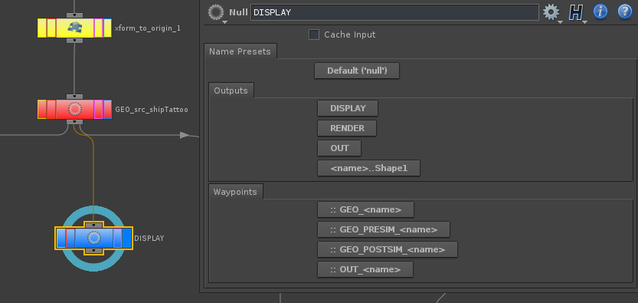
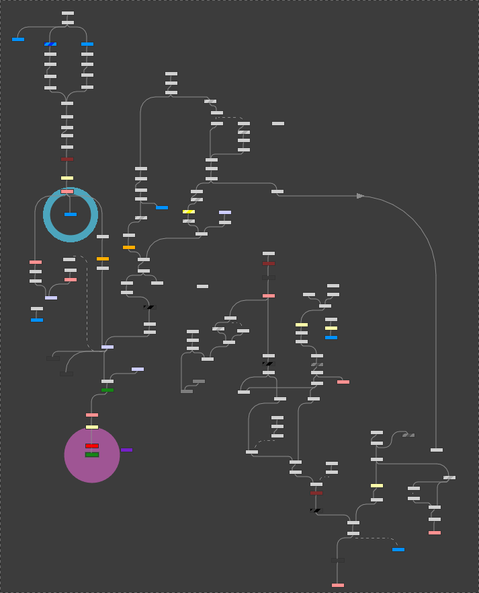
...and now for something not entirely different... This is how my Null SOP's default preset looks like: These buttons are one-liner python scripts which rename and colorize the Null accordingly. So I never type "OUT", I just click. ) I color "display" nodes to blue (same as display flag color); OUTs (render outputs) are purple (same as render flag color), animated ones are yellow, "waypoints" (important network points marking end of a section) are red, and that's about it. ("export points", e.g. where I fetch data from to other networks are green) I'll check out this OnCreated.py script, I didn't know this functionality existed. I wish it was documented... A word of warning: don't go too crazy with colors, or else you end up with networks that drive you crazy because they look like rainbows, and you lose what you thought you'd gain. This is an actual production network (hence a few dead ends ), IMHO this is the amount of coloring that provides relevant information without polluting everything with colored candy )

-
zoom/track viewport without adjusting camera parms
riviera replied to substep's topic in General Houdini Questions
In Maya there are camera parameters (which affect the viewport only) that allows you to pan and zoom on the view if it were a 2d image (and it won't affect your camera render frustrum). The tool you're talking about adjusts these parameters based on the user's mouse inputs in the viewport. The closest you can get to this in Houdini by adjusting the Screen Window X/Y and Size parameters (and reset them before you render, as they do change the camera frustrum AFAIK). But I don't think there's an interactive tool for that so you have to tweak these in the camera parameter panel. Such a tool would be very useful sometimes, though. (Another thing I'd like to have is a "dolly-zoom" camera tool. 3dsmax has it and I wrote one for myself back in my Maya days, but I don't know how to do it in Houdini.) -
Do you accept bug reports from people who buy the source? Some kind of maintenance plan perhaps, even? :DDD (just kidding) Anyhow, sounds like a great thing!
-
I can even provide some explanations on the various aspects of particle retiming if anyone's interested. (Although hopefully everything's explained in the qLib example scene -- look for the "Timeblend qL" one)