All Activity
- Today
-

Even Borders on Triangulated Remesh
EH_Studio replied to EH_Studio's topic in General Houdini Questions
Yes, this yields much better results, plus a couple of nodes I didn't know about. I'll give this workflow a try in my own setup. Thanks so much, Konstantin! I follow you on YouTube and always appreciate the cool tips you give us. You're a treasure to the community! -

Even Borders on Triangulated Remesh
konstantin magnus replied to EH_Studio's topic in General Houdini Questions
Hi Eirik, perhaps this combination of similar nodes helps. even_borders.hip -
 bohne joined the community
 -
 pixflow7 joined the community
 -
 tedatsavages joined the community
 - Yesterday
-
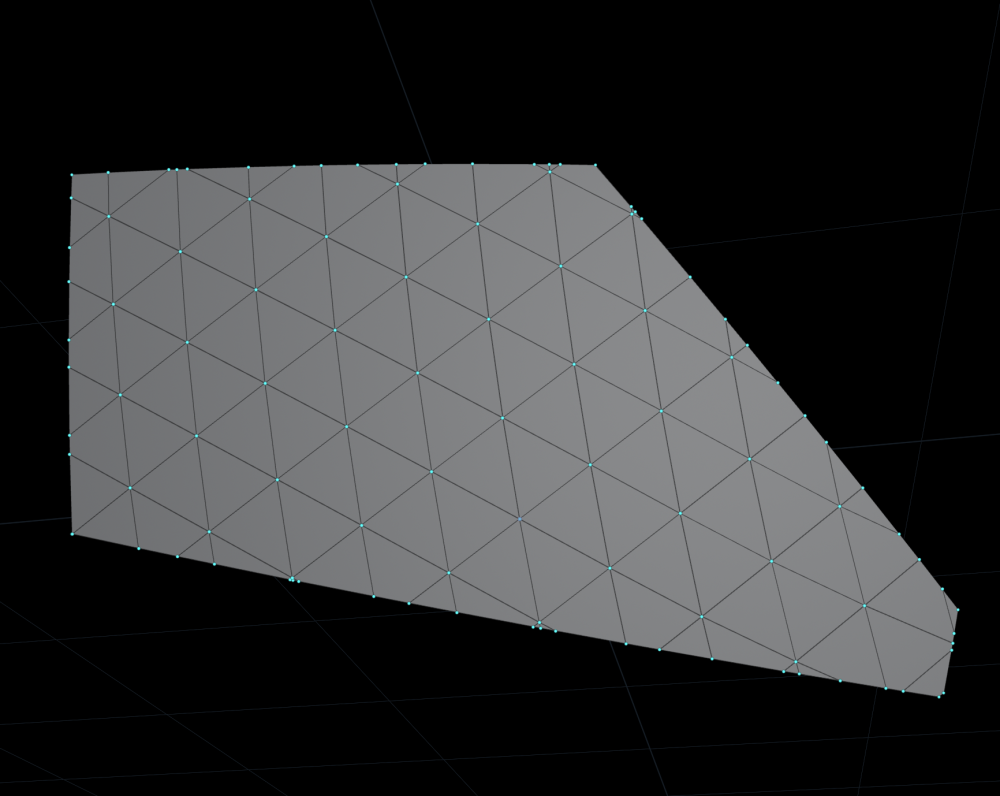
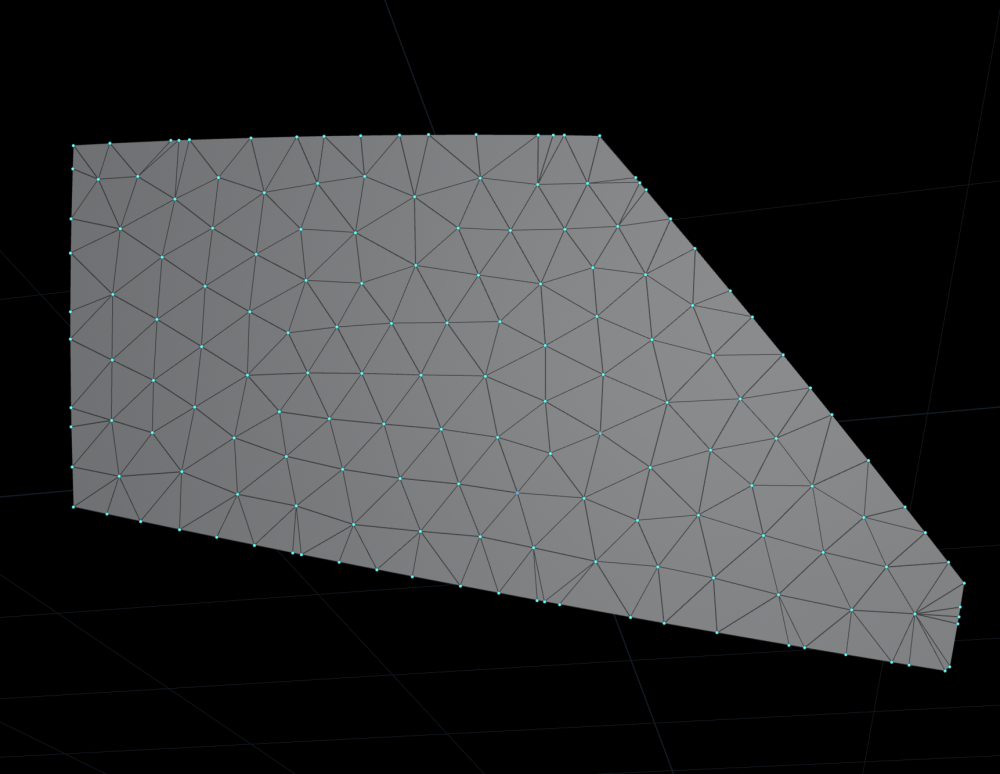
I've tried many different ways, but I still can never get good borders when using the remesh node (needing equilateral triangles for Vellum). Polypath, fusing, resampling, isolating just the border using edge group to curve and redoing the aforementioned...none of this seems to work. Even with a high iteration count, the issue persists. Any tricks to get around this? I just want a more even distribution of points on the border of each patch, with equal-sized triangulation, while preserving the exact border shape. Here's a before and after remeshing comparison...
-

Unable to see primitive icons in the viewport
vsuvarna replied to vsuvarna's topic in General Houdini Questions
Launching houdini in debug mode through the terminal gave me this output: LINK[Beauty line wireframe shader]: error: function `HOUapplyBlendShapes(vec3, vec3, int)' has static recursion. Still not sure what's breaking and how to fix it. - Last week
-
 LeanneTwine changed their profile photo
 -
LeanneTwine joined the community
-
 odin12 joined the community
 -
Problem with that, is you better to know somone who build it.
-
 Miettinen joined the community
 -
 alan5566 joined the community
 -
I have been out of the loop for a long time due to switching careers, but that Gaussian splatting tech looks promising. Considering you can animate them.
-
Hi. I've been having some trouble with houdini (linux). I'm not able to see some primitive icons, such as the camera icon/frustrum, null, smoke object bounding box. Other icons for lights and 3d geometry are visible. I have checked my viewport settings and tried opening houdini in openGL and Vulkan modes and even reinstalled once, but still no success. My last resort might be to do a full uninstall and try reinstalling. Has anyone else faced such an issue? I've searched online to find solutions but couldn't see anyone talking about this issue. Houdini 20.0.547 Fedora 44 KDE wayland Mesa 26.0.8
-
 Rynka joined the community
 -
 sssssbbbbb joined the community
 -
 mitchellsaunders joined the community
 -
 Just a quick follow-up in case anyone else runs into the same need. After looking around a bit more, I found an online tool that handles most of the text formatting tasks I was talking about, such as converting uppercase to lowercase, sentence case, and other quick text transformations: Mayúsculas a Minúsculas Converter I've been using it for small web-related tasks and content preparation, and it saves me from opening an editor or writing a quick script every time. Still curious though. For those working in Houdini or similar workflows, do you prefer external utilities like this for simple text operations, or do you keep everything inside your pipeline with Python/VEX tools?
 -
meh?
- Earlier
-

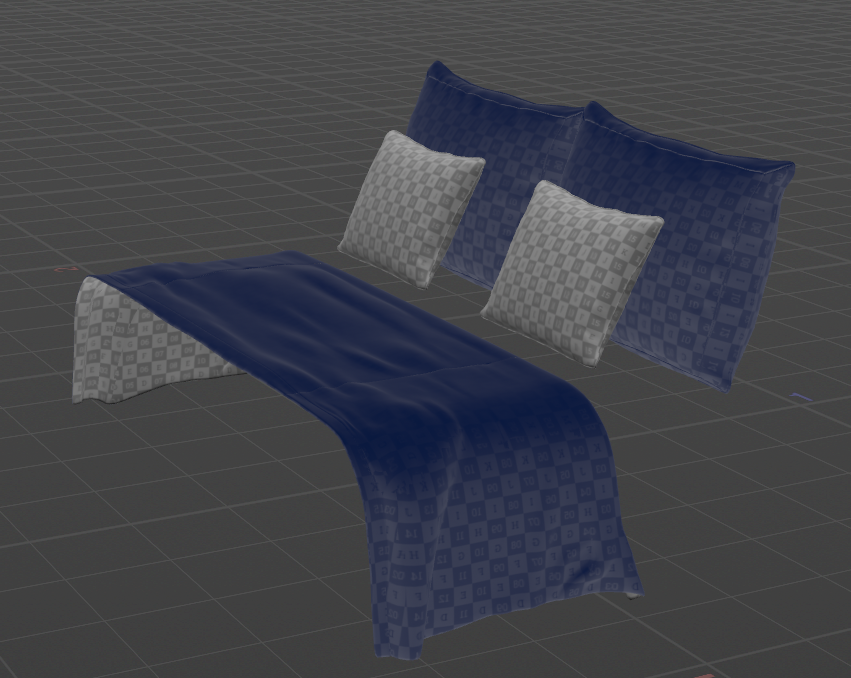
How to flip reverse face orientations per connected piece
Sepu replied to noc2's topic in General Houdini Questions
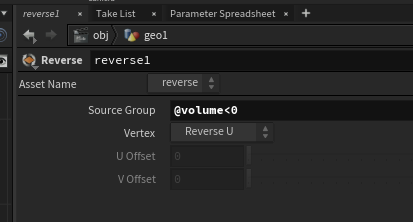
You can also use the measure sop in volume mode and measure by piece and then in the reverse sop you can just say @volume<0 so if there any negative values you reverse them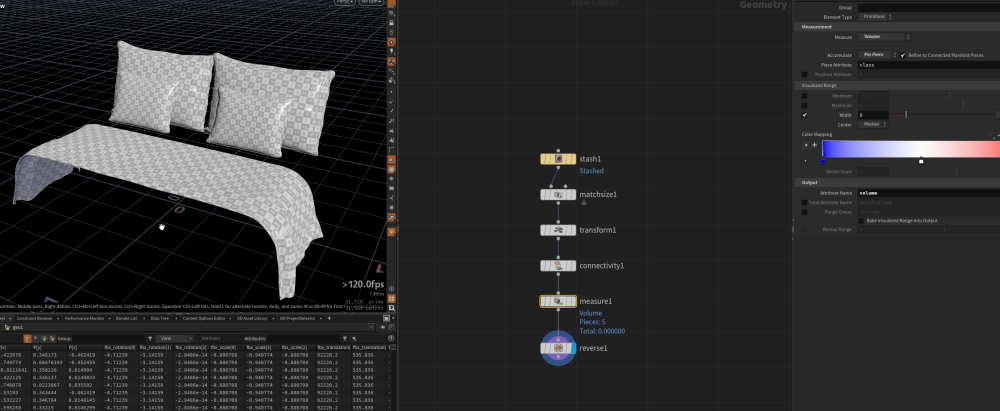
-

How to flip reverse face orientations per connected piece
noc2 replied to noc2's topic in General Houdini Questions
Thank you so much Paul <3 -
Awesome, thanks so much for your help!
-
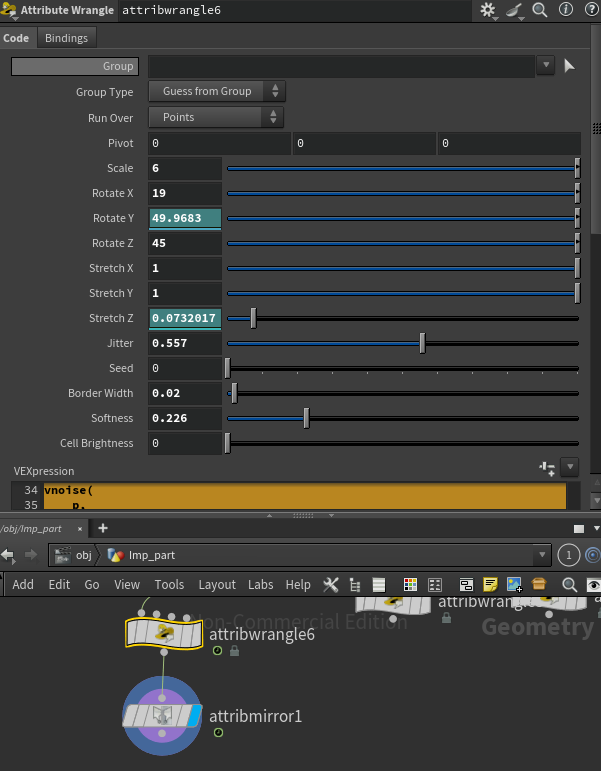
vector p = @P; // Center control, optional p -= chv("pivot"); // Scale the cellular pattern p *= chf("scale"); // Rotation controls in degrees float rx = radians(chf("rotate_x")); float ry = radians(chf("rotate_y")); float rz = radians(chf("rotate_z")); matrix3 m = ident(); rotate(m, rx, {1, 0, 0}); rotate(m, ry, {0, 1, 0}); rotate(m, rz, {0, 0, 1}); // Rotate the cellular noise space p *= m; // Directional stretch makes the rotation visible p.x *= chf("stretch_x"); p.y *= chf("stretch_y"); p.z *= chf("stretch_z"); float f1, f2; vector pos1, pos2; vnoise( p, chf("jitter"), chi("seed"), f1, f2, pos1, pos2 ); // Border calculation float edge = f2 - f1; float border = 1.0 - smooth( chf("border_width"), chf("border_width") + chf("softness"), edge ); // Cell color value float cell = rand(pos1 + chi("seed")); // Final result float result = lerp(cell * chf("cell_brightness"), 1.0, border); @Cd = set(result, result, result); f@cell_border = border; f@cell_value = cell; f@cell_result = result;

-
How to flip reverse face orientations per connected piece
fencer replied to noc2's topic in General Houdini Questions
How about compare only once prim to vertex normal for each piece. flip_reverse_prims_v02.hipnc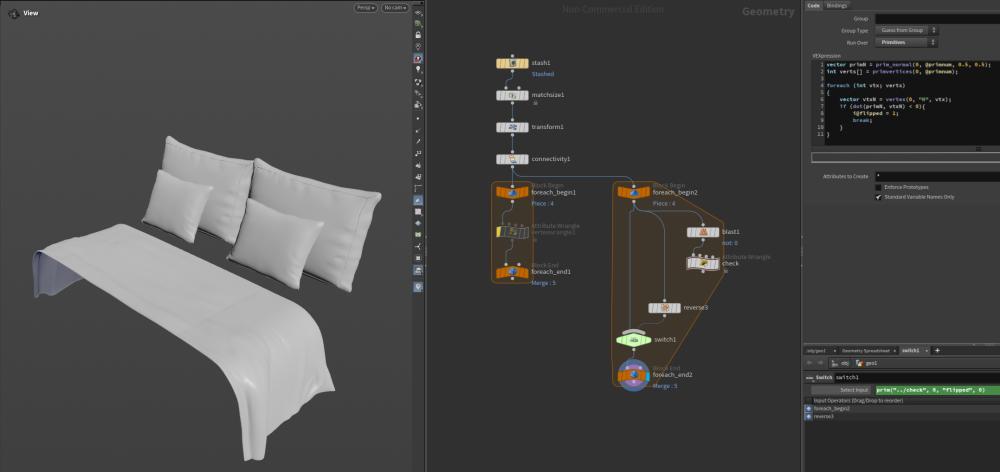
-
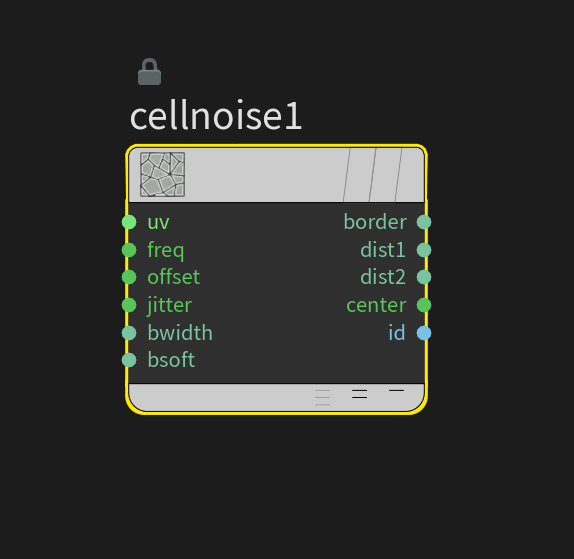
I really like the cellular noise node that can be used inside a point VOP, as it yields good borders compared to trying to remap worley/voronoi patterns. The downside is that it can only be used on a 2D uv map. How would one go about getting the same results with a vector 3/3D input? Similar to the 3D outputs of Unified Static, Turbulent, AA noise, etc. I've tried searching, but haven't really found anything directly addressing the issue. Thanks!
-
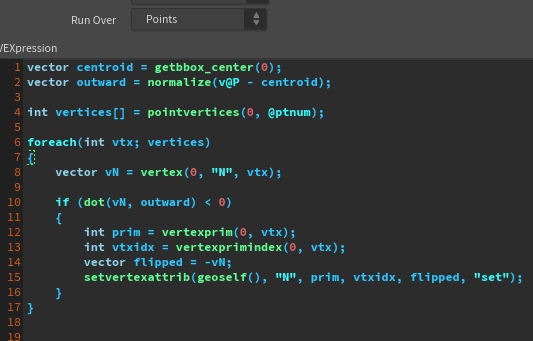
Hi; I have an asset that I imported into Houdini that has pieces with reverse Vertex Normals inside a for each loop per connected piece node, I have written a vex code that finds their bbox center of a piece and tries to determine which pieces get flipped according to the dot product of the point positions and the the bbox center point and have gotten no result out of it And this is what I could come up with for islands with volume. I have absolutely no idea as to how to handle flat plane like structures. Maybe compare their vertex normal orientations to the centroid of the entire enclosure? But then again my code doesn't do the job Any help would be appreciated. AJ flip_reverse_prims.hiplc
-
Hi Daniel, It's 6 years later and I've been looking into doing the same thing. Any possibility in sharing please? Thanks!
-
thanks this fixed my issue!
-
https://www.patreon.com/posts/polar-inversion-159637654 I have been experimenting with Houdini’s new Copernicus network and started porting some of my existing COP tools into custom OpenCL COP nodes. The first one is a Polar Inversion filter implemented directly as an OpenCL COP node. The core mapping is based on radial inversion around a center point: scale = radius² / distance² In practice, the important part is not the formula itself, but making it stable and usable as an image filter. The implementation uses inverse mapping, where each output pixel traces back to the corresponding source position. Near the inversion center, the denominator is clamped using a pixel-footprint floor, with an optional softness floor. This avoids the unstable singularity you would otherwise get from dividing by a near-zero distance. For sampling, the node uses deterministic subpixel supersampling and Houdini’s rectangular filtered sampling through "imageSampleRect". The filter footprint is currently based on the output pixel footprint, which gives better reconstruction than a naive point lookup while still remaining predictable and fast. This is the direction I want to take with Copernicus: converting my existing COP nodes and implementing more advanced image filters, compositing operators, and procedural transformations that are not currently available in Houdini. The goal is to build a deeper image-processing toolset inside Houdini, using the same philosophy I use in my VEX work: low-level control, practical performance, and tools designed around real production needs.
-
Hi everybody I hope you are having a lovely Friday so far. I don't know if this is the right channel to post questions but there is this great tutorial from Entagma on how to do a paint stroke. Great! But how would you approach if you need to add a brush interacting, like a brush doing the paint brush stroke. Would you use a vellum hair sim on the hair of the brush interacting with the viscous Flip solver simulation. Is it possible to mix vellum and flip solvers? Thanks https://www.youtube.com/watch?v=8TvAe3GxNFs&t=17s
-
Particles and Anticipation. Have Fun . proc09.h


- 212 replies
-
- 1
-

-
- sacredgeometry
- guilloche
- (and 4 more)
-
Thanks for the tips! gonna check that out, thanks again for taking time to help me!
-
Try to adjust closer to worldscale, based on this collision padding and amount of bullet substeps. Check constraints, seems something messed up here. Also, PY position initially is under the ground what doesn't help.
-
Hi Here is my approach to this effect: chain.mp4 magnetos_stick_02.hip