Search the Community
Showing results for tags 'noob'.
Found 17 results
-
Hi , its the second time that i lose the vexpression window in a attribute wrangle , i think i've hit a shortcut to show only the modified parameters but i can't figure what is it , its drive me a bit mad .. if someone know how to bring that back it would be nice , Thanks
-
Hello all, I’m returning to Houdini after stepping away for a bit, and figured I’d brush up a little by giving the Karma renderer a spin. While the general workflow appears to one-up the ancient Mantra, I keep running into the same dumb wall, despite going through basic tutorials by three different artists (per this LesterBanks page: https://lesterbanks.com/2019/11/all-about-karma-and-lops-in-houdini-18/) While everything else seems very straightforward (though still possibly buggy) the thing I can’t seem to get to is any kind of final rendered bitmap that is not just a field of black pixels. I’ve tried rendering through every file-type option (.exr, .tif, .pic, etc) and through every render buffer (tried MPlay, Render to Disk, Render to Disk in Background, etc.) but I am only getting black images, no matter which tutorial I’ve followed. Here’s a link to my project structure: https://www.dropbox.com/s/0edzqf0ivr24scx/KarmaKitchen.zip?dl=0 I took to monitoring CPU / GPU activity: While Karma IPR is running, CPU / GPU activity is ~90%+ / ~15%. For “straight to disk” rendering, CPU doesn’t go above 3%, though Houdini’s Scheduler / Render Manager verifies that the computer is actively rendering. I’m not sure if this will give any clues, but here’s a snapshot of the RM during render. https://www.dropbox.com/s/em4bnzcm4rtnd0i/RenderManager.JPG?dl=0 Otherwise, I’m running Houdini’s Indie license, though as far as I’ve been able to research, Karma is compatible with the Indie license. Am I wrong about this? Also, as a general question, is there a hugely significant speed advantage to Mantra? Seems like it might be wiser to hold-off on Karma until it’s out of beta stage. Any thoughts on that thought? Preemptive thanks to any responders! NpF
-
Hi there! Houdini noob here ^^ Some days ago I found this image on the internet and I really liked it so I thought about trying to replicate it but maybe animating it hehe to me it seemed like it could be made using curl noise fields so I followed the entagma's vex 101 tutorial and I manage to make this little animation as a test, and I really liked it. I think is pretty close to the image, BUT i have 2 issues with it that i don't really know how to fix or adjust a little, so i was wondering is maybe some of you guys could help me a bit or at least guide me to the right path. https://imgur.com/a/wyg2zMS First: Looping it, is it possible to loop The curlnoise or the curlxnoise? Or is there any other noise function that would produce a similar result but easier to loop Second: Is there any way to soften the curlnoise behavior in these spots? https://imgur.com/a/rLB40Hf My best idea so far i just placing the camera in a place where these intersections aren't in frame haha but would love to know if it's possible at least to make those somewhat less dramatic? CurlNoiseTest_v1.hip
-
I've been working on trying to solve a problem that probably has several ways to attack it... but I can't seem to figure this out. I'm trying to have an animated object that rocks back and forth, and inside of that object is a hinge constraint that ideally would follow the object and let the gravity node do its thing. I the example file, Imagine a sailboat on the seas, rocking back and forth on the waves, and the boom rocks swings based on the boat's motion. I've attached a hip file to show my train of thought. Any help is appreciated. hinge_test.hiplc
-
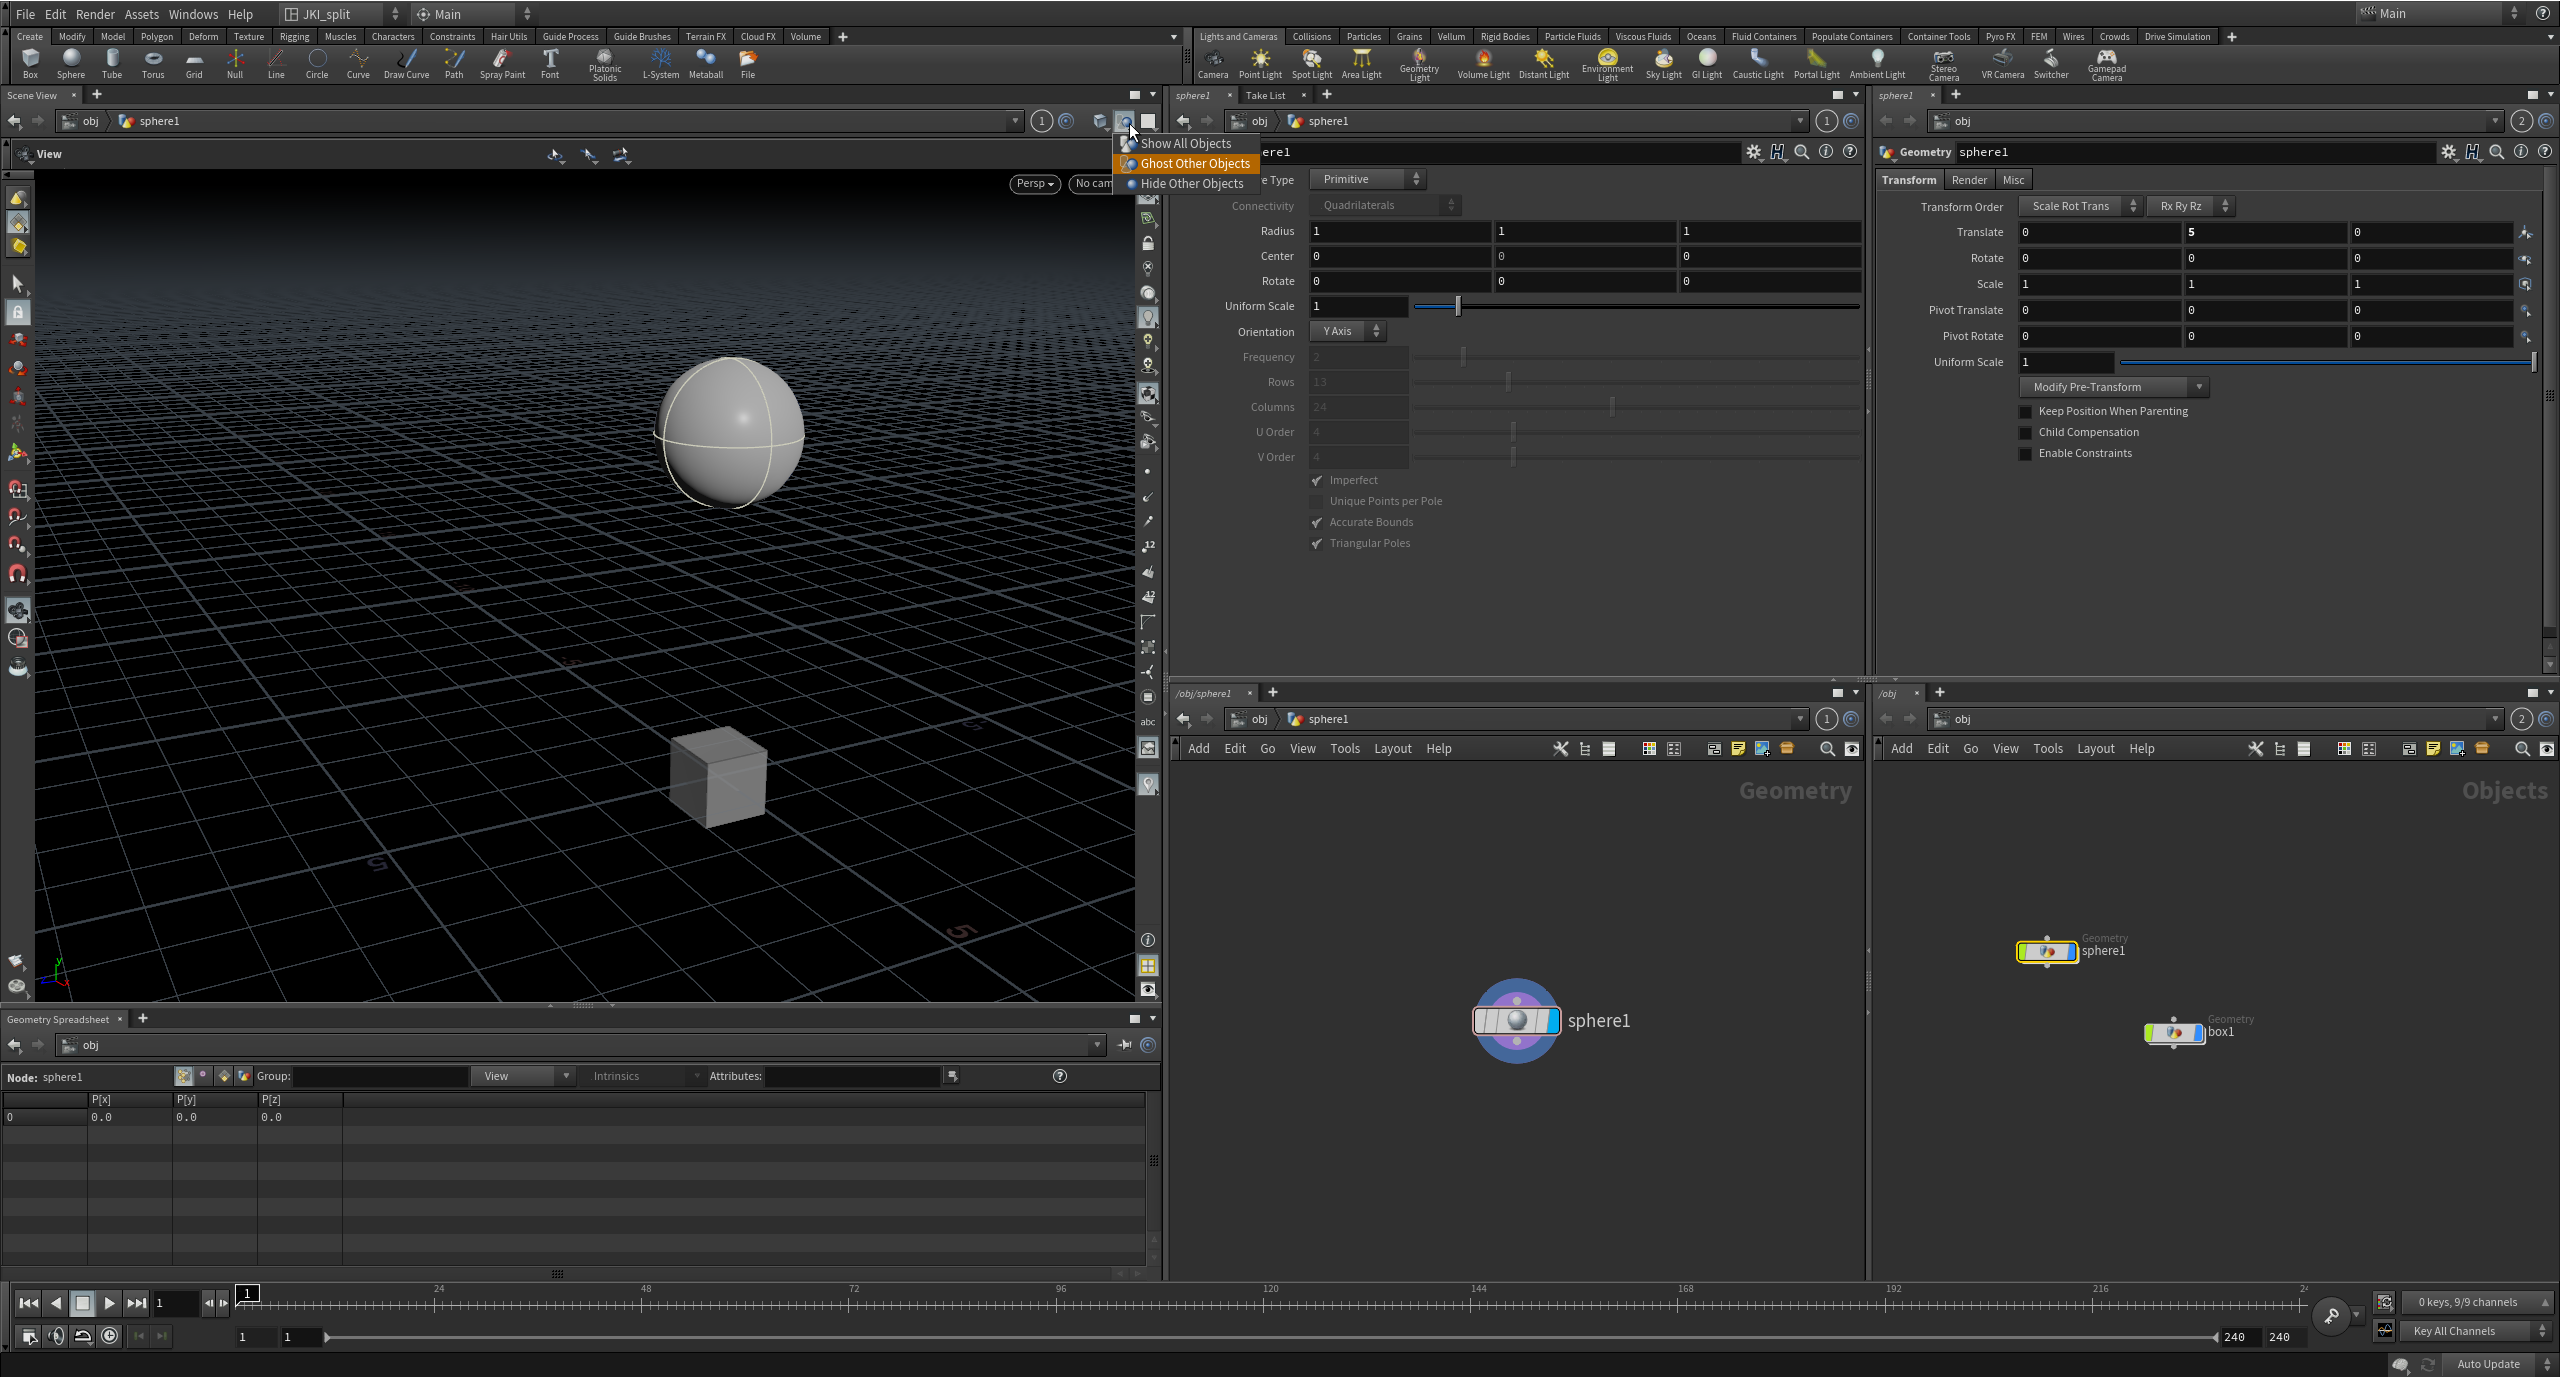
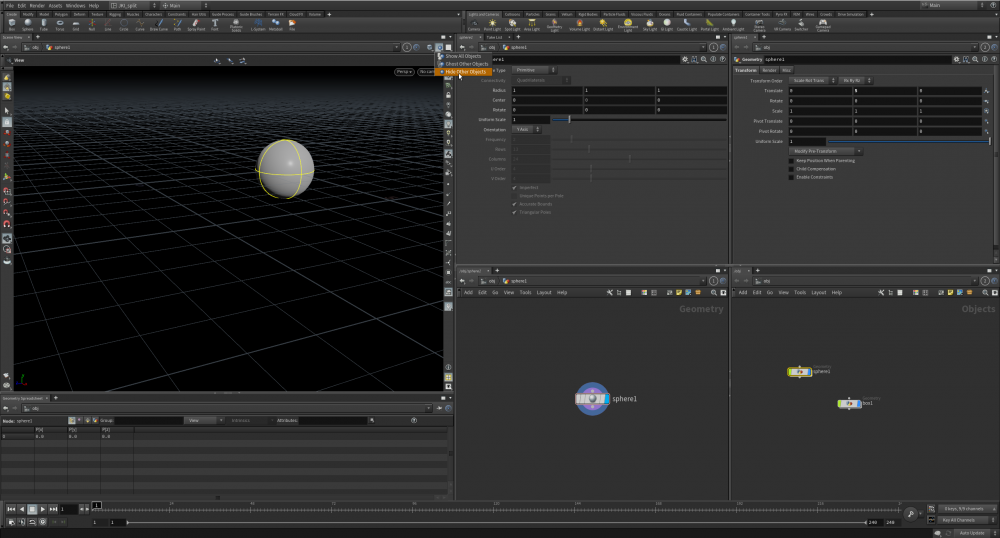
I made a sphere and set Translate Y to 5. If I have Ghost Other Objects on it stays above the grid. As soon as I switch to Hide Other Objects it moves down to the origin. Is this normal?

-
So, I'm still learning the ropes of Houdini. I have been following a series of YouTube tutorials on vellum cell replication (https://www.youtube.com/watch?v=rIog_V8kv4Q) and I've got to the 45 min on this second tutorial, and I am now insanely stuck. I realise in my scene vs in the tutorial the gap between the left and right cell pieces I don't have as large a gap. I think this is what is causing the sim to go bonkers as I think despite everything in place so far the geometry is colliding. I'm just not sure on how to prevent this/how to increase the distance between the left and right side so the geometry stops colliding and ruining the whole sim. I have gone through every node time and time again, and as far as I can tell I have followed the tutorial EXACTLY. My end goal is to create an embryo (only on basic cell division level) and its literally doing my brain in. PLEASEEEEE HELP ME!!! Thanks! (Have attached scene file, so you can probably tell me alllll about the glaring error I've overlooked haha) cellsofvellum07.hipnc
-
 Hey! I was going through some tutorials on growth solvers, and I noticed that a lot of them are driven by the "food" group looking to get "infected" if you know what I mean. I wanted to try and make a growth solver that workes differently, looking instead at the points that are already infected and infecting more from their perspective. A very simple summation of what I'm trying to achieve: 1. List the points around me 2. If they are food, they are candidates 3. Infect only 1 of the found candidates rinse and repeat I've put the code underneath in a point wrangle in a solver, but it doesn't work well. I tried running the command on the seperate food and infected groups but that doesn't seem to improve either. What happens when it doesn't go well: 1. nothing 2. Almost every point gets put into the infected group in 1 framespan and then the solver doesn't do anything anymore. //initialiation of radius to search for, and random seed; float radius = 0.2; float seed = 8008135; //stalking prey (finding a list of points to infect); int neighbours[] = nearpoints(0,@P,radius,5); //hopefully grabbing a random one out of the stack of many; float array_length= len(neighbours); //random number between 0 and the length of the list of neighbours; int targetp = rint( rand(seed) * array_length); //looking up point ID in list of neighbours; int point_to_infect = neighbours[targetp]; //actually infect the point, if it is food; if (point(0,"infection",point_to_infect) == 0){ setpointattrib(0,"infection",point_to_infect,1); }; I haven't any clue what's going on, I got no errors other than a little green line under the local variable "targetp" when it gets created. I've attached my .hip! It might be something else I'm doing wrong. I hope you can help me, thanks in advance, Sasbom active infection.hip
 -
Hey everyone, I'm starting my houdini journey because the company I'm going to intern at in the summer does a lot of houdini stuff. I don't want to be left in the dark, so I'm studying on my own for now. When I was at the company in question, last time, someone showed me a way to use a volume from a mesh (he used the test_rubbertoy geo) to get a intersection plane without using boolean. I remember he used some wranglers, and ended up with a grid with color data which he used to delete the unnessecary parts outside the colored intersection area. Then he somehow turned the mesh into a isosurface, to smooth it out. I've been trying this for some time now and I can't for the life of me figure out how he did it. I've had two nearly succesful attempts, one where I used the Intersection Analysis to get the intersection between a grid and the (rubbertoy -> vdb -> vdb to poly (to fuse seperate meshes together)), then filled the edges I got from that, and then remeshed, which admittedly gets me at least a flat intersection plane. One major problem is that this approach makes the normals of the resulting mesh flip upside down randomly everytime I move the intersecting mesh, which is a pain if you'd want to use it for particles or something. I tried using a wrangle to copy the point normals of the nearest points to the points of the remesh, but I haven't had much luck with that. The other thing is that since the Intersection Analysis only returns edges, the shape of the surface is not taken into account, above method only returns planes and distorted planes on surfaces. The other one I used a attribute transfer with a (mesh -> vdb fog -> wrangle to fit density to 1 everywhere -> scatter -> color {1,0,0}) to project red points from the point cloud to a grid surface, which works, but VERY slowly. one bonus with this technique is that you can blur the resulting "intersection" but its way too slow. So, what I've been thinking is this: A VBD is basically a point cloud, so there needs to be a way to compare mesh points to the points in the volume, and assign a color to those points that are close to points on the geo. I remember said someone doing something like that with a pcopen, but I don't really understand how. I think I get the method, but if someone knows something better, please say so. I've been struggling with this for a couple of weeks now. I strive to be more than a shelf tool user, at the least. Thanks in advance, sasbom
-
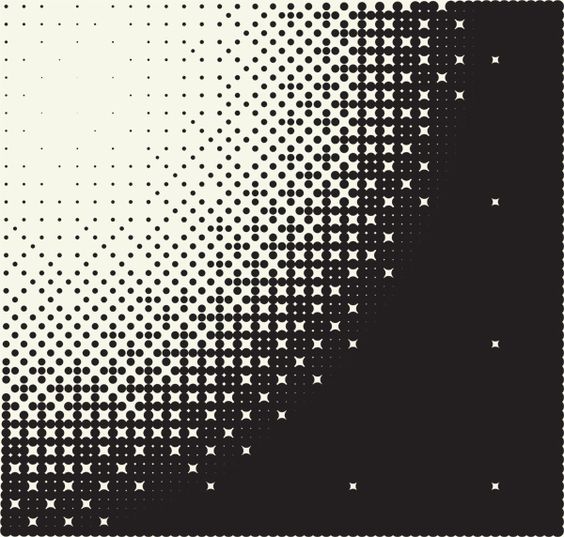
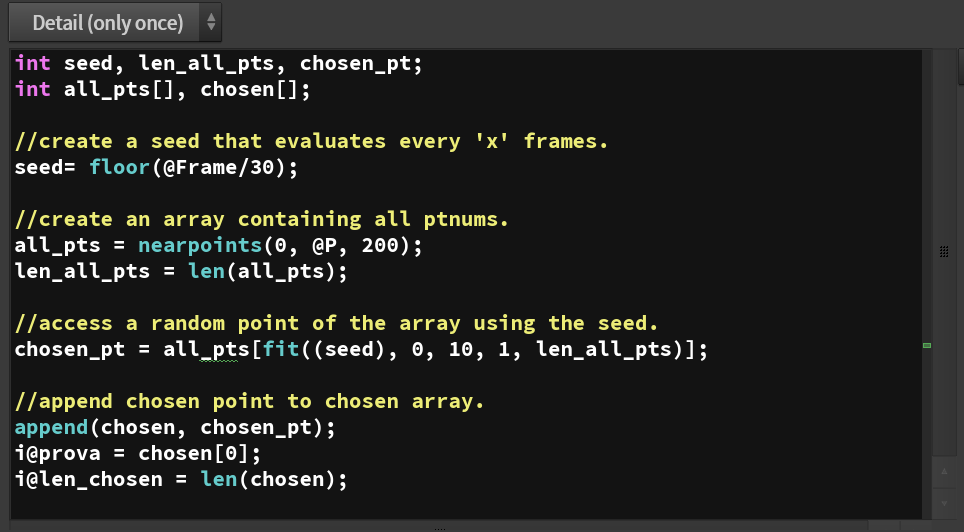
hi everybody, it's my first question here and i'm all out of noobish solutions. I'm trying to recreate this (see attached) using vex only, as an excercise. Now i managed to create the circles, and i want to select random points from where i can influence the radius of the neighbours. In order to do so I created an array of all the points, created an attribute that stores the ptnum of a random one and refreshes every 30 frames. The problem is now i want to store these values in a new array over time, but the append function only refreshes the current number. Is there a way to append a new value to an array every "x" frames? Hope I explained my situation clearly enough, and thanks to anyone who wastes a little bit of his/her time answering optical_with_circles.hipnc
-
Hello Guys, I hope all are doing well. I'm prtmsh, new to the cg/vfx industry, currently an intern learning camera tracking and matchmoving. I started with matchmoving to get my foot in the door, but I aspire to be an FX artist. My question is related to what learning path to follow. I have very basic knowledge of modelling in Maya and 3ds Max. I cant afford to attend any VFX/CG school, mostly watch youtube and Digital tutors. Should I first learn to create particle sims like fire,smoke etc in Max/Maya and once i'm good at that look for a junior level job, and slowly move on to Houdini. Will knowledge of Max and its FX plugins help me towards understanding Houdini better? I am aware I can start with Houdini directly, but reading from posts here I suppose i'll have to study Math and python as well. Kindly excuse me if my question is redundant or too noobish, I have very beginner level knowledge of what CG/VFX is. I would appreciate your advice. Thanks & Regards.
-
10 Cores shouldn't be this slow?..Should it? (also hair details don't seem to show here? any ideas)
-
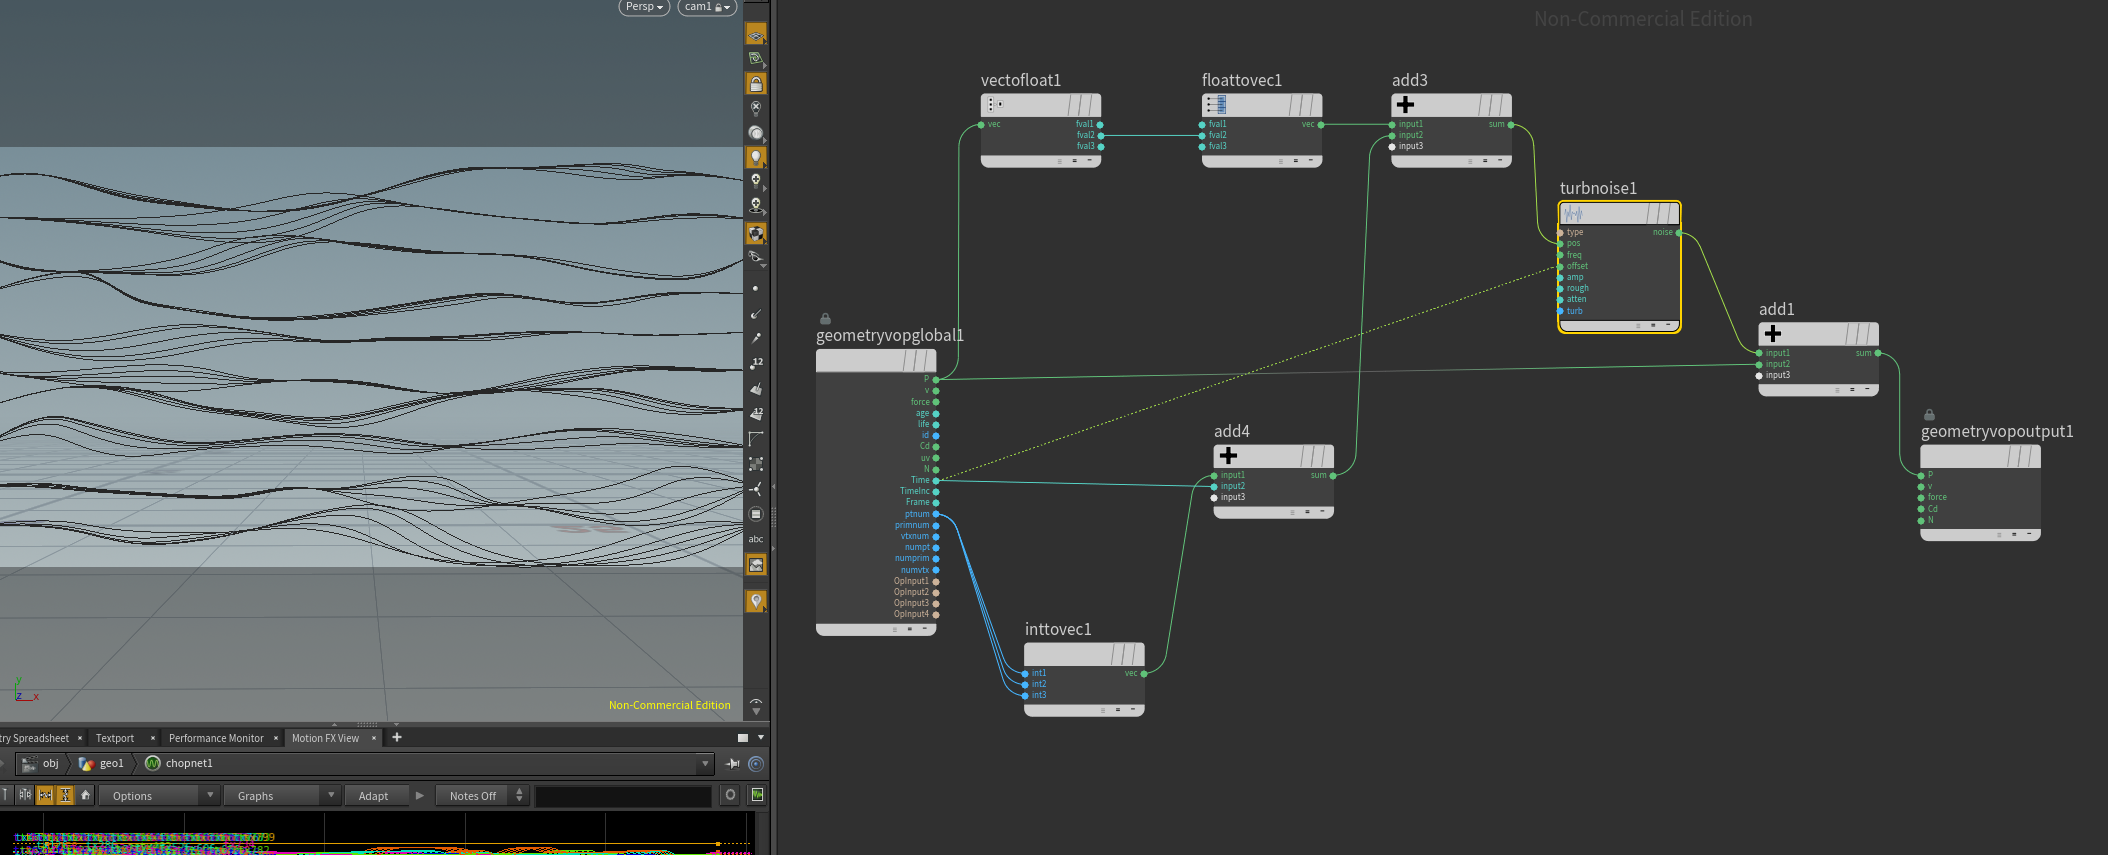
 So, i tried something from scratch for the first time, albeit very simple... almost there! That being said i did got stuck up... 1. SOFT SELECTION GROUP: i am trying to apply some animation to a bunch of lines through a pointvop. i want the animation to be limited to all the points but the ones at the ends of the lines, i create a group of those points... it works,- but could be better if i could make the animation blend to the static points at the end. 2. FADING TRAILS: At the end i added a bunch of trails with some lag and or jiggle. i am coloring them with the width attribute through an 'attribute create' node. Is there a way to make each trails less opaque than the previous. (if this can't do the job, any other tips?) 3. NOOB VOP NETWORK CRITIQUE: I am pretty sure my vop network is far from efficient, i would appreciate if anyone has some tips to make it more logical/ efficient. I hope i was able to explain myself. (i have attached a screenshot for reference) d.
-
hi everyone, how do i randomly colorize each object separately instead of each primitive? Thanks in advance, d

-
i am trying to follow this class by ari danesh at around 20:40 mark he uses the noise function in a point wrangle. i can not get it to work... it returns me with errors saying "noise" or the variable "P" is an ambiguous call to function/ undefined variable. i am using houdini 16.0. Anyone knows what i might be doing wrong. thanks in advance, d.


-
I'm just wondering if someone will point me in the right direction as to what I need to research to hack this together. I've included a test .hip file that contains the bones of what I want to do... but without the desired effect. I want the mower to actually force the broken elements up under the mower and spit them out the other end. Any pointers greatly appreciated. lawnMower.hip
-
Hi all, first of all, I'd like to say I'm new to this website, and have only been working on Houdini for about four months. I really like the interface, and I'd say I've made some pretty 'okay' stuff for a beginner. But now, I'd kind of like to take a step up and begin putting my work into real videos. I've looked at the composite view tab, but as far as I can tell, it only handles images. Would I have to export it to an external program and then insert my video? Or is Houdini even capable of this? Also, as of right now, my only sources for tutorials are youtube (hardly any) and the Houdini Tutorial Archive over at papicrunch, which is getting more and more limited. I'm not so sure I'm ready to move on to Houdini Papers yet, as I'm mainly a visual/tactile learner, but I did a Voronoi destruction scene based on a paper. I would really enjoy if you could point me towards some more beginner/moderate tutorials that are preferably videos. Thanks!
-
so i have these particles right, i understand they render default all big and sphereical. i read in the help that you need to set up some stuff in POPs; in the solver, right now i have a render node that has blur and size parameters, but nothing shows up on the render. I also know that doing this in the un-cached DOP is not very economical. how in the heck to i set up these parameters (age, size, etc.) to work on a cache sim? should i have set up that kind of stuff pre-cache? sorry for the noobness, always appreciate any help i can get. thanks again.