Search the Community
Showing results for tags 'blend'.
Found 17 results
-
Hey everyone, I've made a crowd simulation, and for that I inputed an FBX (from C4D) with bones and skin to the Agent node and added many animation clips. I wanted to make my chars open their mouth like you'd usually do with a blend shapes node, but the rig is not accessible in Houdini and there's no nodes for skin and bones (if there were I could just add blend shapes to geo) Do you guys have any idea how I could add those facial expressions without going back to C4D and having to add more bones and re-skin the base rig/model? Thank you.
-
i have a walking cycle motionclip and a head turn motionclip. How can i have a walking cycle with the tun head animation applied? I just want to apply the head animation from the 'head turn' to the walking cycle essentially. must be pretty obvious but i am quite new at this and struggling with the basics
-
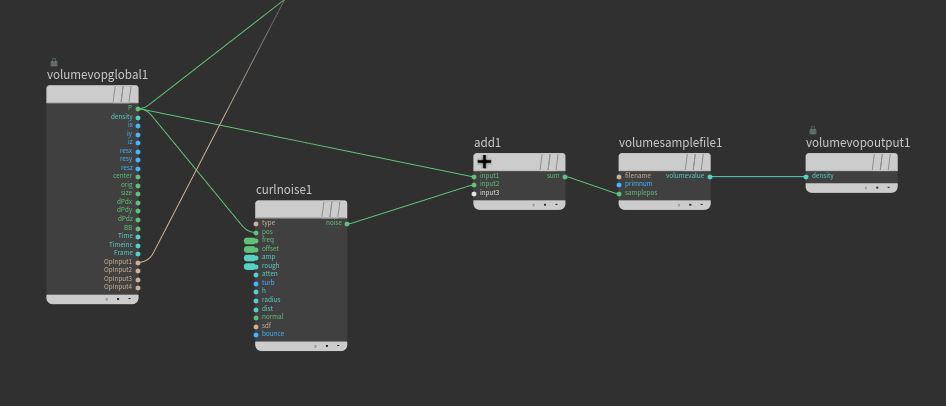
Is there an easy way to blend two vdbs using for example a gradient on the Y axis? i have a displaced fog vdb and i want the displacement to happen in a certain area. Can i control that with a mask somehow inside the volume vop or do i need to blend the fog vdb without the displacement? Any workflow tips?
-
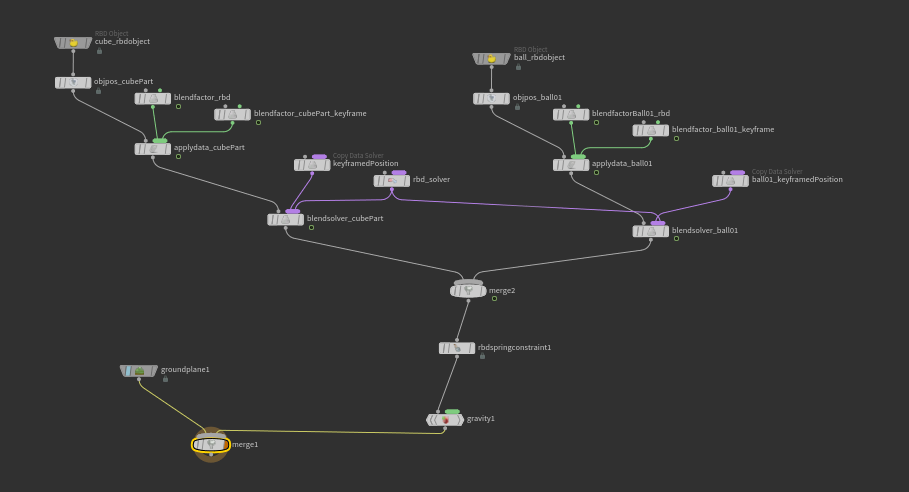
I'm trying to get these two objects to move towards each other after they hit the ground. Blend solvers are being used to allow the objects to transition between their keyframed positions and dynamic states and I need to add an attractive force which is what the spring constraint is supposed to be for. If I plug it in and doing nothing to it outside of hooking up the constrained object and the goal object it works fine. However, I want to control the timing of it so it can work it into an animation. When I tried to keyframe the spring strength or activation parameters the constraint would stop working or not work properly. Result from keyframing the activation parameter. The objects do not pull towards each other, the constraint just keeps them in place. Node network Does anyone know why this is happening? Thanks in advance!

-
A quick Houdini smoke simulation done in a day. This was done by using the gas target force microsolver. Hip file attached - feel free to take a look! Cheers, Mark run_smoke_v002.hipnc
-
Hello everyone!! I have seen these organic creations and I have fallen in love <3 How we can do somenthing like this? We need too much VEX code to achieve it? I'm sure that between all of us we can achieve it! Cheers!!!!
-
 Hi there! I've found a lot of topics somewhat talking about this, but haven't been able to get anything working. I am trying to constrain or parent geometry to an animated FBX bone. In my scene, a character emits particles from their mouth, but that animation is at the SOP level. I could use a rivet, but that only tracks the position of the bone, and not the rotation. If I use a Parent Blend constraint at the Object level, nothing from the Sop level animation affects the child. Am I missing something on how parenting works in Houdini? Or perhaps there is a better method to accomplish this kind of constraint relationship? Thanks for any help!
 -
 Hi guys, I have two identical bone hierarchies - one is at rest pose and the other is animated motion capture skeleton. Is there a way to blend the rest skeleton to the animating skeleton using chops? I've looked at the constraint shelf. But it would be quite cumbersome to do this for every joint using these tools. Is there a way to bring in both the rest and animating skeleton channels procedural - using wildcards or something and then blend the rest to the animation? Anybody have any setups I could take a look at? Thanks for your help!
 -
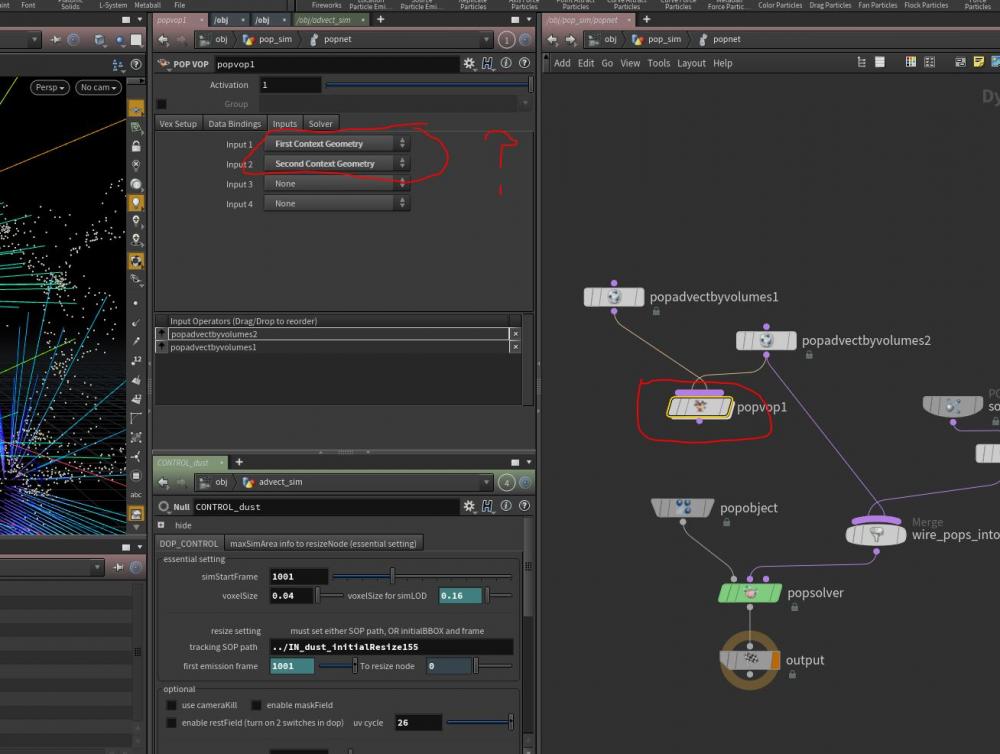
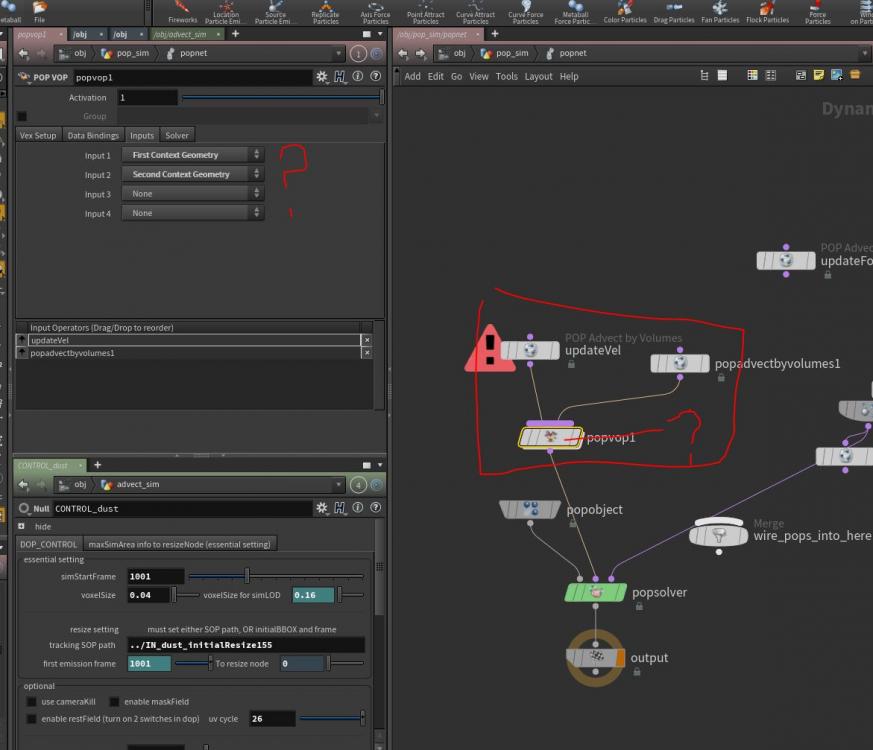
Hi, I have a question about popAdvectByVolume in popSim. There is a option parameters > update velocity and velocity blend. Instead of blend, I want to add two popAdvectByVolumes, but I have no idea how to use popVop as first picture shows As second picture, I tried to set first popAdvectByVolume as velocity update, and set second one as force update. I was thining two combined vels = vel + force But it's not working exactly. Does anyone have idea how to set up vopPop? thanks!


-
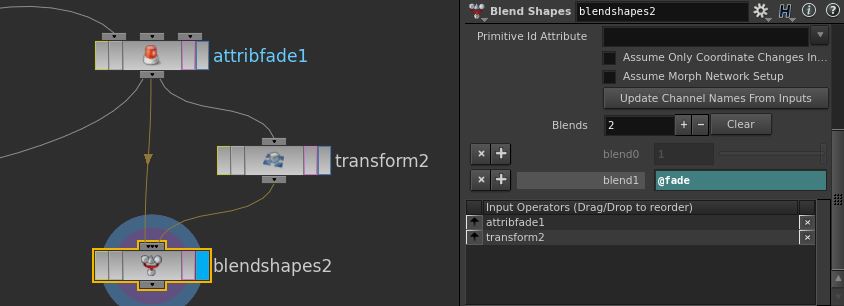
I'm trying to drive a BlendShapes' SOP blend parameter using a point attribute, @fade. The @fade is a point attribute and have it's value animated. But the blend parameter doesn't appear to read this animated values and keep showing 0 instead. The question: the blend parameter doesn't work with point attributes? I tried VEX and Hscript forms (@fade and $FADE). The second crashes.
-
Hello everyone! I have attached a scene with a simple setup. This is a result from a rbd sim. I would like to run a flip simulation from this geometry but first I need to find a way to make the original geometry blend with the mesh of the fluid simulation. The idea is to get a smooth transition between the geometry itself (with shaders and textures) and the polygons from the particles. Any ideas how I could achieve that? Thank you blend_test.hip
-
 I know it is possible for one to transfer points from object A to object B if they both have the same number of points. It is also possible to transfer points from object A to object B if object A has more points than object B by using a wrapping formula which looks like this: Object A scatter1 (60) attribute create "variable1" (integer, value = $PT % npoints("../scatter1")) Object B scatter (15) attribute create "variable1" (integer, value = $PT) Plug into Blendshape/Sequenceblend and presto. What I would have liked to find out after this was how to "wrap" a smaller number of points onto a bigger number of points. A friend and I managed to make a formula to do this but only mathematically and I am not sure how to apply this principle to transferring points from one object to another in Houdini to which I am still quite new. Here is the formula: Object A - scatter (3) [A, B, C] Object B - scatter (11) floor($NPT Object A / $NPT Object * $NPT Object A + ($NPT Object B % $NPT Object A) * A So here's what it would look like: floor(3/11)*3 [A, B, C] + mod(11, 3)*A So basically my question is: Would this formula be useful? I have tried to write these values into attribute create nodes but got stuck somewhere everytime. Thanks!
 -
Hello Od|forum! I ran into a little problem. I had the idea to make a procedural texture. I wanted to use ambient occlusion to blend texture A with texture B. I used a Pointvop to blend the two textures. Two Colormaps hold the two different textures which both go into a Mix. I used the AO I already got on the floor as the Bias in the Mix. This method kind of works. Texture B, which is green, is in the places I want it to. Texture A as well. However; both of them do not have the checkered pattern that is in the texture. Is there someting I missed? Or is it a viewport thing? Thanks in advance! -Bram Texture_Mix_Problem_01.rar
-
Welcome, I made myself a DA dealing with locally morphing geometry based on a distance from a locator. I just used a custom attribute, which value was dependent on a centroid of a locator, then imported this attribute into a VOP SOP and used a little bit of math to get a falloff distribution outwards the locator point, and blend between source and target geometry. Now, how to do the same for locally blending shaders/ textures ( I am not very experienced at VOP materials)? I cannot import attribute here, from what I see I can get attribute values by referencing a file on disk, not a node directly. How about making a digital asset for locally morphing textures then? Maybe I am looking in a wrong place? Thanks in advance,
-
Hi All, I need a bit of help figuring something out. I need to fire a morph (blend shape) whenever the bones have less than 90 degrees (or another specified amount) from each other. How do I get access to the bone info and where is the rotation info I'm looking for. I've looked at the bones and I don't see any such info on the tabs. Thank You PS: Don't know if it makes a difference but I'd like to know for both IK and FK - thanks again
-
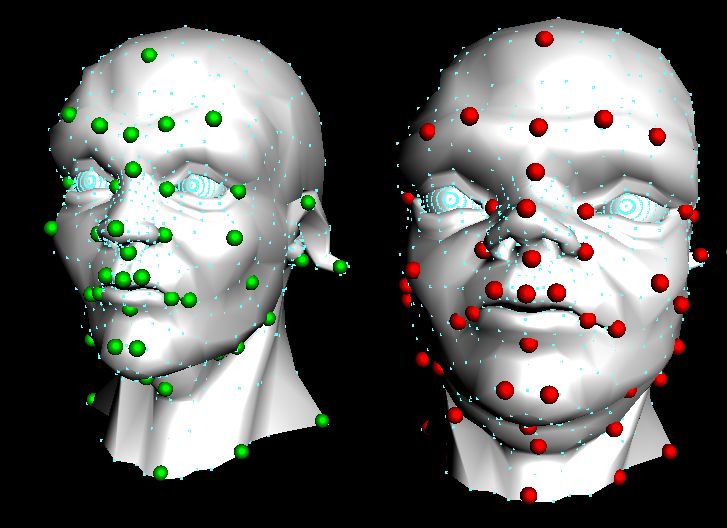
Hi all, Been away for so long, this is my first post in some years I believe. Anyway I was at a Houdini event the other day and they were talking through all the great new features in Houdini 13 and beyond and I noticed on one of the slides that numpy is now included in Houdini since 12.5 or even earlier. It's been so long since I delved into Houdini that this massively useful fact had totally passed me by. The first thing that lept into my head when I saw this was my old HDK sop RBF morpher which is a totally awesome deformer that has gotten me out of so many tricky deformation scenarios over the years. Finally I realised I could re-write this in a Python sop and not have the issue of people needing to compile it to use it. A few days later and after a couple of hours work here is the result. No error checking yet just the bare bones of the functionality. Of course it's no where near the speed of the HDK one, but hey at least compilers aren't an issue with this one. This is the source code and I've attached a example hip file and otl, non-commercial versions. # This code is called when instances of this SOP cook. import numpy as np import math node = hou.pwd() geo = node.geometry() inputs = node.inputs() kernel = node.parm('kernel').eval() power = node.parm('power').eval() scale = node.parm('scale').eval() def linear(r): return r def smooth(r): return r*r*math.log1p(r*r) def cube(r): return r*r*r def thinPlate(r): return r*r*math.log1p(r) def sqrt(r): return math.sqrt(r) def pow(r): return math.pow(r,power) kernels = {0: linear, 1: smooth, 2: cube, 3: thinPlate, 4: sqrt, 5: pow} def rbfU(r): return kernels[kernel](r) if len(inputs) > 2: featureGeo = inputs[1].geometry() targetGeo = inputs[2].geometry() numFeaturePoints = len(featureGeo.iterPoints()) matrixQ = np.zeros((numFeaturePoints,4)) #setup all the matrices with the feature point positions i = 0; for p in featureGeo.points(): matrixQ[i,0] = p.position()[0] matrixQ[i,1] = p.position()[1] matrixQ[i,2] = p.position()[2] matrixQ[i,3] = 1 i += 1 #print matrixQ matrixQtranspose = matrixQ.transpose() #print matrixQtranspose matrixK = np.zeros((numFeaturePoints, numFeaturePoints)) #scale = 1 for row in range(numFeaturePoints): for col in range(numFeaturePoints): ppt = featureGeo.iterPoints()[row] p1 = ppt.position() ppt = featureGeo.iterPoints()[col] p2 = ppt.position() p = p1-p2 matrixK[row,col] = rbfU(p.length()/scale) #print matrixK #setup the final set of linear equations in one massive matrix matrixA = np.zeros((numFeaturePoints+4, numFeaturePoints+4)) for row in range(numFeaturePoints): for col in range(numFeaturePoints): matrixA[row,col] = matrixK[row,col] for row in range(numFeaturePoints): for col in range(numFeaturePoints, numFeaturePoints+4): matrixA[row,col] = matrixQ[row,col-numFeaturePoints] for row in range(numFeaturePoints, numFeaturePoints+4): for col in range(numFeaturePoints): matrixA[row,col] = matrixQtranspose[row-numFeaturePoints,col] #print matrixA #setup the solutions to all the linear equations, i.e. the target feature positions targetX = np.zeros((numFeaturePoints+4)) targetY = np.zeros((numFeaturePoints+4)) targetZ = np.zeros((numFeaturePoints+4)) i = 0; for p in targetGeo.points(): targetX[i] = p.position()[0]; targetY[i] = p.position()[1]; targetZ[i] = p.position()[2]; i += 1 #solve the linear equations to find the weights that map the features to the targets weightsX = np.linalg.solve(matrixA, targetX) weightsY = np.linalg.solve(matrixA, targetY) weightsZ = np.linalg.solve(matrixA, targetZ) #print weightsX #apply the weights to the actual points on the input geometry to get the final resulting positions relative to the target feature points NfPts = numFeaturePoints for opt in geo.points(): outX = weightsX[NfPts]*opt.position()[0] + weightsX[NfPts+1]*opt.position()[1] + weightsX[NfPts+2]*opt.position()[2] + weightsX[NfPts+3]; outY = weightsY[NfPts]*opt.position()[0] + weightsY[NfPts+1]*opt.position()[1] + weightsY[NfPts+2]*opt.position()[2] + weightsY[NfPts+3]; outZ = weightsZ[NfPts]*opt.position()[0] + weightsZ[NfPts+1]*opt.position()[1] + weightsZ[NfPts+2]*opt.position()[2] + weightsZ[NfPts+3]; p1 = opt.position() i = 0 for p2 in featureGeo.points(): p = p1-p2.position(); rF = rbfU(p.length()/scale); outX += weightsX[i]*rF outY += weightsY[i]*rF outZ += weightsZ[i]*rF i+=1 opt.setPosition((outX,outY,outZ)) [/CODE] ExampleRBF.hipnc RBFmorpher.otl

-
Greetings to the greatest 3D community! I'd like to introduce you my new digital asset "RampBlend". The idea behind “RampBlend” is to help character riggers and animators get rid of complex muscle-systems which are often too slow, troublesome and tedious to set up. It was specifically created with the concept of “corrective blend shapes” in mind, where changes to the Blend factor trigger sequential morph targets. I'd like to thank this community and Mangi who kindly shared the base scene for my tests. Any comments or suggestions to help improve this asset are more than welcomed. You can download "RampBlend" at this url: http://www.orbolt.co.../ik_::RampBlend Introductory video (vimeo HD720): http://vimeo.com/74942919 Introductory video (Youtube HD1080):
-
- 1
-

-
- blendshape
- driven
- (and 7 more)