All Activity
- Yesterday
-
 Kokles joined the community
 -
 I also don't like to export directly from SOPs. I tend to do all of my work in SOPCreate nodes so that I can see how my geo is being translated into USD before I cache. You should be able to specify the primitive path on the Geo Clip Sequence node. I don't have a hip file on hand but I have made a tutorial that covers a caching + referencing workflow that might be helpful. Scenes can get slow for loads of reasons, even when everything is cached. The main thing you can do to keep things as light as possible is make sure you have no time dependency badges and ideally have proxy geo for everything. If it's a big scene with lots of assets then unloading payloads can help too. Regarding the bgeo cache, you can use that directly in the Geometry Clip Sequence (as long as you're rendering in Houdini/husk). I do that for heavy fluid Sims as you're right it tends to be a smaller file size. I also cover this in the tutorial above. Alternatively for other things I'll treat the bgeo cache as a temporary cache to avoid having to recook things and then save my USD cache from there. You can of course save directly to USD instead of bgeo. Just use a USD Export in sops or USD ROP or File Cache in LOPs. Note that you should only need the Geometry Clip Sequence if you're caching really heavy geo to per frame USD or bgeo files. For most things you can save to a single USD file which is much easier to work with.
 -
 Bubbly4334 joined the community
 -
 Thank you very much, Matt, for your detailed response and explanation. I greatly appreciate your time and insight. I was hoping to understand more about how you structure your scene while keeping the pipeline in mind. I'm planning to use the Component Builder for asset creation, and I’d prefer not to export USD directly from SOPs. From what I’ve read in some forum discussions, exporting USD from SOPs can sometimes result in missing attributes. For that reason, I'm currently using the Geo Clip Sequence node. My goal is to bring all geometry into Solaris and cache it there. However, I’ve encountered an issue with the Geo Clip node: when I save the output, it alters the hierarchy names. I'm not sure how to prevent this so that it matches the hierarchy created by the Component Builder. Any guidance on how to resolve this would be very helpful. If possible, it would be incredibly helpful if you could provide an example file showing the correct workflow. I’ve looked through SideFX documentation and tutorials but haven’t found one that addresses this specific issue within Solaris. Without caching, I've also noticed the scene becomes quite slow during lighting — especially when working with fur or feathers. Additionally, I have a question about caching: after creating a .bgeo cache, is it necessary to generate a separate geometry cache? It seems to create redundant files, and in cases involving fur or feathers, the geometry cache tends to be significantly larger than the .bgeo. The only benefit I’ve seen is that the Geo Clip Sequence loads faster. As mentioned, is there a way to directly generate the final geometry cache without first creating a .bgeo cache? I’d like to avoid repeated caching steps if possible. Thanks again for your help and any advice you can offer!
 -
 Duppep joined the community
 - Last week
-

Need Help Post Sim Ripple Tutorial
Shieh3 replied to adamknauer1's topic in General Houdini Questions
FMX HIVE 2022 presentation by Simon Fiedler & Bastian Schiffer -
 THVRQ joined the community
 -
 Max1586 joined the community
 -
Here's a couple older links on the topic.
-
 Shraunqhf joined the community
 -
Hey everyone, I have been experimenting with some new ideas & wanted to ask—has anyone tried incorporating AI-generated content into their FX workflows in Houdini? I am talking about things such as using AI-generated textures, noise patterns or even animation cues as part of simulations or procedural setups. Also I checked out a Gen ai course that briefly discussed how AI tools can be used in creative production & it sparked a few ideas. I want to know if anyone here has used AI outputs to drive things such as pyro, particles or other FX elements. Not just for quick concepts but as a core part of the workflow. I want to hear if any of you have tested this kind of mix. Did it actually help or just complicate things? Maybe someone’s even built tools around this idea? Thank you....:)
-
 ChaesarA joined the community
 -
 AustinSnunk joined the community
 -
Hey magicians, I was following Pizola's guided sim tutorial, and I don't know why my pieces are not falling down. The ghosted box is used as a guide velocity. I have uploaded the file here... Another problem is that small pieces are sticking to the surface area. Playblast1.mp4 GuidedRBD_Upload.hip
-
 silverglider joined the community
 -
2025-03-1422-12-16.mp4.e555422f6dfe2821d968424cac091851.mp4 I have been looking for this tutorial, does anyone know who makes it? John Kunz? It explains how they added ripples post sim. If you know the tutorial please send me! Thanks
-
opinput path expressions in Solaris?
PixelNinja replied to GlennimusPrime's topic in Lighting & Rendering + Solaris!
lopinputprims('.', 0) -
I remember there was a tutorial on this. Do you have the link to the artist that originally posted this? Thanks
-
 I remember there was a tutorial on this. Do you have the link to the artist that originally posted this? Thanks
 -
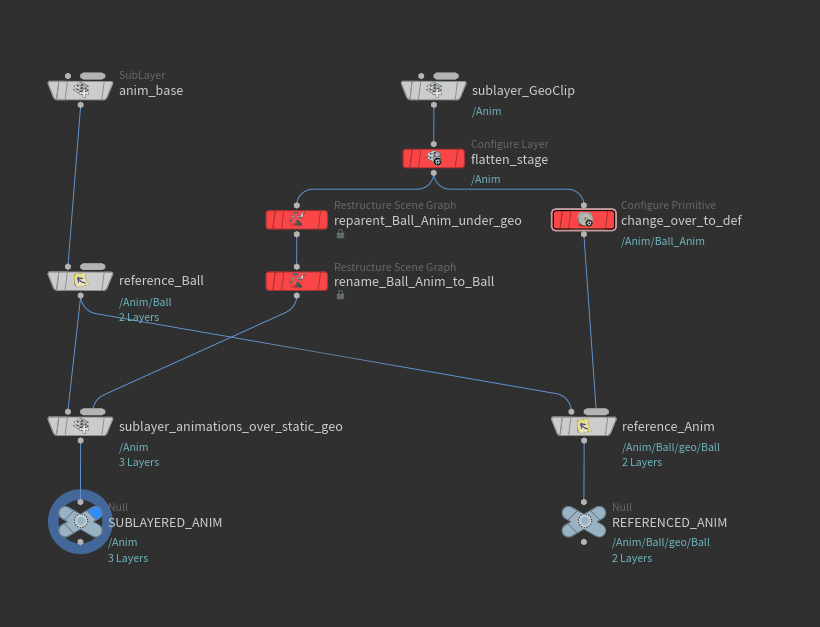
I don't know your pipeline so I can only comment on why your scenefile doesn't currently work. If you're intent is to sublayer deforming meshes over static meshes then your deforming meshes layer must be authored such that the mesh prims are in the correct place. Your scene attempts to sublayer /Anim/Ball_Anim over /Anim/Ball/geo/Ball, so it won't work. You could reference the deformation onto /Anim/Ball/geo/Ball but your deformation layer has /Anim/Ball_Anim specified as an "over" not a "define" so that won't work either. Essentially you need to reauthor your GeoClip layer. The red nodes in the image here are what I needed to do to make it work. My recommendation would be to either author your deforming mesh with a heirarchy that matches your asset (/Ball/geo/Ball) or your shot (/Anim/Ball/geo/Ball). In the former case you can sublayer the animation over the asset and then reference the animating asset into the shot. In the latter case you can simply sublayer the animation over the shot. Hope that helps. As a side note, I try to avoid sublayering after referencing as it leads to more layers on disk than necessary. If you look at the layers panel, every time you end up with an implicit layer sandwiched between explicit or "don't save" layers you'll end up with an extra layer needing to be saved. So try to order things to keep implicit layers together at the top of the stack so they nicely collaspe into a single work layer when you export.
-
For anyone else stumbling on this years later I had the same issue today. If you have your Karma render settings "Velocity Blur" parameter set to "Velocity Blur" or "Accelleration Blur" it won't render any Deformation Blur unless you set your deforming mesh prim to "No Velocity Blur" with a Render Geometry Settings LOP.
- 1 reply
-
- 1
-

-
 If you want to import camera into Solaris from OBJ context use Scene Import (Camera) from tab menu. From my experience it imports camera with all animated hierarchy. Or you can first bake all camera animations into a new camera with Bake Animation ROP then import this camera into LOP context.
 -
 I have a camera in SOPs, animated with two Null controls. Normally, I'd bake the camera and bring it into Solaris, but currently, baking misses the aim animation from the Null controls. How can I fix this? Ultimately, I just want to bring the animated camera object (controlled by the Nulls) into Solaris. Looking for a quick, easy way to do this!
 -

Hello. How can I add noise to my wireframe?
tamagochy replied to Gabor781's topic in General Houdini Questions
Use divide-> compute dual on the mesh then convert to lines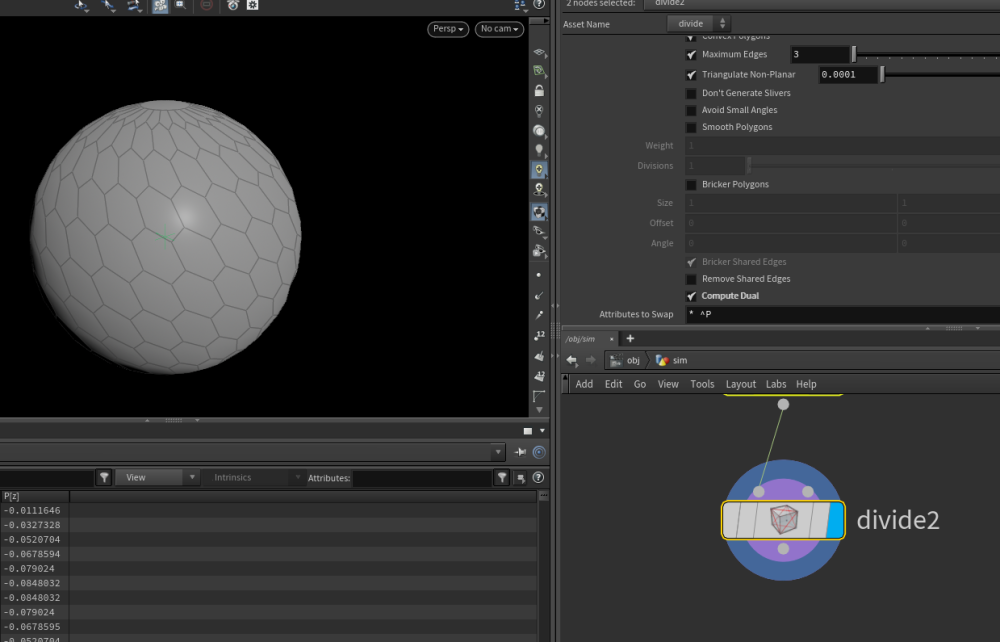
-

deadline rendering redshift dll error
samesami replied to angelous4x's topic in General Houdini Questions
If you are not rendering with cpu, just delete redshift-core-cpu-vc140.dl from the Redshift folder. -

Hello. How can I add noise to my wireframe?
terencemace replied to Gabor781's topic in General Houdini Questions
Look into Voronoi Fracture -
Hello everyone, Hope someone has some insight on how to fix this error. While submitting to my local box, to i get this error Not sure what to do or what this means. Any suggestions would be helpful.
- Earlier
-

Attribute Growth [SOLVED]
GlennimusPrime replied to GlennimusPrime's topic in General Houdini Questions
Apologies @vicvvsh I missed your post. This is even perfect. So simple and fast to work with. Thank you! -

Export/Import Redshift Proxy in Solaris, issue...
Earller replied to Masoud's topic in Lighting & Rendering + Solaris!
The issue likely stems from how the proxy is exported — it’s being treated as a single mesh without preserving per-component hierarchy. To fix this: In SOPs, ensure each component has a unique path or name attribute (use Name SOP or Attribute Create). In the Redshift Proxy Output SOP, disable "Export as Packed Primitives" to avoid flattening the geometry. In Solaris, when using the Redshift Proxy LOP, set it to "Load as Reference" and confirm that hierarchy is preserved in the Scene Graph Tree. Each component should appear as a separate prim. Once you have separate prims, use Material Library LOP and Material Assign LOP to assign materials to individual components. If the proxy continues to load as a single mesh, consider exporting as USD with proper hierarchy and assigning Redshift materials directly in Solaris for more flexibility. Hope this helps! forward proxy -

Images baked in white or black color only
Rival Consoles posted a topic in General Houdini Questions
Hi there, I'm trying to bake vertex colors applied to a high-res mesh into the same mesh but low-res and both have a principled shader applied to it. For now, no matter what I change in the principled shader or in the bake texture rop, the baked image comes out black. White UV island img attached If I just try baking a simple texture based on the high-res uv space, without transferring to the low-res mesh, a shiny white UV island image is created. I checked "Use Point Color' in the principles shader, applied the shader to the mesh, in the "bake texture" rop, I add the UV object, and check the Surface Unlit Base Color (basecolor) and the image is baked white. How can vertex colors can be properly baked in Houdini?
-
That's exciting! BUF’s in-house 3D app going public is huge—especially if it’s fully procedural. Can’t wait to see how it stacks up against Houdini and Blender!
-
 SM Tools changed their profile photo
 -
 Does the drive for writing the caches have to be accessible to both machines in a distributed sim? Is it possible to not use a network and just save the caches locally in each machine?
 -
untitled.mp4 sweep basic.hip you answering your own question ... sweep it
-
VM_Promo.mp4 VEX Manager 1.0 Snippet manager and code editing tool for H20.5+ The VEX Manager is a user-friendly tool for managing and editing VEX code as well as saving notes all within Houdini. It simplifies loading, creating, editing, and organizing VEX expressions, making it essential for artists working with VEX scripts. Download it here https://shirmanor.gumroad.com/l/vex_manager_v1