Search the Community
Showing results for tags 'code'.
-
VM_Promo.mp4 VEX Manager 1.0 Snippet manager and code editing tool for H20.5+ The VEX Manager is a user-friendly tool for managing and editing VEX code as well as saving notes all within Houdini. It simplifies loading, creating, editing, and organizing VEX expressions, making it essential for artists working with VEX scripts. Download it here https://shirmanor.gumroad.com/l/vex_manager_v1

-
Hi everyone, after using rhino/grasshopper, and blender for a while, I just decided to getting into houdini, so that's my quest. I would need to measure the distance between a curve and an object( the object is a pipe/tube, and a curve is an helix that goes along the tube), then copytopoints a cube with the origin on the curve going towards the tube. In order to stay procedural, I would like to give to the cube, the exact or an avarage distance between the curve and the pipe, like so I can change the radius of the 2 components (tube and curve), and the distance of the cube will follow automatically that distance

-
Hello to everyone! I'm creating this topic just to see if someone is able to break down the remesh node in VEX. The point is to achieve a faster result using a wrangler or more as a substitution for the remesh or polyreduce. So here you have some questions: 1. Is it better to use the original mesh (deleting and modifying the mesh) or creating a new one (generating points)? 2. Is the source code used in the remesh node faster than any script that could be written in VEX? If you find a way or you have an idea about how to do it, don't hesitate to share it with the community!
-
Hey, bit of a specific use case here, but has anyone successfully used the .asCode() Python function with the SOP solver? I can't seem to get it to save and recreate the nodes inside of the sop level solver node. I spent some time researching it but haven't found anyone even mentioning this problem. Everything else seems to work fine with the function even the DOP level SOP solver. It's just the SOP level solver that has this issue. I'm kind of at my wit's end trying to figure this out. I might be missing something super simple or obvious here, but I'm hoping someone else has encountered this and figured out what is happening. I suppose it could also be a bug, I haven't taken the time to dig through all the change logs on the SideFX website. I'm currently encountering this in Houdini 18.0.348 (which has known issues with the .asCode() function) as well 18.0.597 (where those issues have supposedly been resolved). If anyone has any insight I'd really appreciate a nudge in the right direction. Cheers, Brandon
-
In short, how can I calculate the transformation matrix, or just rotation similar to how a geometry constraint/rivet works, where you define a few points as reference to glue a geo to an animated one? Long one: I want to procedurally animate the preroll of some packed RBDs, by comparing frame 1 and 2 of the simulation and project the objects backwards in time using that offset. It's a pre-broken sphere, so for translation, I find the average position of all points for both frames to calculate the offset per frame, which works great. [@P -= offset * backwardFrame;] The rotation part isn't as accurate though. I believe multiplying a rotation matrix with a scalar [@P*= rotMatrix*time] doesn't produce the desired results, so I am trying to calculate an axis and a rotation value that describes the difference between these two frames. I am currently picking the positions of 1 random but similar point in both geometries relative to their center, which I cross to find the axis. Then I use an acos(dot()) to get the angle between these two vectors. It almost works, but not 100% and picking a different point changes the result a bit. I guess that's happening because I need to take in consideration more than 1 points into the two geometry. thank you
-
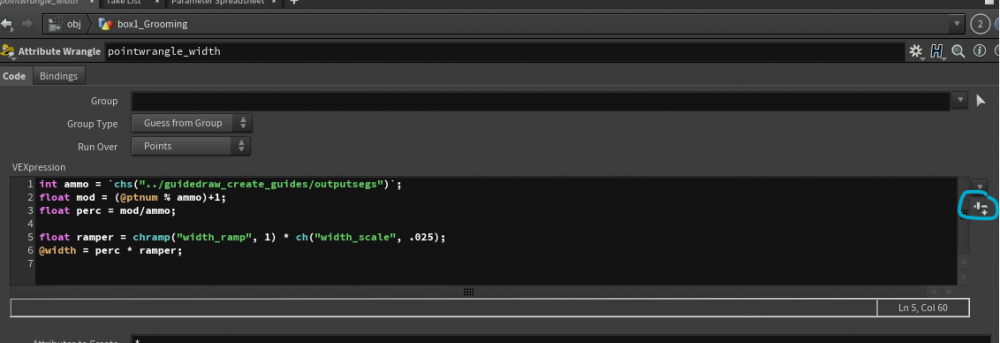
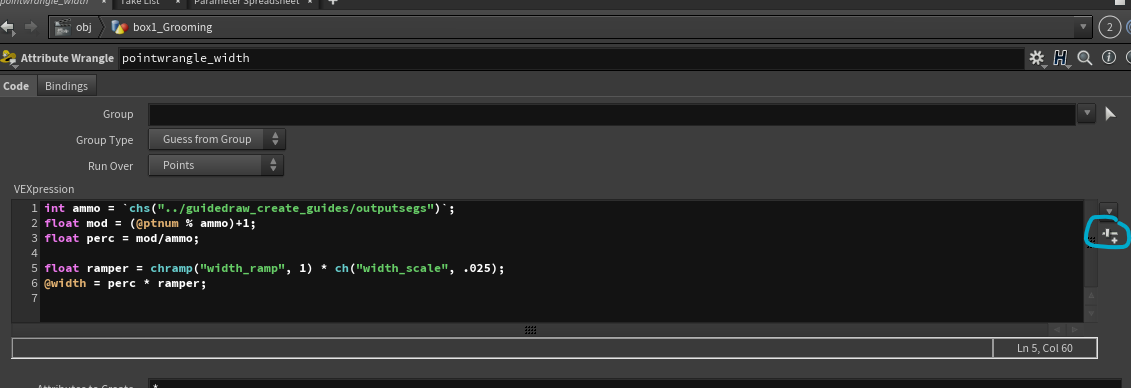
i am creating a attribute wrangler and will create 2 params, from the UI i can click that little icon and will create it for me, super easy. I did try to to grab the param and press "push button" h=hou.node('/obj/box1_Grooming/pointwrangle_width') ex=h.parm("exportlist") hou.Parm exportlist in /obj/box1_Grooming/pointwrangle_width> ex.pressButton() but nothing happen =( i inspect the button via "edit parameter interface" to see if there was a code or a callback attach to it,but didnt find anything... =( how could i create those params?
-
 Hi all, ** The thing I want to do is to obtain the coords from this kind of file and write vector positions. The positions corresponds to the place and orientation of each photo was taken. I want to track the path in wich the photos was taked. I have a file called cameras.sfm from "structure from motion" created with meshroom app (not inside houdini). I can read the file and split the lines with python, but I don't know how can I give format and write attributes to pass to an object. I'm new coding in python The file has two basic sections: - one called "views" that is an array of specs of a camera... that I don't need, but at the bottom of the file, is an array is what I need to give some format and pass to the attribute in sop level The array starts with the tag "poses": And each "pose" has an Id, maybe could be usefull to write an attribute for the id and others for the vector for the values in transform/rotation and the "center" I have some code for read the file and print/split lines but... I need help, hope you can guide me Thanks in advanced...
 -
Hello, I was wondering if anyone has dabbled with building a custom environment for Python development in Houdini. My goal is to simulate the hython shell in visual studio code and run my script with corresponding feedback in a Houdini session. The SideFx documentation on Command-Line Scripting is a great start. I understand bash scripting and setting $PATH variables but with that said I am a noob for creating this kind of interwoven setup and could use some guidance.
-
.thumb.jpg.ddf40d77d4edbb1e4d850a3ff91c66b7.jpg) Hello, I am simulating a data driven project. Say I have a volume node that generated a sphere volume, I also have 200 columns data that will fit into 0 - 10 range, and these 0 - 10 values will be used to generate different 200 color point in the color ramp slider in volume visualization node, and the effect I want to achieve is that 200 shells of spheres are colored based on 200 column data, and each shell's color also changes based on each row's data in each column. Like the screenshot I attached here, but I need more color points. What I want to do definitely needs coding, but I don't know where I could code to manipulate volume visualization node. Hope someone could help! This seems boring, but I really need some inspiration for my project~ Many thanks in advance!!!
Hello, I am simulating a data driven project. Say I have a volume node that generated a sphere volume, I also have 200 columns data that will fit into 0 - 10 range, and these 0 - 10 values will be used to generate different 200 color point in the color ramp slider in volume visualization node, and the effect I want to achieve is that 200 shells of spheres are colored based on 200 column data, and each shell's color also changes based on each row's data in each column. Like the screenshot I attached here, but I need more color points. What I want to do definitely needs coding, but I don't know where I could code to manipulate volume visualization node. Hope someone could help! This seems boring, but I really need some inspiration for my project~ Many thanks in advance!!!.thumb.png.d9959d98e6eef534e5dd64f61f4d97a6.png)
-
Hi guys, Just a quick question I hope have a simple answer! I have a dual boot setup and switch back and forth between Win and Linux. Due to files having to point to same location I have a variable in the .env that point to each respective mounting place $NAS. Now, I imported an FBX through the File menu and it pops in as expected, but all the nodes have the full path in them. With the Textport I can do the "opchange" operation to switch the mounting place to the variable - but when I do that it converts the variable to it's value (the original path). My question now is: Can I somehow do the opchange without the Textport converting the variable to it's value and simply make it put the variable there instead of the path? I hope my rambling is not too confusing. Thanks a bunch, Jack
-
In the Python SOP, I've run into a wall trying to get an integer converted to a string. In the larger picture, I'm trying to subtract 1 from a value which is currently part of a string. There are probably neater ways to write these steps, but I'm fairly new to Python so I'm writing it all out to make things easier to follow. I start with a string such as: string = "f27" Then remove the 'f' like so: string = string[1:] Convert it to an integer: integer = int(string) Subtract 1 from the value: integer -= 1 set new string string_new = "f" + str(integer) The last line returns an error on the Python SOP: TypeError: str() object is not callable. This is confusing because these same steps work just fine in the Python shell. Is there an alternative to str(), or am I using it wrong?
-
 hello everyone,i'm learning c++ and I'm new to Houdini HDK. I was reading another topic, someone told that you can use example files and manipulate them. so I have some questions for you: as you can see the header code and it's definition namespace HDK_Sample { /// Run a sin() wave through geometry by deforming points /// @see @ref HOM/SOP_HOMWave.C, SOP_HOMWave, SOP_CPPWave class SOP_PointWave : public SOP_Node { public: SOP_PointWave(OP_Network *net, const char *name, OP_Operator *op); virtual ~SOP_PointWave(); static PRM_Template myTemplateList[]; static OP_Node *myConstructor(OP_Network*, const char *, OP_Operator *); /// This method is created so that it can be called by handles. It only /// cooks the input group of this SOP. The geometry in this group is /// the only geometry manipulated by this SOP. virtual OP_ERROR cookInputGroups(OP_Context &context, int alone = 0); protected: /// Method to cook geometry for the SOP virtual OP_ERROR cookMySop(OP_Context &context); private: void getGroups(UT_String &str){ evalString(str, "group", 0, 0); } fpreal AMP(fpreal t) { return evalFloat("amp", 0, t); } fpreal PHASE(fpreal t) { return evalFloat("phase", 0, t); } fpreal PERIOD(fpreal t) { return evalFloat("period", 0, t); } /// This is the group of geometry to be manipulated by this SOP and cooked /// by the method "cookInputGroups". const GA_PointGroup *myGroup; }; using namespace HDK_Sample; void newSopOperator(OP_OperatorTable *table) { table->addOperator(new OP_Operator( "hdk_pointwave", "Point Wave", SOP_PointWave::myConstructor, SOP_PointWave::myTemplateList, 1, 1, 0)); } static PRM_Name names[] = { PRM_Name("amp", "Amplitude"), PRM_Name("phase", "Phase"), PRM_Name("period", "Period"), }; PRM_Template SOP_PointWave::myTemplateList[] = { PRM_Template(PRM_STRING, 1, &PRMgroupName, 0, &SOP_Node::pointGroupMenu, 0, 0, SOP_Node::getGroupSelectButton( GA_GROUP_POINT)), PRM_Template(PRM_FLT_J, 1, &names[0], PRMoneDefaults, 0, &PRMscaleRange), PRM_Template(PRM_FLT_J, 1, &names[1], PRMzeroDefaults), PRM_Template(PRM_FLT_J, 1, &names[2], PRMoneDefaults), PRM_Template(), }; OP_Node * SOP_PointWave::myConstructor(OP_Network *net, const char *name, OP_Operator *op) { return new SOP_PointWave(net, name, op); } SOP_PointWave::SOP_PointWave(OP_Network *net, const char *name, OP_Operator *op) : SOP_Node(net, name, op), myGroup(NULL) { mySopFlags.setManagesDataIDs(true); } SOP_PointWave::~SOP_PointWave() {} OP_ERROR SOP_PointWave::cookInputGroups(OP_Context &context, int alone) { return cookInputPointGroups( context, // This is needed for cooking the group parameter, and cooking the input if alone. myGroup, // The group (or NULL) is written to myGroup if not alone. alone, // This is true iff called outside of cookMySop to update handles. // true means the group will be for the input geometry. // false means the group will be for gdp (the working/output geometry). true, // (default) true means to set the selection to the group if not alone and the highlight flag is on. 0, // (default) Parameter index of the group field -1, // (default) Parameter index of the group type field (-1 since there isn't one) true, // (default) true means that a pointer to an existing group is okay; false means group is always new. false, // (default) false means new groups should be unordered; true means new groups should be ordered. true, // (default) true means that all new groups should be detached, so not owned by the detail; // false means that new point and primitive groups on gdp will be owned by gdp. 0 // (default) Index of the input whose geometry the group will be made for if alone. ); } OP_ERROR SOP_PointWave::cookMySop(OP_Context &context) { OP_AutoLockInputs inputs(this); if (inputs.lock(context) >= UT_ERROR_ABORT) return error(); duplicatePointSource(0, context); fpreal t = context.getTime(); float phase = PHASE(t); float amp = AMP(t); float period = PERIOD(t); if (error() >= UT_ERROR_ABORT) return error(); if (cookInputGroups(context) >= UT_ERROR_ABORT) return error(); GA_Offset ptoff; GA_FOR_ALL_GROUP_PTOFF(gdp, myGroup, ptoff) { UT_Vector3 p = gdp->getPos3(ptoff); p.y() += SYSsin( (p.x() / period + phase) * M_PI * 2 ) * amp; gdp->setPos3(ptoff, p); } if (!myGroup || !myGroup->isEmpty()) gdp->getP()->bumpDataId(); return error(); } my first question is: we have this int header file : SOP_PointWave(OP_Network *net, const char *name, OP_Operator *op); where is it's definition in *.c file? ----------------------------------------------------------------------------------------------------------------------------------------- my second question is: void newSopOperator(OP_OperatorTable *table) { table->addOperator(new OP_Operator( "hdk_pointwave", "Point Wave", SOP_PointWave::myConstructor, SOP_PointWave::myTemplateList, 1, 1, 0)); } why this function is void? I know because it won't return anything, but why it shouldn't? why newSopOperator's parameter is a class (i know a class is custom data type) but why? and what is table in the parameter? ----------------------------------------------------------------- BEST REGARDS
 -
Hi, Im new to python, Im trying to use vscode as external editor but it really sucks at being intuitive for a beginner... 1) Im trying to add the hou.module so I can see the functions but It doesnt show the functions: my settings.json looks like this: { "python.pythonPath": "C:\\PROGRA~1\\SIDEEF~1\\HOUDIN~1.287\\python27\\python.exe", "python.linting.pylintEnabled": false, "python.linting.enabled": true, "python.linting.flake8Enabled": true, "[python]":{}, "python.jediEnabled": false, "python.autoComplete.extraPaths": [ "C:\\Program Files\\Side Effects Software\\Houdini 18.0.287\\houdini\\python2.7libs\\Hou.pyc" ], } (I tried without the [] brackets too) 2) Also when I edit a .py Code tells me: Linter flake8 is not installed. And when I click Install is says: There is no Pip installer available in the selected environment. Can someone help? Im using: Windows 10 Houdini 18 VS Code v 1.41.1 Python v 2.7.15 64-bit
-
http://patreon.com/posts/33249763 http://gumroad.com/l/houdinisupercharged In this video I will show you some of the inner workings of the context-sensitive rule-based hotkey system that I implemented and one I have been using for a while to speed up my workflow inside Houdini. It's a very light-weight and flexible system that allows an arbitrary number of actions to be assigned to any key, with extensive modifier key and state support (Ctrl, Shift, Alt, Space, LMB, MMB, RMB, selection state). It's deeply integrated into the overlay network editor workflow.
-
- 5
-

-
- optimization
- walkthrough
- (and 11 more)
-
Hi, How do I find the name of a node to pass into the 'createNode()' function? I'm following a tutorial, and in it he writes: .createNode(“ifd”) to create a mantra node. But I can't figure out where I find this. I've printed the node using the ‘.asCode()’ function, but I'm not really sure what I'm looking for. Thanks a lot
-
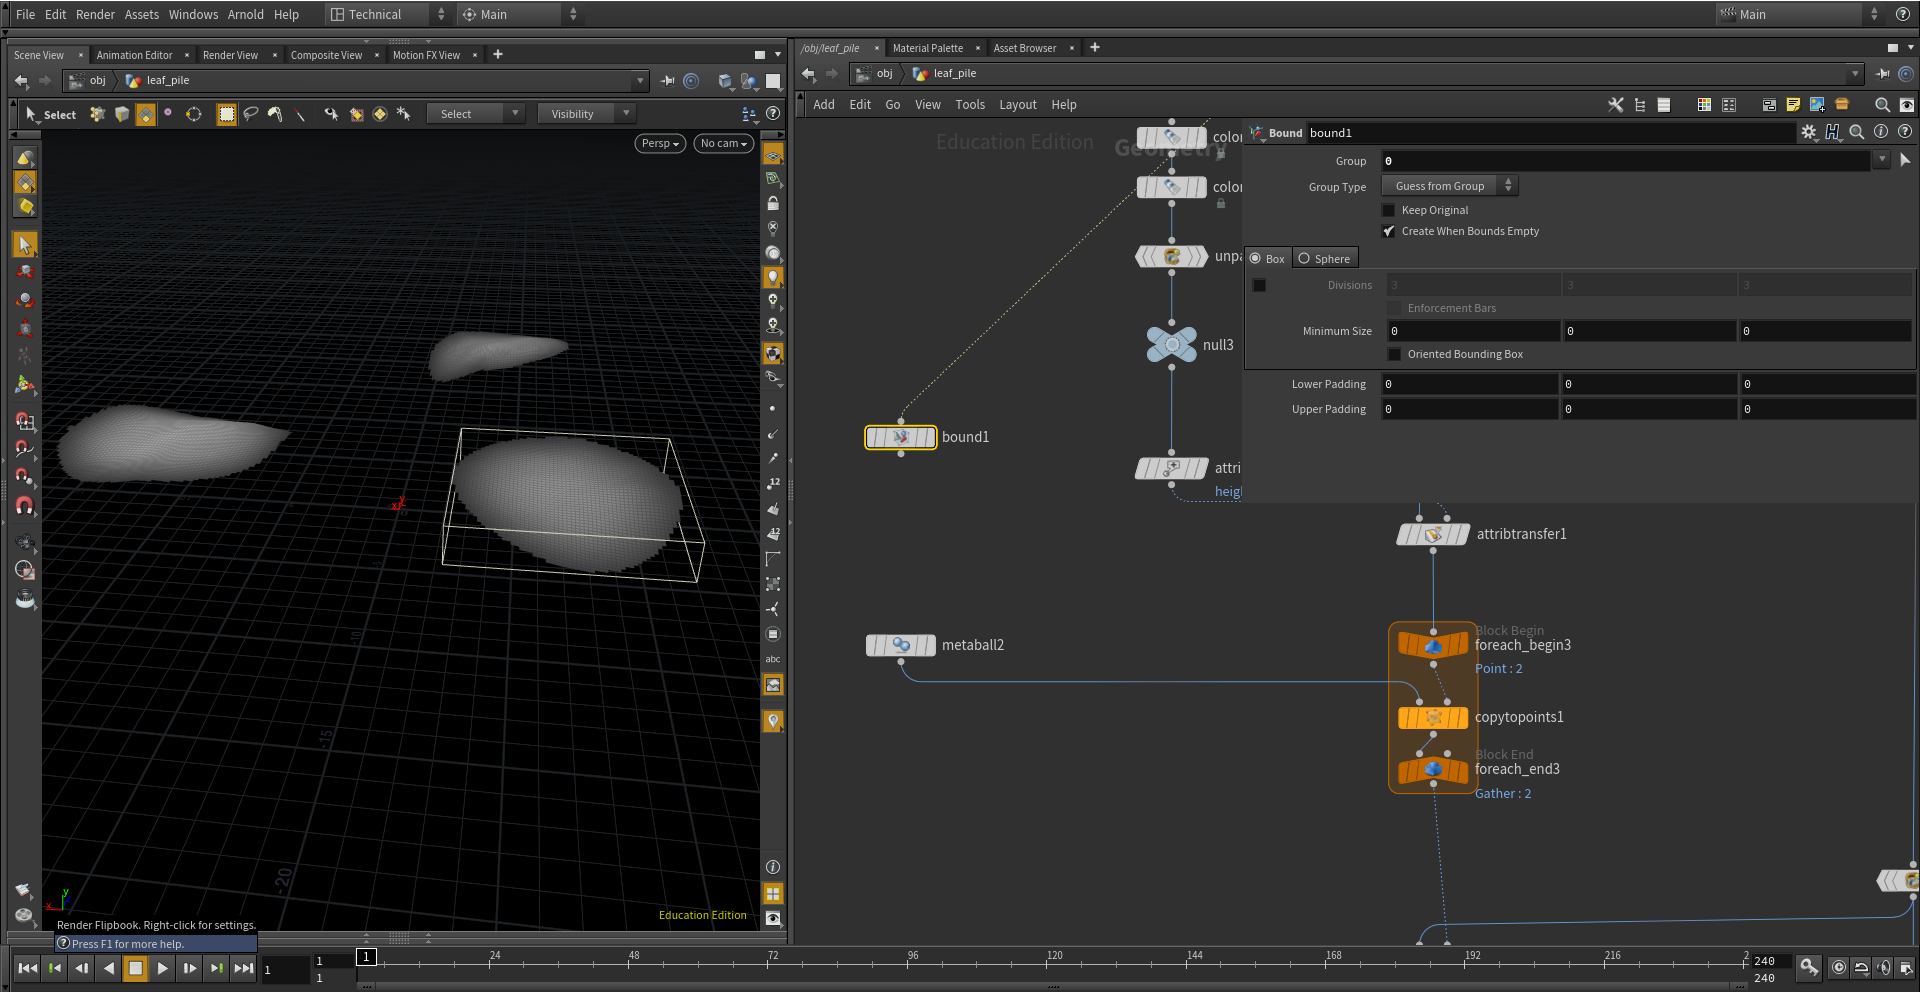
Hi Guys, For a tool i'm working on i need the radius of my metaball to be affected by the size of a painted region from a terrain, can anybody suggest how this would be done? It needs to change as the user paints but i'm getting stuck on the exact terminology of the code i would need to type into the region field on the metaball, this is what i currently have typed into the radius field on the metaball but it isn't working: getpointbbox_size(/obj/leaf_pile/"bound1", 0) Any suggestions would be greatly appreciated!

-
 Hi, I am currently trying to use mantra in distributed rendering mode. (mantra -H machine1,machine2) It all works as expected, but as soon as I connect something into a cached shader (for example a constant into the principled shader), the error “No Code Generator Available for opshader_path_xyz” pops up and it doesn't render at all anymore. It also happens with custom cached shader assets. All works well in non distributed rendering mode. If I unlock the asset, then it seems to work again since the asset is then "in the file", but this is unfortunately not useful in production. Additional Info: I am using windows and the “Force VEX Shader Embedding” checkbox is on. Has anyone experienced this error before? If no I'll submit a bug report. Cheers, Luca
 -
Hi there. I’m having some trouble translating two parameter expressions in this tutorial using Houdini 14 to Houdini 16.5: https://player.vimeo.com/video/130386299 The first expression is for the Value parameter in a attribute create node (given the name “WIDTH”). It is meant to tapper the octopus tentacle geometry. The attribute was created as a Ramp Float (given the name “cross”), in a null node named “Cross_RAMP.” The expression looks like this: chramp(“../Cross_RAMP/cross”,$PT/$NPT,0) The second expression is meant to help centralize control for the Scale parameter in a sweep node. The expression look like this: point(“../WIDTH”,$PT,”width”,0) So the null where the ramp was created is being tapped in the attribute create node, which is being tapped by the sweep node. But it is not working. The errors I get for these offer some leads, but I’m too new to code expressions to sort it out on my own. Wading through the online documentation and trial and error has not yet proven fruitful. I could use some help. Would someone tell me the proper expression to write, either with a VEX snippet, or other such replacement code? Thanks in advance for time and efforts.
-
Is there a environment variable that will allow Houdini to open in manual when Houdini is fired up? That being said, is there an env variable that will also allow me to save incrementally? Thanks for your help Midi
-
Hey guys! I'm starting this thread to share few shelf scripts i use and came across, during my houdini journey. Please feel free to add in more! # ADD NODES/OBJECTS TO MANTRA (Customisable) Select node(s) and click on the script to add it to mantra's force object/matte object etc. You can customise where to add by changing the parameter name (line 22) import hou selection = hou.selectedNodes() names = [n.name() for n in selection] my_list = “” if len(selection) < 1 : my_list = "nothing selected, please select at least one object" else: a=1 for sel in selection: my_list = my_list + "\n" + "selected object " + str(a) + ":" + sel.name() a=a+1 hou.ui.displayMessage(my_list, buttons=('OK',)) length = len(selection) print "Number of nodes selected: " + str(length) paths = [n.path() for n in hou.node('/out').allSubChildren() if n.type() == hou.nodeType('Driver/ifd')] selected = hou.ui.selectFromTree(choices=paths) mantras = [hou.node(path) for path in selected] for m in mantras: m.parm('matte_objects').set(' '.join(n.name() for n in hou.selectedNodes())) #CHANGE PARAMETER NAME AS REQURIED print ("Selected mantra nodes : ") + m.name() new_name=' '.join(names) hou.ui.displayMessage("( "+ (new_name) + " ) – added to selected mantra(s) matte objects.", buttons=('*OK*',)) #SETUP DELAYED LOAD Select node(s) and execute. It'll create procedural shader and setup all the parameters. Works on all nodes with 'file' parameter. #function for node variable: return type, description and name def extract_getTypeName(node): nodetype = node.type() description = nodetype.description() type_name = nodetype.name() return type_name #show selection tuple names selection = hou.selectedNodes() print len(selection) my_list = “” if len(selection) < 1 : my_list = "nothing selected, please select at least one object" else: a=1 for sel in selection: my_list = "selected object : " + sel.name() a=a+1 hou.ui.displayMessage(my_list, buttons=('OK',)) #for each object in selection lenght = len(selection) print "DONE!" for i in range(lenght): #create python variable for selected node selected = hou.selectedNodes()[i] if selected: meshop=hou.node('/shop'); meshop=meshop.createNode('vm_geo_file'); meshop.setName('delayed_load_shop_1', 1) targetdshop=meshop.path(); meobj=hou.node('/obj') meobj=meobj.createNode("geo"); meobj.setParms({"shop_geometrypath":targetdshop}); meobj.setName('DELAYED_load_geo_1', 1) targetfile=selected.parm('file') or selected.parm('sopoutput') mefile=meobj.node('file1') meobj.parm("geo_velocityblur").set(1) meobj.parm("vm_forcegeometry").set(0) meshop.parm("file").set(targetfile)
-
 This operator allows you to run an OpenCL kernel as part of your SOP network. Depending on the GPU, some operators can be orders of magnitude faster than even VEX. In this case the OpenCL code is 144 times faster than VEX on GTX 970.
- 10 replies
-
- 14
-
-
Hello Everyone, http://www.hossamfx.org/math-in-houdini-vol2/ Hello Everyone, Description: In volume two of Math in Houdini training. We will continue exploring the big role of math in creating visual effects and controlling the simulation behavior and this time we will move to more advanced concepts and provide cool projects. I will explain one of most important physical parameter: the gradient. And show you how to use it in rigging and collision and give you wide idea about using gradient in different operations in Houdini also We will go indepth with matrices and learn cool techniques using the matrix: it is the “Frame of Reference” you must know this magic secret about matrix. If you have many questions about Quaternion parameter, So we will dive into this concept and answer all questions with cool projects and we will see how to create quaternion field to effectparticles motion and if you don’t know what is the Vector 4, we will have cool project about using vector 4 inside the wire solver dynamics. And I will show you how it to build your own cloth simulation from scratch, this part will give wide idea about how the dynamic solvers work and what is the constraint , gravity , and how the collision is calculated ….. and many other math topics. Thank you. Lesson plan WHAT IS THE GRADIENT, AND FOR WHAT !!! all dynamic solvers use Gradient and normal and velocity and collision calculations, all this Physical Parameters use Gradient, you absolutely Know what is the Gradient !!! ? 1. Gradient & Slope Relationship– Are there any relationship between it? 2. It can create Normal – slope can create normal, how? 3. Speed and Velocity calculates –it is awesome how slope can calculates speed for everything. 4. Slope & Dot product in Rigging – No more tutorials about how to Rig the wheel. 5. Gradient of surface – Slope can create Gradient 2D field. MATRIX IN DEPTH !!! we will start by talking about for what we need matrix and next it will be more clear how it is easy to use matrix, and Frame of Reference is strong concept that you must have idea on how to use. 6. Why we created the Matrices – to understand matrices I must know for what it was created. 7. Recreating the Matrix – Now we will see how it is more easy with Matrices. 8. Frame of Reference – it is cool Concept you must know how to use with matrices. QUATERNION, NO MORE QUESTIONS ??? you don't know any thing about quaternion! you will know every thing about it, for what, when to use, how to control and how to build field of quaternion to advect particles. 9. What is the Quaternion – You will Have depth understand of this Scary parameter. 10. Quaternion Field part 1 – Quaternion inside Dynamics can create awesome animation in Particles. 11. Quaternion Field part 2 –How to Keep Particles inside defiened Volume using quaternion attribut VECTOR 4 IS A QUATERNION, ... !!! the orient attribute in the Wire solver is very important and you must know how it work, in this project we will manipulate this Attribute to create procedural dynamic animation. 12. Quaternion & Wire Solver – Big role of Quaternion in wire object. 13. Feelers & Quaternion part 1 –Feelers of insects moving around all the time, we will simulate this motion with quaternion. 14. Feelers & Quaternion part 2 –How to control the physical parameters of feelers to get nice real motion. SIMULATION CODE & COLLISION it is very important to get depth understand of how the Dynamic solvers work, we will see how we can build cloth simulation and add collision to this simulation using the Point VOP and Sop Solver. 15. Apply Gravity –Without any dynamics solvers, we will create our solver and start by adding gravity force to objects using the point vop and sop solver. 16. Create Cloth Force – Define the force spring between cloth object points and create pin constraint for new solver. 17. Gradient & Collision –Gradient of Volume is the way to create collision between objects. ِAll Content With Project Files . Full information Here
-
 Hi Please consider changing the default background for the style for "No Syntax Highlighting" to a brighter color. As it is now it's almost impossible to read. I seems a lot of people leave this setting at default, which is fine but please make it easier to read. Something like this will be more than sufficient: pre.ipsCode{ background: #ccc; }
-
The most powerful wrangle operator due to the sheer fire power of the HDK. Performance increase can vary from a few times to thousands of times depending on the scenario.
-
Today I was investigating how really works wrangle nodes type( more in general vex ) trying some printf debug statment. as written in the reference : "This node runs the snippet on the detail or every point/primitive/vertex (depending on the Class parameter) in the input geometry. The snippet can edit the input geometry by changing attributes. It can access information from other geometry using attributes and VEX functions." so chosing point class parameter and having for example an array/set of points( I don't know how point are actually internally handled by houdini), the code is "applied" to every i-th elements of the array, like a big external "invisible" forEach loop. Correct me if I'm wrong. now, my snippet is very simple: for (int i=0; i <5;i++) { printf("Point processed is %d \n", @ptnum); printf("Number of iteration: %d\n", i); }


.png.ed41b6794b3d6a78addeff4b10f17c74.png)