Search the Community
Showing results for tags 'rigging'.
-
hello how would you go about changing the inputs of pointtransform inside using autorig component graph, I almost made a null this was the last step. I need the transforms0 to be the name of my node, I tried using Dict::renamekeys or Im just missing an easier way to do this? edit: I realize I probably do not need this, the controller is functioning as expected, so just out of curiosity, how would i rename the the ports of pointtransform?
-
I managed to find some time to make this tutorial on building USD hierarchies in SOPs. I couldn't find many resources on things like setting pivots and altering transforms so once I figured it all out I thought I'd share the approach. Hope someone out there finds it useful.
-
I have a simple helicopter rig where I animate the rotation of the rotor blade. On frame 1, the value is 0, and on frame 60, it's 52000. https://i.imgur.com/hepgoiG.png Everything works correctly in Houdini. However, when I import it via FBX character import into 3ds Max, Maya, or back into Houdini using Filmbox FBX (it doesn't matter), the result is the same. The animation values do not start from 0 to 52000 but from 0 to 9520. If I animate the keys differently, for example, using 64354 on frame 60, the values will be different but still not matching. https://i.imgur.com/4bNjeue.png https://i.imgur.com/SbQVOo1.png I tried manually setting the keys and baking them, but the result is still incorrect. Everything else in the rig works correctly. I also created a rig using just a box and rotated it using rigpose, but the result is also incorrect. It seems that the issue lies either in the export process or with how the rigpose animation works with larger values. I need the rotation value data to set up motion blur in 3ds Max. Additionally, in another shot, there is slow motion, and it's important for all values to match correctly so that I don't have to animate the rotor blades separately in 3ds Max. Interestingly, the blade's position matches after the export, but the actual value decreases in some unknown logic - https://i.imgur.com/LWFtDbM.gif Before the export, in the second frame, the value is 881.356. Afterward, it becomes 161.356 (which is 360 + 360 + 161.356). It reduces by a full 2 rotations. In the fourth frame, before the export, the value is 2644.07, and after, it's 484.068. At this point, I can't see any logic behind it.
-
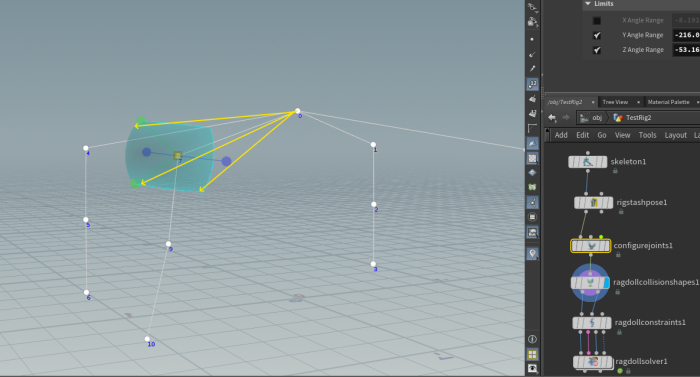
 Hello there! When I click "Bone1", Ragdoll collision shapes adds a collision node to point0. The same happens when I click Bone2, Bone3 or Bone4. How do I add collisions to Bone1 .. Bone4? Should I click respective joints 4, 7, 1 and 8? But that does not seem right. The node configure joints is similarly puzzling. Does the image bellow mean that the Bone1 will move only in the cone displayed by the sphere? I've noted in a yellow color valid positions that I imagine.
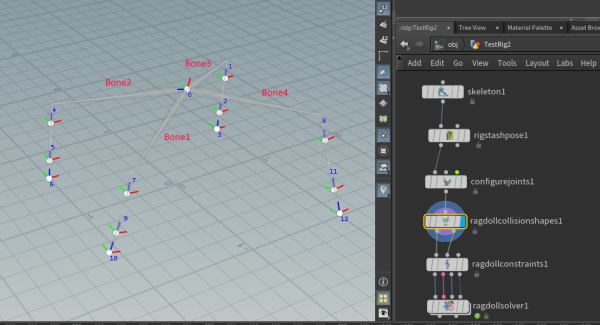
-
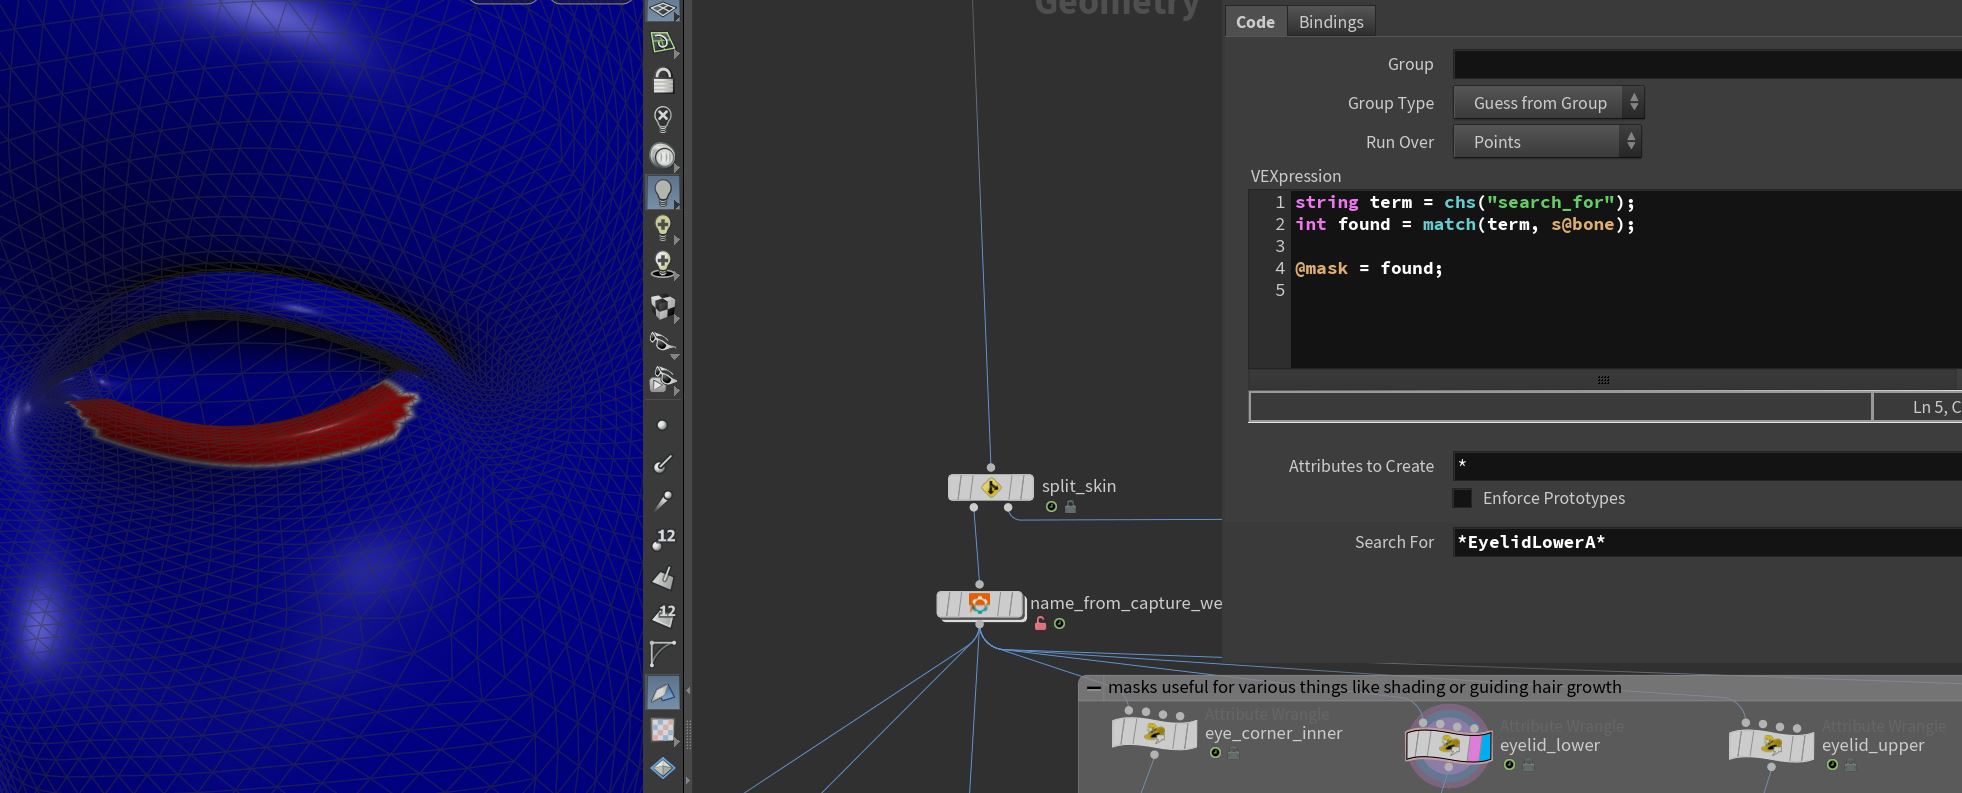
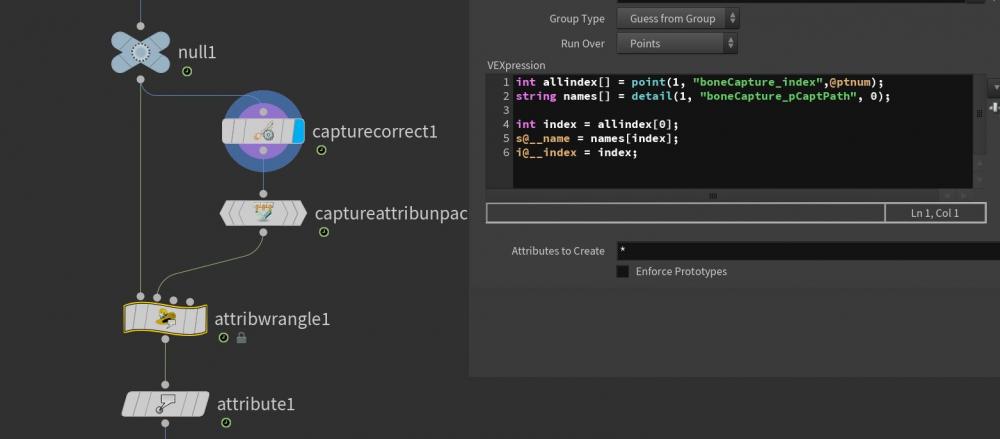
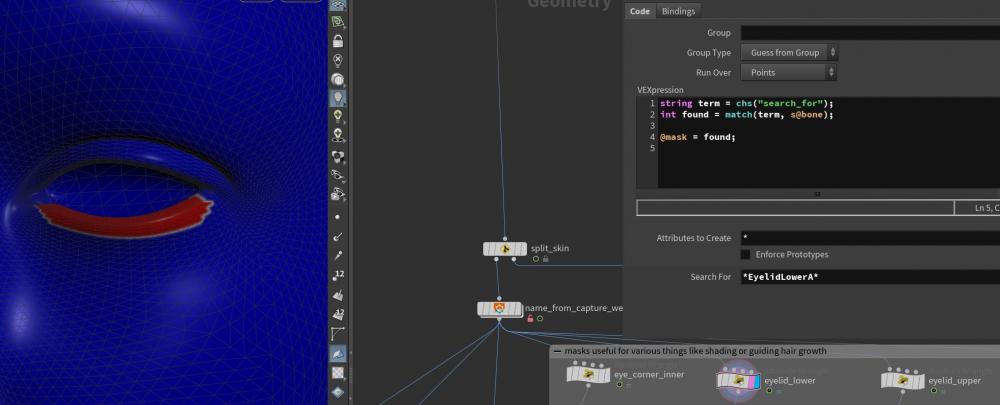
Hi all, I'm working with a character .fbx imported from another package, and need to extract the painted weights for a specific bone to a point attribute to use as a mask. Right now i'm using the labs Name from Capture Weight node, which unpacks the weights and saves the name of the bone that has the highest influence on a point to string attribute by just returning the first entry. Then I use the following vex to do a search for a particular bone(s) in that string attribute, something like "eyelidLower*": string term = chs("search_for"); int found = match(term, s@bone); @mask = found; that returns 1 for all the points that match the term so i can a linear mask, but I want to return and sum the actual weights - is this possible? Many thanks
-
 Hi all, Is there a way I can use a shelf tool python script to select a joint in the rig tree window pane when I have a rig pose SOP selected?
 -
Hi new to kinefx and mocap, can't get my character to go for some reason- the arms get all crossed up. Would love some help with this. I want to bind/retarget the character to the t-pose in the first frame of the animation but then loop through the rest of the anim without that frame- can't figure out what my node setup should look like for that. File attached, thanks so much Retarg_Help.zip
-
Hi, has anyone been able to successfully match the Mocap skeletons from the CMU database to a Mixamo skeleton? I've been trying for days overall, trying all sorts of combinations and tutorials but I end up with twisted skeletons and arms all over the place. I think it has something to do with the CMU skeletons having their shoulders inside on top of the next points wheras the Mixamo ones are in normal shoulder positions, but using rig match pose nodes to move the points around hasn't helped here. Have watched a lot of tutorials multiple times including the ones by Parker Coleman on Youtube which are great, as well as a few official SideFX ones, and I've learned a bit about Kinefx in all this but not enough to get there. Thank you.
-
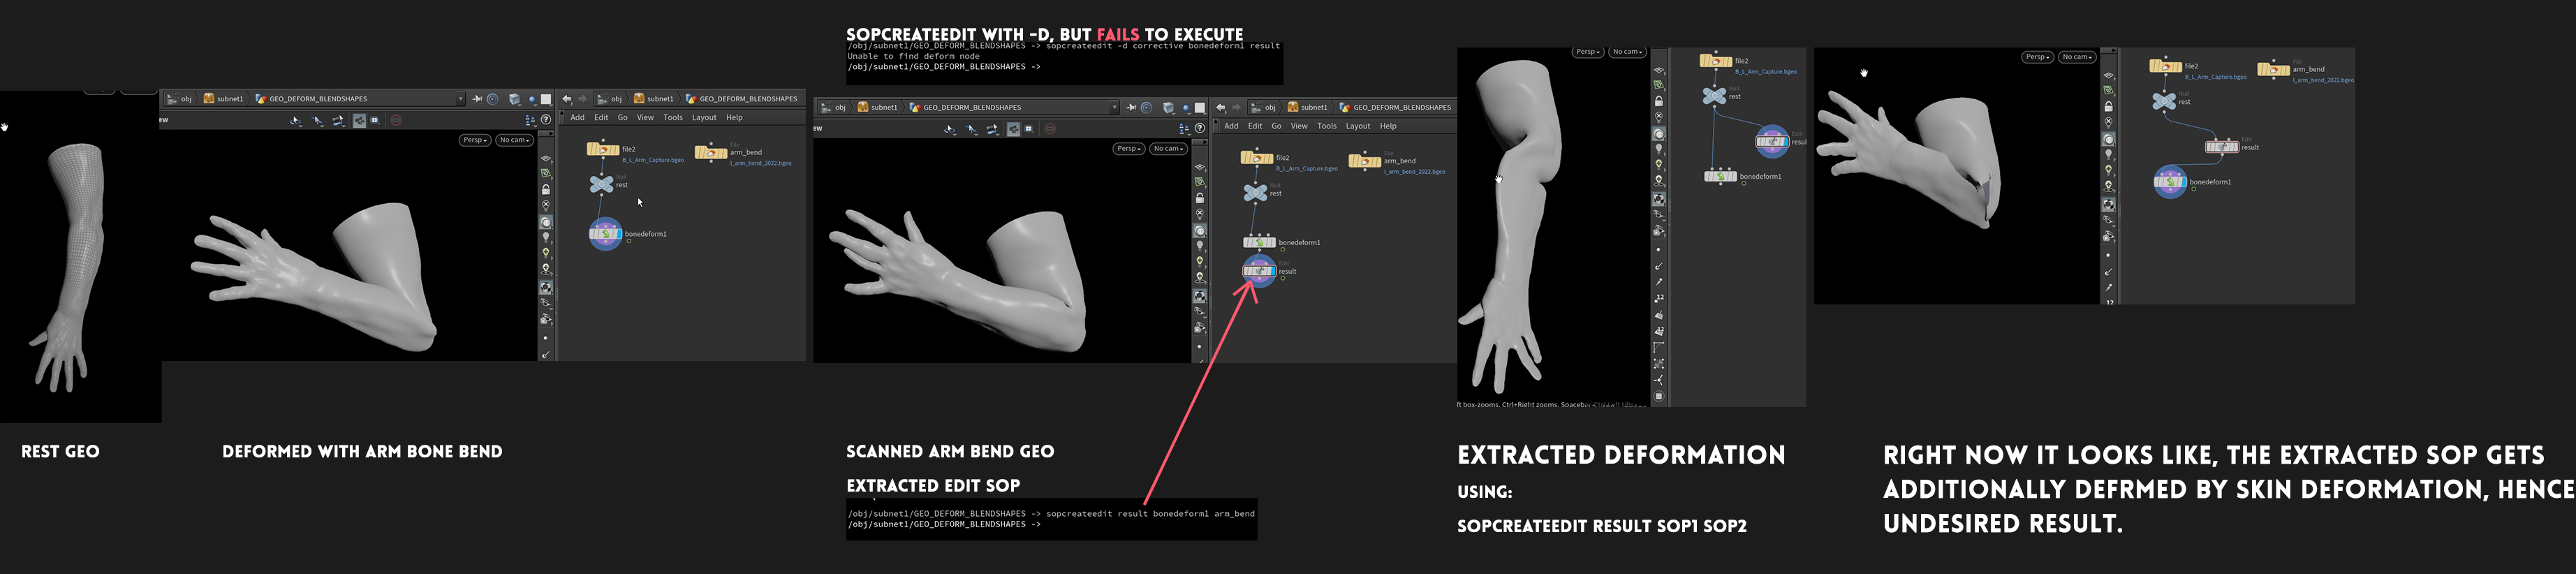
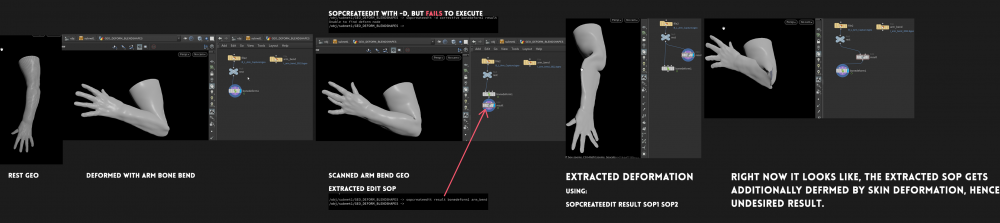
Hi ! I'm working on a rig, completed with Rigging series tutorials made by Michael Goldfarb. I've got two scans of an arm, open and bent one. Unfortunately elbow deformation is troublesome. I followed these videos : https://vimeo.com/221779886 and https://www.rokandic.com/houdini-rigging-techniques-ii The first video made by Ramteen presented a method with sopcreateedit -d name sop1 sop2 Using command with -d didn't work, so I did without. sopcreateedit name sop1 sop2 Trying the command with -d resulted with an error, it couldn't find a deform node. I assume this is a key-step to achieve the proper result.. The directory was right, otherwise I wouldn't have extracted anything at all. Without any further ado I'm atatching self-explainatory image, representing the issue. When I tried Rok Andic approach with Shape Difference node, it didn't work at all... only errors in CHOP NET saying improper SOP input. Even having all capture attrs intact Does anyone have an idea what's the solution? Maybe you could help? @Ramteen@michael Many thanks in advance!
-
Hi everybody, I'm trying to rig a book. I have a problem with blending between IK and FK as the angle between IK and FK position is more than 180 degrees. I tried to cheat this problem adding interim position between these two positions and while it almost solved my problem, it behaves very strange at some point. On the gif below you can see it jumps at the end and overshoots. Sometimes at jumps at right position for one frame. The idea is when the book is closed, bones follow the rotation of root, but when it is open, the book cover looks at the goal on left regardless of the rotation of the root. Any suggestions on how to solve the problem? Thanks in advance. Here is the hipfile: testBookCover.hipnc
-
I’ve been attempting to use the motion effects CHOPs for rotation parameters inside a rig pose sop, but every so often the channel reference breaks somehow. This forces me to redo my motion effect. I’m not very familiar with CHOPs, my question is what would be the best way to go about baking the motion effect’s animation to keyframes so I wouldn’t have to bother with chop references breaking? Thanks.
-
Hello all, I've been searching around for a while and I can't seem to find much on muscle simulation that doesn't already have a rig that was made in Houdini. The animation I have is from Maya, so I can bring in the cached and cleaned geo no problem. But I do need the rig to be able to attach muscles to the model to be able to move with it. It seems counter intuitive to bring in cached geo just to make a rig ontop of it, with the added problem of attaching it to the already moving skin. I might also not be looking at it properly, so it comes down to this; Does somebody have a good workflow for getting muscles to move with the cached geo in Houdini, or how to export an animated skeleton from Maya to Houdini? I'm properly confused, even documentation help would be good at this point, maybe a secret blog post somewhere
-
So this goes in my list of petty requests, my background is as a designer and ugly rigs make me crazy. Can anyone think of a simple way to get the Attach Control Geometry to ignore the rotation of the attached joint or easily counter-act it? Some controls, for instance IK foot controllers, Knee pole vectors, and certain controllers for things like shoulders and clavicles, generally (by convention) are usually set in world space. That is: the control isn't oriented to the joint's rotation, it's just attached with a world rotation of 0,0,0. Of course you can manually adjust the control, but that takes a fair amount of fiddling (especially if it was your OCD that made you want to change it in he first place). I thought I could dive inside and bypass something or add some nodes in there, but it looks like everything is handled by one slow Python script and my Python ain't what it was. I'd like to just be able to add something that bypasses the transfer of the joint orientation to the controller or inverts the matrix.
-
^This is what I'm going for. I'm trying to follow the guide here: https://www.sidefx.com/docs/houdini/character/kinefx/retargetcleanup.html , specifically Example 4: Making a character appear to move and balance on a platform. However, the character seems to be doing almost the opposite of what I would expect. The feet stay planted on the platform, but the upper body leans into the motion even further rather than leaning to counterbalance the lower body. The guide's setup seems very straightforward, and from what I can tell mine is essentially the exact same. I've tried switching out the character, but haven't gotten better results. Is there something I've missed? (The model is Passive Marker Man from Mixamo, but I don't want to upload it for copyright reasons. You can just switch out the model with any rigged fbx though, and reselect the foot joints in the deletejoints1 and fullbodyik1 nodes.) Balance.hipnc
-
Title says it - is there any way to have a parented joint not inherit the scale of its parent joint? I tried setting scaleinheritance attrib to 4 both before and after the rig pose - no success. I assume there is a rig vop or wrangle solution. I made a naive attempt of getting the transforms, extracting the scale and replacing it with scale from an inverted transform but that didn't work either. Any ideas?
-
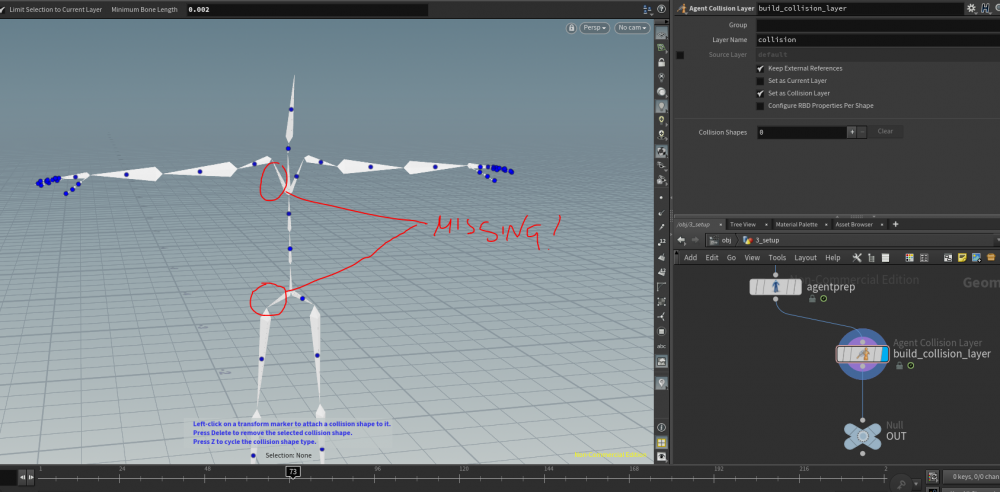
Hi guys, I am learning crowd simulation at the moment, which is suoer fun. With the premade Mocap Bipeds, all works fantastic. But when I create an agent out of an FBX from Mixamo, it gets super weird. When I try to set up everything for the ragdoll, the collision layer shows me that bones are missing. Why is that? Did you ever experience that? Also the question? To I always have to set up the joints from scratch? Is there no autmatic mode that kind of defines the moving angles? Thank you so much!! Patrick
-
Hello everyone, UPP Advertising (www.upp.cz/advertising) is looking for a Houdini Rigging Artist for a long-term cooperation. If you are interested, send me your showreel and CV to email: martina.sramkova@upp.cz Have a nice day, Martina HR Recruiter
-
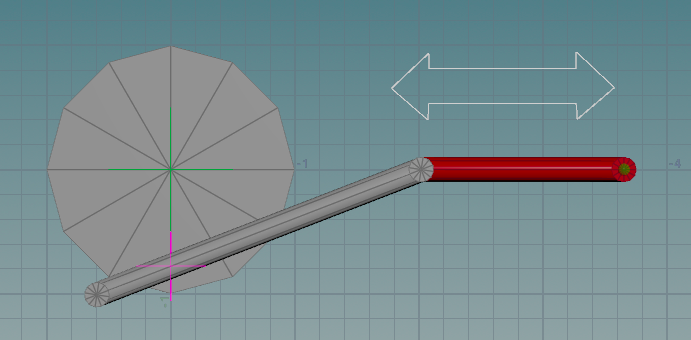
Hi everybody! Does anyone know how to make a moving piston, line on train wheel? I'm stuck on making red part to move back and forth while wheel is turning around. piston.hipnc If somebody can help me, I would much appreciate!
-
Hi there, I’m importing a rigged Character Creator 3 model into Houdini using the fbxcharacterimport node in Kinefx. The model has shape keys used to control facial expressions. In the geometry spreadsheet, these are showing up as primitive attributes. However, when I select the Rig Pose node, these each become detail attributes. My question is, how can I go about accessing these attributes, and using sliders on them to animate them in Kinefx? Or do I need to use chops in some way?
-
 Hi I'm trying to make a chain of points follow a curve, maintaining the distance between them. I can achieve this in a rough way by using primuv/ primitive attribute in vops and offseting the U value by the distance. However this doesn't preserve the length L, due to the curvature. How would I find the 'chord' points of the curve along the vector P1P2 ? Another way to think of this would be the intersection of the curve and a sphere of radius L. Are there helper functions already part of Houdini that will allow me to do this? Thanks
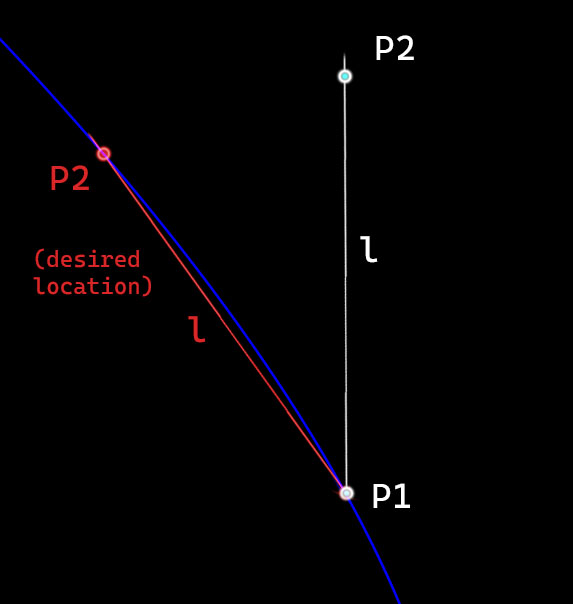
-
Hello folks! I try to rig a character with the KineFX and capture tools but the mesh does not follow the skeleton completly. I get errors from the 'capture_layer_paint sop'. See the attached hip, there is a simple animation. I also have to reset the viewport with the new LABs command (> Help> Reset Viewport) often to see the selected SOP... rig_capture.hipnc
-
Hello all! Is it possible to recreate this tutorial in houdini? https://www.youtube.com/watch?v=rCxftP5dLQc&feature=emb_logo Thank you!
-
 Hi Everyone, I hope you can help me with this because I'm really interested in how to fix this. In short, I would like to know how to stop the bones from twisting 180 degrees when their goal null is pushed beyond their base's coordinate. The attached scene is using an off the shelf "IK with constrains" rig with only two bones. "Bone 1" I only want to be able to rotate on the x axis (y and z angle ranges are set to zero) and on x only in a -20 and +20 degree range, so I've set all these. But when I push the goal null on the Z axis past the coordinate of the base of bone 1 (so grab the goal null and drag it past -5 on the Z axis) you will see that it is twisting 180 degrees and now facing the other (wrong) way and going on. So the angle range limit is working but I want to be able to make sure that the bones can not twist and go the wrong direction when pushed beyond the limits, they should only be able to move within their angle ranges and nothing beyond that. Any help or suggestion is greatly appreciated. IKproblem.hip
 -
Hi Guys, my very first try on Houdini Rigging and Muscles, is it possible to make a muscle with one loose end? I need a rig dynamic udder. (cow) The other thing I experiencing is when I ad a "Muscle Displace" and connect muscles it strongly deform my skin.. Why?? Thanks.
-
Greetings, I have a conventional null and bone hierarchy, using the default nodes provided by Houdini. I would like to replace them, however, with my own HDAs, that have the same exact internal structure, one for bones, another for nulls. The reason is that I want to add extra parameters and scripting to the nulls and bones, and it is easier to do it on HDAs. So far, I haven't seen any difference in performance, but I fear that it will drop, once the size of the hierarchy increases. Is that a valid concern? That a default node will outperform a HDA with identical internal structure, for the sole reason of this being a HDA? Thanks in advance.