Search the Community
Showing results for tags 'smooth'.
Found 21 results
-
Hey All! Currently I'm almost a month in now, trying to accomplish something inside houdini as a complete newbie. I was hoping there would be someone out here that has the knowledge to help me out a bit. Every tip is a helpful one for me at this stage entering the amazing world of houdini! So this is what I'm trying to accomplish. I'm trying to simulate a logo inside a big bath full of chocolate that slowly sinks down and drowns in the thick, viscous fluid. I got everything set up with an ocean source, narrow band particle sim and got everything cached. It looks pretty fine, until I continue to the meshing part. I've already spent quite some time trying to get to know the particle meshing tools inside of houdini, and for this case the best one turns out to be the workflow using the VDB toolset (since It gives me the most flicker free results). It get's pretty smooth as well, and I can give it a final smooth using a normals node, followed by a attribute blur that blurs out the point normals. Now comes the part where I'm getting stuck: I'd like to export this to another 3D application. In this case Cinema 4D. But unfortunately, I can't seem to figure out a way to transfer over these smoothed normals to an alembic file. What could I do to render out the pretty result in cinema, like I'm getting in houdini? Thanks a bunch in advance guys! I already learned A LOT from all the crazy talented people on this forum, so thanks a ton for that already. Stay safe,
-
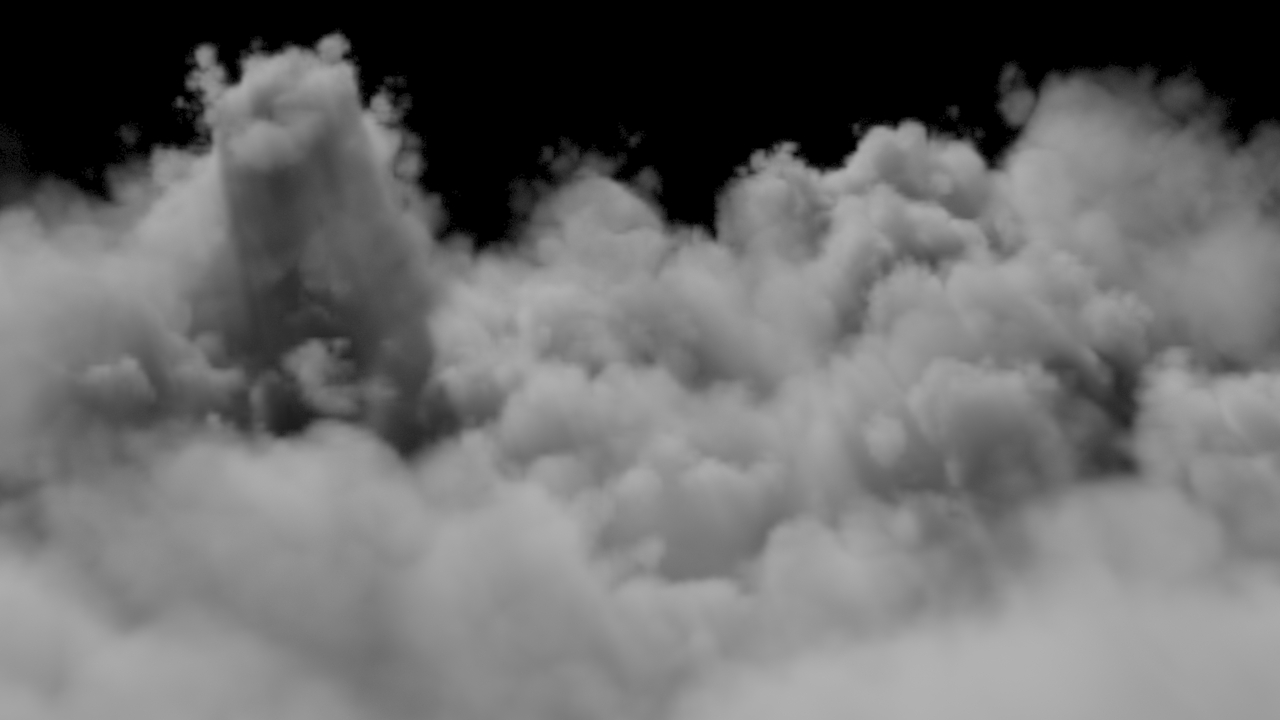
This is roughly what I'm trying to create, only with a smoother transition. In the example, the smoke is being generated by an animated gradient ramp, and the opacity of the text geometry is controlled with another ramp at render time. With Houdini, I want to utilize another workflow, I'm importing the whole text in my pyro sim as a fog vdb. But I don't want the whole text to be affected at once, I want to gradually dissolve the text from left to right, similar to the shown example. 1. (How) Can I drive the 'activeness' of the pyro solver with an attribute? 2. How can I make my density text vdb as opaque, as if it would be an sdf? Thank you in advance!

-
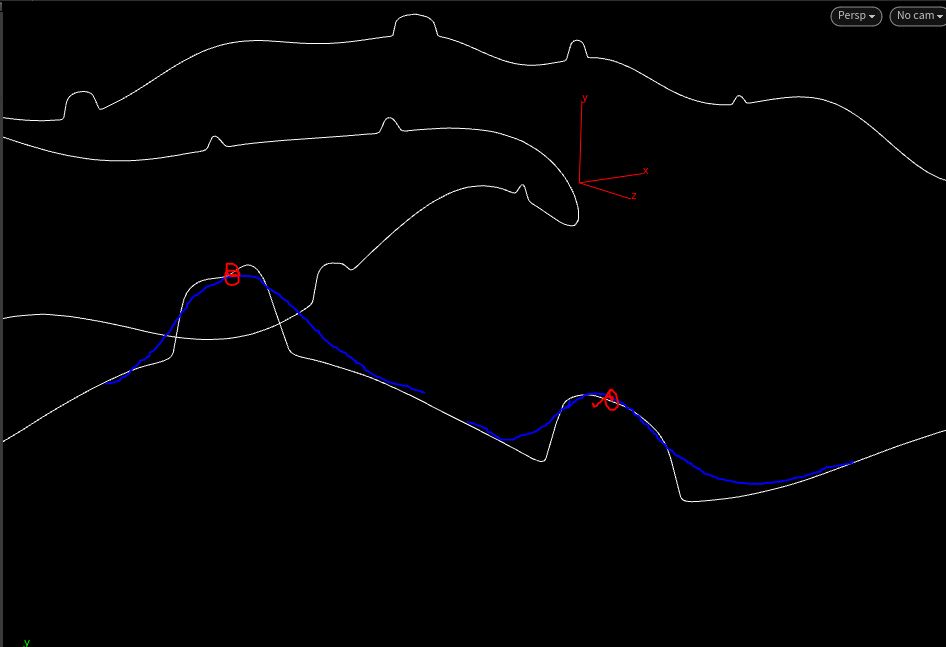
I have some curves i want to smooth out but not everywhere. i need to keep the peak of every bump at the same height and ease in and out.
-
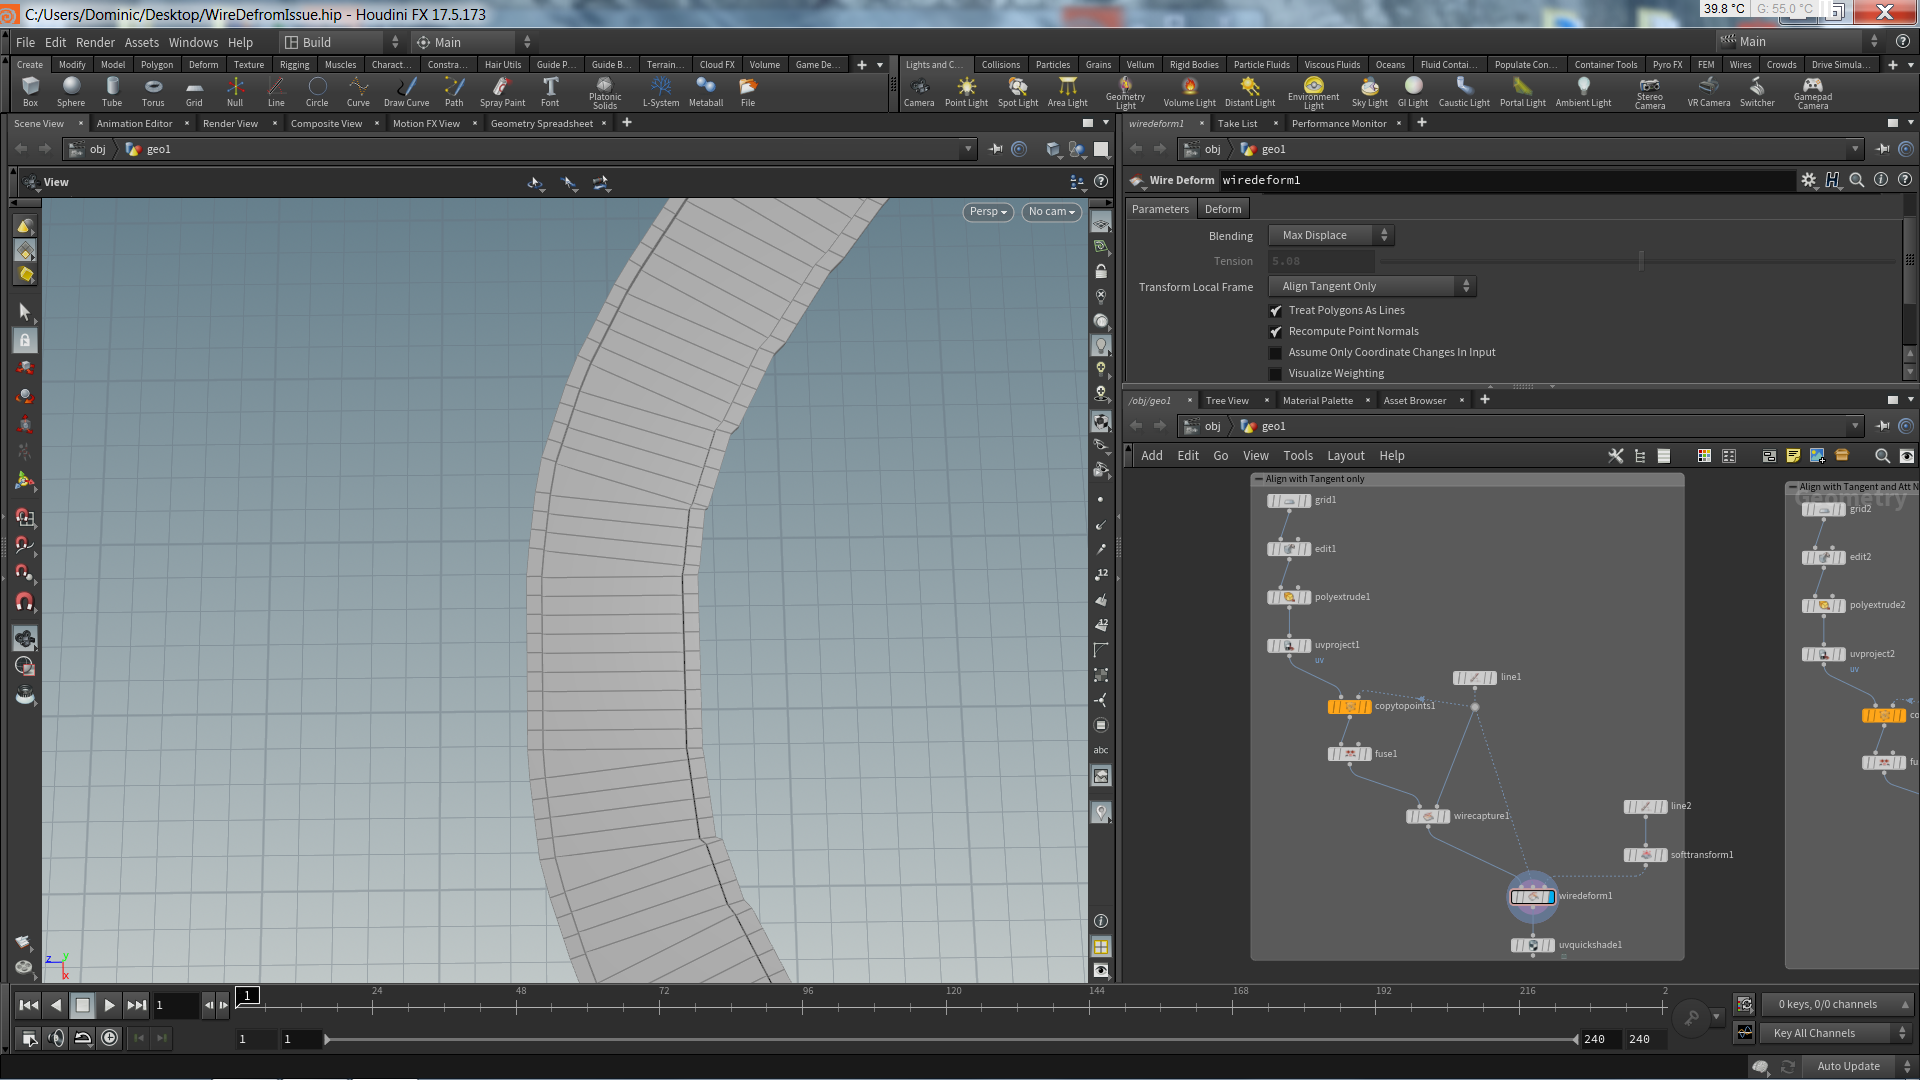
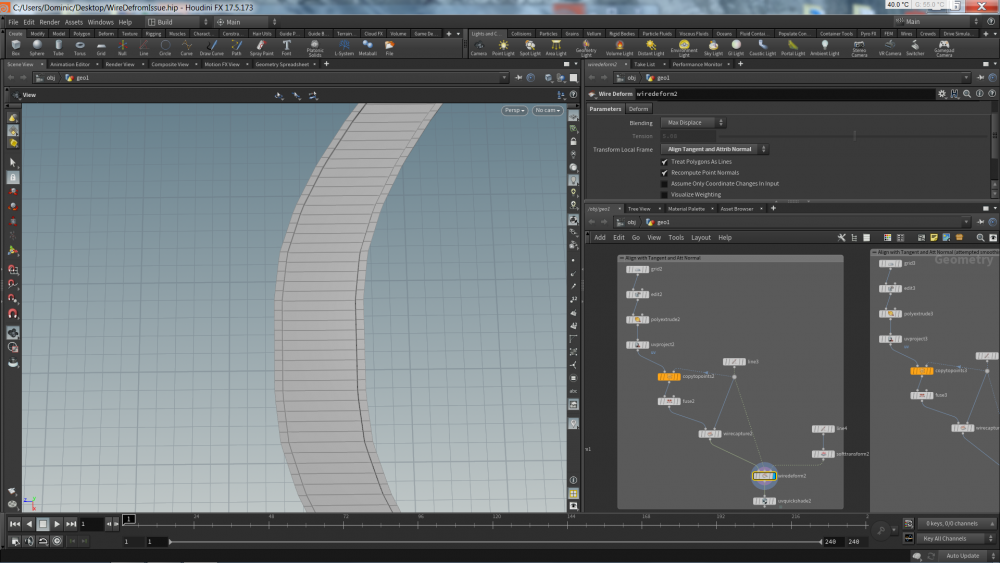
Hi all, Ive recently started looking in to using the wire capture and wire deform SOPs, all is going well however, when deforming on a simple bend i am having to compromise between mesh curvature and stretching Uvs. It seems that toggling between "Align Tangent only" and "Align Tangent with Att Normal" on the wire deform gives me these two different effects. My question is, is there a way to achieve a deformation that effectively smooths out the aligned tangent? (i thought maybe setting my normals as tangent u and smoothing them would help but it has no effect.) Aligned tangent only - Aligned with Att Normal - Thanks all! WireDefromIssue.hip

-
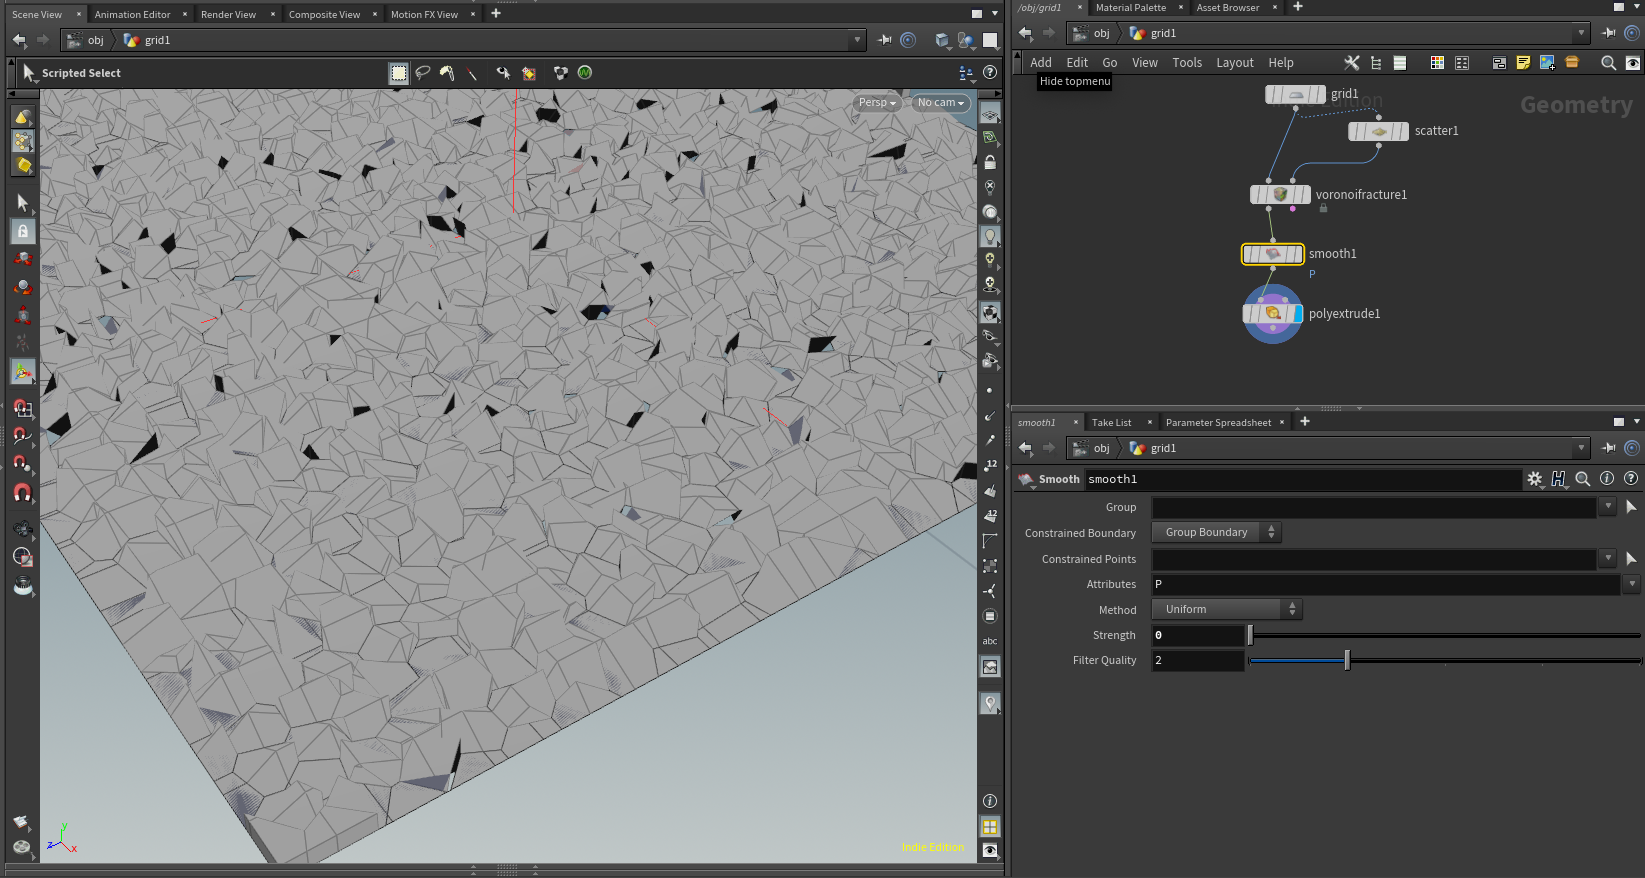
I'm trying to make a plane of simple rolling hills using voronoi. I don't want realistic terrain, just basic smooth curved circular overlapping mounds with phong material. I think what I need to do is generate flattened spheres that extend outwords from the center of each cell, but I haven't been able to locate the right node to do that. I've tried grid -> voronoi fracture -> smooth -> extrude but it can't get anything that looks rounded. What am I doing wrong here? Why does everything I attempt look so "rocky" like broken glass? First image is what I have, others are examples of my intended look (more or less).


-
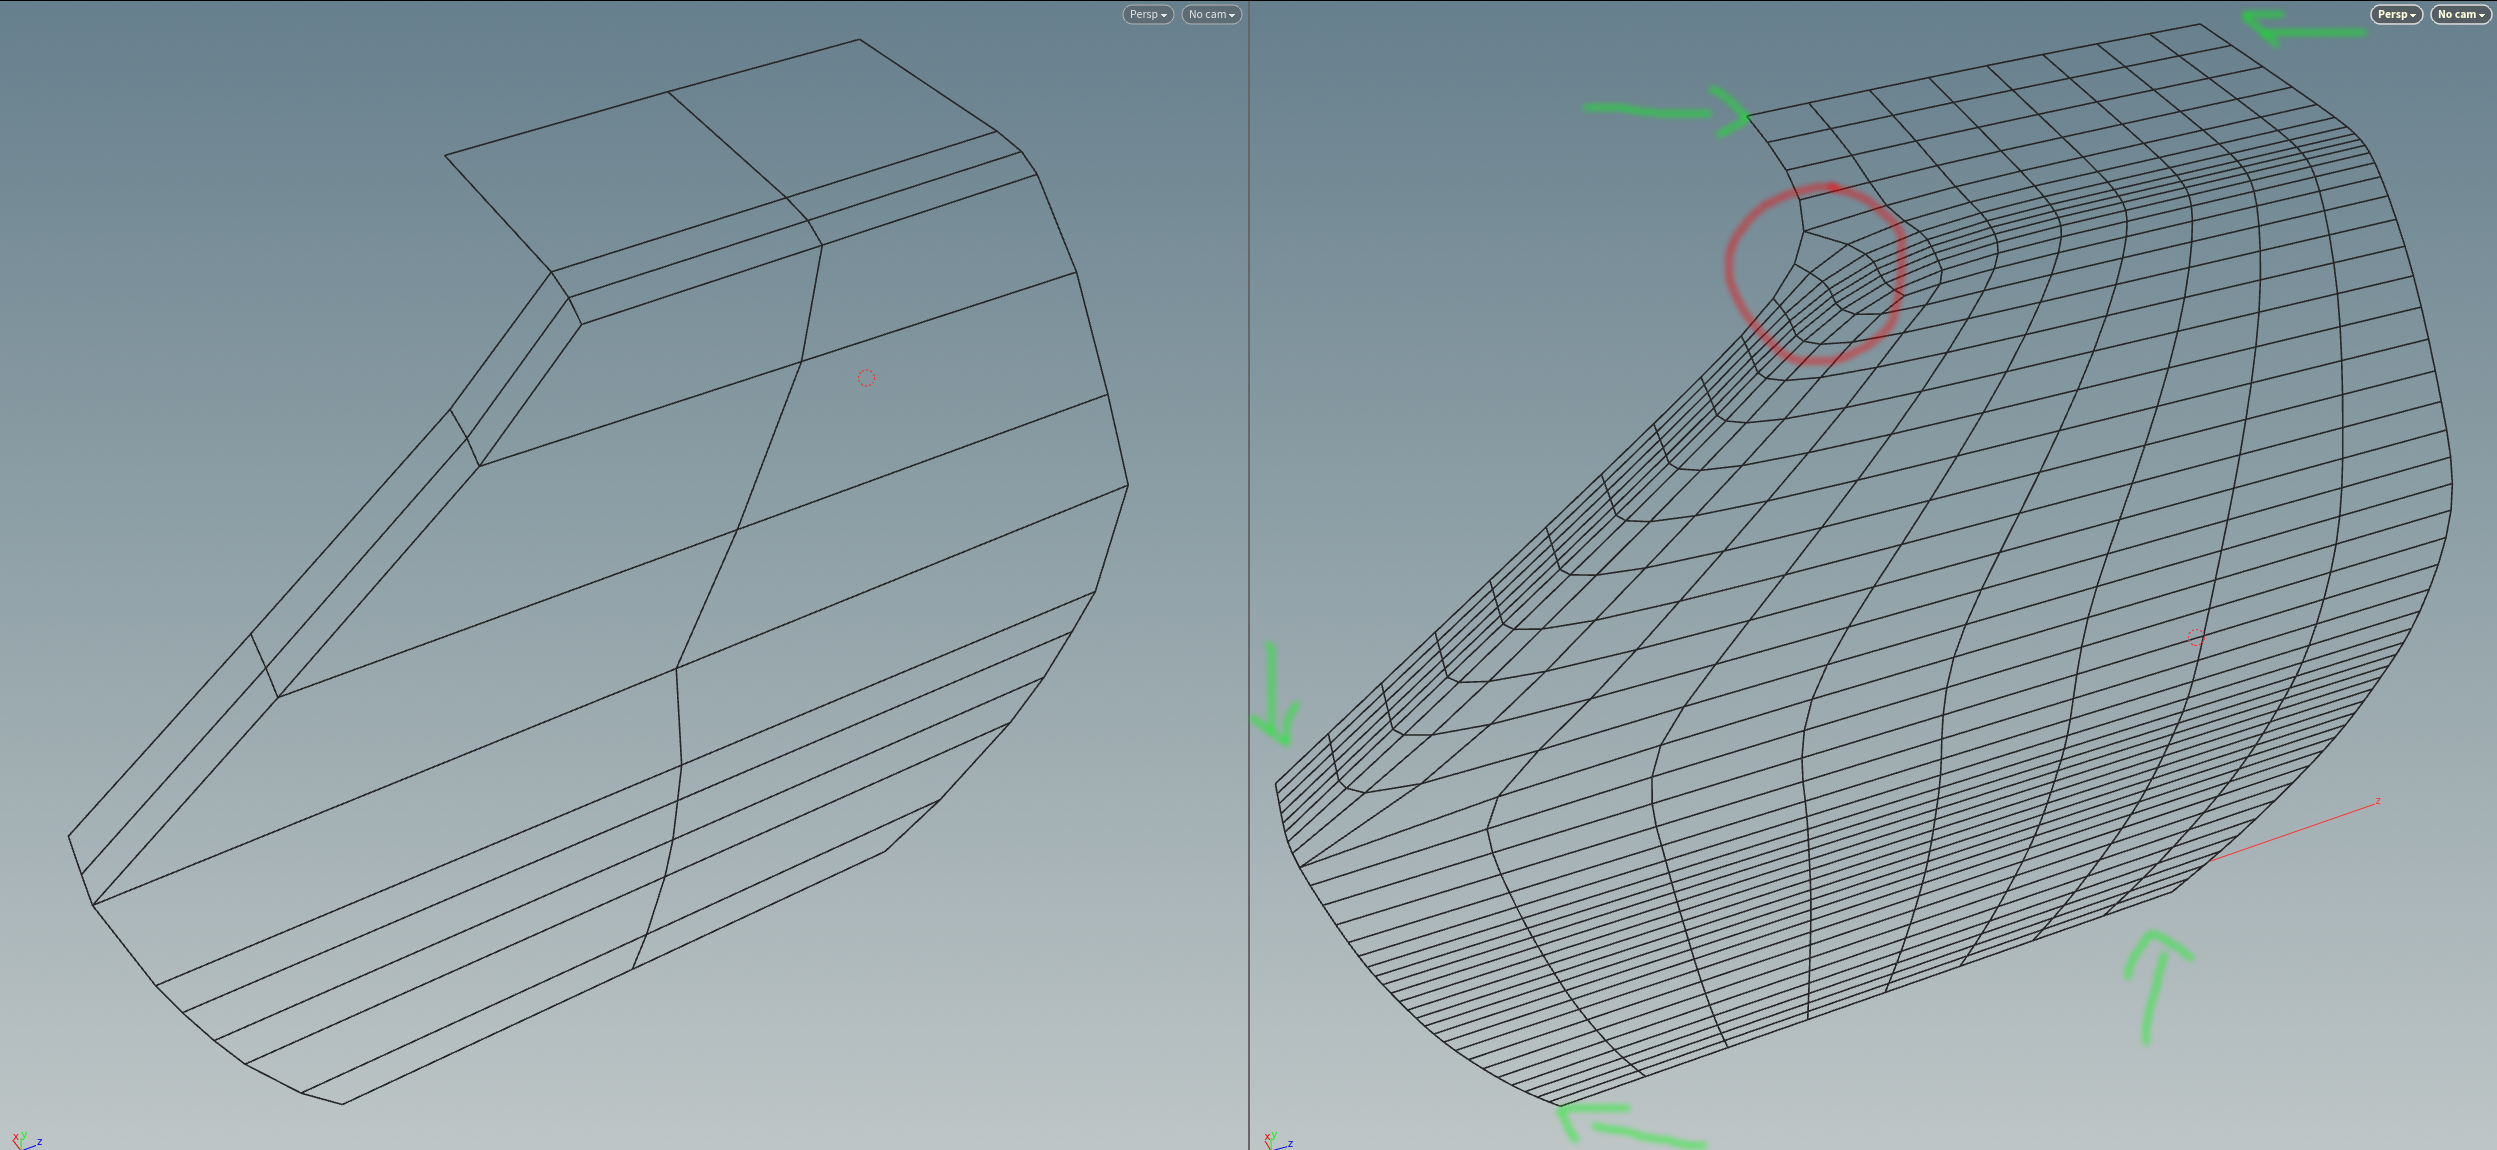
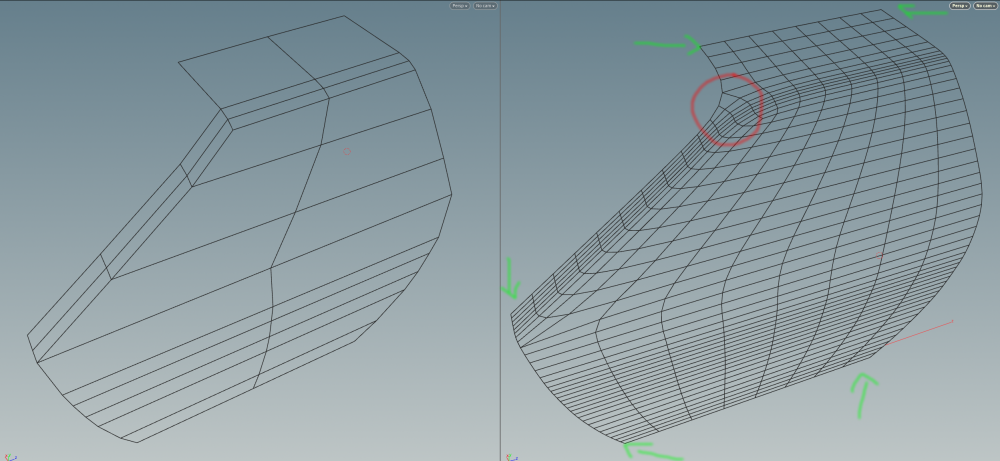
 Hello everyone, The title says it all. But to illustrate the idea better, I've also attached an image, where red lines show concave parts, that have to be smoothed (simplified), and green mark convex parts, that have to be preserved.
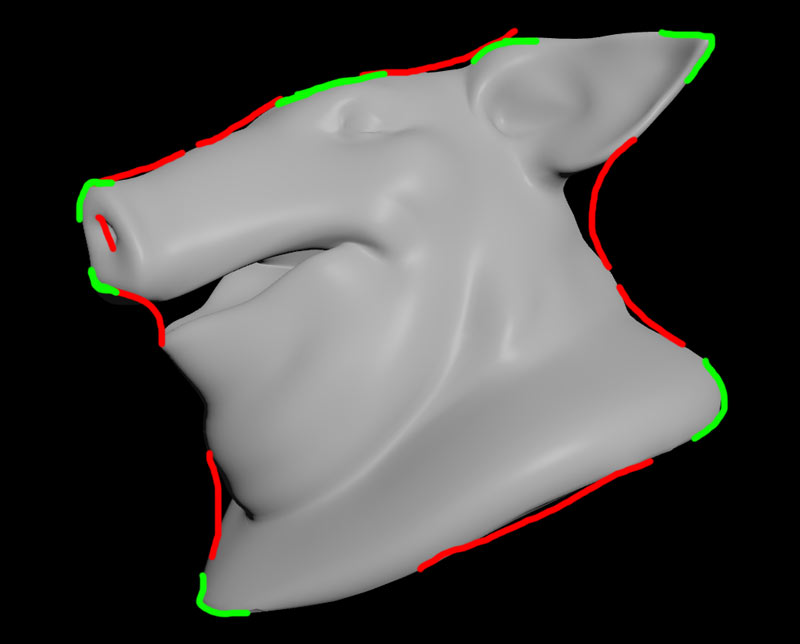
-
Hello!! I am new in Houdini, so I need your help! How can I smooth the transition of an extrusion? -I don't want the extruded pieces to suddenly pop up, instead I want the procedure to be done gradually- thanks
-
Hello, i have been encountering this subdivision problem during the modelling process,i tried using edge loops but they won't solve the issue. What i also don't understand is why does it only happen on that particular corner? Thank you for time
-
Need a bit of help on a problem for a client, ( on an NDA as well ). Basically, I have a pipeline that shoots to Octane in C4D for the VDB usage and the smoke sim I made is fine and they are head over heels for it but the type (in the smoke) in the first frame is too pixelated for them and not high res enough. I've been trying to find the right amount of density and type space to keep the titles as sharp as possible but when I put them into C4D and play around about it's still exported in Alpha somewhat pixelated. Any ideas? I have a sample hip of the pig had at a reasonably replicated density to the pig but I need it to be more stoic. Smoke_collide_pig.hip
-
Hey guys, Is there a way to control the strength of the smooth based on an attribute intensity? top image without smooth, botton with "full" smooth In this case I'd like to smooth only the red areas, controlled by the intensity of the color. Scene is attached Cheers, Alvaro smooth.by.attribute.v1a.hiplc
-
Hey friends: When I used maya, there was an option called "smooth" that I used in maya fluids. You know how voxels are boxes, so "box" like artifacting can appear. Smooth would render the corners and smooth squarish look that the voxels had, getting ride of the voxel-like appearance. Is there a way to do something like that in mantra? Thanks

-
Hey guys, I've noticed the VDB Smooth and the VDB Reshape have a VDB ALPHA MASK thing on the node's second input. I've tried it in the obvious way, connecting another vdb into the second input, but it doesn't work. Can anyone give me a hint on that? My "not working" scene file is attached Thx vdb.mask.v1a.hiplc
-
Hi all, Does anyone know how to use the mask input option to smooth a part of the mesh inside the particle fluid surface node? I want to specify with a volume (ie. a bounding box) which part of the mesh to smooth or keep (instead of using the velocity or vorticity mask). I created the volume to mask with (just a box turned to vdb) as a separate OBJ, I am then object merging it and connecting it to the third input of the fluid surface node, then in the filtering tab in mask input I check it and put in the name of the volume. I have tried to do several different things on the volume itself (regular VDB, Fog VFB, etc.) and nothing seems to work or make any difference. When I turn visualize mask on all it shows is nothing is applied to it (ie. all of the surface has 0 smoothing applied to it) How do I properly use this feature and get the node to recognize the mask? Am I going about this the right way? Many thanks, CrownSplash Anim C.hiplc
-
Hi, this formula is about offsetting animation of several objects (or points, etc.) over a period of time, in such a way that the interval of time for each object is related to number of objects and the desired period of time. Let's say you have 10 objects, and you want to animate all of them over 3 seconds, with some time offset for each object. With this formula you can change the number of objects, adjust the amount of offset or adjust the period of time, and each object will automatically adjust its start and end time, so all object animation will fit within the specified period of time. Recently, I started learning Houdini and VEX. I was curious to see the application of this formula inside Houdini. then I found this thread: http://forums.odforce.net/topic/24056-learning-vex-via-animated-gifs-bees-bombs/ in the example of Twisting Box, matt uses "smooth" function. this is what I was looking for: smooth() function in Houdini is the equivalent to ease() function in AfterEffects.
-
- 5
-

-
- smooth
- after effects
- (and 8 more)
-
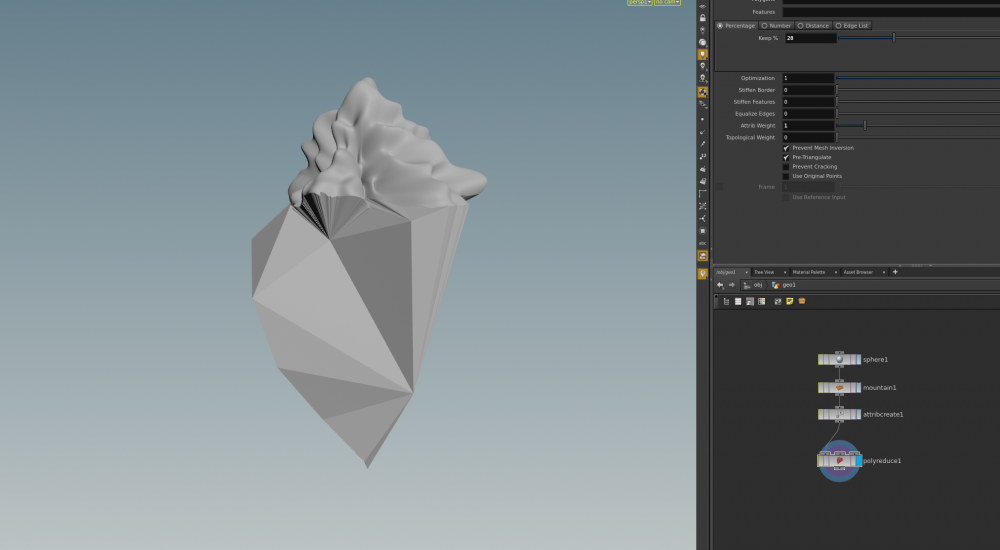
Hi all, I am trying to create an effect where I can take any high rez model and smoothly reduce the number of polygons so that it is high rez and smooth on one side, and very low rez and faceted on the other. This is purely for aesthetic purposes, as I think that look would be quite cool. The area where the transition happens should be arbitrary (ie. a group of points) but to keep it simple initially let's just say the transition happens over the entire model on the Y axis, so at the top it has the highest density of triangles and at the bottom the lowest. My initial idea for accomplishing this was simple - put down the model, create an attribute called 'weight' and assign it to points according to their position in Y, then use a Polyreduce with the Attrib Weight set to 1. Alas, this did not work. It reduces the mesh alright, but instead of a smooth transition I get a very sharp transition from smooth to completely faceted. Worse, the keep% parameter doesnt really have much effect on how faceted it is after enabling the weight attribute. Can anyone think of a better way to do this? im sure there is.. Ideally looking for something that could almost be a digital asset and would allow the most flexibility in defining where and how the transition occurs (ie. painting the model, groups, point attributes, etc.) Attached is hip file and screenshot for reference. (p.s. it takes a few min to cook at the current model resolution). Thanks! Smooth to Facet_2.hiplc
-
Guys, any tip on how to get rid of those stripes and the tiny bumps? The simulation is pretty high res. Particle Separation is at 0.01 and i'm simulating it with 5 substeps. I think, for the stripes, it could get better with more substeps but it's already taking forever to simulate so i'd like to check if you guys could recommend me some cool approach. Here's an image and a video showing the sim. Thx
-
Smoothing geometry on the GPU using OpenCL. In VEX it has to be done in 2 steps where the same thing can be achieved in OpenCL in one step using barriers [khronos.org]. For a 822K polygon model, it's over 500 times faster than VEX on GTX 970 for 1000 iterations, and over 600 times faster for 10K iterations. Timings are recorded separately as there seems to be some overhead when running them one after another. Special thanks to SESI.
-
 Hi people, I'm coming from traditional 3D modeling packages (about 13 years of experience here...) like Maya, C4D, modo, Blender and recently started using Houdini as I'm fascinated by its procedural tools and workflows. When I've been modeling in those traditional 3D applications I usually used that typical box-modeling approach for modeling stuff and used subdivision to get a smooth mesh. I typically used edgeloops to crease certain edges in the subdivided mesh - the usual workflow you are all familiar with, I guess. I'm wondering now about the best practices to crease edges for subdivided meshes in Houdini. How do you guys usually do this in Houdini? I know that I can do the same in Houdini and use edgeloops in my meshes, add a subdivide node and have the same result as in my traditional packages. The main concern is I want to stay as procedural as possible. I can change the position of my edgeloops afterwards in the specific nodes and keep the whole model history non-destructive, okay. I could possible also use the crease node on certain edges and do it that way. I have seen a lot of tutorials now where stuff like stairs etc. are modeled procedurally which is awesome. Everything is being modeled without any subdivisions but with plain hard edges - which doesn't result in very realistic geometry as we all know 100% hard edges do not exist in realilty. Okay, these tutorials are also usually aimed at game developers and in games you usually want to avoid too much polygons. None of those tuts show or even mention how to do the whole stuff with softer edges or subdivision surfaces. So what's your workflow when you want to model something procedurally that's looking as if it's been modeled the traditional subdivision surface way in the end? I'm sure there are ways in Houdini I haven't even thought about and I have just scratched the surface of Houdini yet:) thanks a lot for your help in advance. Marco
 -
Hi All! I have been trying to create a smoothly blended intersection between two pieces of animated geometry by using VDB SDF's. The end goal is to have highly detailed geometry with blended intersection points that have a few controls to adjust how the blend looks. I was pointed towards the paper on Spiderman 3's Sandman showing the mathematics used on the levelsets, and then found GallenWolf's post referencing the paper and showing how to achieve the look within vops with isooffset volumes: http://forums.odforce.net/topic/17978-sdf-blending/ These were both extremely helpful, thank you! However, creating this setup with VDB's is alluding me! I don't quite understand how the math is working to blend the levelsets the way it is, so it is proving difficult to adjust anything that might be needed within the Volume Vop. I have also been able to isolate the intersection area with a vdbactivate, but I am fumbling a bit trying to figure out either the next step or if that is even a necessary step. When plugging the vdb's directly into the math from the original isooffset setup, I get a negative valued band where the intersection is happening, so something is working. The second VDB is completely lost at this point though. On top of that, the original parameters designed to adjust the radius of effect and such are not behaving in any understandable way for me. They seem to be adjusting something? I have attached a cleaned up version of the hip file I am testing with. Any knowledge anyone has on the subject would be greatly appreciated! I'm pretty sure I'm going in circles. Thank you, vdb_blend_v001.hip
-
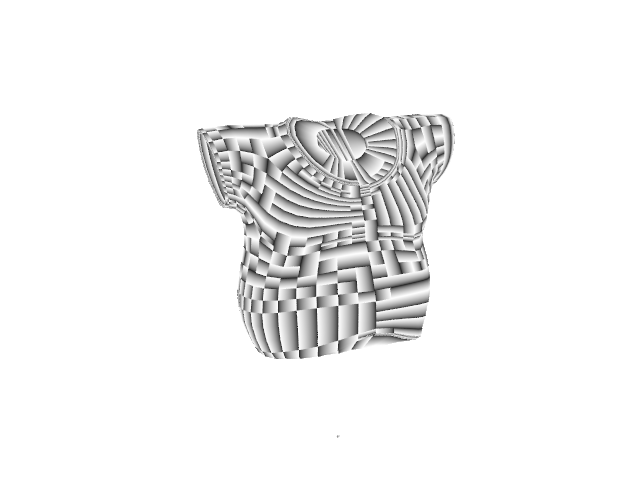
Hey I'm having a strange issue. I modeled a fosset to shade but the S & T are just strange. I'm confused since I thought S and T were suppose to have everything to do with the UV map 0-1 space. However, here (see image) I am getting some strange results which cause my shader to appear almost at random. I dropped in a perfect asset (shirt geometry) that works perfectly in production when I textured and shaded it, but as soon as I plug in the S into the color ouput of the material shader builder it appears super strange. I'm confused at why I'm getting these results. Thanks

-
hello! maybe someone can help me about that, i want remove the noise of floor in fluid, every more poly detail is more noised... i have tried up smooth and some stuff, nothing. i ask because its a lot time simulating that, i would apreciate the solution. thanks you very much in advance