Search the Community
Showing results for tags 'Mantra'.
-
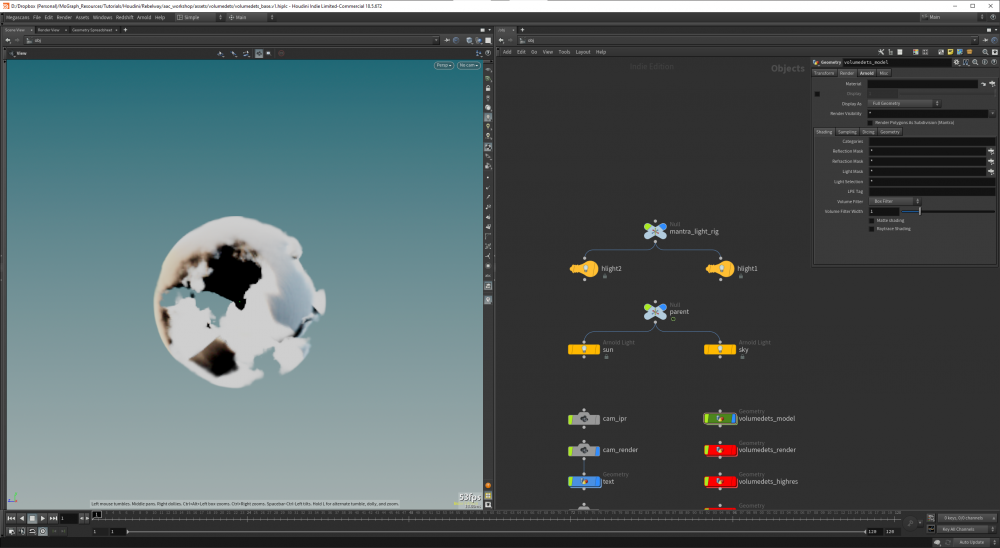
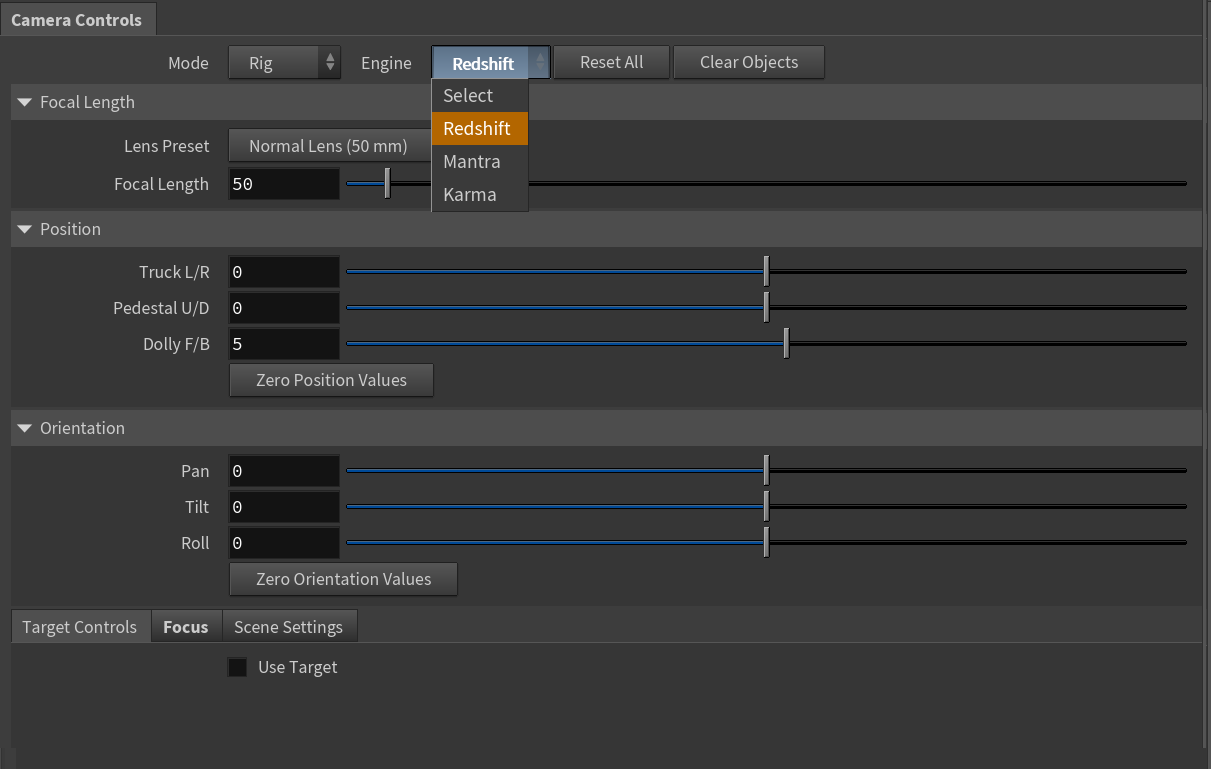
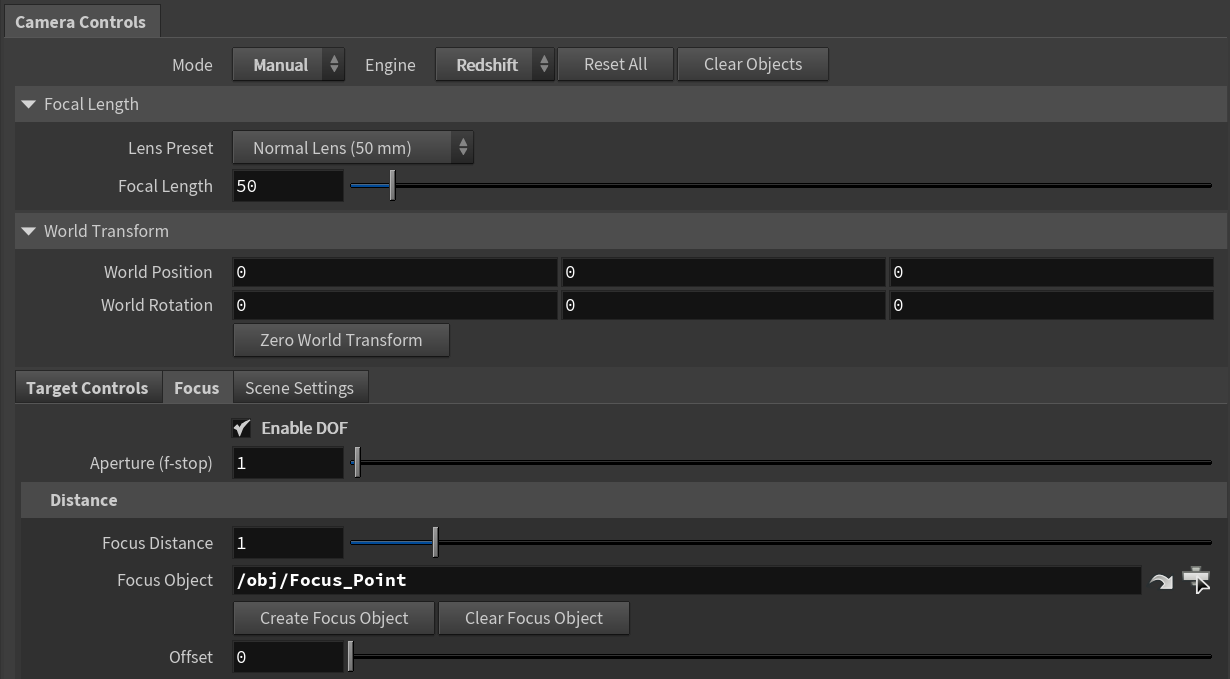
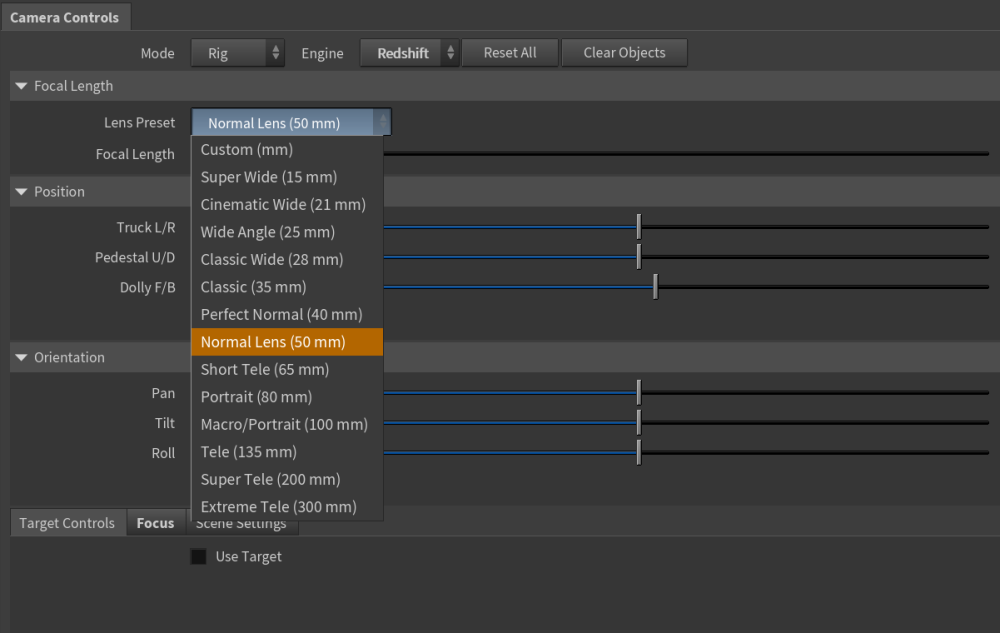
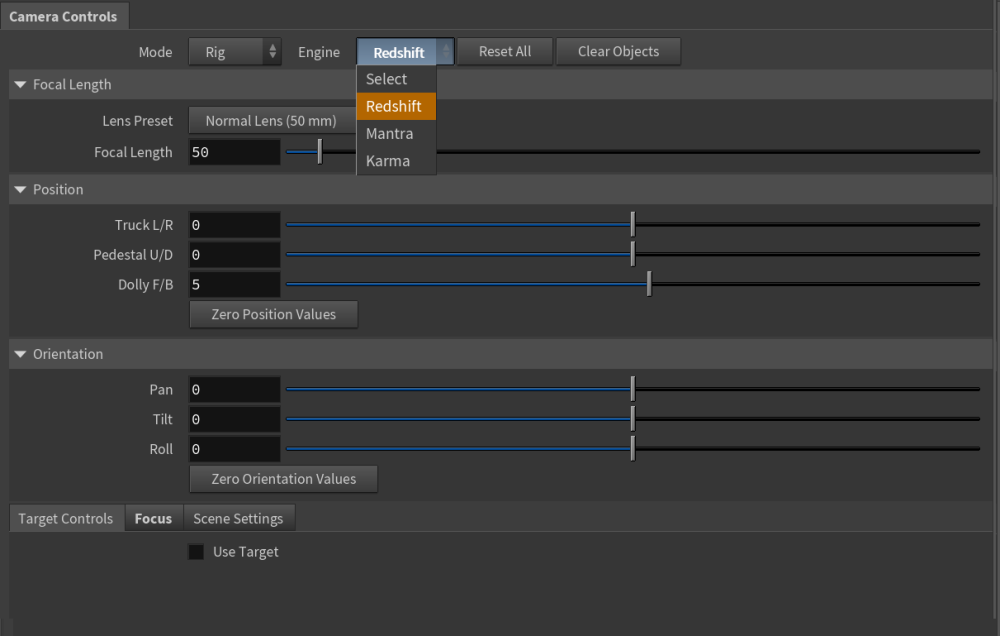
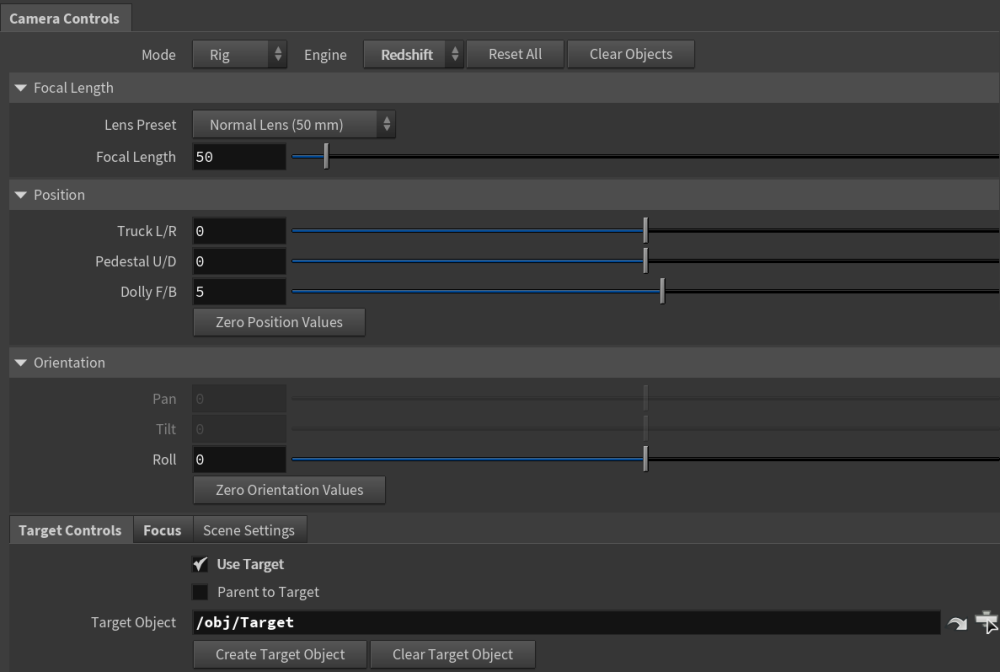
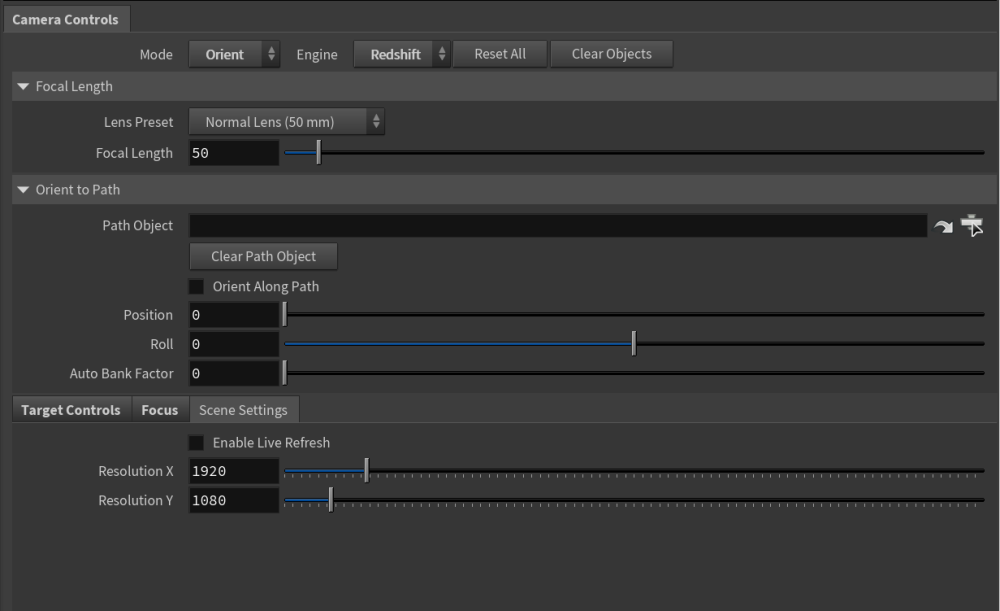
 CamRig Pro A dynamic camera system for Houdini, designed for fast setups, flexible rig modes, and multi-renderer DOF management. Get it here: https://shirmanor.gumroad.com/l/camrigpro Promo_2.mp4 Features One-click creation of a complete camera hierarchy 13 Lens Presets 3 Render Engines - Redshift, Mantra & Karma Supports both OBJ and SOP-based look-at targets Preserves camera orientation and position when switching targets Three rig modes: Rig – dolly, truck, pedestal, pan, tilt, roll Manual – direct XYZ transforms with the CamRig Pro null Orient to Path – align and animate the camera along curves All rig modes support look-at targets and focus nulls Rig mode has an added Parent to Target mode for camerawork base around a moving target DOF controls for Redshift, Karma, and Mantra (focus distance, aperture for Karma/Mantra Only) Generates renderer-specific ROPs when selected (Redshift, Karma, or Mantra) Import to Solaris Auto-assigns the camera to the scene viewport Supports multiple rigs with auto-numbering and non-destructive setup Utility buttons: reset transforms or clear objects using Zero All & Clear Target/Focus + Global Reset buttons Fully written in native Python — no HDAs or external dependencies making it easy to share Shelf/Tab menu integration for one-click access inside Houdini Includes 2 optional custom node shapes, CamRig Pro node and a minimal connecter Requirements Houdini 20.5+ Python 3.11 Included CamRig Pro Python tool Instructions for use inside Houdini Compatible with Redshift, Karma, and Mantra
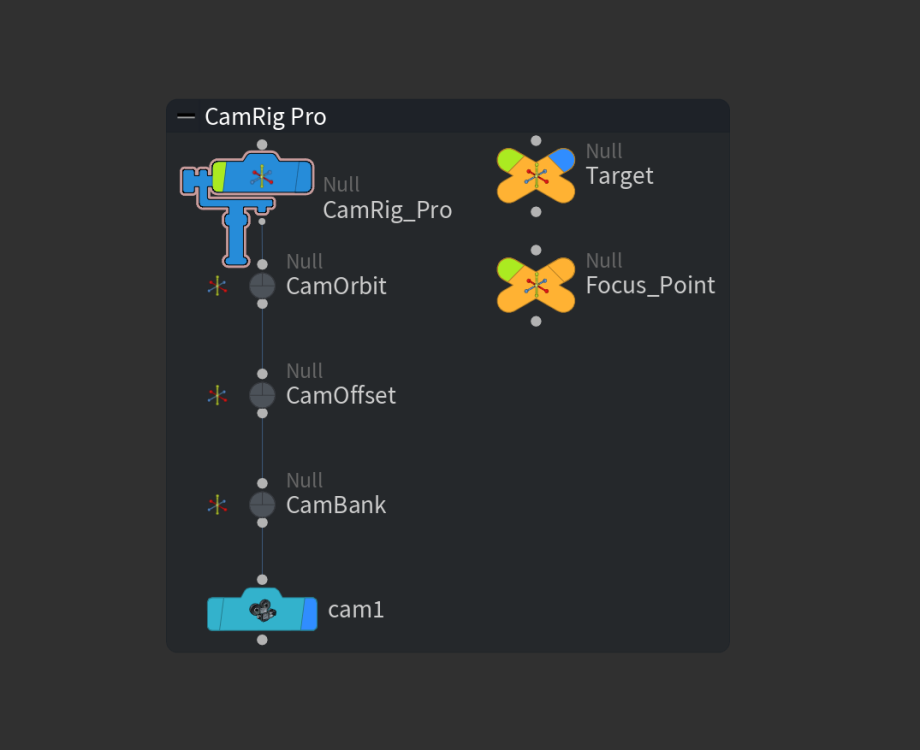


-
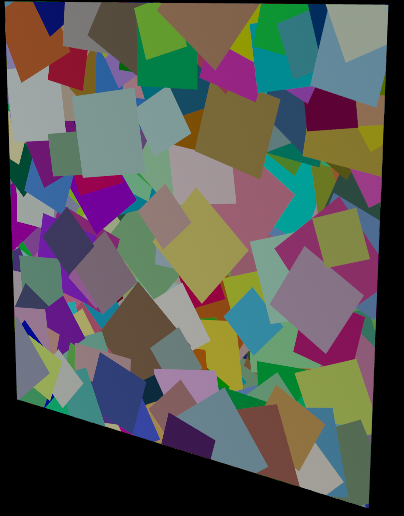
Is there a way to somehow set up an order for Mantra to render each grid covering the other? Creating a rendering order for example based on ptnum? Or something like this is not possible? sprite_rendering_order.hiplc I'd like to achieve this, see how the grids cover each other, no intersection: (this was made with COPs, just for demonstration)
-
It's my first time using Houdini and when i go to render view and press render nothing shows up but a black screen and on the top right it just says "generating scene..." I left it for several hours still nothing changed. Device - Nvidia rtx 4070 and ryzen 9 Help !!
-
 Hi Guys. I downloaded this FBX file a while back and it's been great. It's a Mark VI ship that's textured. I brought it into Houdini and mantra reads it well. The only problem is I'm using Redshift for the scene with water and I'm not sure how to get redshift to read the shaders or how to connect them. I can't seem to find any useful tutorials on this either. A couple years ago Grand Master Atom was amazingly helpful with a script that he wrote for redshift to read downloaded shaders but I can't get that to work anymore. I think the recent updates over the years broke that script or something. Anyone know how to connect so redshift reads the shaders? Pierre Mark_VI_Patrol_Boat_Dirty.hiplc
 -
I don't do a lot with shaders, so I am not really sure what is possible and what is not, but I am attempting to sample details of one object from a shader applied to another. For instance, I place a curve on top of a grid, then have the shader sample the shortest distance to the curve to drive the shader. Is this possible? Or do I 100% have to use an obscenely dense geometry to sample it into an attribute so a shader can use it? I technically don't mind, but I was really hoping I could avoid that step and just have the shader do the work. I have tried using a nearpoint VOP in the shader, both with op:/obj/mySOP, exporting the points to disk and then targeting the file, as well as the same methods for using a point cloud. I know exactly how to do this with attributes on the mesh, it would just be cleaner to be able to do it as a shader.
-
Dear Forumers, I need a layer to comp for my shot where the floor is lit by a pyro sim that gets REALLY close to it (actually touching). I am using Karma for this project, but understand I MAY have to use Mantra????? Thanks in advance for help =) Nick
-
 I’m using mantra to render some fur texture, but the rendered result seems quite different from the viewport one. Is there anything I can do to make rendered textures look better?
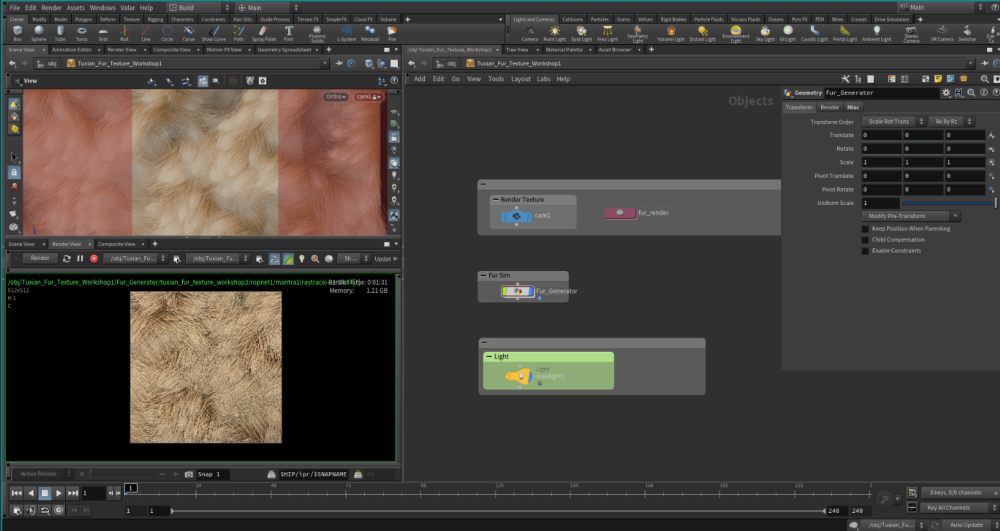
-
Hello, everyone! I'm very excited to share my Procedural Lake Houses tutorial series, where I show how to generate the houses all the way from base silhouette to final shading. Example of the Generated Content: Link to cmiVFX page: https://cmivfx.com/products/494-procedural-lake-house-building-creation-in-houdini-volume-1 Thank you for watching and have a good day!
- 46 replies
-
- 7
-

-
- procedural modeling
- mantra
- (and 4 more)
-
Hello guys. As title says, I'm created an grayscale procedural texture in Cops network. I'm made it work as displace map, however it comes as huge cost, needing an ultra high detailed grid. I'm would like to use it as bump, since the ideia it's to use that as fine details. I'm couldnt make it work by writing the path of copy into texture path in Bump & Normals tab. Not clue what's suppoed to do. Please help me. bump_v00.hipnc
-
Helo houdini nation. Just a simple question. I am rendering animation in mantra, and I just want to know if u guys don't know if there is a possibility to set a render time limit per frame. Like Corona renderer has for example, so I can guess the approximate time rendering of whole animation (all frames)? Thank you very much for any suggestions. corona example: time-limit per fame:

-
 Hey all, I'm trying to render out a crowd in mantra, and while my hair and hat styles are working, I'd like to add some variation to the crowd agent itself. I've already baked out maps for each agent via COPs ( 8 each) and the idea is to create a style for each agent, in this case M_01_*. I'm Trying to randomize the highlighted number in the img attached and fit it 00-07 based on @primnum or @ptnum if possible? Or can you directly use an attribute value in Material style sheets? I could just create an integer value per agent via vex then somehow use it in the style sheet? Thanks in advance!
-
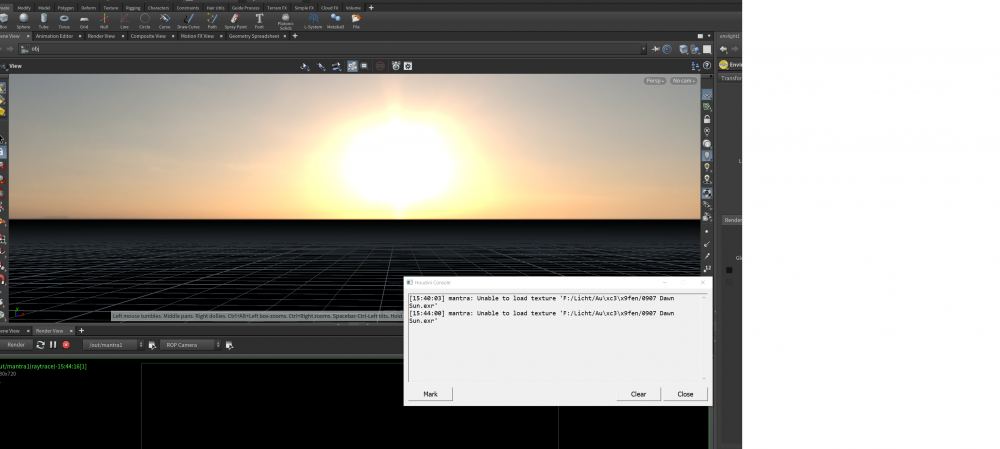
Hey everyone with the newest Houdini I seem having an issue with the environment light, rendering with mantra. When I insert an HDR or EXR it will be shown in the viewport correctly, but when I hit the render button I get the message prompted seen in the image attached. Help would highly be appreciated!
-
 Hey there, after years I finally decide to study Houdini more seriously. I'm starting again with the Particles course from Applied Houdini, I just finish my first run with the 2nd vol. and I'm really interested in GPU rendering because of rendering time. It's not that I don't like Mantra (actually sounds super interesting to have a native renderer so robust), but for example the last scene I worked, with like 50M particles, took me more than 10 hours to render like 4 seconds at 1280x720. So I would like to take some advices from you: since I'm just a beginner, is it interesting to already try to work with a GPU renderer, like Redshift, so my rendering time will be faster and I'll be able to explore and study more things quickly as well? Or should be better to keep with Mantra and get more knowledge about it? Thank you!
 -
 Hey everyone, basically what I have is this: and what I want is this: Obviously, it looks like I could just move the pig head up in space haha. But I have a more specific case that requires the pig head to be visible through the plane giving the ILLUSION that it's on top of it. Put simply, I want the pig head to always be drawn/rendered on top of the plane, regardless of depth/occlusion. It's really easy to achieve this with compositing, but I'm hoping to pull this off at render time using materials in Mantra. I'm open to some complicated node setups (maybe turning the plane transparent wherever the pig head is behind it???) But hopefully it's just an easy setting that I've missed. Thanks so much in advance!
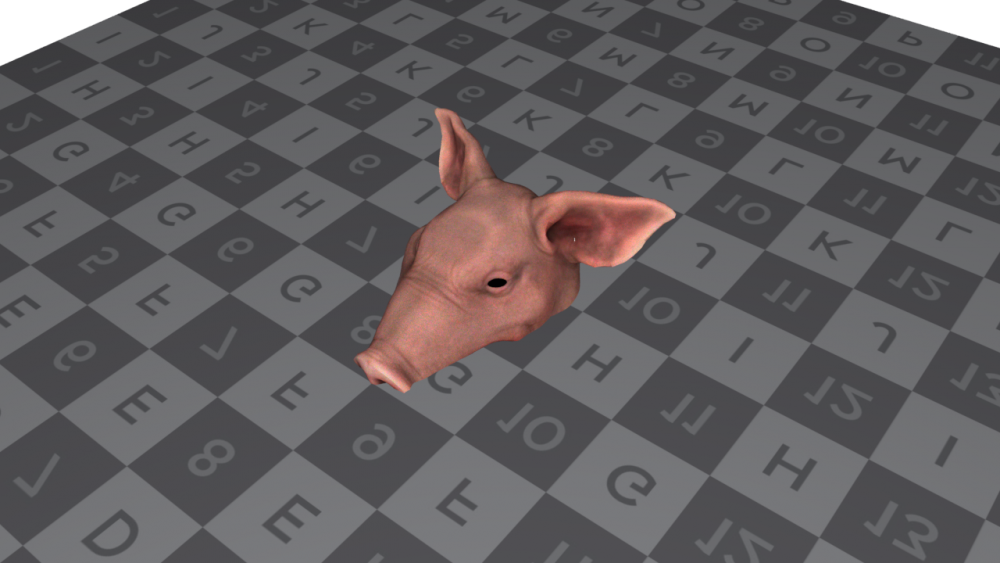

-
 Hi, I am trying to render a volume which has been rasterized from a bunch of points and that volume is in constant motion. The camera pans fast from left to right tracking the moving volume. I have a test camera that's static and if I take a test render through that static camera, the motion blur looks proper. But when I render though my shot's animated camera, the motion blur is messed up. The volume looks like a blurry blob of mess with no definite shape to it. I tried asking people that I know personally. Everyone suggested to reduce shutter time in camera or completely make it 0. But that's completely removing motion blur. Is there a way to make mantra pick only the velocity blur and not camera blur?
 -
Hi there! I would like to do a render passes where every object has a constant colour and right now I am doing it via takes ( which is very time consuming to set up). I have also tried the op_id and primid in mantra but that doesn't give me a different colour for each object in the scene. How would I go about doing this more efficiently? Any and all help would be greatly appreciated Cheers! Ronald
-
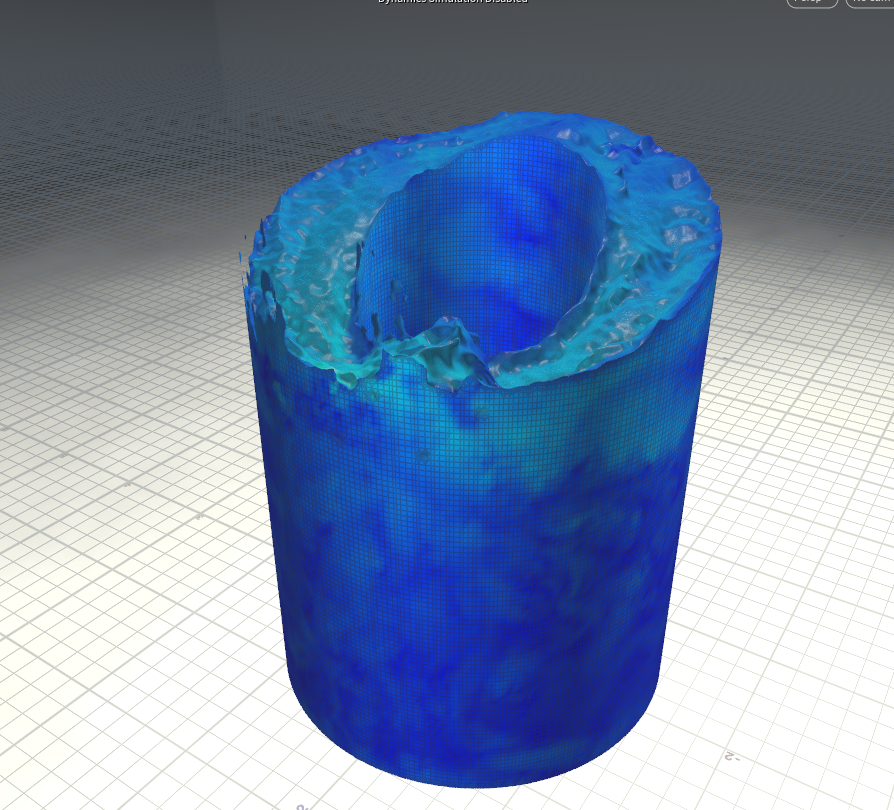
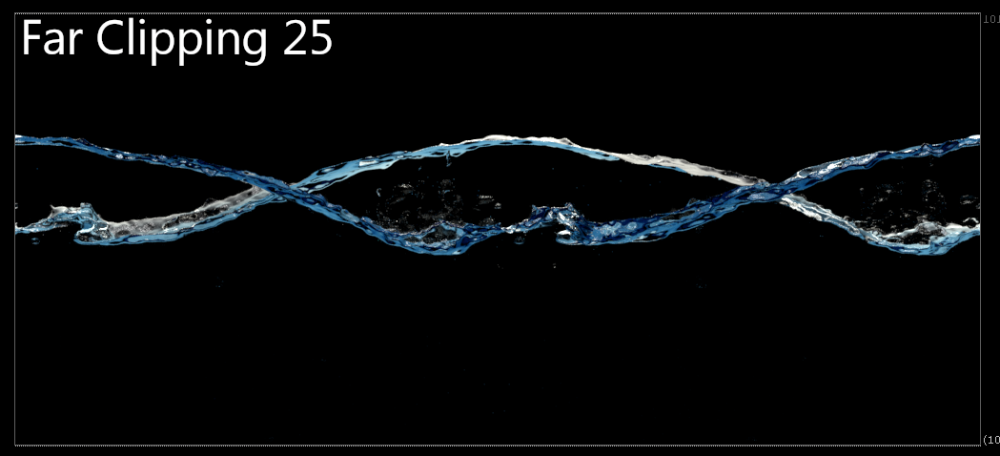
 Hello wizards! I am doing some glass renderings, and for a very specific case I am facing a problem that could be potentially solved by limiting how far a refraction ray should travel. Like, if the next level of ray depth already travelled a certain distance kill it and return the color of the environment for example. This is because there are some cases where my object could refract itself which is something desirable but only at a certain distance. I found on the documentation that there is a maxdist for the RayOption on the trace() and refractlight() function, but I have no idea how would I go into using it or building the shader. The render configuration right now is using a custom lens that at the beginning of the project meant for it to let us see the other side of this water cylinder, I can hide a portion of it by limiting the far clipping, but then of course parts that are inside the refraction will still be visible, that's why I'd like to be able to kill the refraction rays if the have travelled a certain distance since self refractions are still desirable for the surface's top part. So far what I would be trying is a combination of manual masking and using the RayLevel image plane that gives me a little of what I need but still not the perfect solution. Certainly a bit of help regarding manipulating the rays within Mantra would be of huge help.
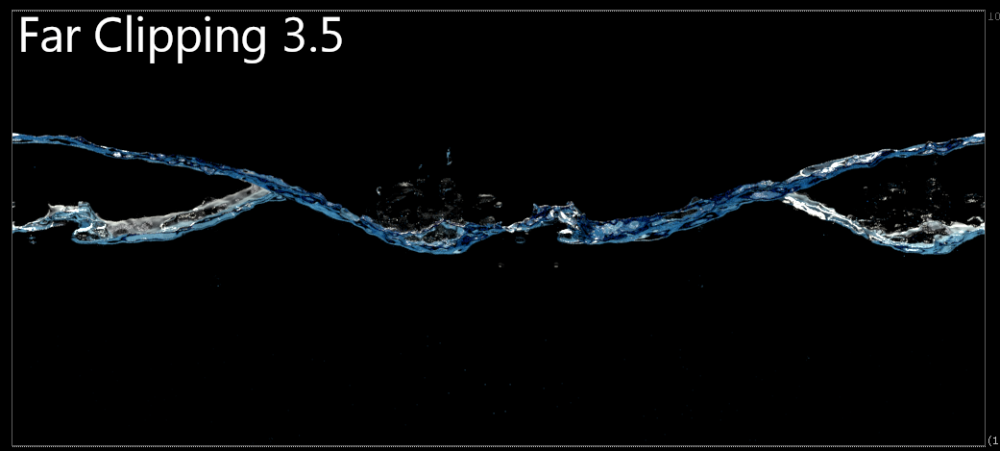

-
shader Where is the Mantra Specular Edge Color ?
Elistan posted a topic in General Houdini Questions
Hi, I can't find a way to get what I can get with a colored specular map in Substance Designer. I'm basically trying to get a fake iridescent effect by coloring my specular map, but in the principled shader, the specular is a float type, so no way to put some colors in there.. In the past I was on Maya with Renderman and there was a specular and an edge color parameter, in wich I was able to put some color, but no parameter is a color in the principled color. I'll put some screenshot of the desired look I want. It's done in Substance designer, with a black diffuse, a normal, a white specular and the colored map in the specular edge color. It'll be used in a movie project for my school so I really hope to get some help , please help !
-
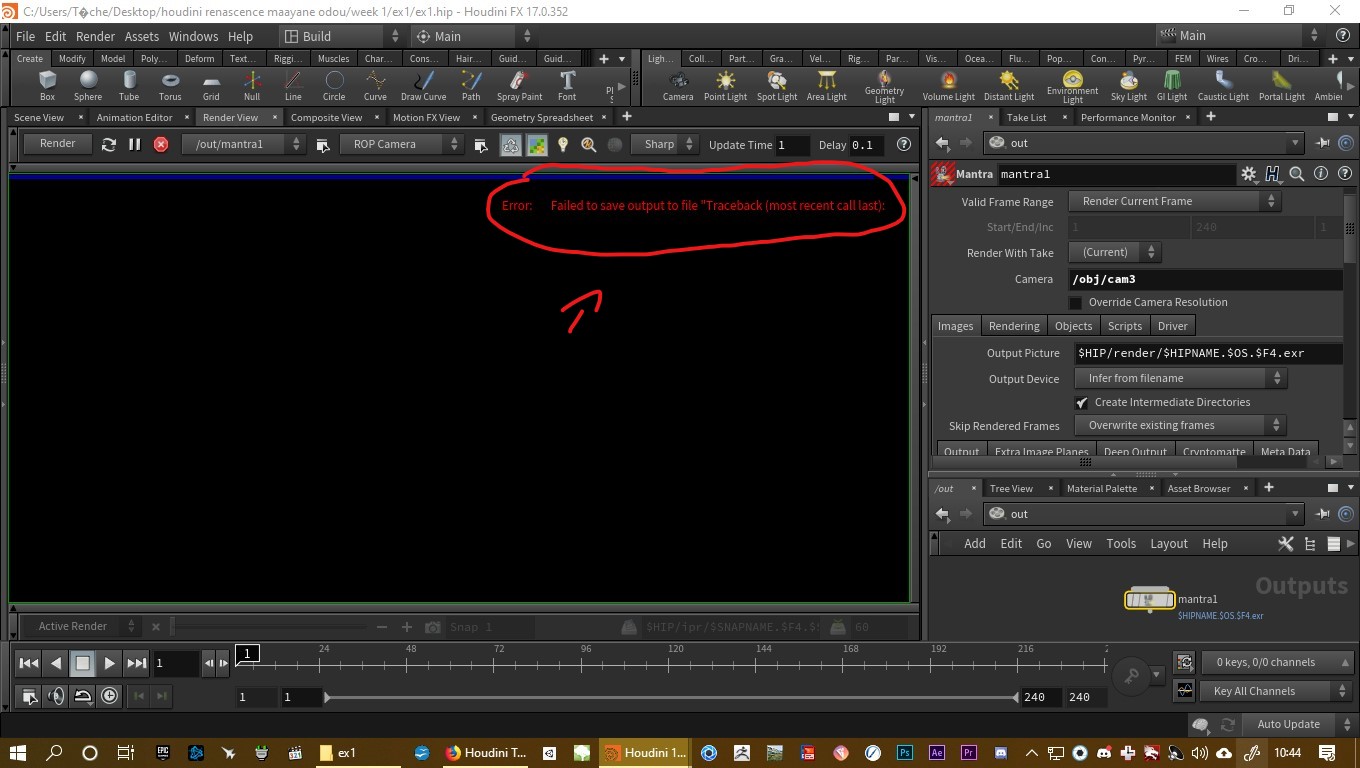
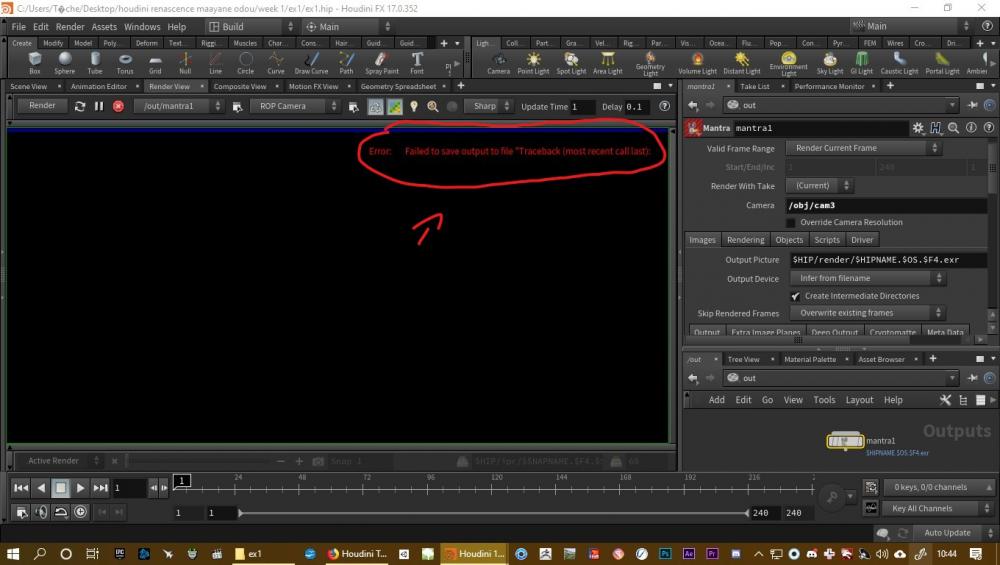
 Hey everyone, Whenever I go to the render viewport in Houdini 17.0.352 I get the following message "Error : failed to save output to file "traceback (most recent call last):" I joined here both the error message I get when I start Houdini and the Message I get when trying to render using mantra. BUG report.pdf Trying to render a frame manually (save to jpeg) also leads to an error. I tried reinstalling Houdini or even deleting preferences but none of this worked. I believe this is a bug linked to Python, but can't figure out what exactly. -- Could you guys please help me with this situation ?
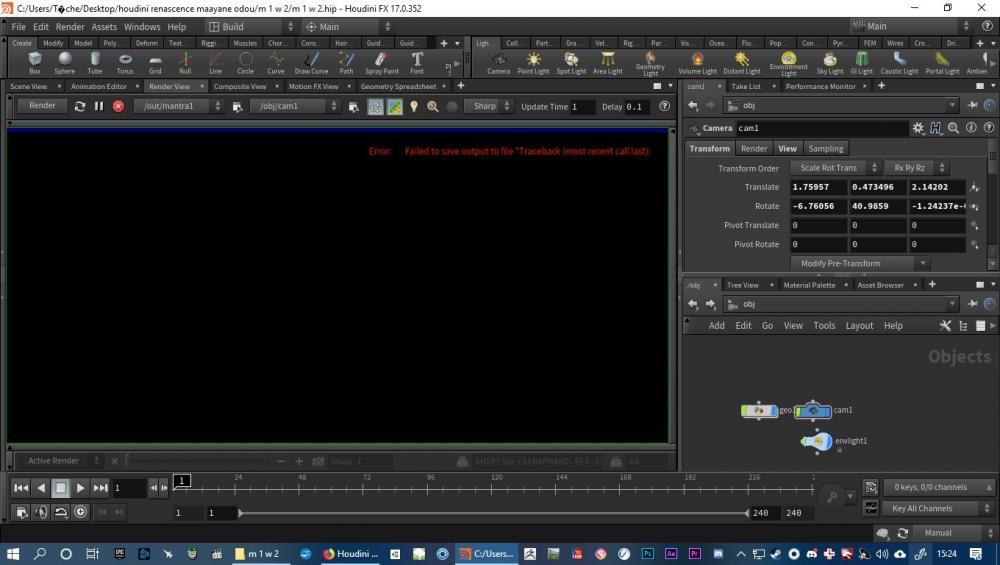
-
Hi all! When I create or download assets for outside set dressing (rocks and stuff) I often wished that Houdini had a decent tri-planar mapping shader. I'm used to it from game engines and it is so convenient not having to create UVs for this type of geo! I like to use volumetric modeling in Houdini for such assets and it can be quite a PITA to create UVs for geometry like that (good UVs that is, that also work in closeups with no seams and no stretching!). With tri-planar mapping you don't need no UVs – just slap the textures on and you're good. Of course it has its limits, but still. So as the built-in tri-planar node in Houdini is quite a pain to use and most of all does not work for normal maps, I decided to create my own. With this Mantra shader I can tri-planar map all needed textures (diffuse, normals, roughness, displacement) at once. And I added a decal mapper as a bonus, to be able to add some details here and there. If anyone's interested, it's free: Description, Download & Video page: https://deepwell.at/pages/triplanar/ [deepwell.at] Direct link to video: https://vimeo.com/637772787 [vimeo.com]
-
Hey I am having a problem while rendering my Ocean Surface. Mantra is not displaying anything in the render view. I can see "mantra: Could not obtain vex from op:_auto_/mat/oceansurface " Any Idea what can be the reason of it, It is keep failing the render!!

-
Hi Everyone, I am trying to create a water splash with separate water trails as shown in the below image. I have created separate sim for splash and main water sim. Using object velocity to emit splashes but unable to get proper shapes of water splash as per reference. Any ideas or suggestions will be of great help.

-
This is a preview of the Houdini 18.5 knit tutorial series Artstation https://www.artstation.com/nemikoait Instagram https://www.instagram.com/nemikocg
-
Hi all! I'm trying to create a layer material and it works fine so far - using it in a mix works as expected. But when I try to use attributes, e.g. the rest position, the binding fails as soon as I use the material as a layer. When I use it directly (assigned it directly to a geo) the binding works fine. And when I use it as a layer (and assign the layer mix to the geo) every other aspect also works fine - just the rest position suddenly is not known anymore (although the geo has not changed and still has the rest pos of course). Attached is a sample scene. The custom shader ("myshader") has a parameter "use_rest". With that you can switch it from using the usual P to using the rest position instead. You can assign the "myshader" material directly to the sphere (everything works fine with both, P and rest) or assign the "layermix" to it (only works with P but not rest). Any ideas? Regards Johannes layered_shader_rest_pos.hiplc
-
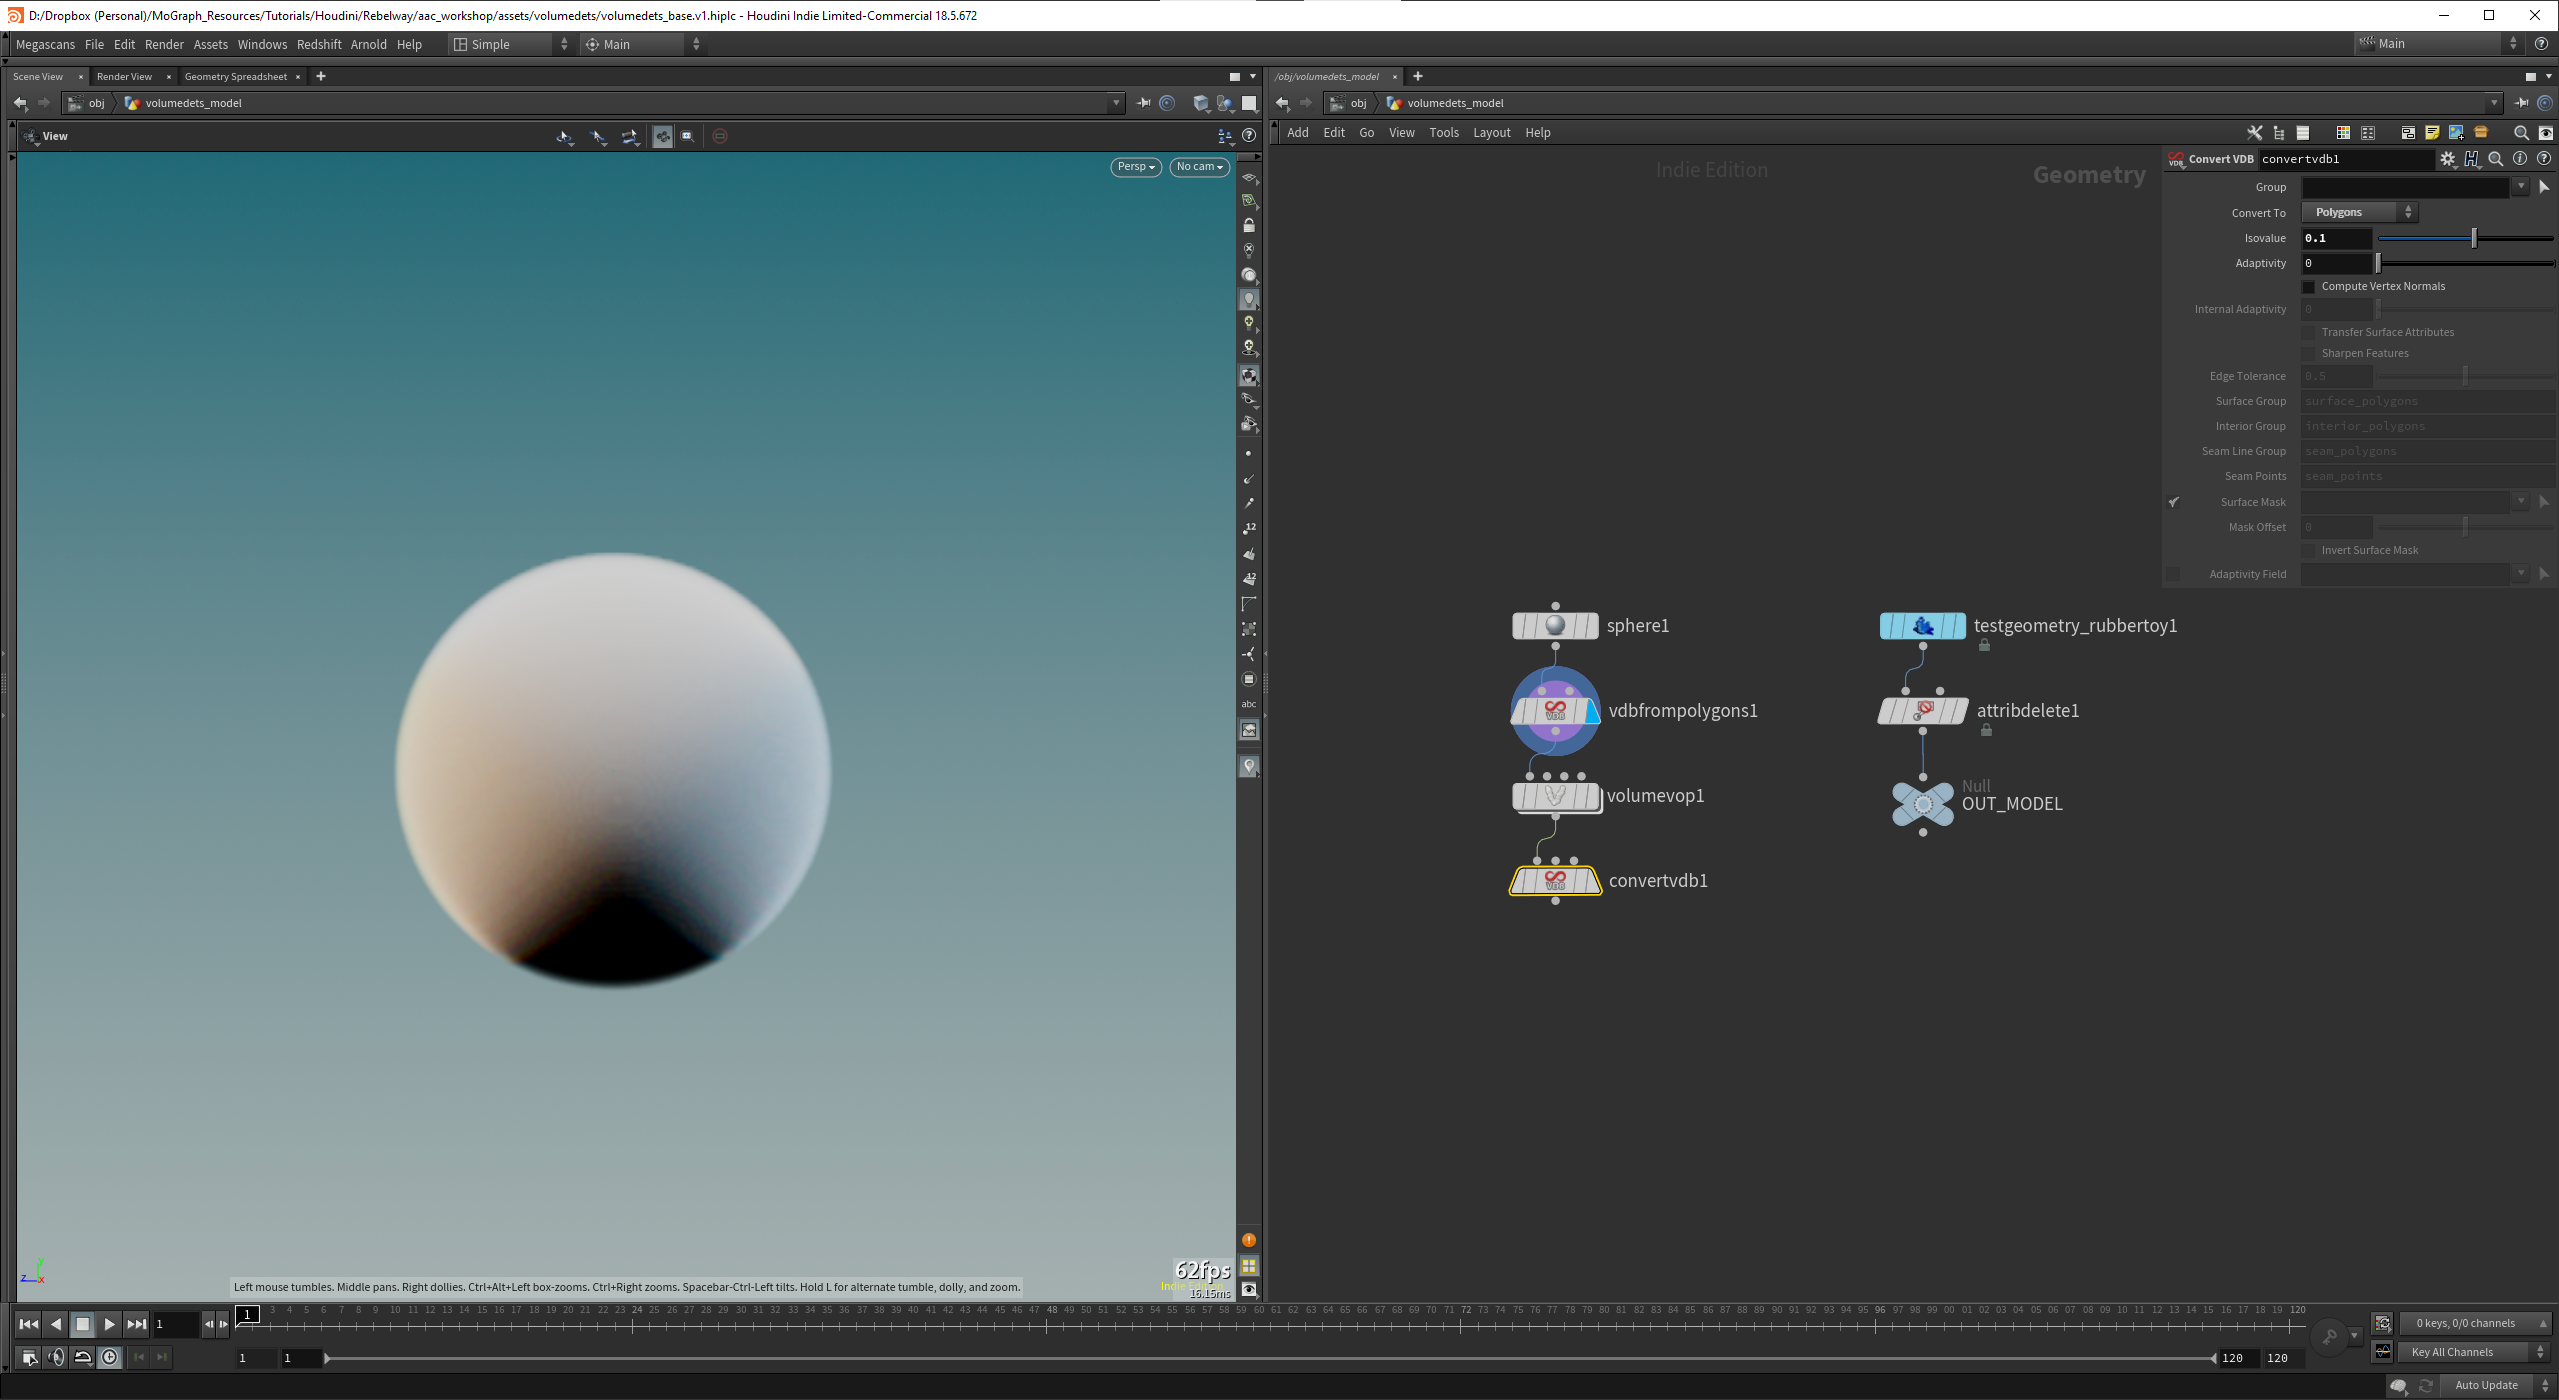
 This is more of a minor annoyance than anything else, but I'm working through part 3 of that free Rebelway asset creation course and around 9:30 I noticed a different behavior than in the video when trying to shade a VDB fog in the viewport with standard distant lights. It seems like the light gets cut off at the surface of the volume, and as far as I can tell it's not caused by the Arnold lights or anything else in the scene. The set up is super basic, and the same thing happens when building the scene from scratch in new projects. That said, it would be nice to have lights interacting properly with the fog, so I thought I'd ask to see if anyone has any idea what might be causing that. I know that this masterclass was created in a much older version of Houdini, perhaps as early as 16.5, so I imagine it might be a version difference, but it seems like a silly behavior to change. Might it be a bug? It still happens after updating Houdini...