Search the Community
Showing results for tags 'Houdini'.
-

kimodo Kimodo + KineFX: Text-to-Character Motion Workflow
raducius posted a topic in Animation & Rigging
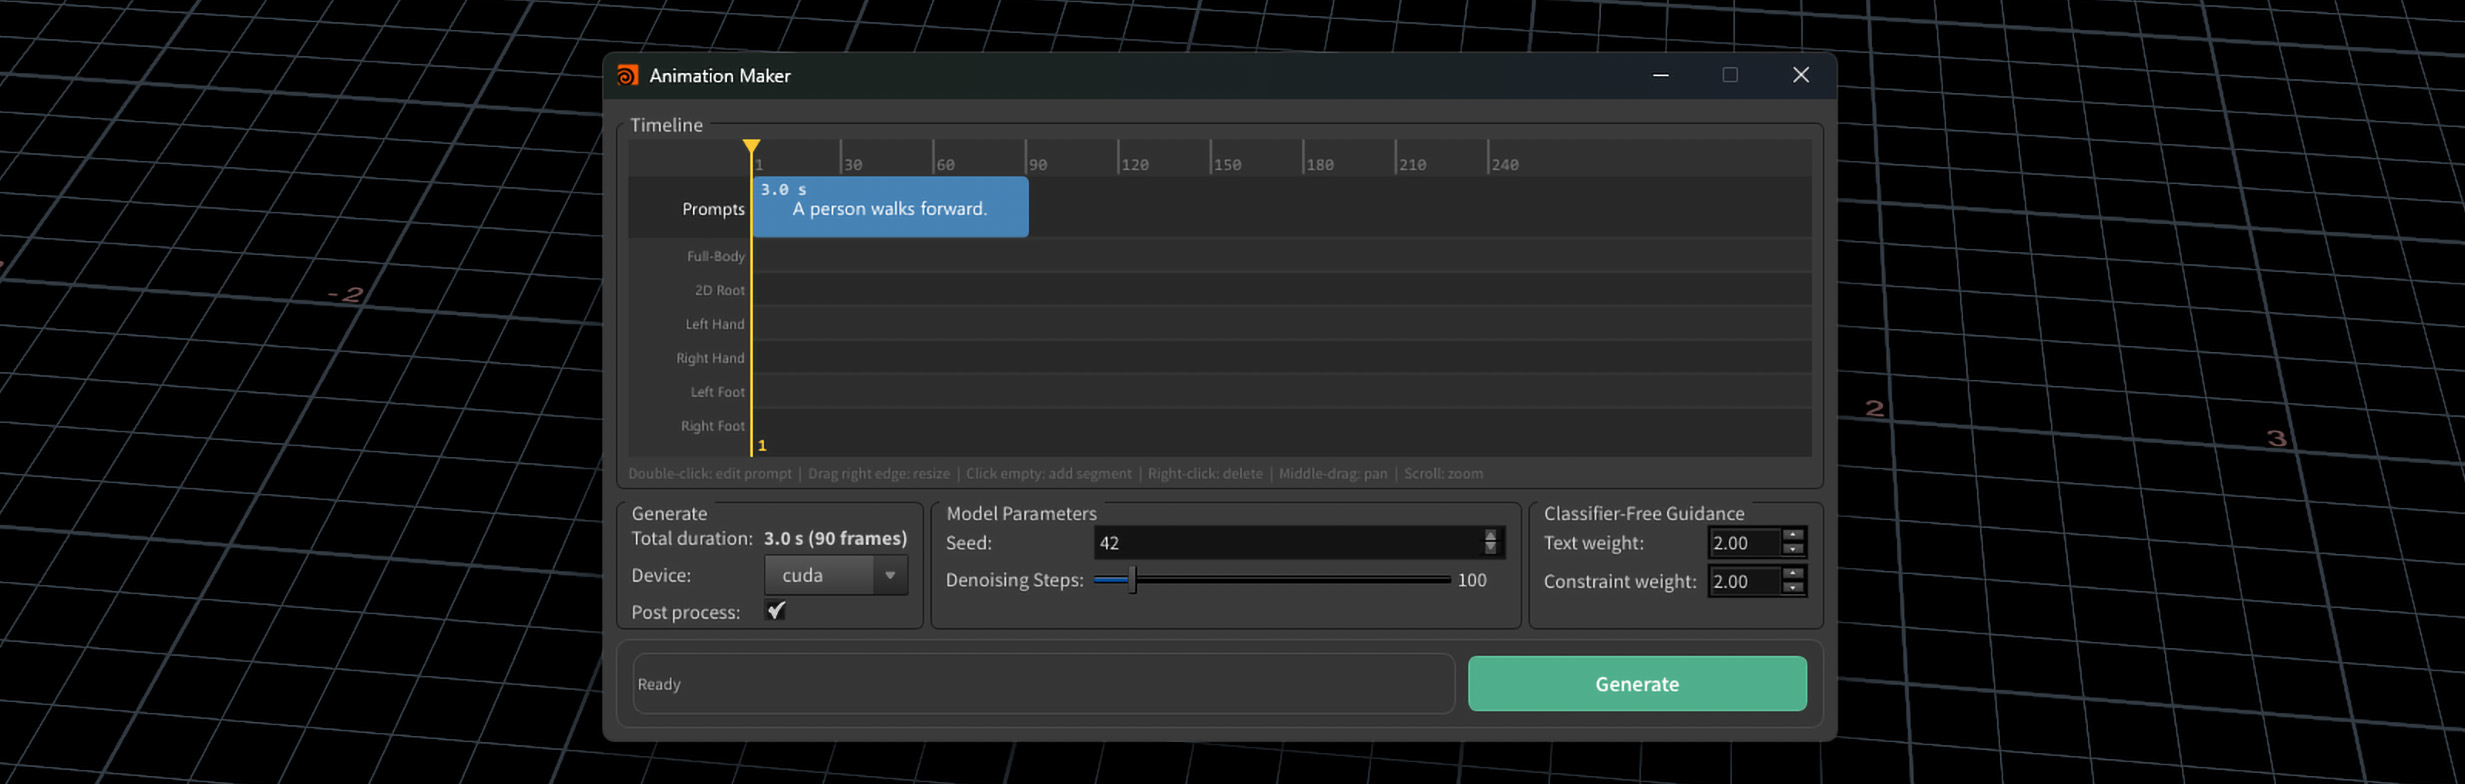
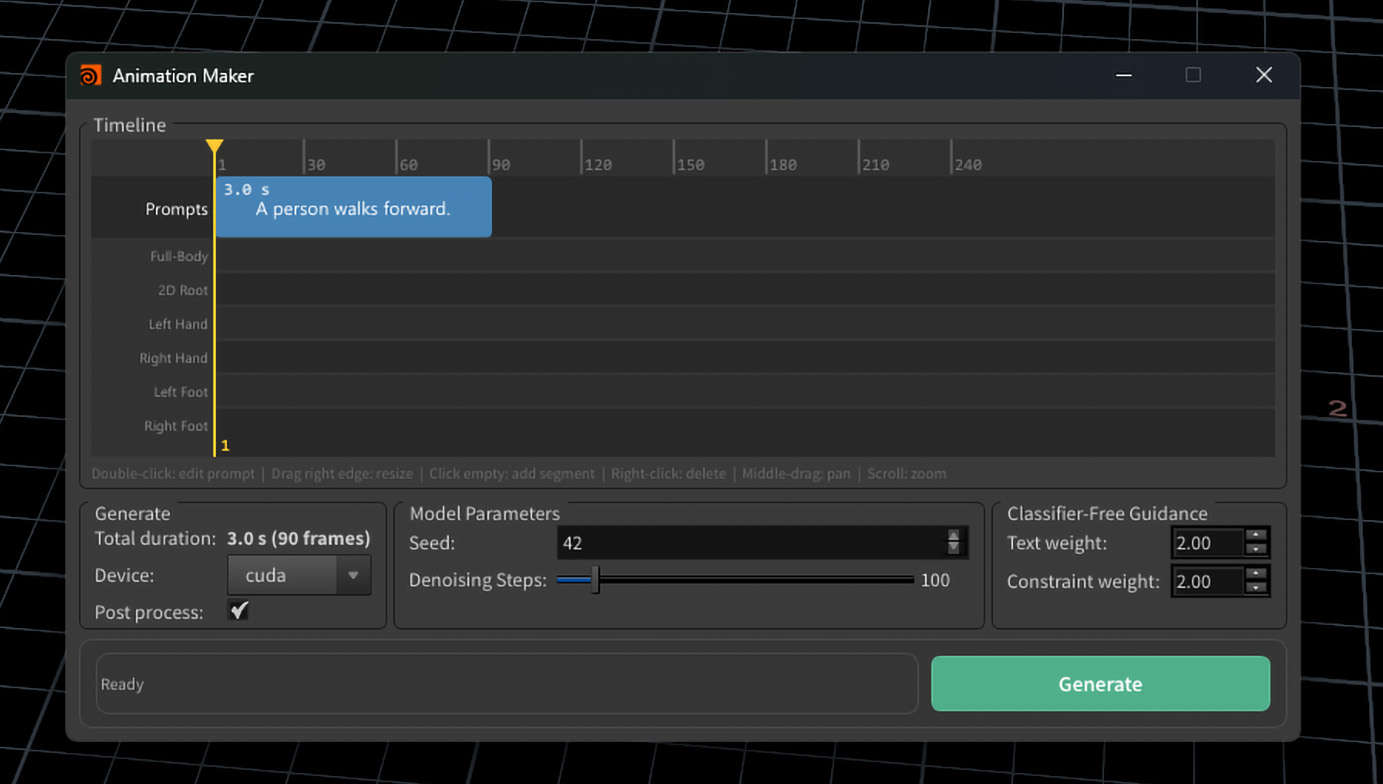
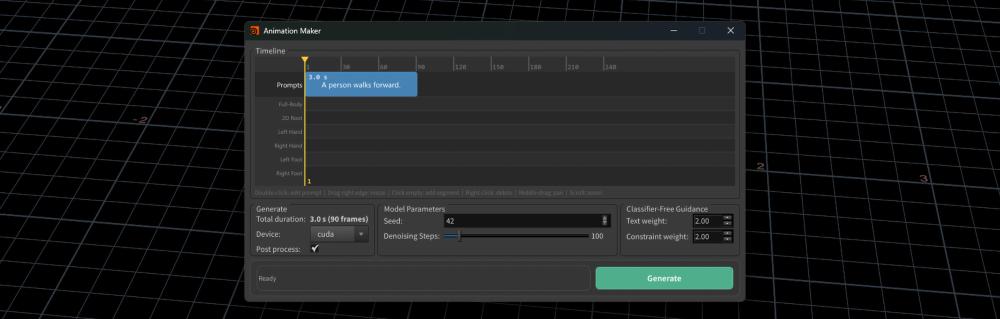
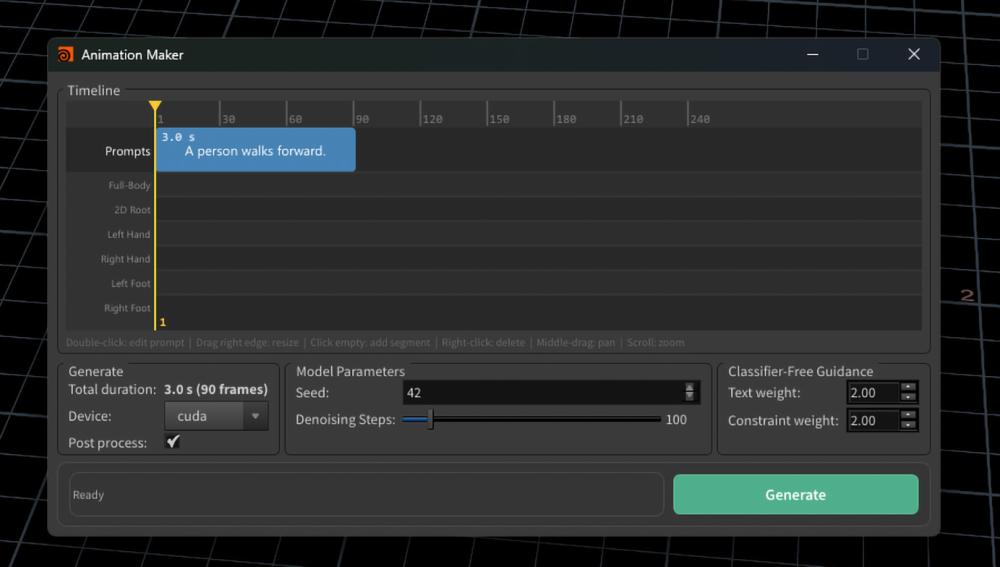
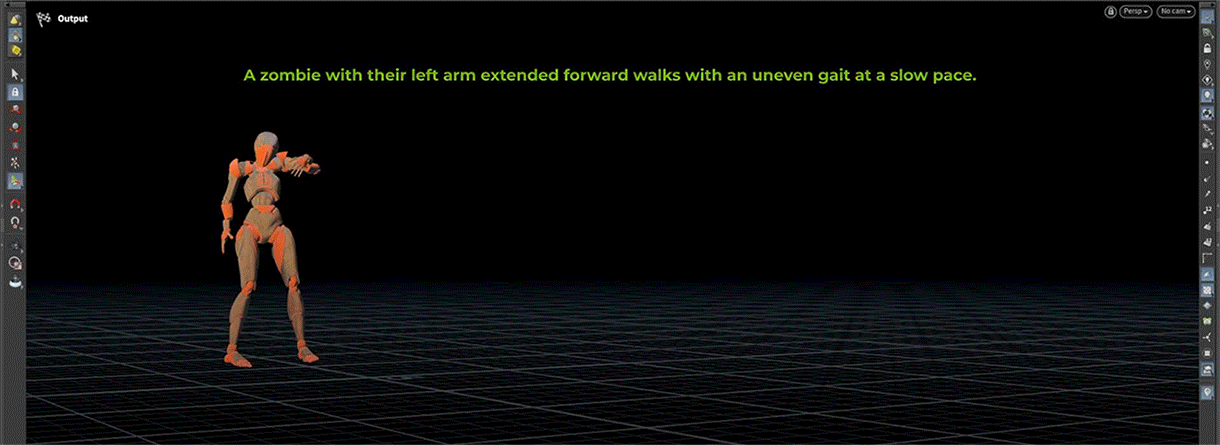
Hi everyone, I wanted to share a new feature now available in Houdini AI Assistant: Animation Maker. It brings text-to-character motion generation directly inside Houdini, using Kimodo for motion generation and KineFX for importing, retargeting, and continuing the animation workflow inside Houdini. Demo: https://youtu.be/dqLJe_3Qlic?si=TEZFXFNnDwSD1ndD The integration is currently available in the Houdini AI Assistant build on Gumroad. Houdini AI Assistant: https://rart.gumroad.com/l/HoudiniAIAssistant Current workflow: Prompt → Generate Motion → Adjust Character Position → Regenerate The current build supports: - Text-to-character motion generation - Multi-prompt timeline - 2D root waypoint controls - Full-body keyframe guides - Hand and foot guide tracks - KineFX retargeting workflow The idea is not just to generate a motion clip externally, but to make the result editable and usable inside Houdini. The generated motion can be imported as BVH, retargeted through KineFX, adjusted, and reused as part of a Houdini character workflow. At the moment this is still an early Windows beta and focused on humanoid motion, since Kimodo is trained around human skeleton animation. APEX support is something I’m also looking into. I’m currently testing different workflows around: Timeline-based prompt segments Motion transitions between prompts 2D path control Full-body constraints Hand / foot end-effector guides BVH import and retargeting reliability I’d be very interested to hear thoughts from Houdini users working with KineFX, APEX, retargeting, or character animation workflows. Houdini AI Assistant: https://rart.gumroad.com/l/HoudiniAIAssistant Would this kind of prompt-based motion generation be useful in your Houdini pipeline? And what would be the most important control features for production use? Thanks, Radu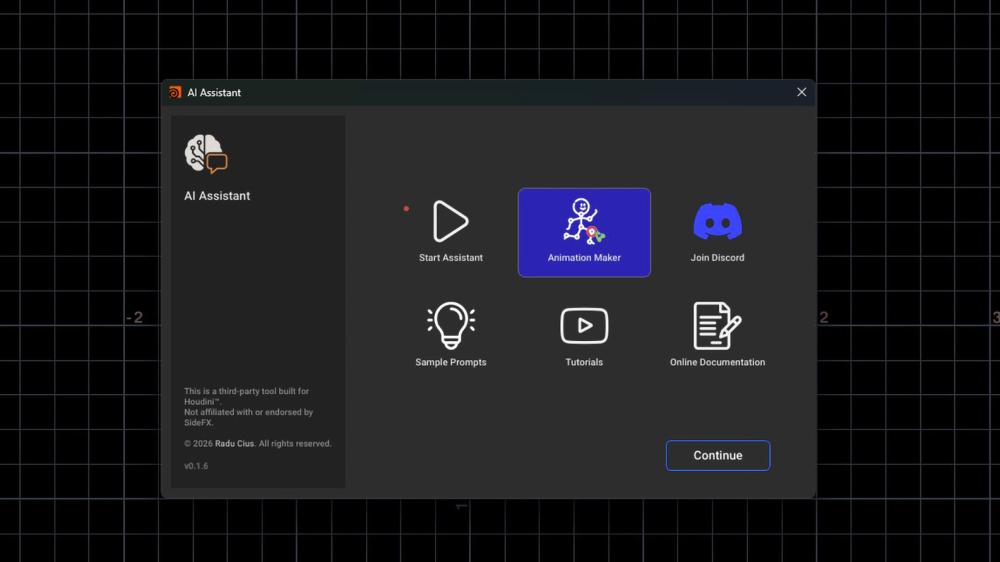


-
After more than 5 months of unimaginable amount of work, I am proud to release my first in-depth Houdini course on VEX More details in the video description and the website. Active Patreon members will receive additional discounts proportional to their lifetime support (25% of their lifetime support). Message me on Patreon for your discount coupon. Enjoy! 01 - Introduction [Point Clouds] 02 - Introduction [pcopen() vs pcfind() vs nearpoints()] 03 - Introduction 04 - Implementation 05 - pcfilter() Implementation for pcfind() 06 - pgfind() 07 - pcfind_radius() 08 - Excluding the Current Point & Ad-Hoc Groups 09 - Finding Min & Max Neighbour Points [Unique Pair Matching] 10 - Concept 11 - Implementation [Camera Based Occlusion with Variable Pscale] 12 - Concept 13 - Implementation [Uniform Point Distribution Over Polygonal Surfaces [Point Relaxation]] 14 - Concept 15 - Implementation 16 - Decoupling Operators [Convolution Kernels] 17 - Introduction 18 - Border Handling [Connectivity & k-Depth Point Neighbours Using Edges] 19 - Introduction 20 - Concept 21 - Implementation [Connectivity & k-Depth Point Neighbours Using Primitives] 22 - Concept 23 - Implementation [Extending k-Depth Point Neighbours Using Edges] 24 - Introduction 25 - Concept 26 - Implementation [Extending k-Depth Point Neighbours Using Primitives] 27 - Concept 28 - Implementation [smoothstep() [Cubic Hermite Interpolation]] 29 - Concept 30 - Implementation [Shaping Functions] 31 - Introduction 32 - Implementation 33 - Blurring Attributes [Sharpening Attributes Using Unsharp Mask] 34 - Concept 35 - Implementation [Generalizing the Kernel Code to Handle All Attribute Types] 36 - Concept 37 - Implementation [Attribute Gradient] 38 - Introduction 39 - Concept 40 - Implementation [Gradient Ascent & Descent] 41 - Planar Geometry - Introduction 42 - Planar Geometry - Concept 43 - Planar Geometry - Implementation 44 - 3D Geometry [Contour Lines] 45 - Introduction 46 - Concept 47 - Implementation 48 - Heightfields [Geometric Advection - Orthogonalization & Flowlines] 49 - Introduction 50 - Concept 51 - Implementation [Clustering & Quadtrees] 52 - Concept 53 - Implementation [Adaptive Subdivision] 54 - Introduction 55 - Implementation 56 - Hashing [Adaptive Subdivision] 57 - Improving OpenSubdiv Catmull-Clark Subdivision Surfaces Algorithm 58 - Half-Edges [Adaptive Subdivision] [Aggressive Performance Optimizations] 59 - Eliminating Groups 60 - Custom Fusing In VEX 61 - Recreating Proximity Structures In VEX 62 - Get Unshared Edges In VEX 63 - Final Optimizations [Limit Surface Sampling] 64 - Introduction 65 - OpenSubdiv Patches 66 - Moving Points to the Subdivision Limit Surface 67 - Scattering Points on the Subdivision Limit Surface 68 - Generating a Point Cloud on the Subdivision Limit Surface 69 - Pre-Generating a Point Cloud on the Subdivision Limit Surface 70 - Creating Isolines on the Subdivision Limit Surface [Adaptive Subdivision] 71 - Computing Surface Normals from the Subdivision Limit Surface [Custom Subdivision Surfaces] [Splitting Edges [Edge Divide]] 72 - Concept 73 - Converting Edges to Primitives 74 - Creating New Edge Points [Rebuilding Polygons] 75 - Concept 76 - Implementation 77 - Preserving & Interpolating Attributes 78 - Multithreading by Connectivity 79 - C++ vs VEX 80 - Preserving Groups 81 - Final Optimizations [Implementing Bilinear Subdivision] 82 - Introduction 83 - Concept 84 - Modeling Test Geometry 85 - Starting from Edge Divide 86 - Creating New Face Points 87 - Creating New Edge Points [Creating New Closed Polygons] 88 - Concept 89 - Implementation [Creating New Open Polygons] 90 - Concept 91 - Implementation 92 - Preserving Primitive Groups & Interpolating Primitive Attributes [Preserving Vertex Groups & Interpolating Vertex Attributes for Closed Polygons] 93 - Concept 94 - Implementation 95 - Preserving Vertex Groups & Interpolating Vertex Attributes for Open Polygons 96 - Implementing Iterations 97 - Preserving Literal Groups 98 - Creating Neighbour Primitives 99 - Final Changes 100 - Testing On Complex Geometry [Implementing Catmull-Clark Subdivision] 101 - Introduction [Closed Surfaces] 102 - Rules [Gathering Edge & Face Points] 103 - Concept 104 - Implementation [Computing Weights for New Edge Points] 105 - Concept 106 - Implementation [Computing Weights for Original Points] 107 - Concept 108 - Implementation [Attribute Interpolation] 109 - Concept 110 - Implementation [Boundary Interpolation Rules for New Edge Points] 111 - Concept 112 - Implementation [Boundary Interpolation Rules for Original Points] 113 - Concept 114 - Implementation 115 - Open Surfaces - Handling Corner Points 116 - Handling Non-Manifold Topology [Open Polygons] [Computing Weights for Original Points] 117 - Reverse Engineering OpenSubdiv 118 - Implementation [Computing Weights for New Edge Points] 119 - Reverse Engineering OpenSubdiv 120 - Implementation 121 - Handling Open Polygonal Curves [Handling Mixed Topology] 122 - Full Geometry 123 - Sub-Geometry 124 - Testing On Complex Geometry [Performance] 125 - Profiling [Grouping Boundary Edges from Primitive Group] 126 - Concept 127 - Implementation 128 - VEX vs C++ [Caustics] 129 - Introduction 130 - Sea Caustics 131 - Pool Caustics [Enhancing Gradient Ascent, Descent & Contour Lines] 132 - Introduction 133 - Implementation 134 - Tracing Both Directions [Updating Distances Properly] 135 - Concept 136 - Implementation 137 - Looping Streamlines Problem 138 - Adding Trace Parameter [Evenly Spaced Gradient Ascent, Descent & Contour Lines] 139 - Introduction 140 - White Paper 141 - Concept 142 - Constructing the For Loop Network 143 - Improving Seed Points Selection for Tighter Packing 144 - Implementing Separation [Enforcing Separation Using Self Proximity] 145 - Concept 146 - Implementation 147 - Optimization 148 - Final Tweak 149 - Applying to 3D Geometry [Custom Subdivision Surfaces] [Extreme Performance Optimizations] 150 - Introduction 151 - Establishing Baseline for Performance 152 - Updating Attribute Interpolate Nodes 153 - Interpolation vs Copying 154 - Optimizing Input Group 155 - Caching Geometry Data 156 - pointedge vs pointhedge 157 - Getting Primitives from Half Edges 158 - Eliminating Edge Groups 159 - Parallelizing Geometry Creation for New Primitives [Unrolling Loops] 160 - Parallelizing Geometry Creation for New Edge Primitives [Unrolling Loops] 161 - Finalizing the Network 162 - Performance Profiling the Latest Version 163 - Conclusion
- 55 replies
-
- 15
-

-

-
 Sony Pictures Imageworks is located on the unceded traditional territory of the Musqueam, Squamish, and Tsleil-Waututh First Nations. We are committed to respecting traditional lands, and working with communities towards reconciliation. Sony Pictures Imageworks Canada Inc. 658 Homer St Vancouver, BC V6B 0T5 Sony Pictures Imageworks is an Academy Award®-winning visual effects and animation studio known for photoreal live-action visual effects, dynamic creature and character animation, and full-CG features. Role Review: We are looking to expand our development team dedicated to enhancing our Creature Effect, Crowds, Environment, and FX tools and workflow. We are looking for a highly proficient Technical Engineer to focus on the development and implementation of robust, high-performance, and domain-specific procedural toolsets using SideFX Houdini. This role requires strong technical leadership and the ability to work effectively with minimal supervision alongside a Lead Software Engineer or Architect. The ideal candidate thrives in a fast-paced production environment where priorities can shift quickly. What You’ll Be Doing: Design, develop, and implement scalable procedural systems and workflows within Houdini for various departments (FX, Creature, Crowds, Environments). Create, maintain, and optimize robust Houdini Digital Assets (OTLs), ensuring stability, ease of use, and adherence to production standards. Extend the core pipeline by developing, integrating, and supporting tools that manage data flow, asset publishing, and version control. Collaborate closely with artists (Creature, FX, Lighting) to gather requirements and troubleshoot technical issues, providing support for both in-house and commercial tools. Partner with engineers across other teams (Shading, Lighting, Rendering) to ensure seamless integration of procedural assets into the overall rendering and compositing pipeline. Document tools and workflows thoroughly for use by the wider artistic and engineering teams. Required Technical Experience & Skills: 3-5+ Years of professional experience in developing procedural workflows and tools in a VFX, Animation, or Game production environment. Demonstrated knowledge of the Houdini environment, including tool creation, optimization, and workflow techniques. Strong proficiency in Python and VEX for writing efficient, custom nodes, and tool wrappers. Proven experience developing and supporting production pipeline tools and asset delivery. Experience leveraging the Houdini API and other DCCs like Katana. Strong grasp of 3D math, linear algebra, and data structures as applied to geometry processing and simulation. Strong verbal and written communication skills, with a collaborative approach to problem-solving. Capable of delivering on multiple competing priorities with little supervision. Preferred skills: Applies curiosity and judgment to identify broader or systemic issues and recommends creative approaches that address wider issues. Documented experience with desktop application development using PyQt/PySide to create custom user interfaces. Experience with C++ for high-performance plugin development. Experience with data science, machine learning, or complex simulation techniques (e.g., fluid dynamics, cloth) in a production context. Bachelor’s or Master's Degree in Computer Science, Digital Media, or a related technical field. The anticipated base salary for this position is within the range of $100,000.00/yr - $120,000.00/yr CAD (up to $150K for Senior candidates). The final compensation package will be commensurate with the candidate's professional experience, technical interview performance, and specific alignment with our team's requirements . Benefits are per company policy: which include healthcare, tuition reimbursement, RRSP's, Sick and Vacation leave, standard increases as applicable. The actual base salary offered will depend on a variety of factors, including without limitation, the qualifications of the individual applicant for the position, years of relevant experience, level of education attained, certifications or other professional licenses held, and if applicable, the location of the position. We value unique perspectives, and want diverse, unique talent to work with us. We encourage candidates from all identities to apply. *Sony Pictures Entertainment is an equal opportunity employer. We evaluate qualified applicants without regard to race, colour, religion, sex, national origin, disability, age, sexual orientation, gender identity, or other protected characteristics. Job Posting Link: https://www.imageworks.com/job-postings/4376
-
- 1
-

-
- pipeline td
- developer
- (and 7 more)
-
Heya! We're Those Awesome Guys, a small indie gamedev team looking for someone to help us turn our concept art into a robust procedural Houdini city generator, hooked up to Unreal Engine. What you’ll be doing: Turning concept art into a cohesive, procedural CityGen HDA Building systems that play nicely with Unreal (splines, assets importing, the whole deal) Making tools that artists actually enjoy working with You should be comfy with: Designing and building procedural city systems in Houdini Creating and maintaining complex, well-structured HDAs Houdini ↔ Unreal integrations Geometry, attributes, and VEX (you know your way around them) Keeping networks and parameters clean, readable, and organized Bonus points if you like problem-solving, experimenting, and shipping cool stuff with a small team. Please send an email with your portfolio and any other relevant links or info to: welackahrdepartment@thoseawesomeguys.com (yes, it's a real email)
-
Hey magicians, I was following Pizola's guided sim tutorial, and I don't know why my pieces are not falling down. The ghosted box is used as a guide velocity. I have uploaded the file here... Another problem is that small pieces are sticking to the surface area. Playblast1.mp4 GuidedRBD_Upload.hip
-
Hey guys. I want to displace my fluid mesh post sim based on a colored ramp. Therefore i use a sin function with @age but its not working like in the example in the second video. First i thought it might have to do with resseding but its also not working when turned off. Any ideas how to set this up? Thanks in advance. wip_III.mp4 2025-03-14 22-12-16.mp4
-
Hey guys. I have this infection setup but i would like to stop the infection and fade it out to 0 over some time. Then start again at a different spot and repeat the whole thing. basically like an animated attrib noise but with a fade in/out(growth) to it. Any help would be awesome! Infection.hiplc
-
 Hi, I'm having an issue for a current project which is requiring me to re-render numerous frames. As you can see on the mesh of the bear and the environment, certain flickering artefacts can be seen. No displacements are being used in this scene, let me know if you need to see the hip file. I am working with Houdini 20.5.278 T_hgp_0050_comp_v001.mov
 -
I'm trying to make a water balloon with vellum simlation that can be broken like the reference in this URL. However, I can't create a cloth that shrinks all at once after it breaks, like the reference. What parameters do I need to adjust to make the cloth shrink all at once after it bursts? Can someone give me some advice? Thank you very much for your help.
-
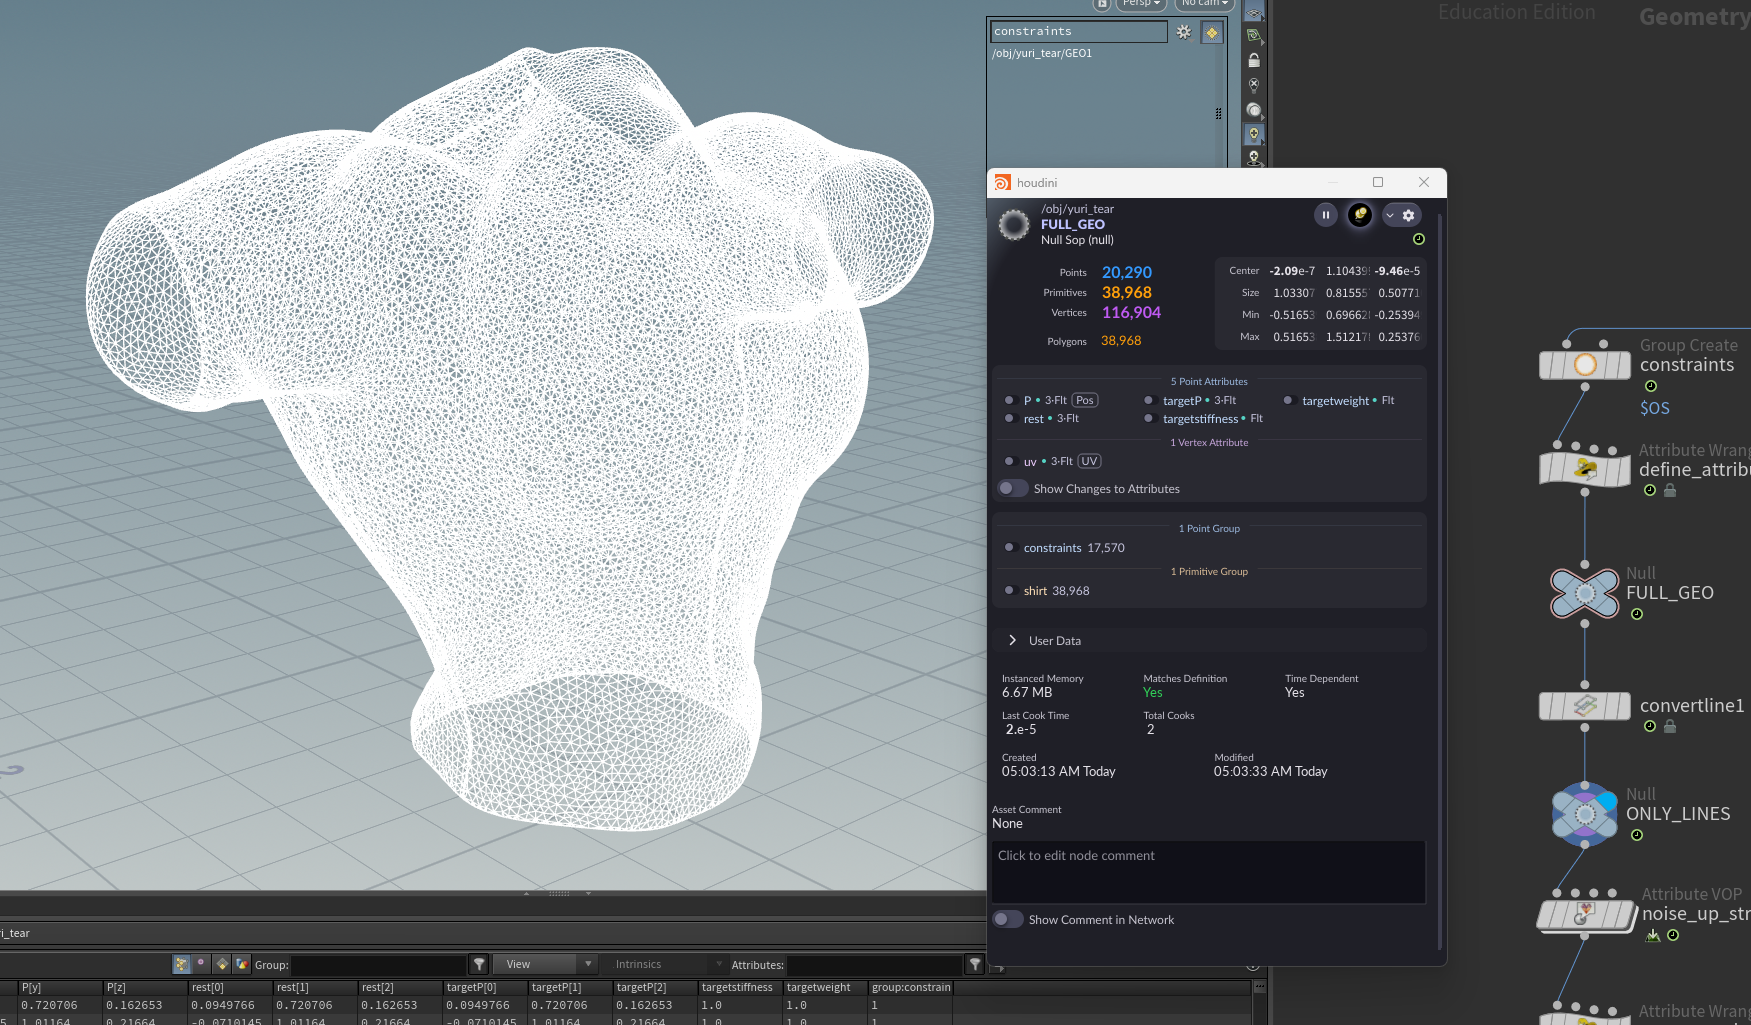
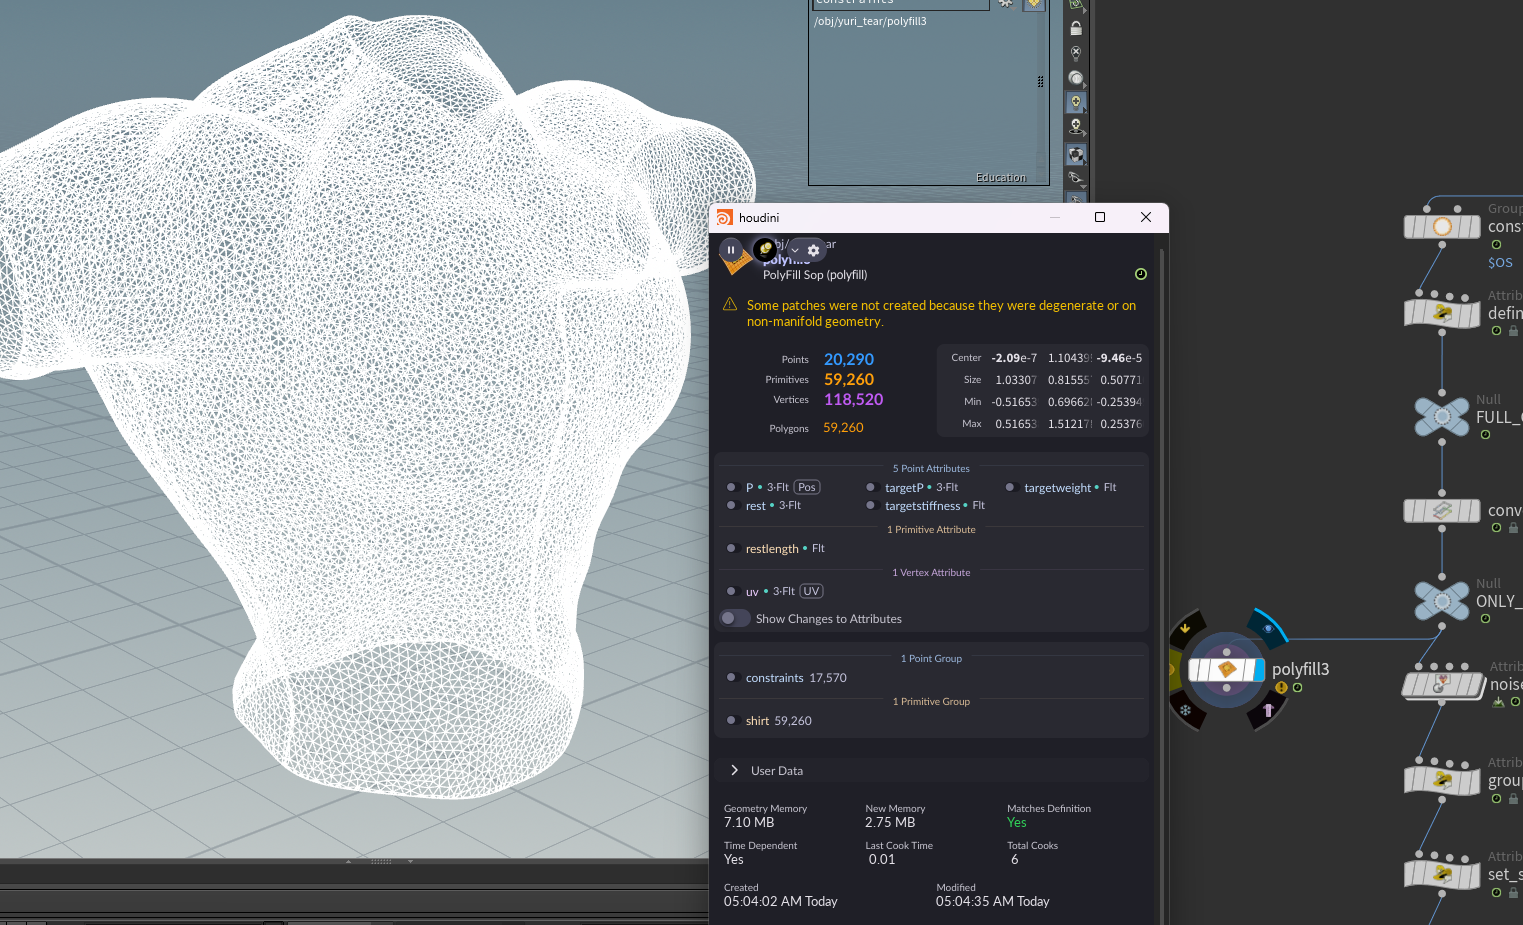
 So here's my geometry : And then after appending the convert line SOP : Now i want to basically "undo" this and go back to having faces (for context i'm feeding these primitives into a grain simulation to tear it). So i tried with the Polyfill set to triangles but it outputs an error. I've tried using the ends SOP, fuse SOP, polydoctor SOP, etc to fix it but it still won't patch the open triangles. Any advice on filling in the faces would be greatly appreciated. Thank you!


-
Hello. Has anyone stayed install older versions of Houdini for Linux and windows? thanks.
-
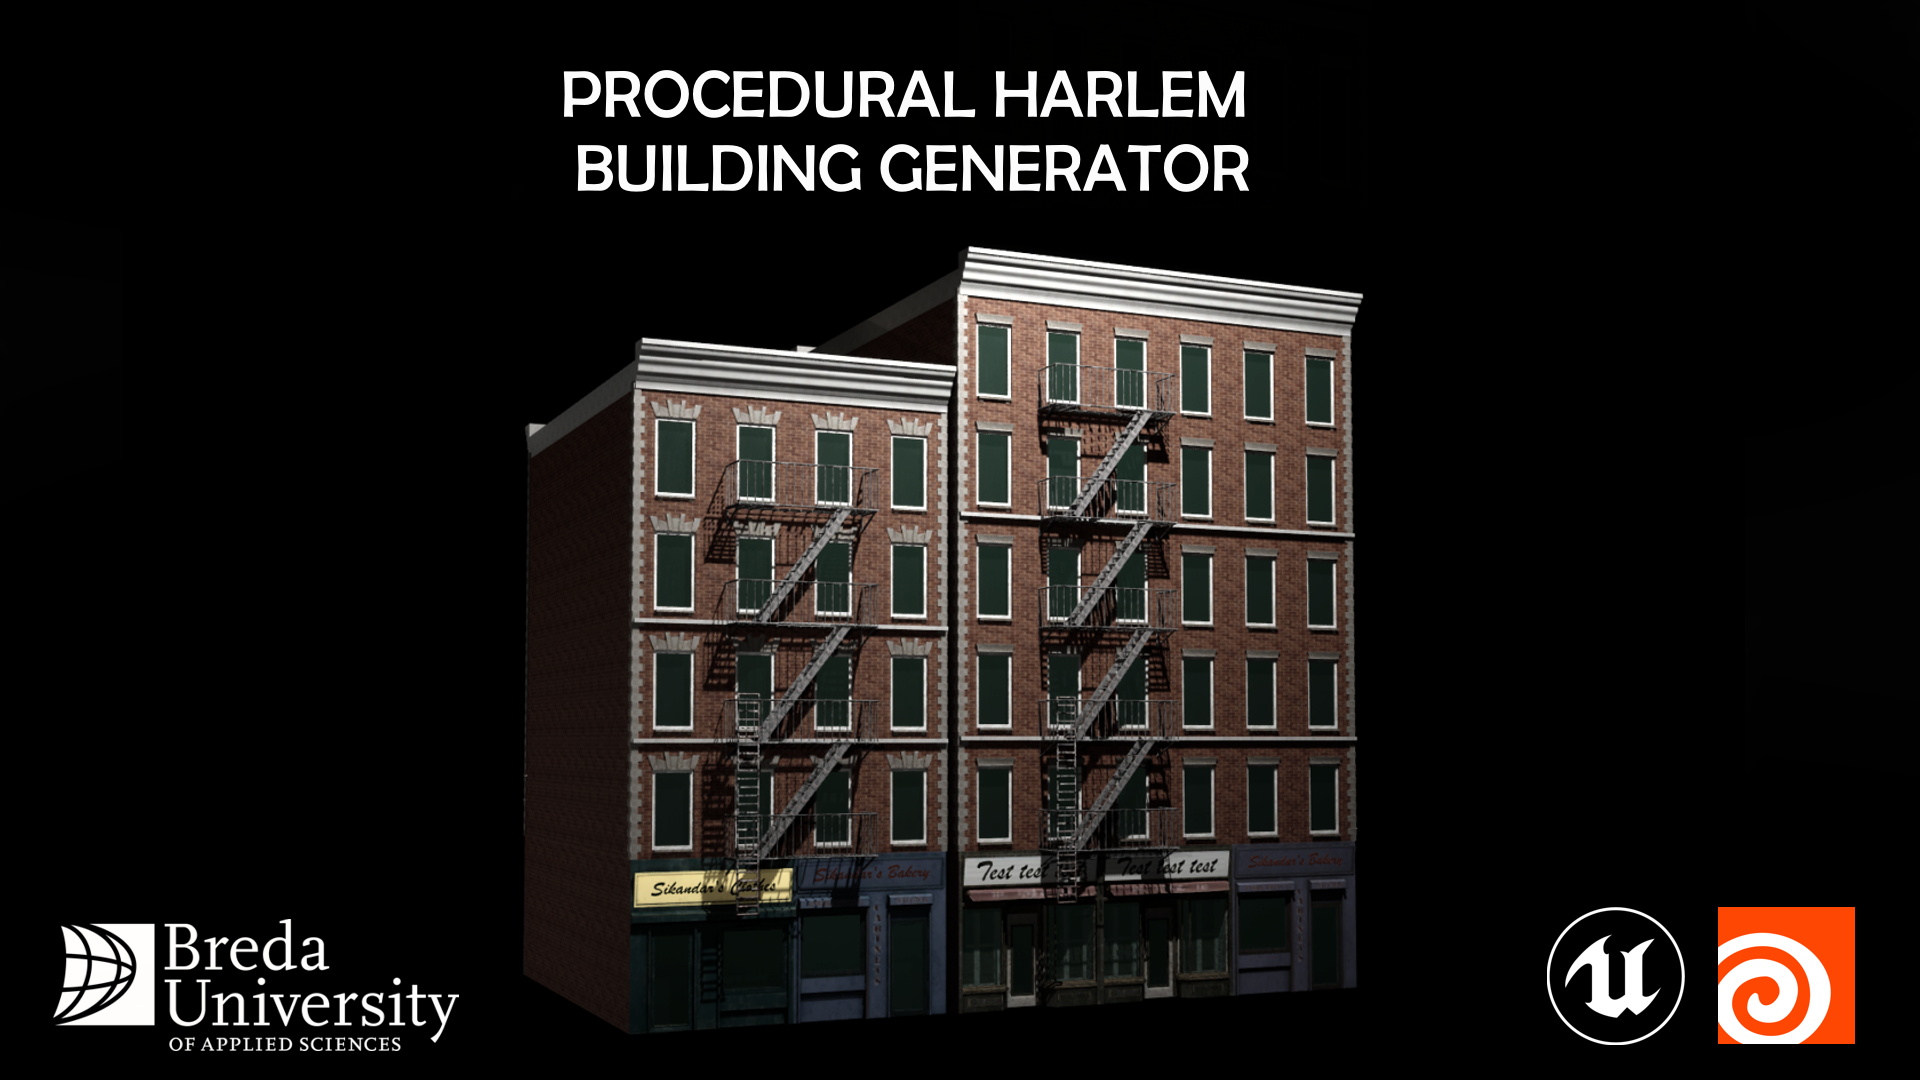
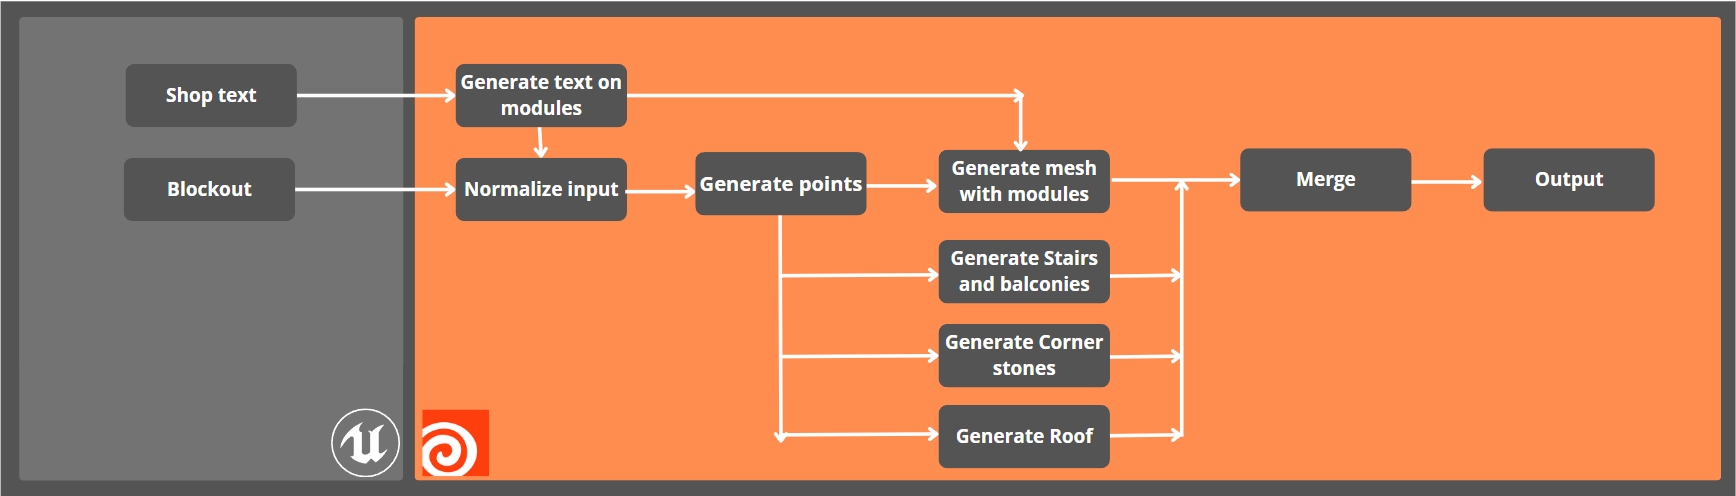
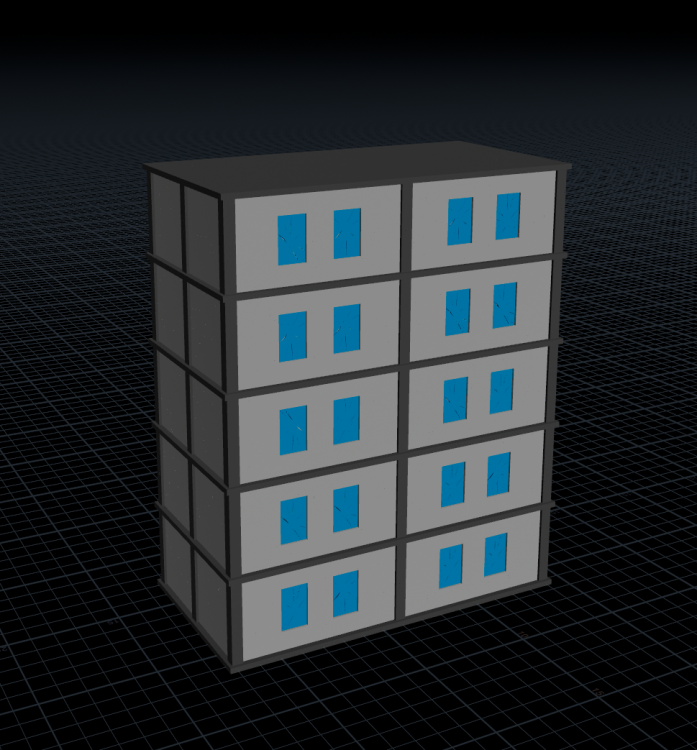
 Hello everyone! For the past 2 months I have been working on a procedural building generator as part of my studies at Breda University of Applied Sciences, that will be incorporated into an upcoming student project. We were tasked with finding a tech solution that fitted with our game, and I decided to try my hand at a polished building generator! For my second project I again opted to create a building generator. As opposed to last time, I worked with the labs building generator tool for the base of this system. The generator allows you to change the different parameters such as the location of stairs, the details on the windows and much more that will be showcased later. During my last project I often ran into the issue that I was using a bunch of MatchSize nodes, which forced me to work linearly when generating my building. this added a lot of time to the generation as every part of the building was recalculated after. To fix this issue, I exported the pointcloud of the building and used this to adjust my settings such as stair location, corner generation and roof generation. By utlizing points which are absolute instead of the local MatchSize nodes I was able to create a more robust building generator that also works quicker than my old project. Here is a video that showcases the Building generator in action. This time around I wanted it to be useable in Unreal Engine, as it would be used by my teams environment artists instead of me. This will hopefully be the last building generator I make at this study, I will be focusing on USD integration next! Thank you everyone for reading, if you have any questions please ask away!

-
 Hi, I'm looking for a solution to this user interface things that happens to me sometimes. When I'm dragging on a vector field in the transform sop, I lose access to the other 2 parameters. In this case it's really bad, it seems that All by transforms are now this way ! For example, in this screen shot, I was dragging the value ladder.. I lost X and Z and only have Y. I have tried clicking on the gear and "Reset Parameter Interface" but it doesn't do anything.
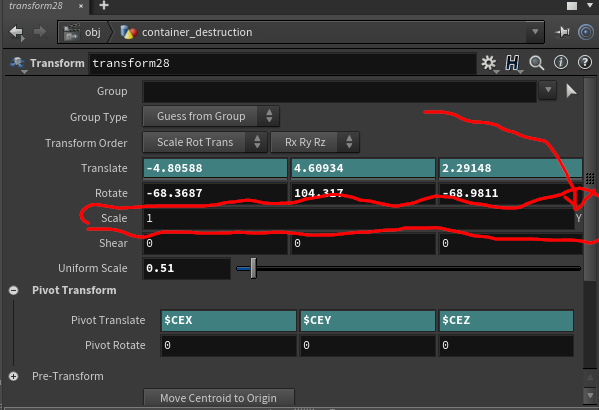
-
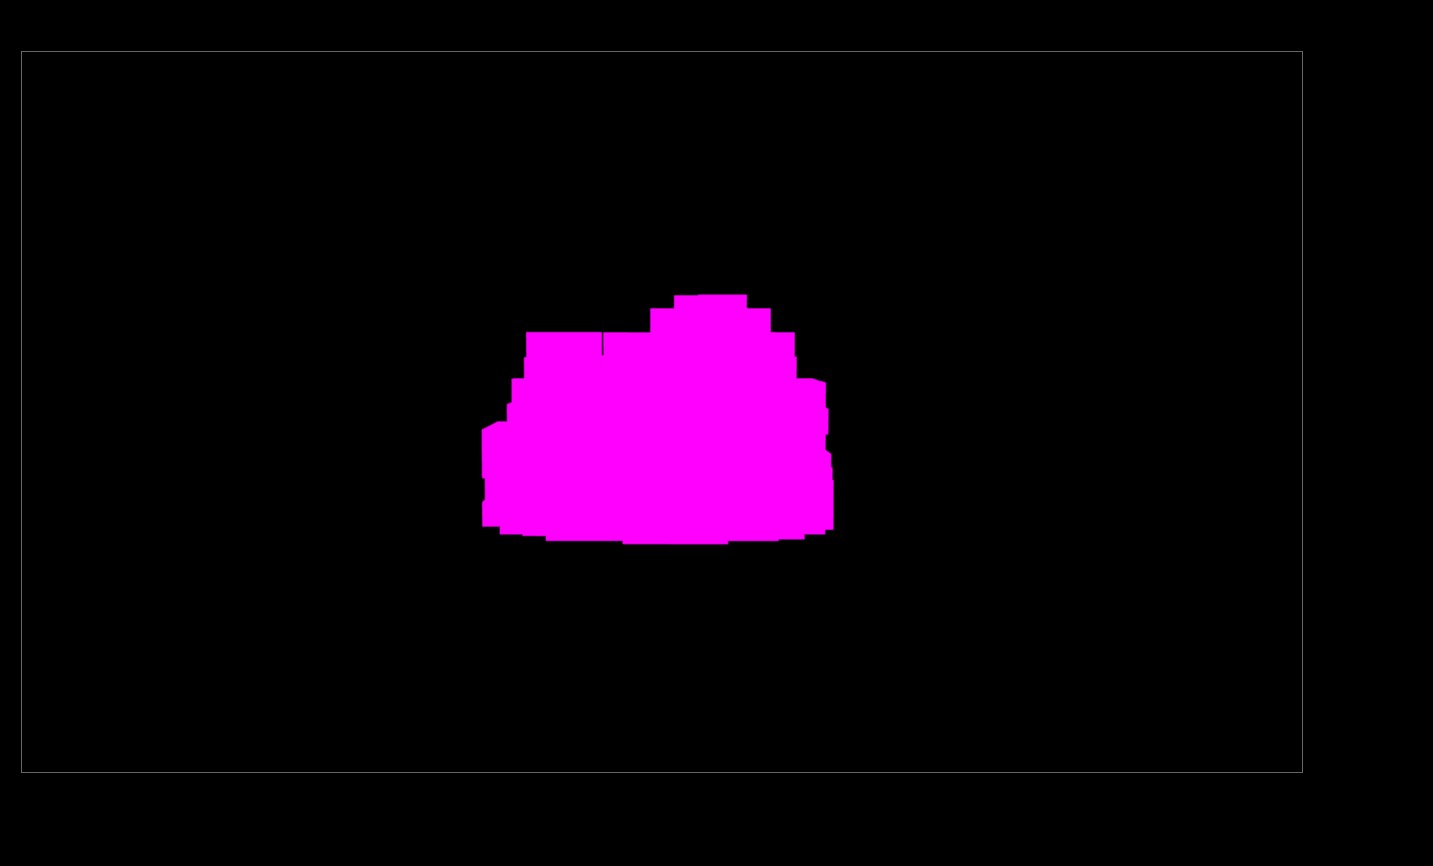
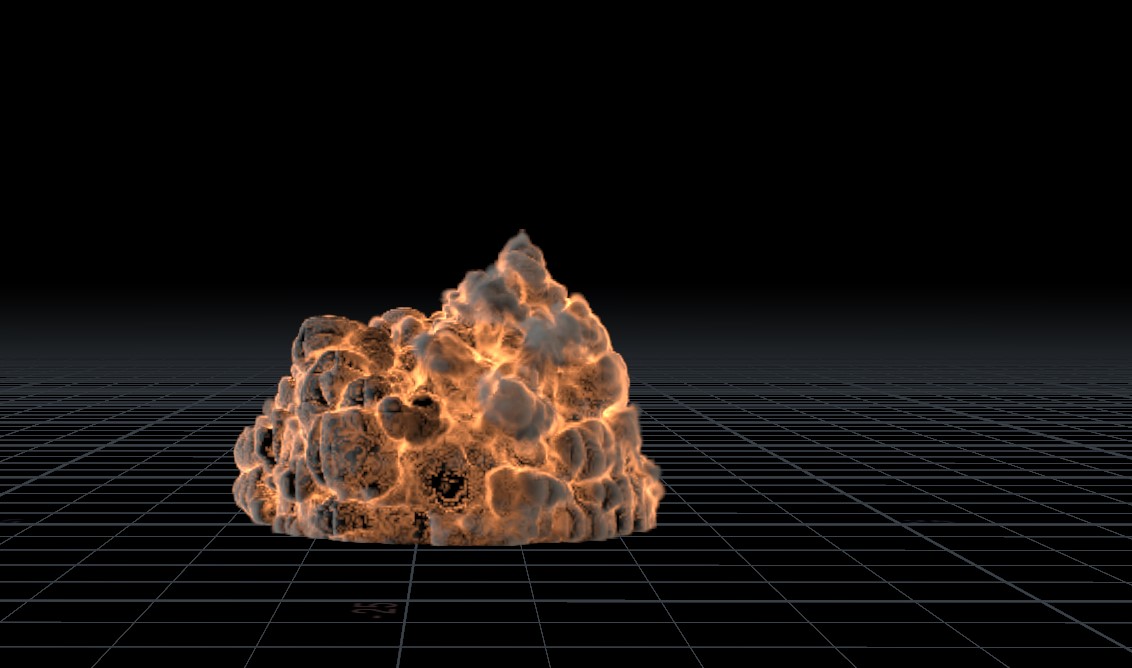
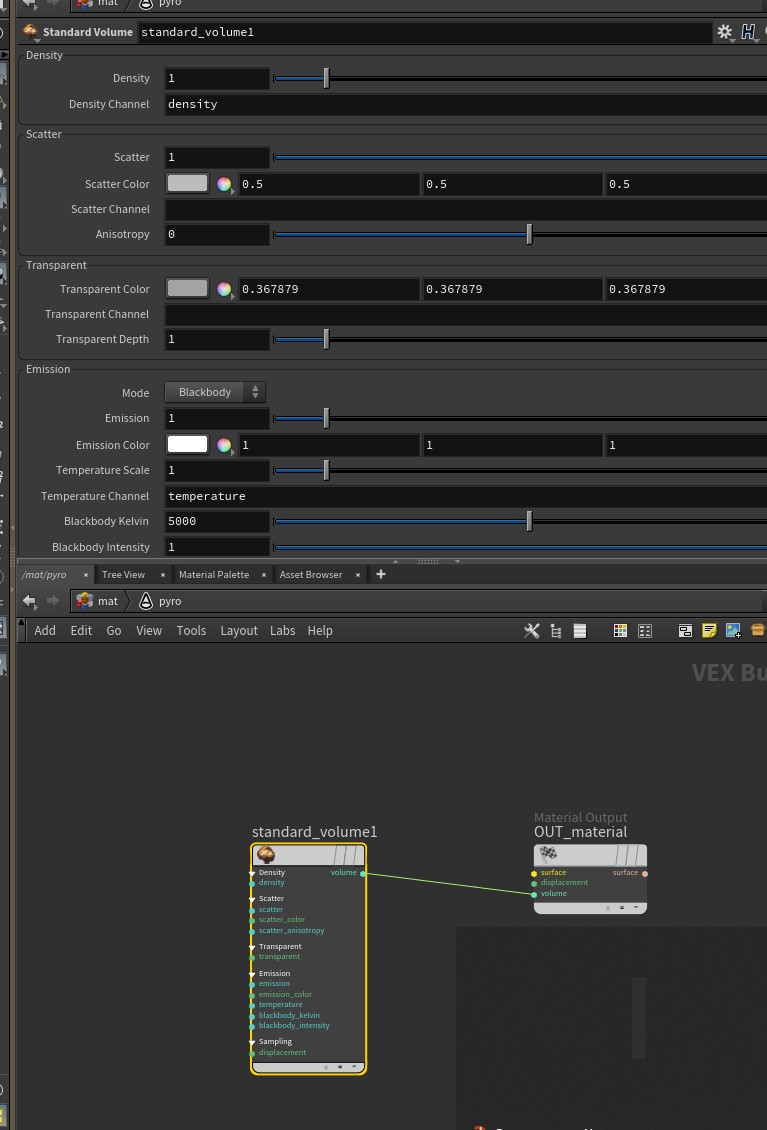
Hi Folks this is my first post. I'm new with arnold in houdini, I use to manage mantra. I'm trying to render volumes (an explosion in this case) with arnold but the volumes don't appear in the render view. As you can see in the pic I attached. Volume exists but in the render view has shown with pink cubes (I applied a standard volume to the explosion node) Does anyone know what is appening? Thanks in advantage panee.


-
 Hi everyone, I’m sharing a video showcasing part of my project, where I’ve been exploring environment design, COPs, and PDG workflows in Houdini. I’ve worked on creating procedural cliffs and textures, and I’d love to hear your thoughts or suggestions for improvement. Although this is my first time posting a video of my work. I’m excited to share and learn from this amazing community. Thank you in advance for your feedback and advice!
 -
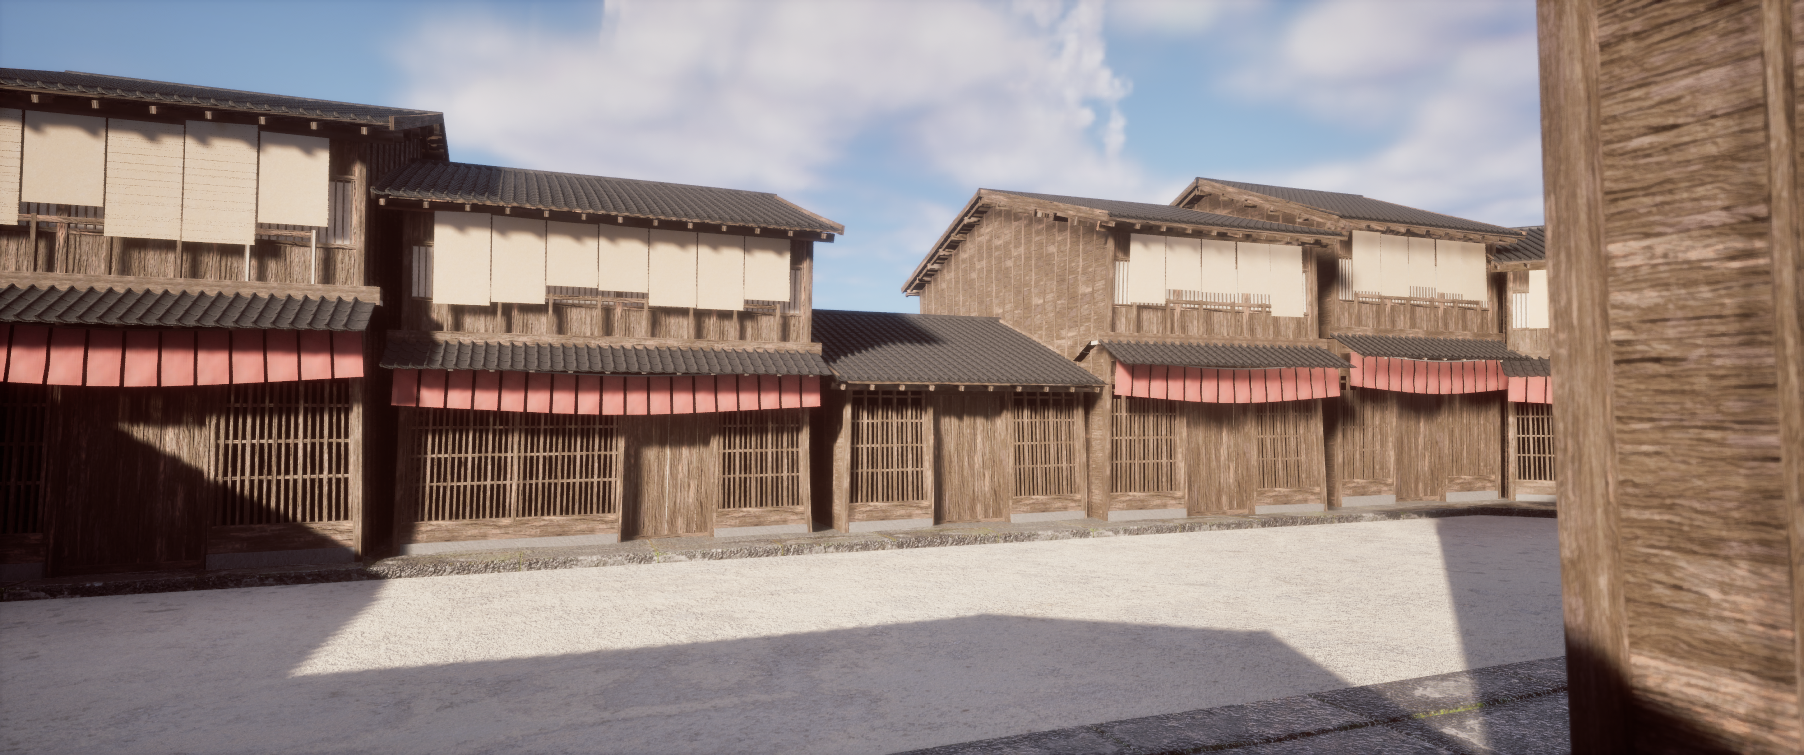
Machiya house generator in Houdini and Unreal
SikandarMaksoedan posted a topic in Tools (HDA's etc.)
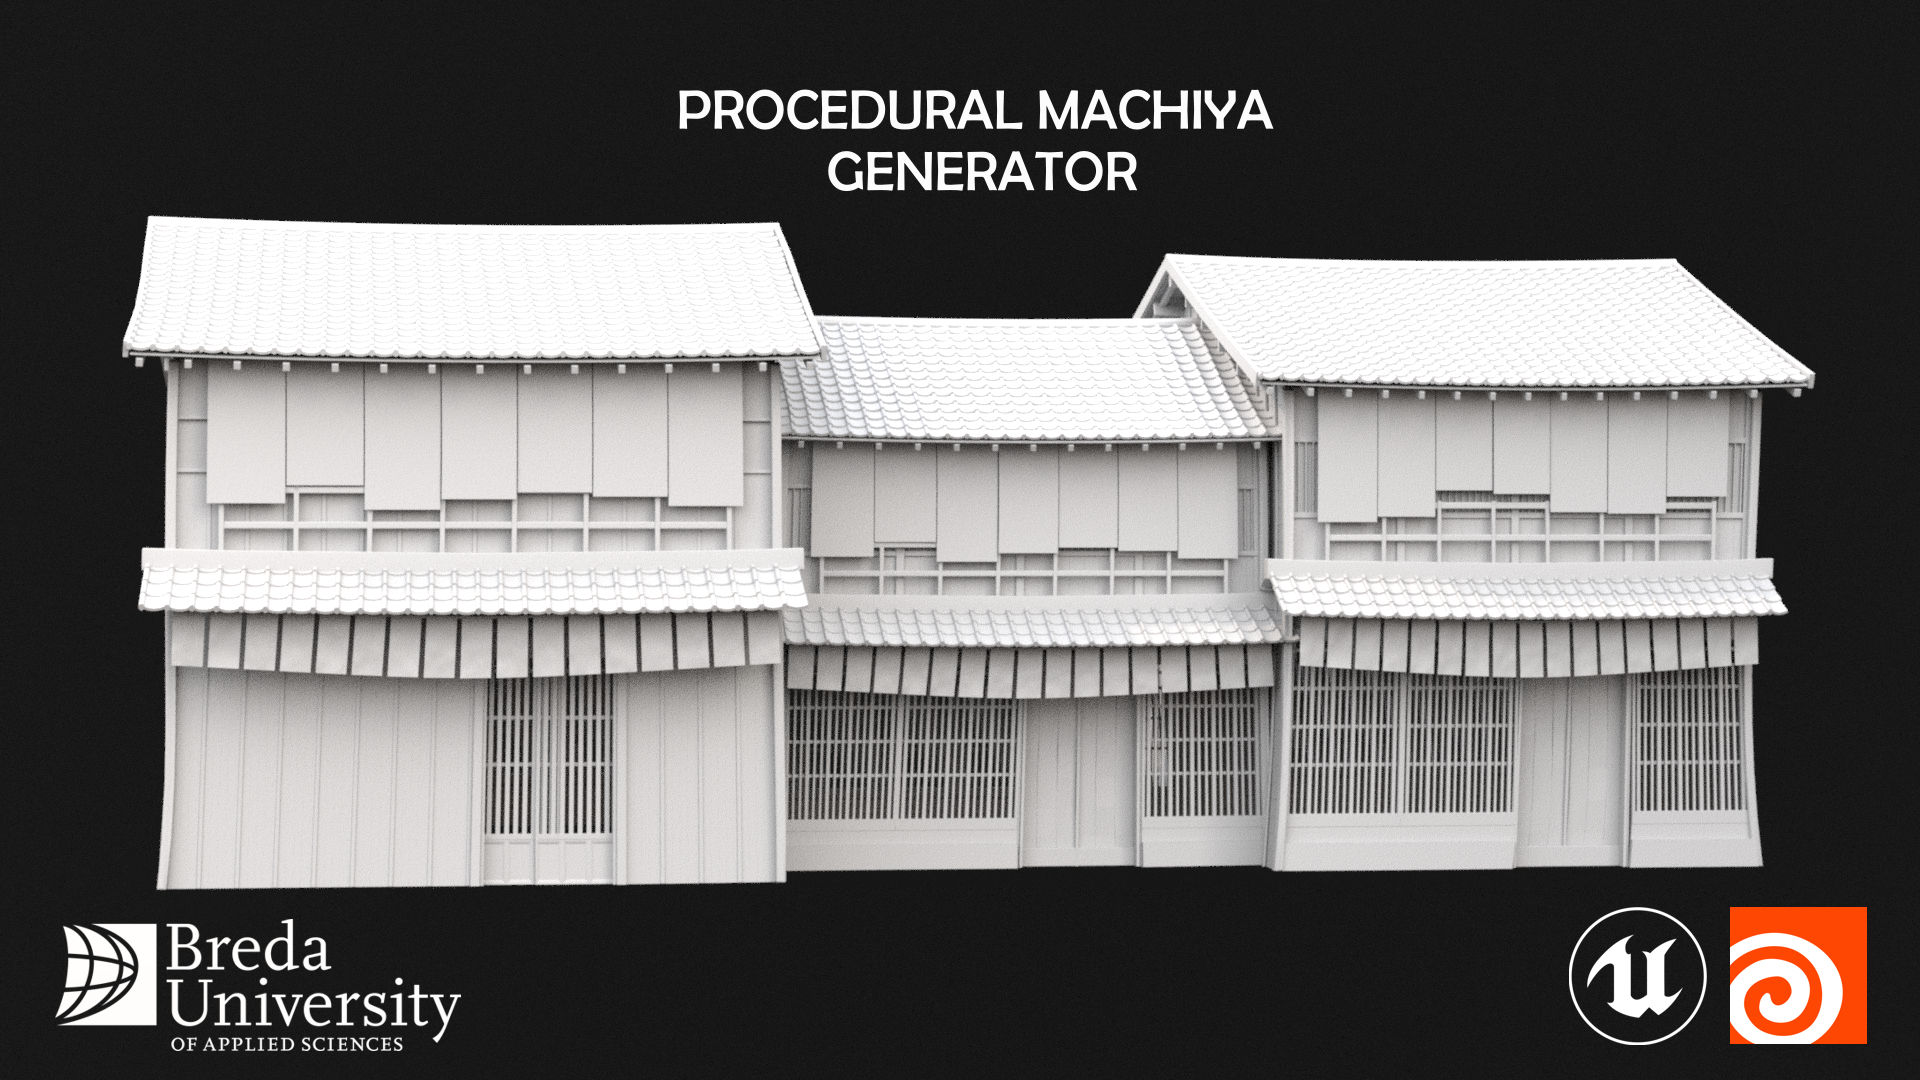
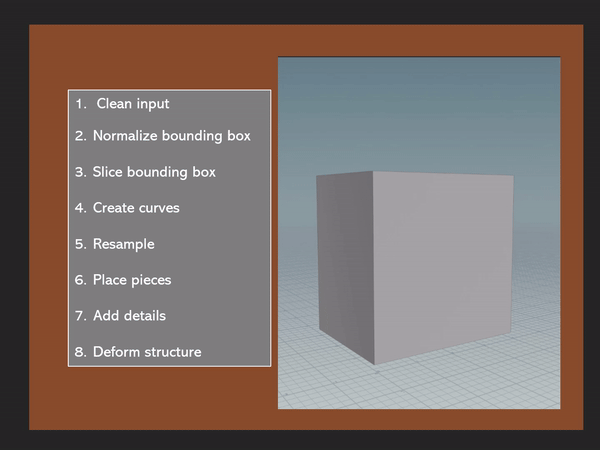
Hello everyone! For the past 8 weeks I have been working on a Japanese Town House generator! This project was made for Breda University of Applied Sciences as a part of my Block A. This is my first Houdini project, so if anyone has feedback for me it would be greatly appreciated. The project was made from scratch as I did not find the built-in Labs building generator easy to build upon. The building generator allows you to change both the roof tiles, the lattices, the windows and the flags for different variances. The size of the building is determined by user placed bounding box, so the tool is able to generate an entire street from just a blockout! Here you can see a diagram of the basic logic used to generate the buildings, excluding the preview mesh generation. I have also made a short video using PDG to showcase different ways that the building generator can create distinct and unique outputs: WhiteOutSpedUp (1) (1).mp4 Here is the tool working in Houdini SpedUpHoudiniShowcase.mp4 And finally, the tool working in Unreal! ToolInUnreal.mp4 Thank you everyone for reading, if you have any questions please ask away!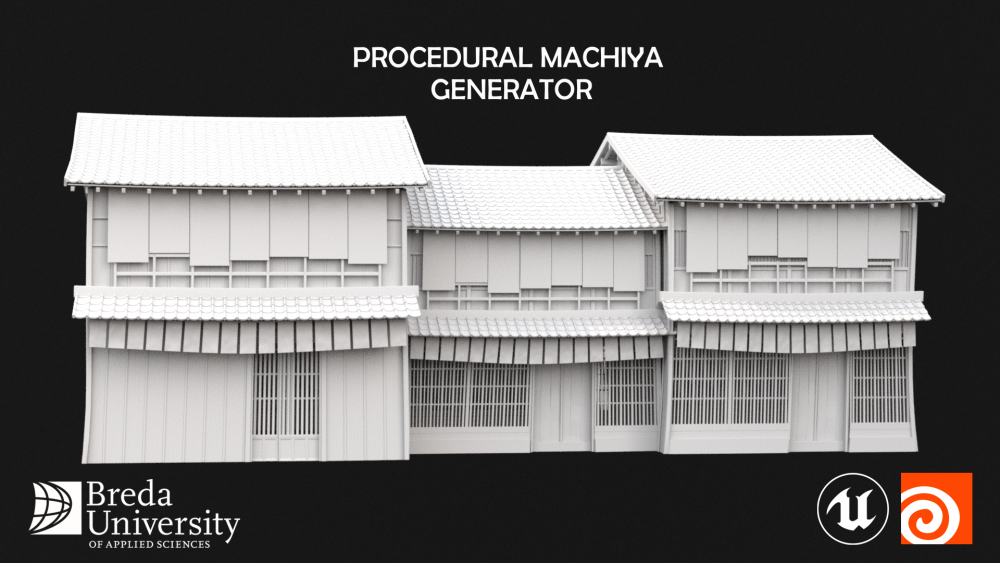


- 1 reply
-
- 9
-
-
- building generator
- building
- (and 9 more)
-
It's my first time using Houdini and when i go to render view and press render nothing shows up but a black screen and on the top right it just says "generating scene..." I left it for several hours still nothing changed. Device - Nvidia rtx 4070 and ryzen 9 Help !!
-
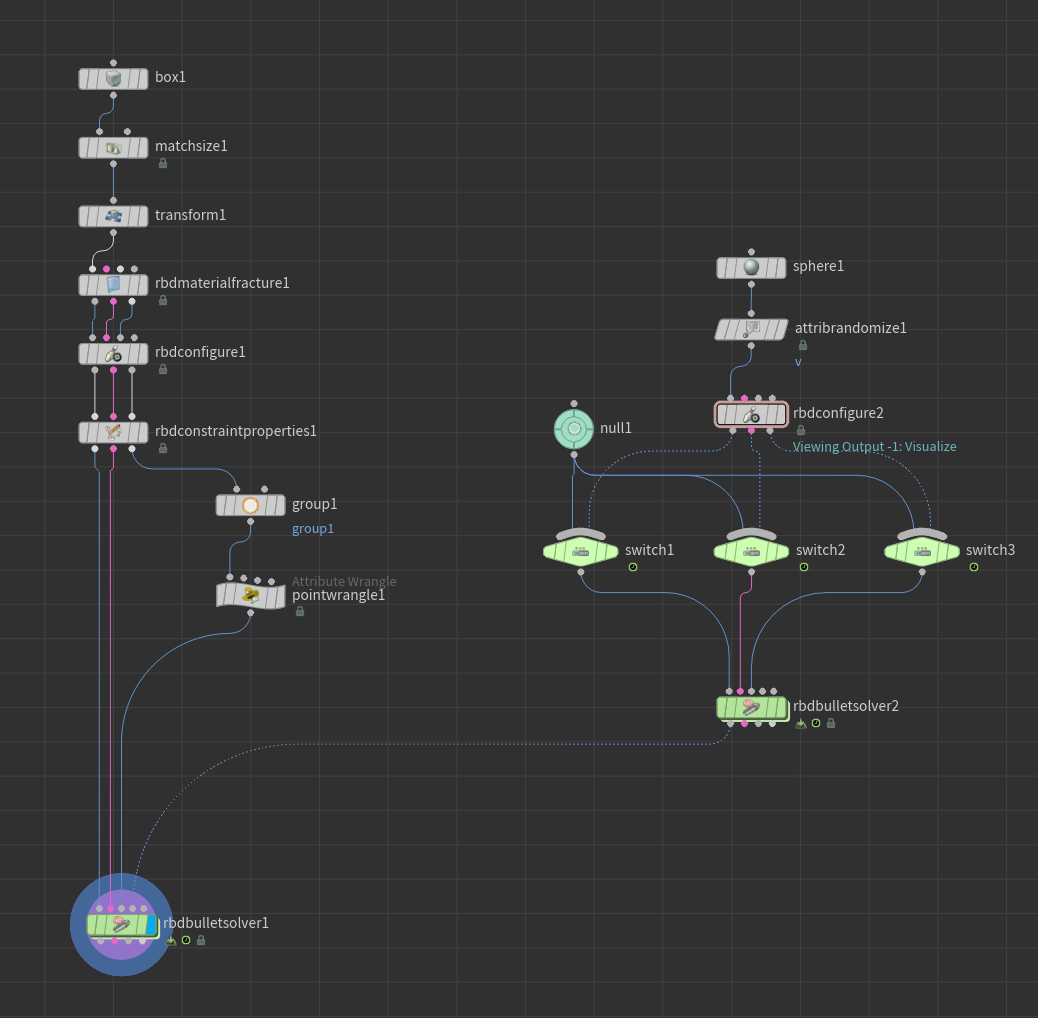
Hello all, Maybe a dumb thing, but I can't figure it out right now. I rebuild a simple setup to understand the issue (you will find the file attached) I have a simple wall that I want to break (RBD SOP) I created a sphere emitter on the other side, with RBD bullet solvers too (RBD SOP), and switches ($FF%20==1). Plugged this one into RBD (wall) for collision. Issue : Only my first sphere is taken in account. 1) Do I need to use DOP ? (didn't figure out the setup yet) 2) I guess as the sphere are spawn over time, the solver can't understand the data ? Let me know your thought. Thank you RBD_Emit.hipnc
-
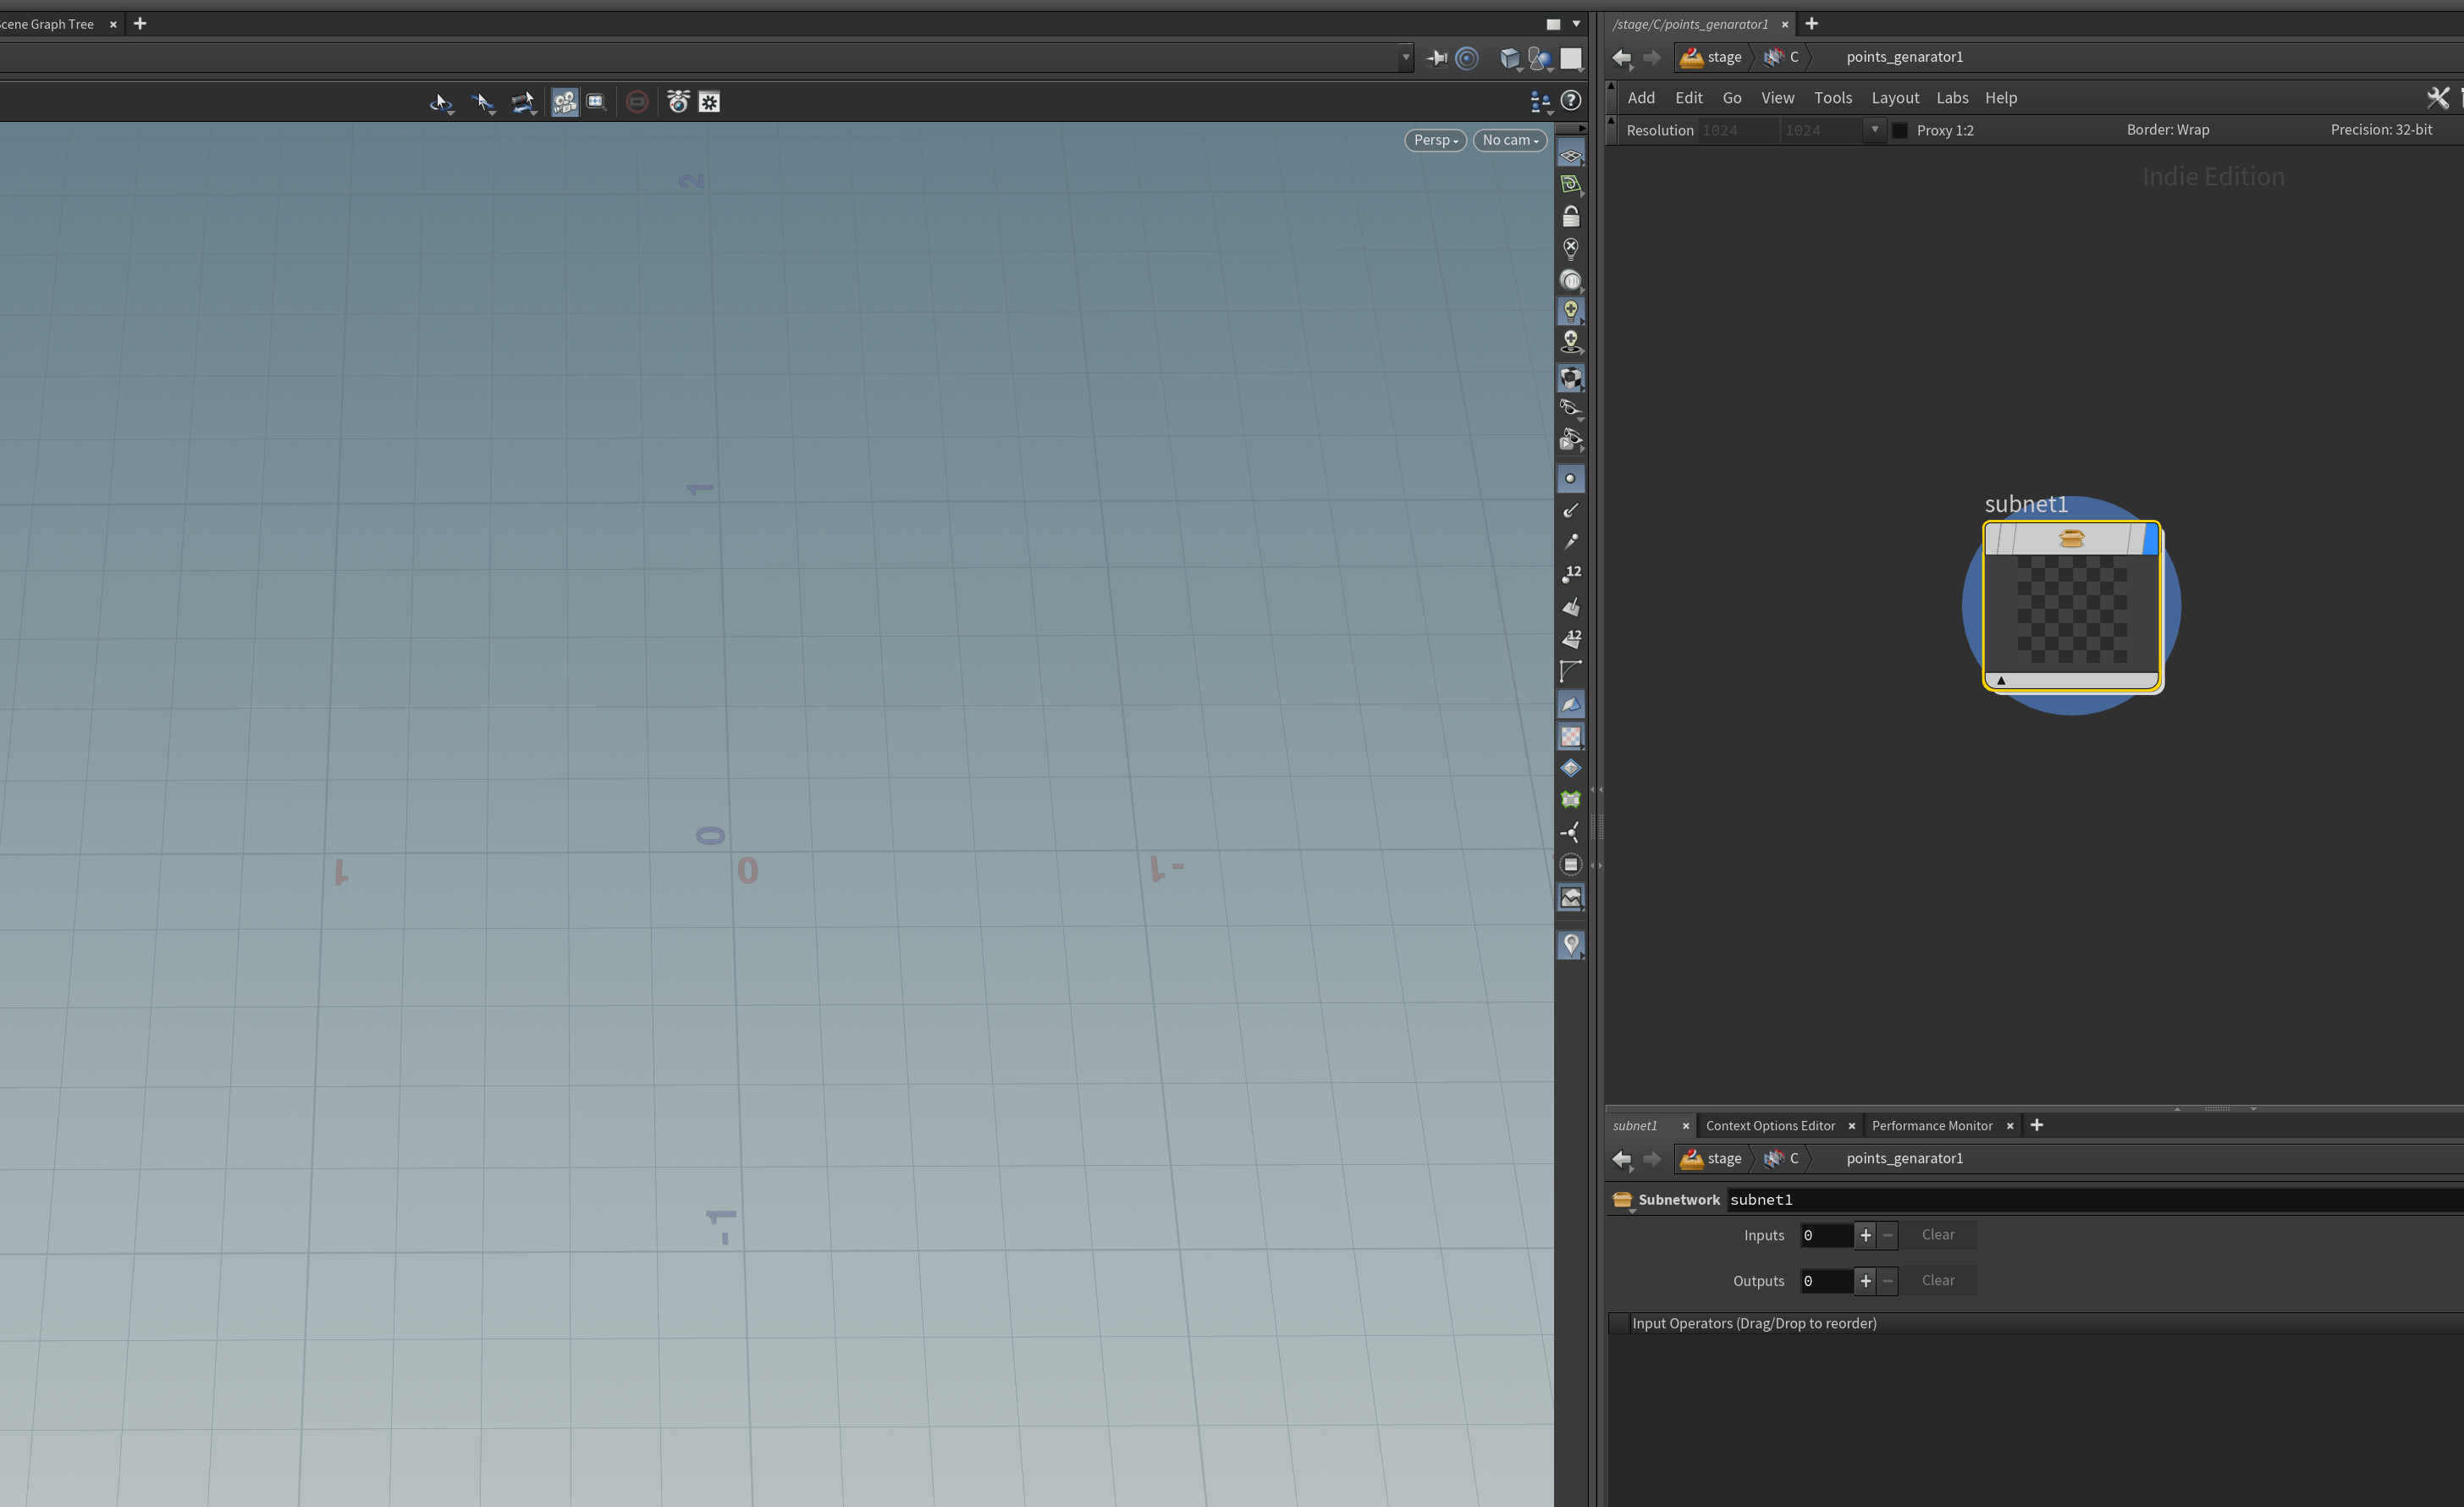
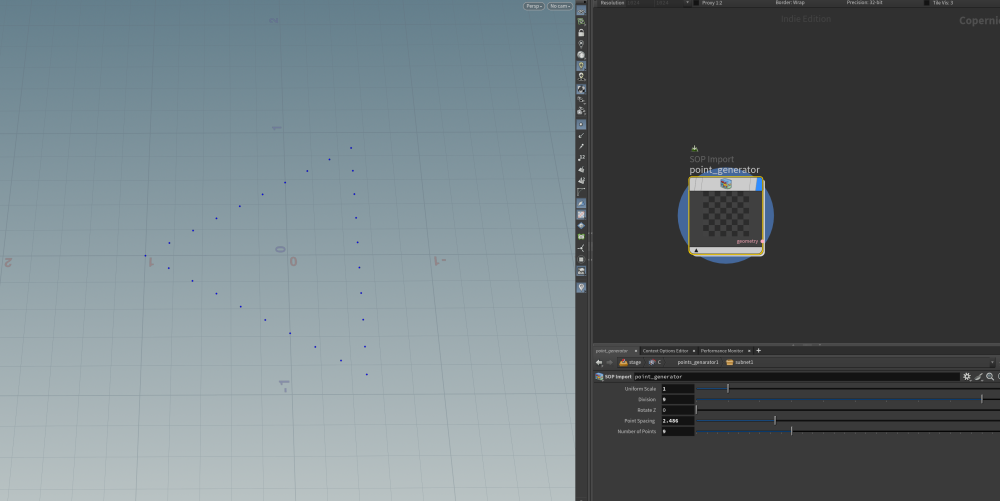
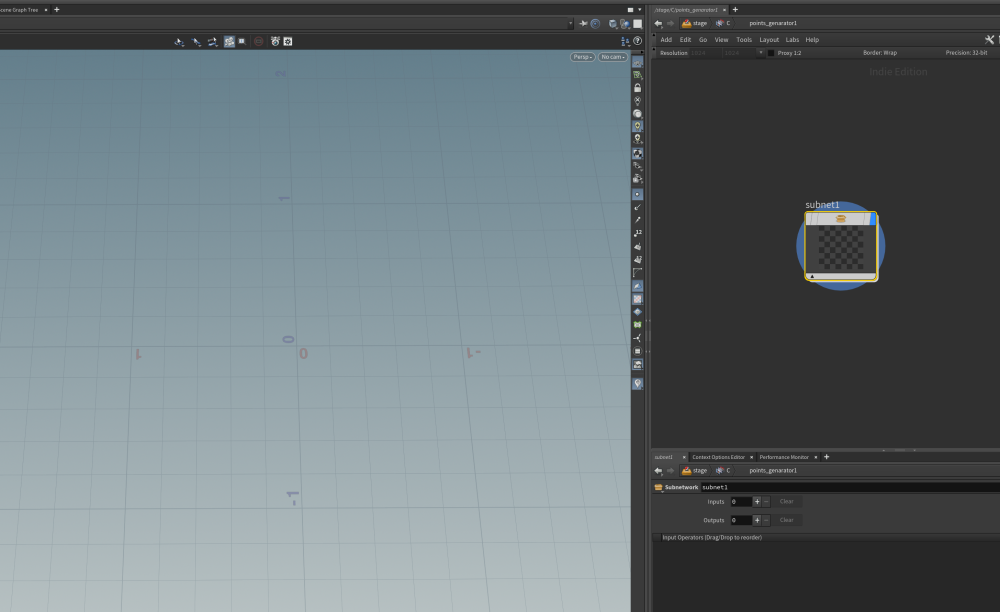
I’m currently trying to create an HDA without using a subnetwork. When I attempted to create a digital asset by selecting the SOP Import node in Copernicus (as shown in the first image), Houdini automatically created a subnetwork, and I couldn’t see the geometry (points) (as seen in the second image). Is there a way to create an HDA without the automatic creation of a subnetwork? Any advice would be greatly appreciated. Thank you!
-
Just testing Houdini muscles speed with mid settings Muscle pass 30 min (20 coll pass,1000 const inter) muscl remesh (min 0.007 - max 0.013) Tissue pass 3 hs ( 600 const inter,max tet size 0.039) Skin pass 30 min (300 const iter,3 substeps) sin remesh min (0.006-masx 0.01) Karma Xpu render 250 frames - 3hs Rig:5950x 64gb 4090
-
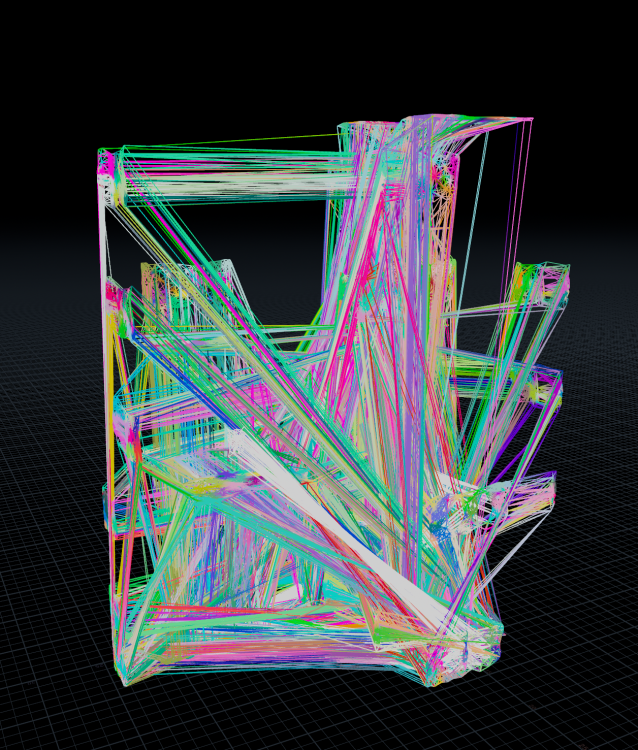
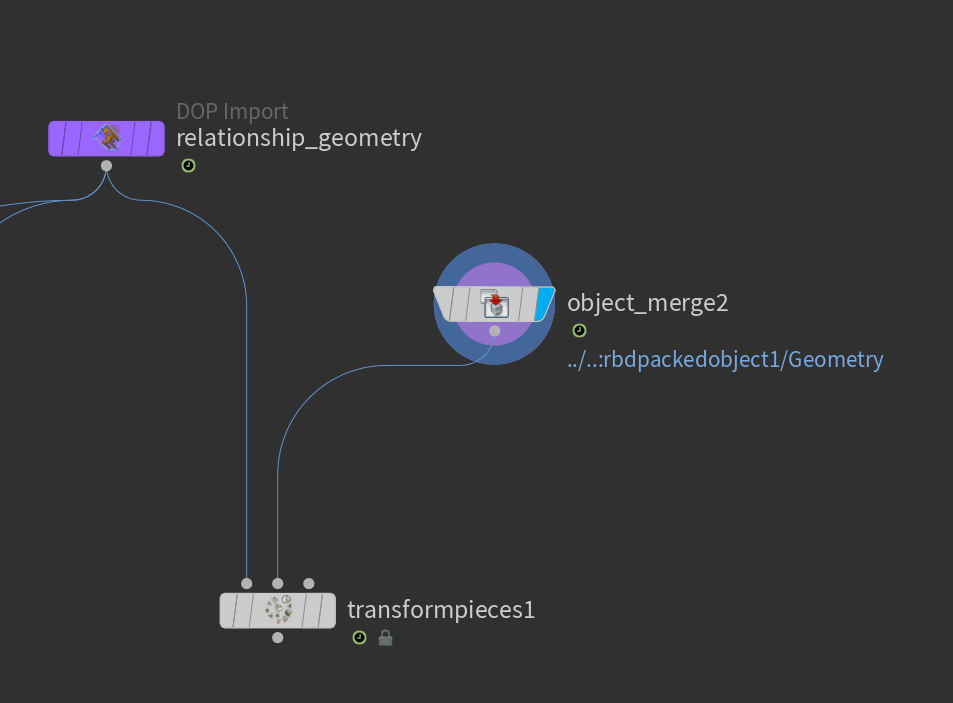
 Hi! I'm currently working on some building destruction (applied houdini II v2) and I'm completly stuck because of one node, the "transformpieces". I use it to make my contrains follow the motion of my proxy geometry being simulated, but it just collapses my constrains into a big mess. Here is what it looks before: (image 2) And After the transformpieces: (image 1) And here is what I have in the 2nd input of the transformpieces: (image3 & 4) I've looked a bit for this problem on internet and some people had the same issue but got no answers... So I hope anyone will know why this is happening.
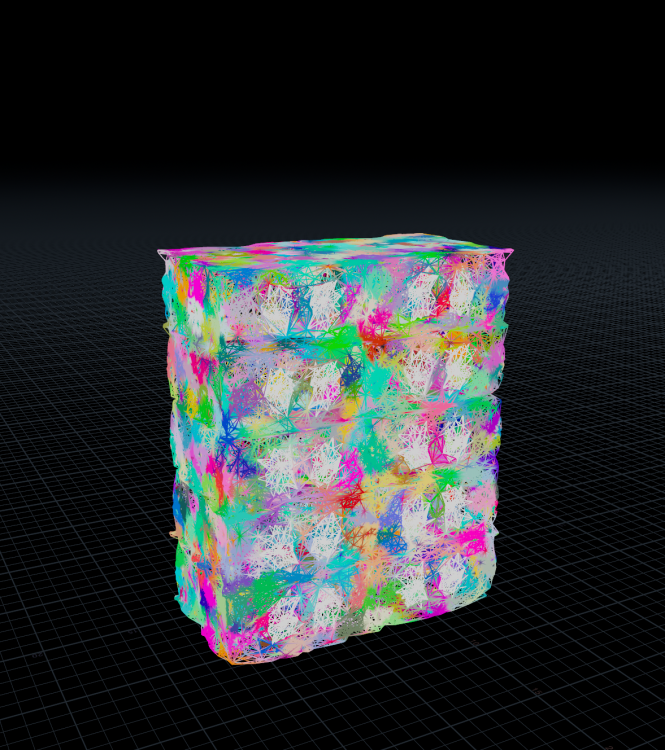
-
 hi i'm a student studying houdini in south korea. and there is one thing i wanna ask, how can i twist cloud volume with volume VOP? i don't wanna make cloud animation using pyro solver. so i tried to twist my cloud several times, but i failed is it right way to animate the cloud using volume VOP? not a volume deform? i'm not sure. please rescue me from the houdini hell~~~ vortex.hipnc
 -
 I am a newbie in Houdini, and I want to create something like this. How do I do that? I have attached a file below video credits IG-@pantherafx Audiovisual explorations -- Nature morph 5music & sound design-@lukashasiba - @polaire.audio...#houdini #redshift #animation #3d #digitalart #visualart #motiondesign #mgcollective #mdcommunity #motiongraphics_p #mo.mp4
 -
 Hi Guys. I downloaded this FBX file a while back and it's been great. It's a Mark VI ship that's textured. I brought it into Houdini and mantra reads it well. The only problem is I'm using Redshift for the scene with water and I'm not sure how to get redshift to read the shaders or how to connect them. I can't seem to find any useful tutorials on this either. A couple years ago Grand Master Atom was amazingly helpful with a script that he wrote for redshift to read downloaded shaders but I can't get that to work anymore. I think the recent updates over the years broke that script or something. Anyone know how to connect so redshift reads the shaders? Pierre Mark_VI_Patrol_Boat_Dirty.hiplc
 -
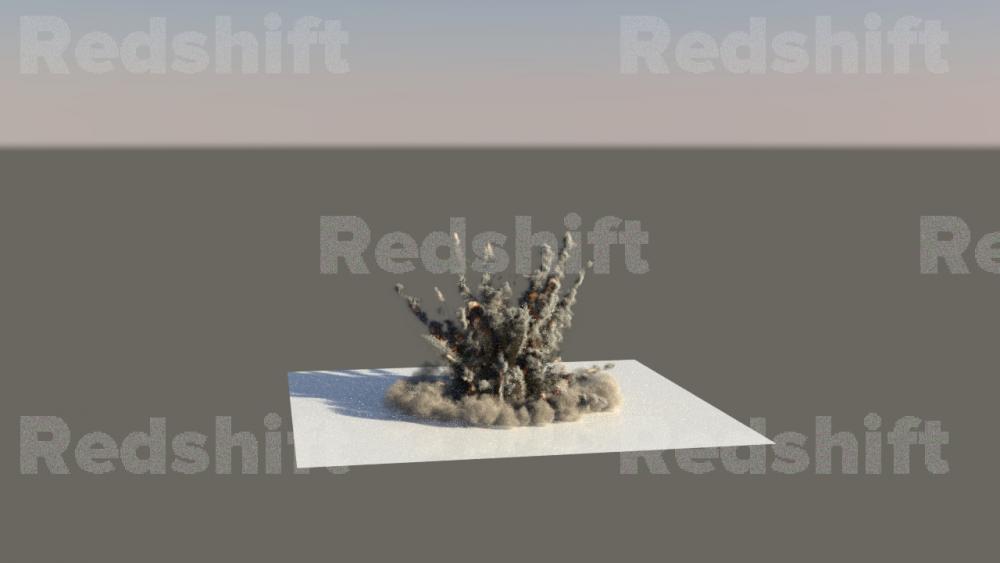
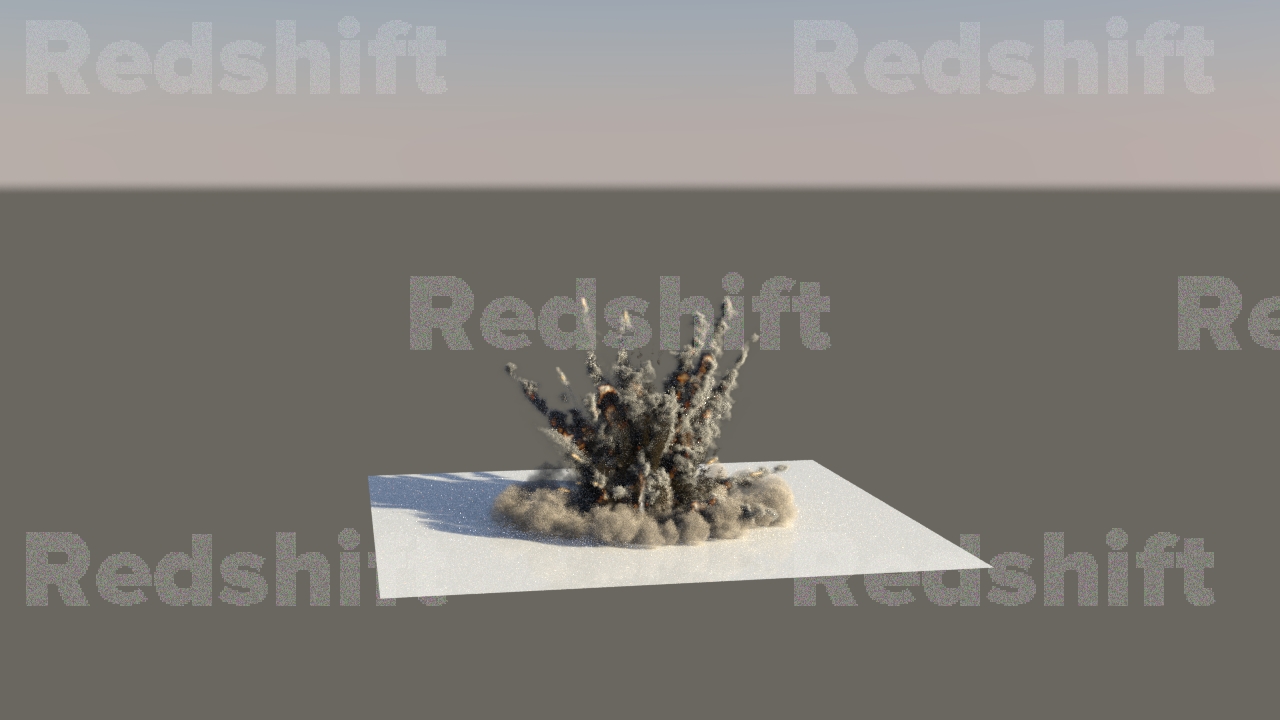
Hello people! I'm currently trying to render pyro exoplosion with the motion blur in Redshift and I didn't succeed with any of my aproaches. I tried Convert to VDB , and then Merge Volume in Velocity mode with the motion blur ON but nothing works yet. I found few HIP examples but they neather don't work. Is there anybody who ever did this? Too bad there's nothing about it in the Redshift official documentation too. Please help