Search the Community
Showing results for tags 'UVs'.
-
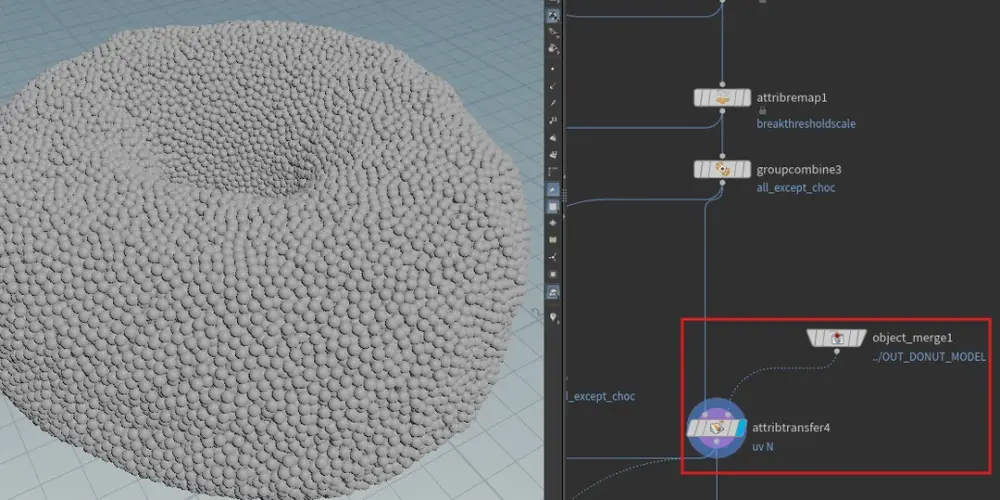
 Hey all! Im making a donut tearing simulation with vellum grains. I use the vertexsplit node to promote the uv's from my incoming donut model, from verts to points. I then transfer those point uv's from the original mesh to the vellum grains And after simming and meshing the grains, i transfer the uv's from simmed grains to the meshed donut, but when i smooth the uv's, i get these weird seam lines. Does anyone know how i can fix this?
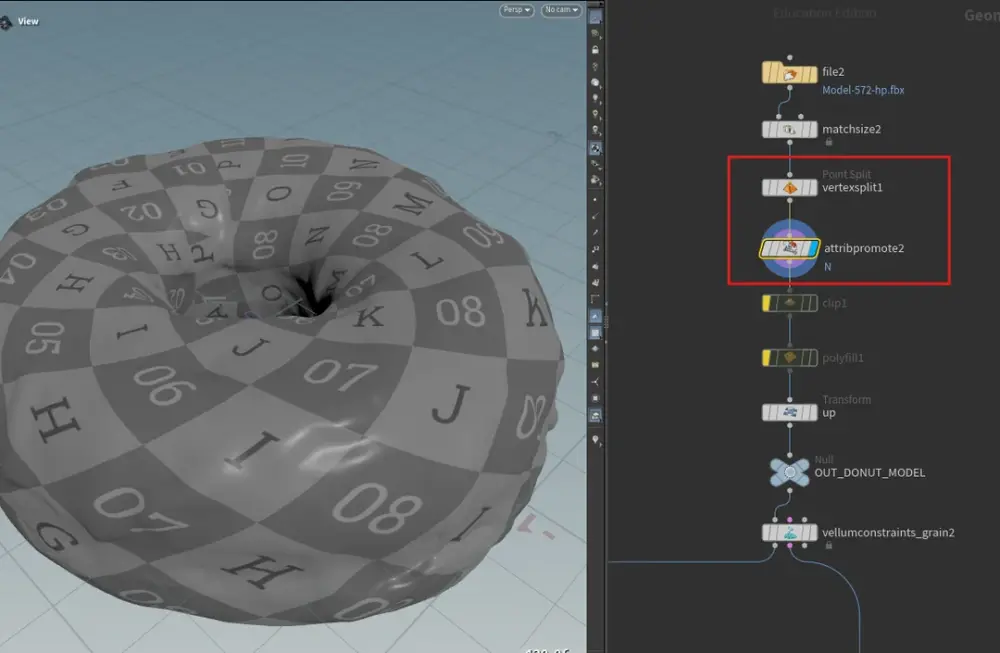
-
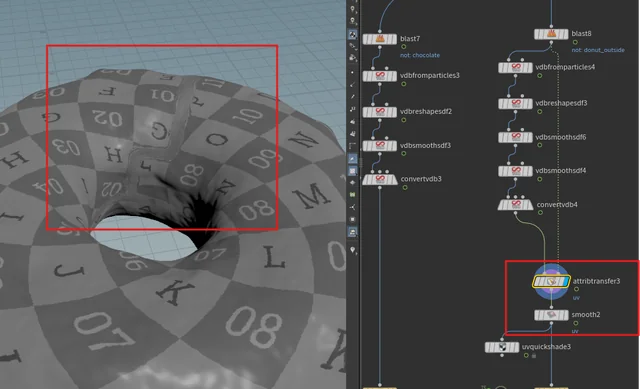
Hello all, I am struggling to get proper UVs to move along with this vdb surface advection (courtesy of artist Jose Leon Molfino). I assume you would just make the UVs the same as the rest attributes but I am not getting the same results (as the video I attached). There is not much out there for blending dual rest and adding UVs to a growth simulation. If someone knows the solution it would be a great help to my personal project!! I attached Jose's file below which I would like to figure out how to add UVs too. Thank you very much! https://x.com/Jose_Molfino/status/1585375392101064704?s=20 ssstwitter.com_1697331574695.mp4 vdb_advection_withoutUVs.hipnc
-
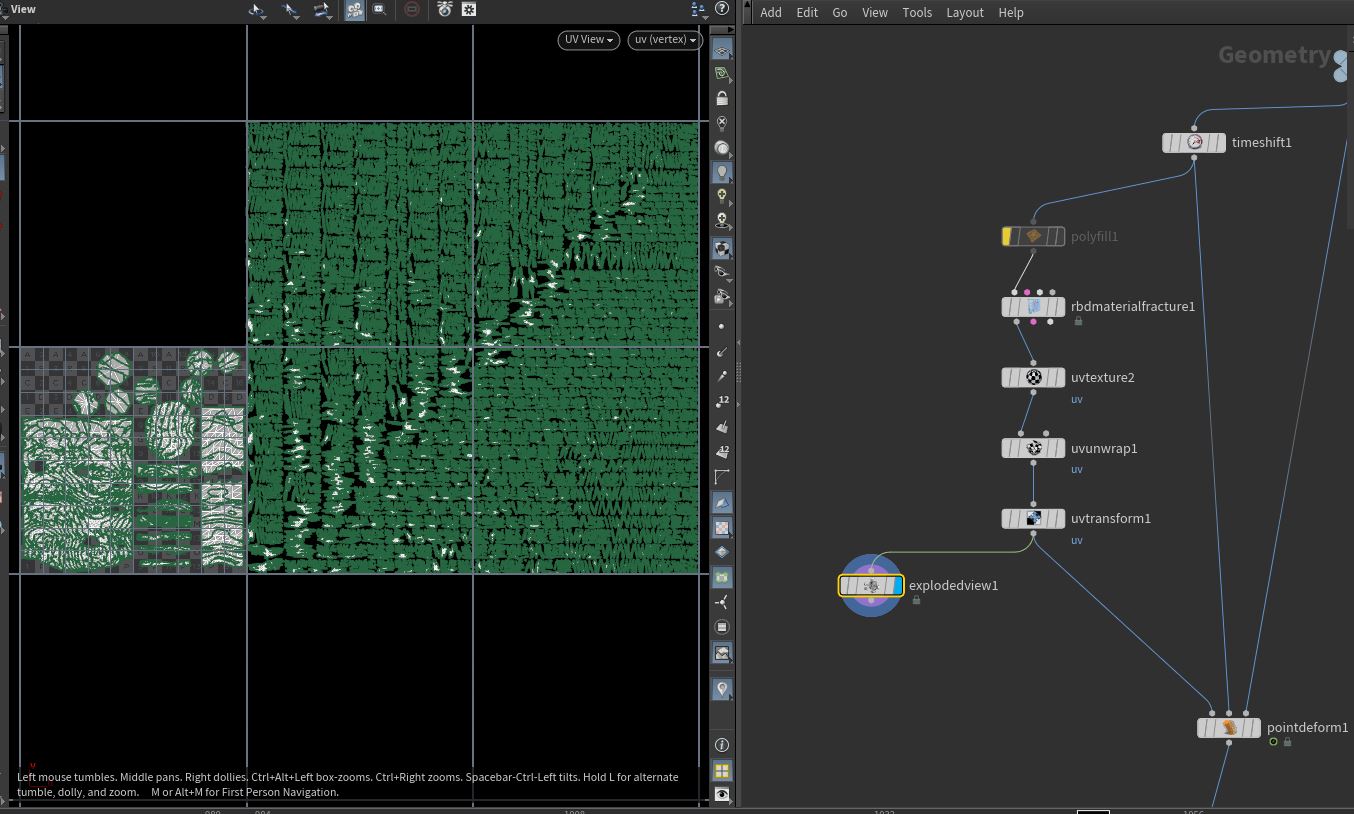
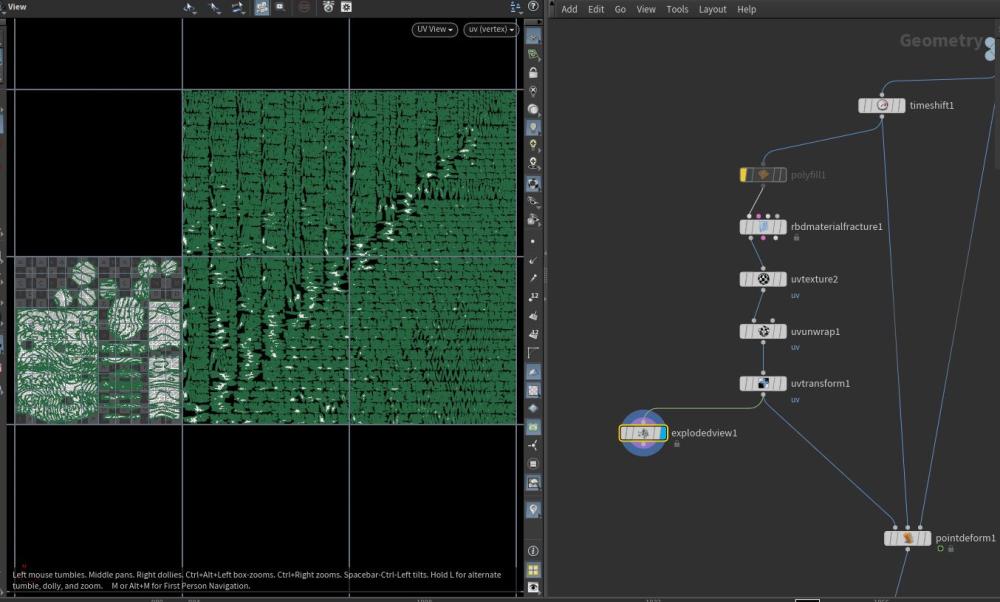
 having a bit of a nightmare with this one... this is my shot... hulk swinging a log at thanos lol (sorry for the 6mb gif!) so i want the log to explode on impact so my log geo was created and uv'd in maya... i exported as a cache with the animation as alembic... it all seems to come into Houdini nicely... I then set it up with rbdmaterialfracture and then some uv nodes to texture the inner pieces.. i just use a simple sphere for collision that i then shrink after impact and move down through the floor to get it out of the way lol!... I have my uv's on the log and it looks fairly nice overall i think... i'm using the rbdconfigure to switch between deforming and active ....thanks to @rohandalvi for his little video tutorial on youtube Here's where it gets tricky in maya... I'm exporting the cache as alembic but its not bringing the uvs in correctly... some parts seem to be nicely textured but then a bunch of chunks aren't working... this is the log geo in Maya viewport and when rendered it doesn't texture those parts as needed... Sorry for the longwinded post i just like to use pics to help it be more clear I've included the log abc cache and a the hip file incase anyone wants to take a look and point out where i could be going wrong? Thanks everyone! Ant shot_MIND_0110_log_v01.abc shot_MIND_0110_setup_v001_clean.hip


-
Hi. I have a fractured object. It's newly created faces along the fracture lines are uv'd in Houdini but do not export. I imported into Maya and only the original uv's are there. See screen shot. I appreciate the help.
-
I have observed a very weird bug. I am using a python node to create a bunch of file SOP nodes and bring in fbx files from a folder. The bug is that the uvs are messed up in comparison to doing it manually where i place a file sop node and select my model - the uvs are fine. Anyone else noticed that? Is this a bug or is my code broken? demo_scene.hip
-
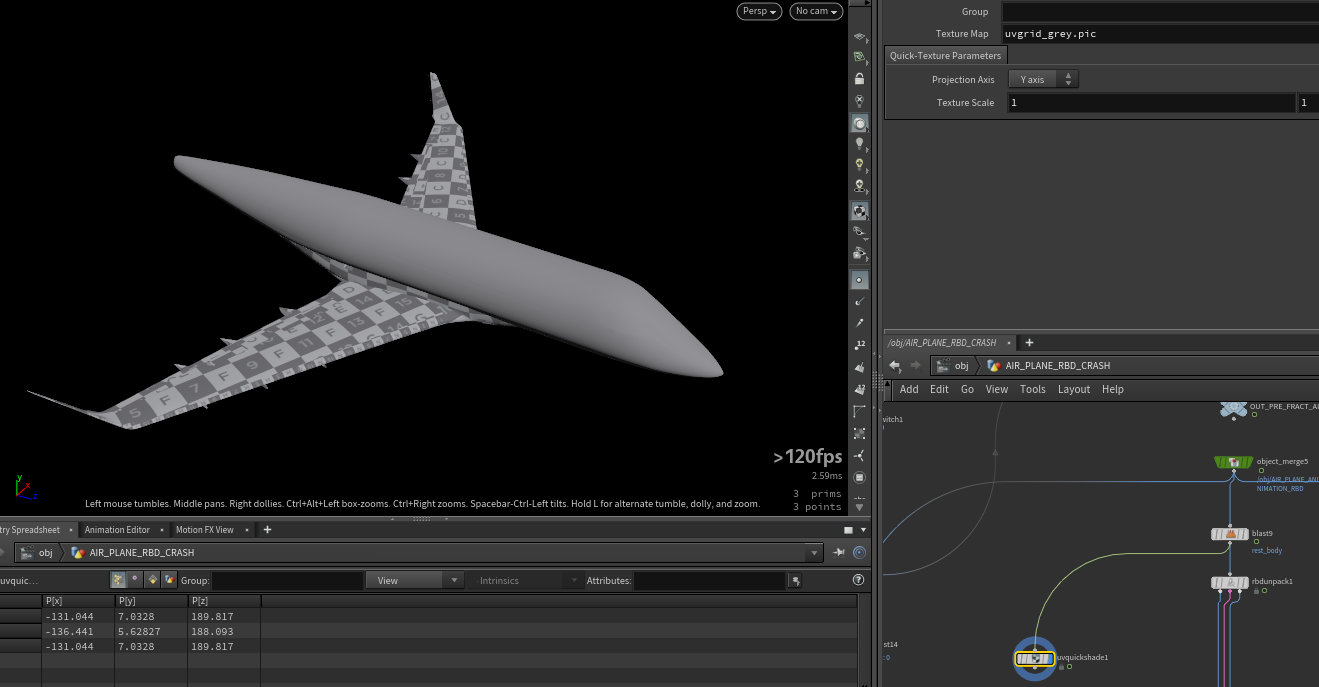
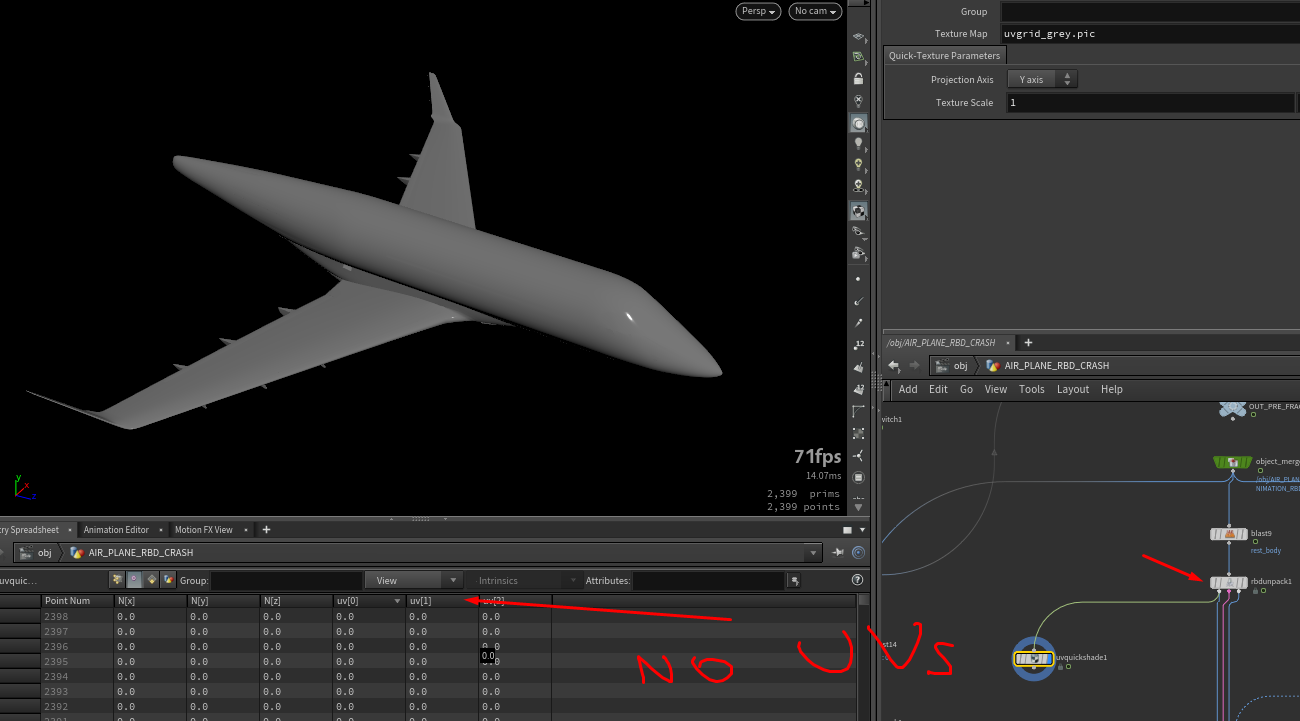
Hello guys, I'm setting up a active rbd pieces using rbdconfigure and rbdpack, after the setup even setting to transfer all attributes the UVs get lost.
-
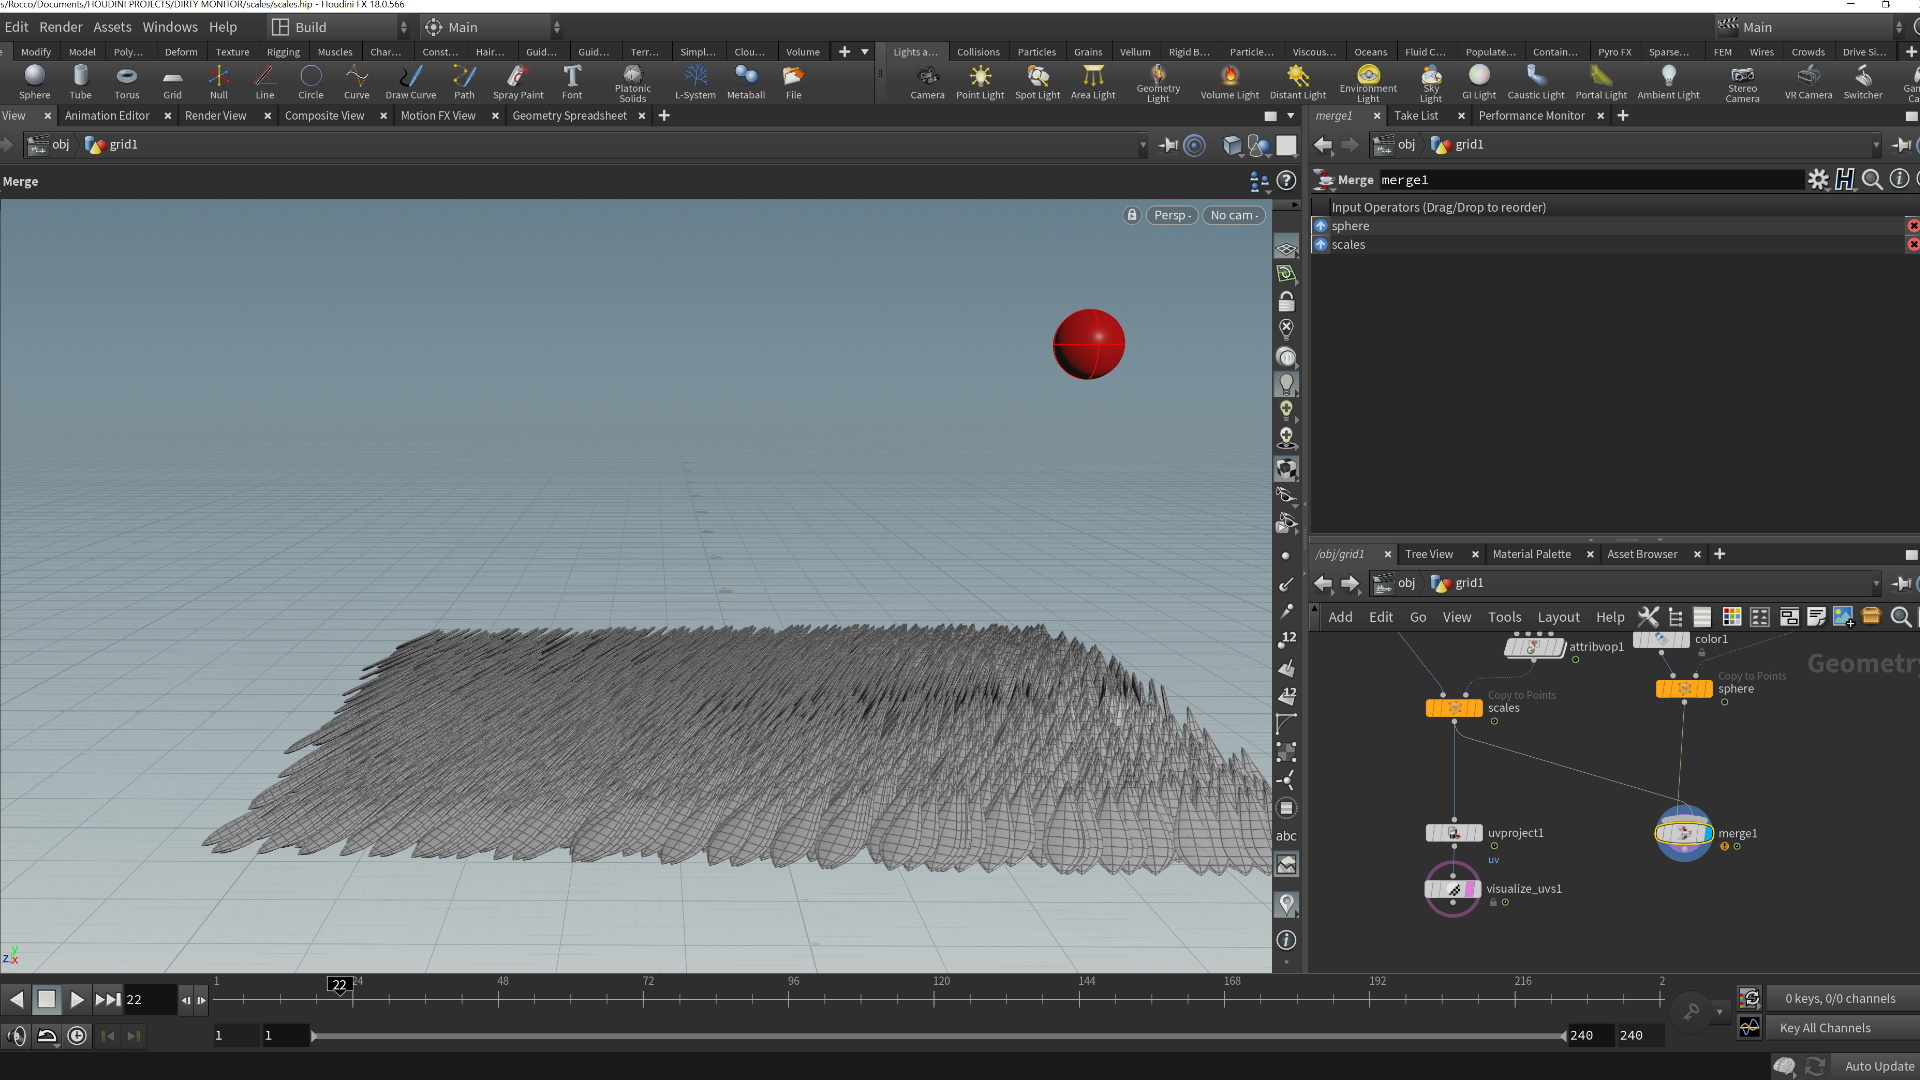
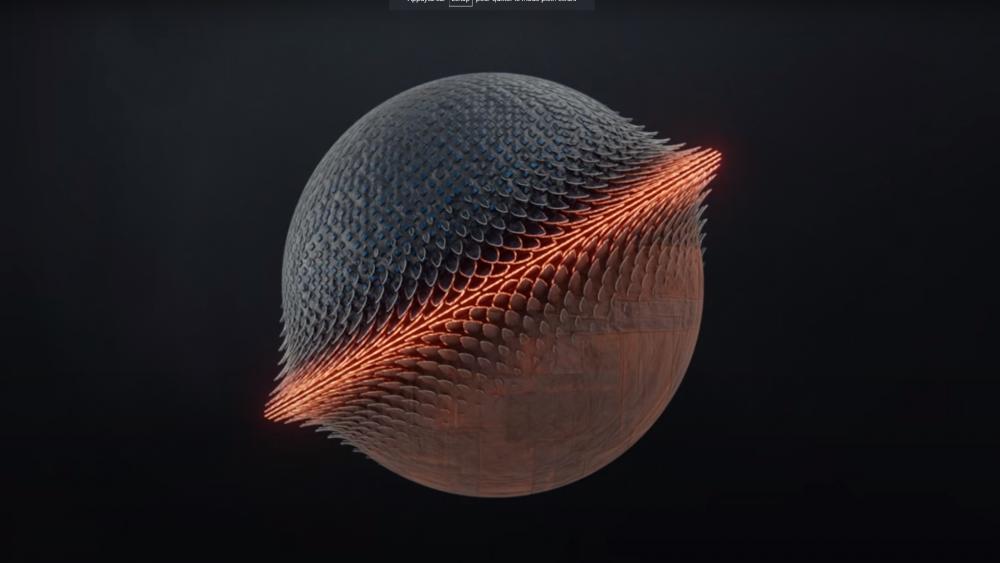
 Hey! It's my first post here on the forum, I'm trying to learn houdini and my problem might sound easy to you but I can't get my hand on the solution. I want to replicate the effect in this video (Blender Tutorial) : https://www.youtube.com/watch?v=xcjrD5SwQBw I managed to get a simplified similar effect but i'd like to have different textures on each UV projected sides of the scales. How can I make this? I was thinking with the timeshift and project the first and the last frame but I'm not sure how to do it... Also It would be nice to have a falloff on the influence of the point to VOP "look at" orientation if someones knows how I could do it. Thanks a lot! scales.hip
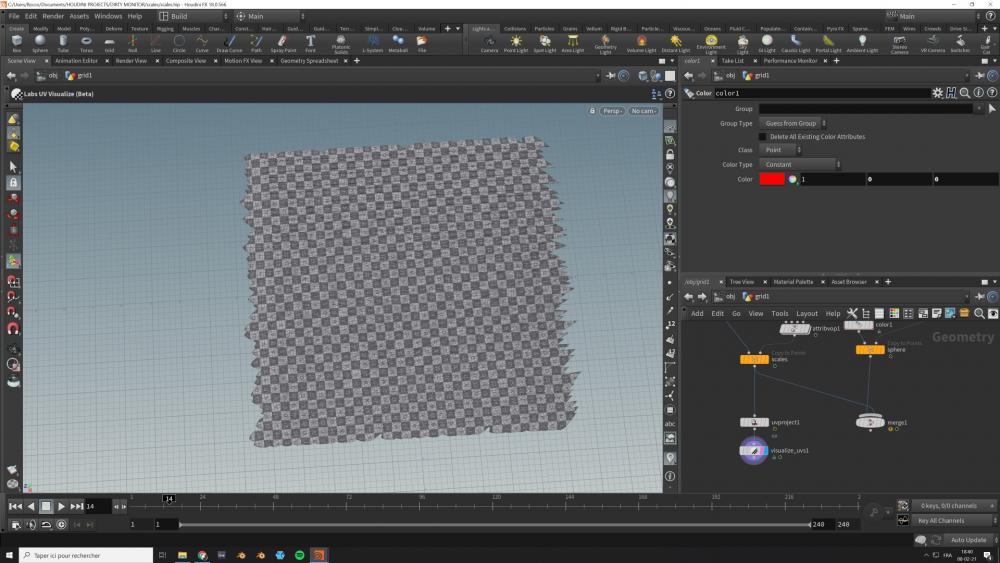

-
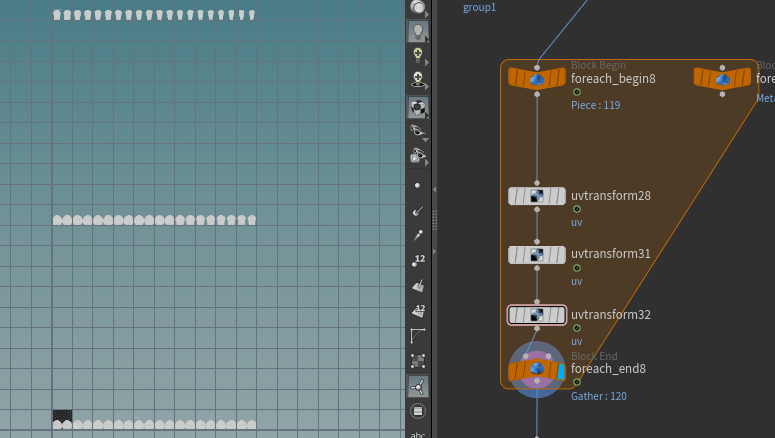
I've got some geo with 120+ leaf geometries and I'd like to procedurally move each geos uvs to it's own separate UDIM. I'm currently using a for-loop and some modulos but it's not quite working right transform x on uvtransform28 = detail("../foreach_begin8_metadata1", "iteration", 0)%10*2 transform y on uvtransform32 detail("../foreach_begin8_metadata1", "iteration", 0)-detail("../foreach_begin8_metadata1", "iteration", 0)%10 Any ideas?
-
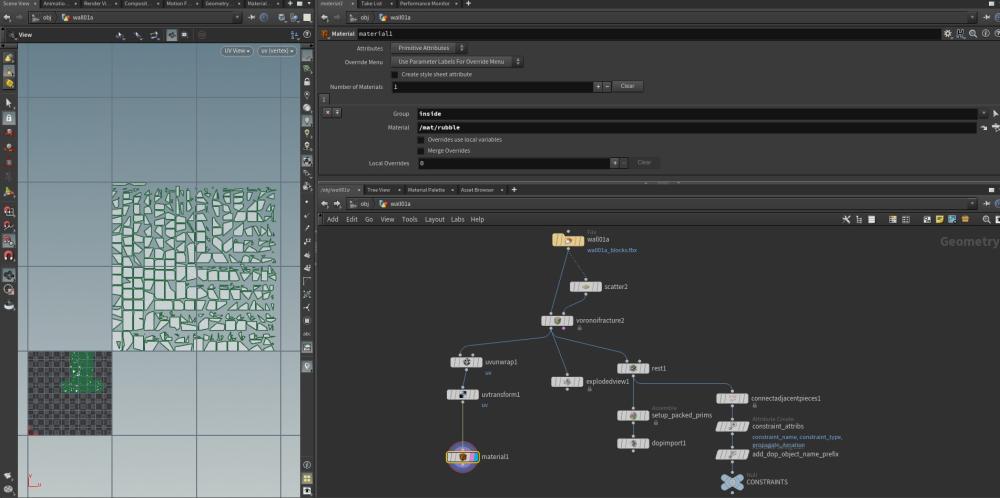
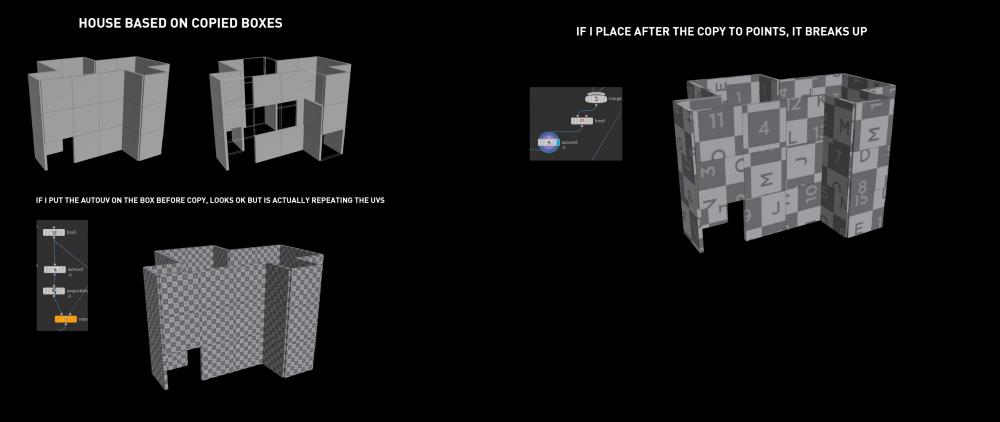
Hey magicians, I'm building a procedural house wich I want some UVs, walls are based on copy to point cubes, I'm having issues to have all the cubes in 1 UV, will post some refs to explain: I tried playing with fuse to merge the boxes, using the autouv on the box before copying, after copying, also tried to make a vdb convert, UVs and transfer back with no luck Any thoughts on how I can get a general UV layout from these boxes? Thanks!
-
Hello, I'm a student and just picking up Houdini for this final year of study and want to create custom UVs for my models coming out of Reality Capture so the texture maps aren't as messy. However there are two issues I'm having and even after looking online and trying out the solutions I got no results sadly. 1) My first issue is upon making custom UVs with poly reduce, auto UVs and transferring those new UVs onto the old high rez model. Importing into Reality Capture there appears to be missing polygons along the UV seams (this will be show in Fig.1)and quite a reduction in poly count. https://imgur.com/i7OFlYu [imgur.com] 2) I'm not sure if this is related to Houdini or Reality Capture but the textures look a little off as well (minus the very obvious texture stretch on the far right in Fig.2 I know this is UV unwrapping problem), it appears that the texture created onto these new UVs are looking at edge normals but I did add a normal node to smooth out the edges. https://imgur.com/CSgRBU7 [imgur.com] Fig.3 shows the texture straight out of Reality Capture and compared to Fig.2 This is a hella lot better https://imgur.com/bbTDbSx [imgur.com] Let me know if the attachments worked, not sure if they did Any help will be greatly appreciated Custom_UVs.hip
-
 This is a bit fx, a bit modeling, a bit rendering, so I'm throwing it here-- I am running sims on a tree model. The original tree was too hi-res to simulate, so I had to run Clean and Remesh to reduce its poly count a little bit. It still proved too oddly-modeled to run a point deform on the original based on the sim, but the sim'd model is still high-poly enough so we're going to use it as the final. What I need to do is transfer the UVs, in world space, from the original model to the down-res'd sim'd model. I tried using Maya's Transfer Attributes, which does exactly what I need, but choked on the source model's size. How can I do this in Houdini? (I know there will be some changes, but those should be mostly in the little tiny branches that are okay to lose, and this is not a hero tree.) I assume it will be something like storing the original models' point positions and then somehow applying those points to the end result of the sim'd/cached model, at which point I could do a straight attribute transfer (and although I get this theory I don't know the steps required), or is there a better way (and if not, how would I do my suggested way)? Thanks so much!
 -
 Hi there, I am trying to project a texture onto an UV unwrapped object through the projection camera and then bake the projected texture on the original object UVs. However, when I do it, the uvtexture node gives me new UVs used for projection than the original object UVs. I would appreciate any tips how can I bake it out on the original object UVs. I attached my setup in a file below. Many thanks for any tips! uvprojectionbake.hip
 -
I created this box mapping digital asset, because there is no simple box mapping option, like you would find in Max for example. This allows you to just rotate, scale and translate the box, and the mapping changes correspondingly. Hope you like it, Cheers!
-
 Hi guys, Doing with my first steps learning this marvelous software :-) I was under the impression that CARVE SOP will slice/cut our meshes (even imported ones) following the information derived from UVs. But now I see that this assumption was wrong… I understood what Carve does when using on Sweeps, Lofts, Birails… stuff created inside Houdini. On a next step, I decided to do some tests using Alembic geometry imported from Modo. My first results were great, because I imported some basic figures, like a thorus or a tube (and at these stage I will continue thinking that slice operation should be derived from imported UVs). But now, using a more complex imported geometry/UVs, I get unexpected results… Now I suspect that Carve Slice operation is derived from internal point order structure and not UV map. My question: is there some SOP or (relatively simple) procedure to apply a slice operation, like the ones produced by Carve, but derived from UVs information? I would like to get something like this mockup, slicing geometry through green and red lines that would be pairs of U and V coords, like the Carve SOP: Unfortunately, this is what I really get: Thanks for your help! :-)
 -
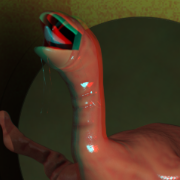
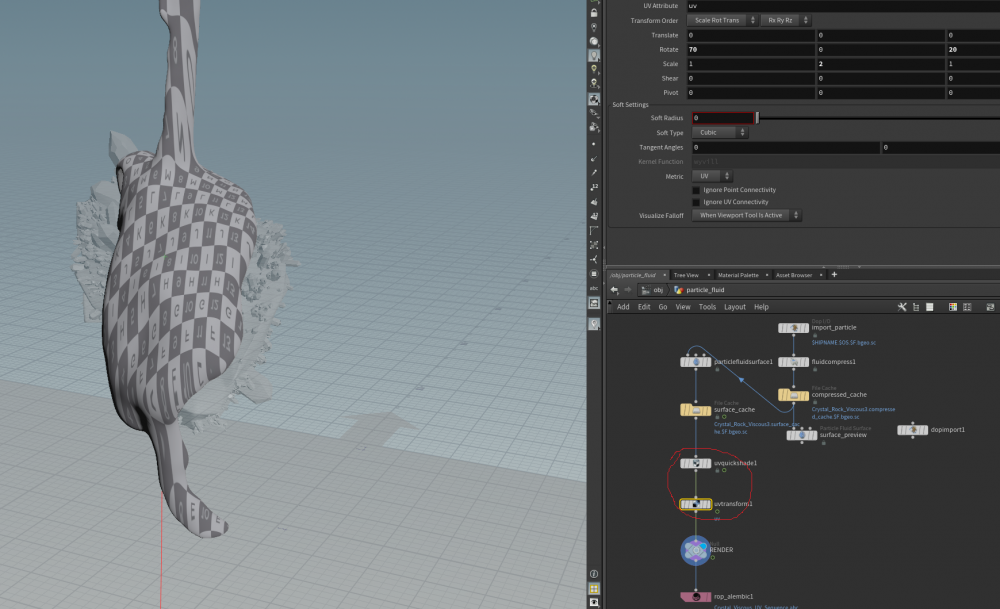
Hello! First time posting. I'm new to Houdini, this is my first project that I decided to do. But I'm a fairly seasoned C4D 3D generalist so I know what I want to do in Houdini, I just don't know how to go about it. I'm in Houdini 17.5. Here is the problem. I have stumbled around in Houdini and made a Viscous Flip Fluid Sim. I made a Sphere an emitter, and emitted my fluid pouring onto a .OBJ mesh that I imported in. I've cached the particle FLIP Particle simin the DOP network, the Particle Fluid Compressed Cached, and Particle Fluid Surface Cached. Now here is my problem. I exported my meshed sim as an alembic from a ROP_Alembic node. Imported into C4D. And then I realized I have a UV problem. This is a Redshift texture and shading pass that I did with my sequence. At the time I forgot to plug in the velocity data tags from the Alembic sequence into the Redshift motion vector blur, so if it looks weird, that is why. Crystal_Goo_Test.mov My texture smudges are on the mesh, but they stay static while the mesh animates. It looks just like the textures from this cartoon it doesn't move with it. So after a bit of digging I realize I don't even have UV's. Because Flip Fluids don't come with UV's, and if I never defined any UV's then how could they just magically appear? lol. So I tried researching how to generate them, and how to export them with the alembic. But for my specific situation I couldn't find anything that was up to date and worked. OR I am too much of a noob to implement what I saw in forum posts. The stuff I saw was for Houdini version 13, 14.5 and 16. I'm on 17.5. Here is a screen shot of how I tried to generate UV's and export them, again I never re-cached my sim yet. I just tried to put uv's on my existing set up. Below is my emitter. And there are no UV's on this sphere primitive, nor anywhere before the output. I took a shot in the dark and tried to see if I could generate them after all my caches (because it took 3 days to cache the fluid surface mesh). So I honestly have no idea where to generate these uv's, how to do it correctly, and how to get them passed onto the fluid mesh for alembic export and texturing in C4D Redshift. I'm including my .hip file with my cache's disconnected. They are over 200 GB's all together so it's too big to include here. Lower the substeps in the Flip Solver or lessen the Fluid Mesher to make it play back faster. I used high settings for my final export (also I tried my best to optimize, but again I'm a noob with Houdini and have probably done things incorrectly in my set up). Crystal_Viscous_Sim.zip The FLIP DOP cache might still need to be disconnected. This is the final step of my personal project. I've done all this on my own but I'm super stuck on this UV generation and export. And once I can export this fluid mesh an an alembic sequence for C4D Redshift I will be set to render. Thank you in advance for any feedback and/or answers. Please write out instructions very clearly for me to replicate if you don't want to provide pictures/ screenshots or .hip files. Again what I'm trying to do is generate UV's for my Fluid Surface, and have then be able to be exported via an Alembic sequence for texturing and rendering in Redshift.

-
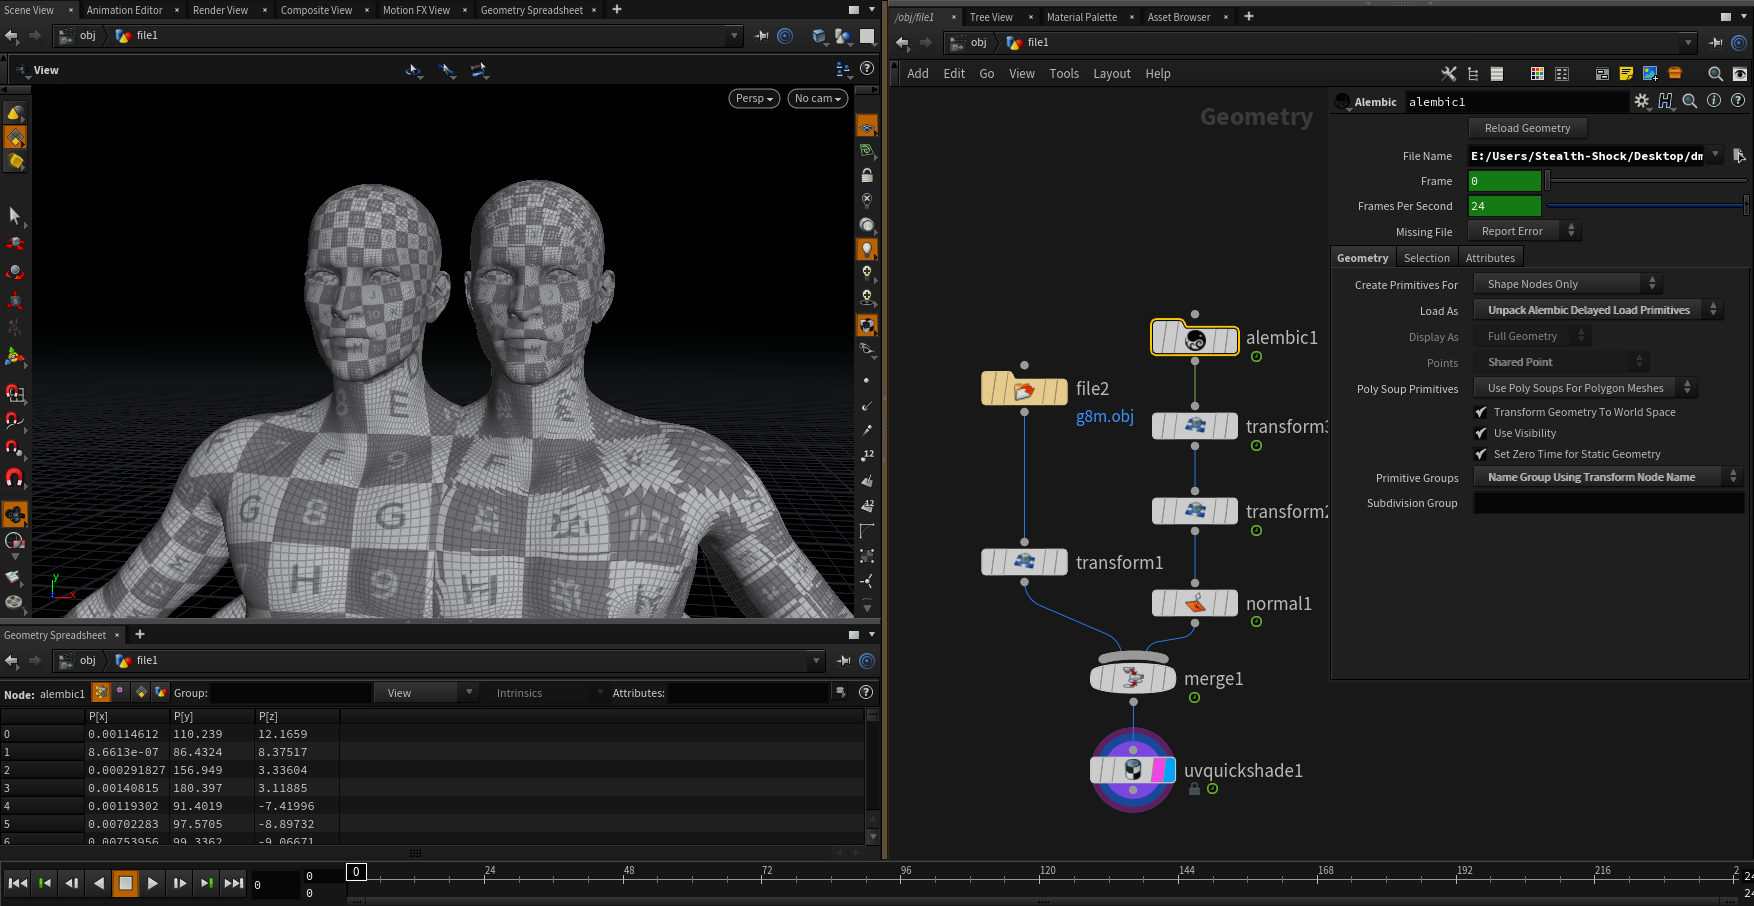
Hi guys, I have encountered a problem while importing alembic files with UVs. They seem to be kinda rotated (right mesh) - on the left is the same mesh but exported as static .obj. Does anyone know how to fix this? I've attached the file if someone is interested Thank you alembic_import_UVs.hip

-
I have an individual object that I need to copy to get a long shape that I will bend to make it circular. After the bend the external side is stretched and the internal is squeezed. Would you make the UVs at the individual object level? or for the full circle of multiple objects?
-
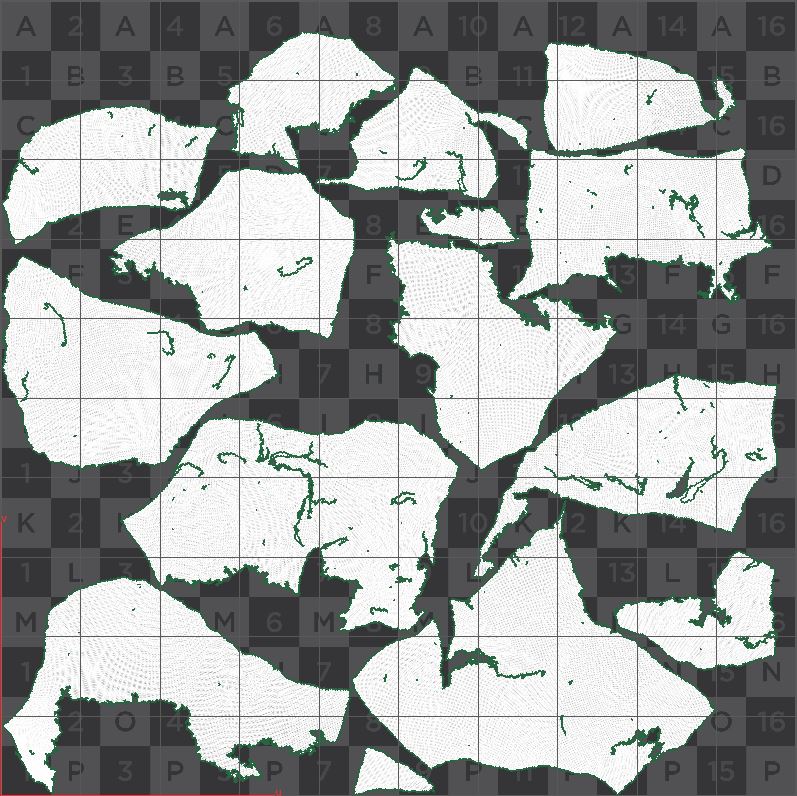
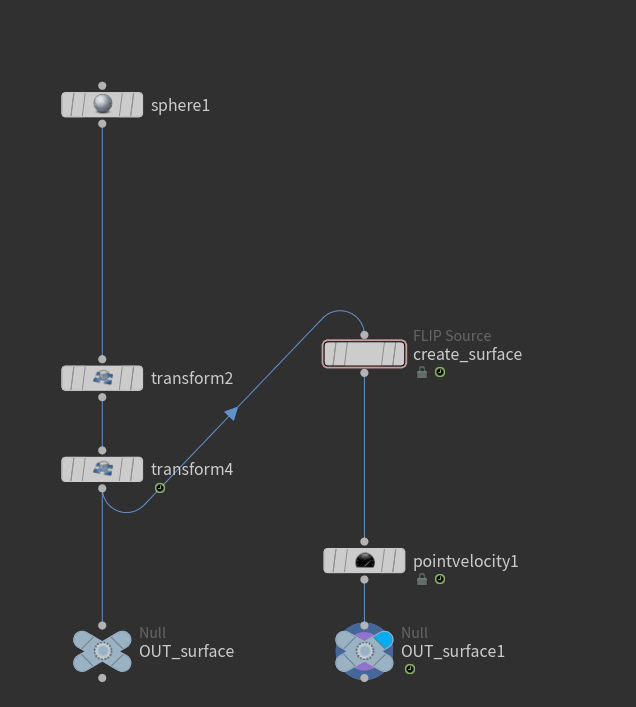
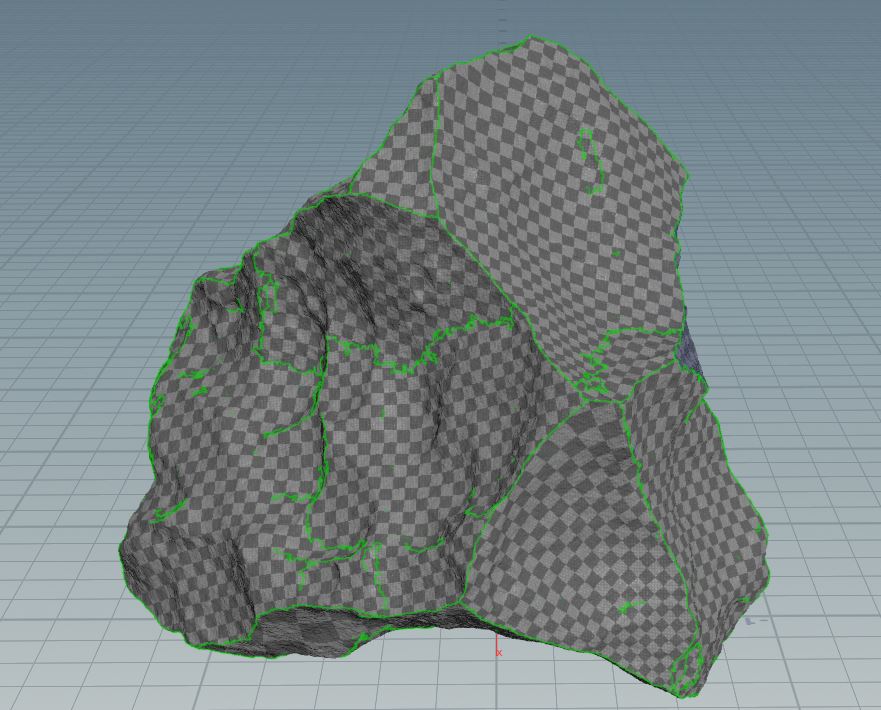
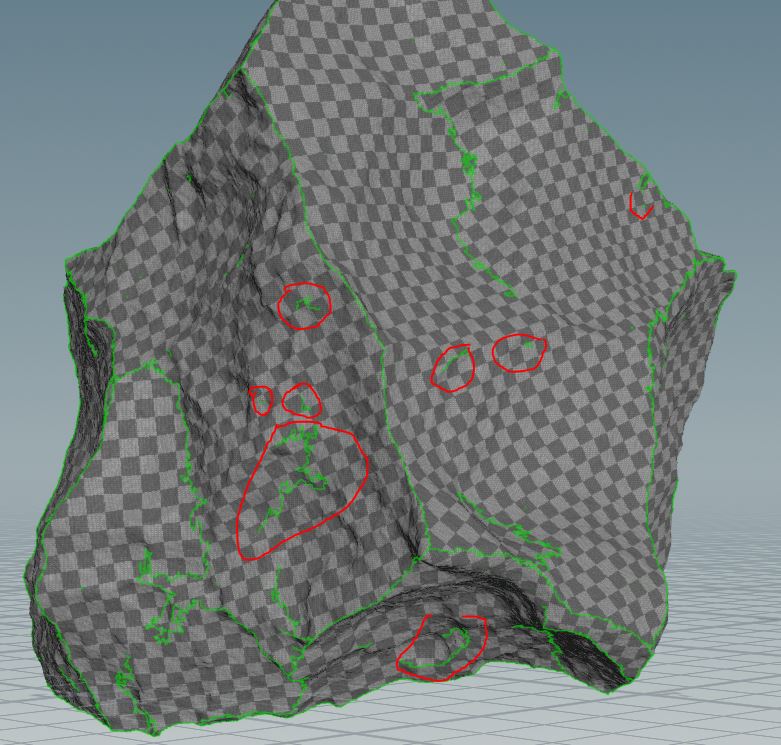
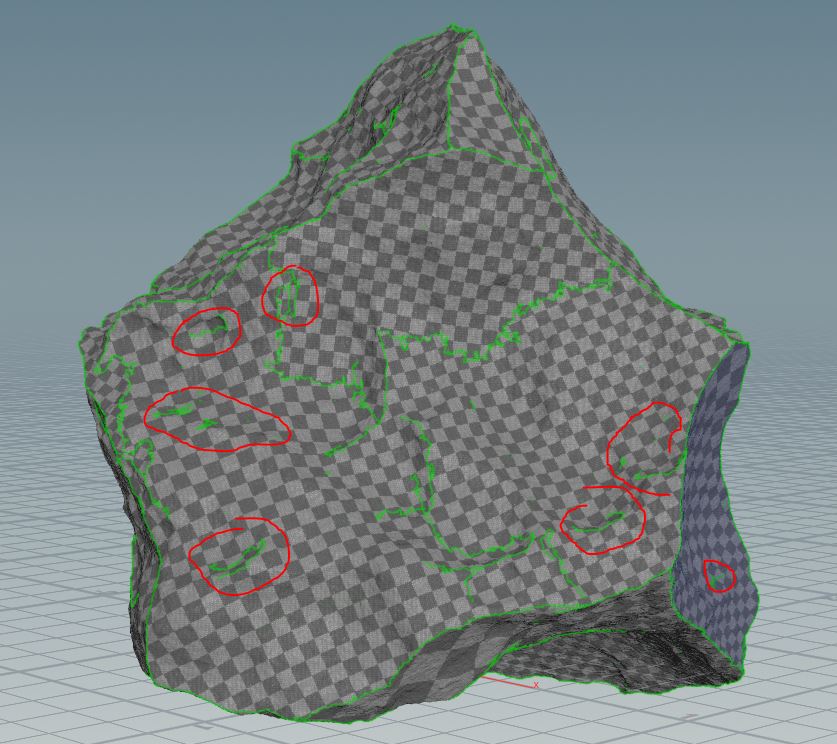
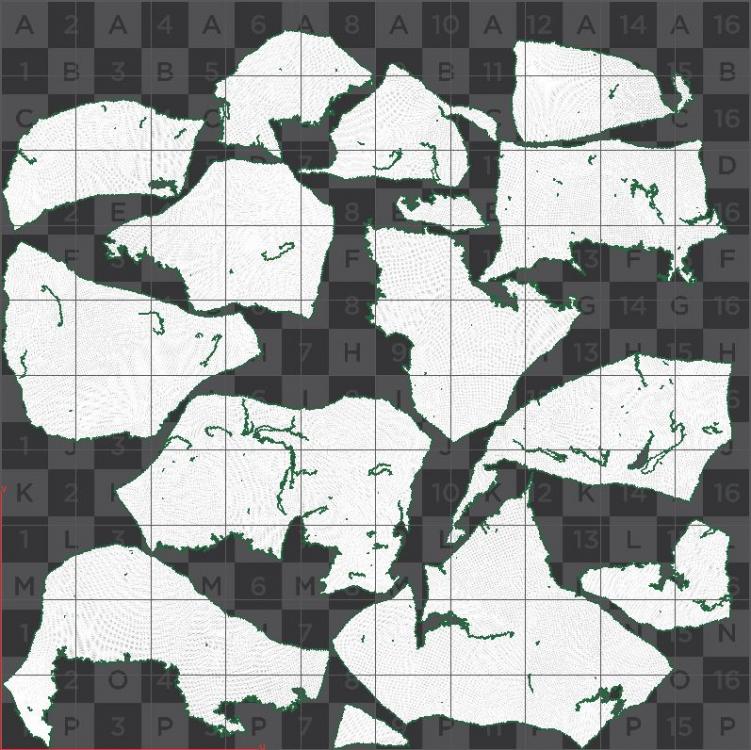
 First time I do UV mapping for a rock (was used to manual UV flatten for hard surface objects) This is a high (very high) poly rock (obviously not for games) I applied GameDev Auto UV, it has taken a bit more than 10 minutes and I got this: 1- How do I clean the apparently unnecessary seam cuts (in red)? 2- Does it look like a reasonable UV mapping for a rock? are there too many seams? it's meant to go to Substance Painter. 3- should I have applied the UV's when it was low poly? (I have 5 layers of noise, each time I want to add noise I subdivide first) At the end I added a close up on the mesh (822170 polygons)

-
Long road, long cable, a bridge, a long wall, fence... most environment assets that use the copy sop create a challenge for me when it comes to texturing and therefore UVs. To make sure I get the most of the 0 to 1 UV space, I want to have one UV island representing the original geometry that has been copied, and place the UV islands of the other copies on top of the original and on top of each other. Any idea how I can place the UV island on top of each other?
-
 Hi folks, I was able to do alembic transport from Houdini to Maya for a scene which has a procedural vine/plant growth, how do I go about to maintain the UVs? kind regards, Clarence
 -
Hey, has anyone tried this yet? In the past when creating FLIPs I would normally carry UVs through DOPs using an attribute promote to carry the UVs from vertices to points, but it seems like this is not working when applying the same methodology with vellum? Please help!
-
Hi all I am trying to figure out how to do transfer of uvs (with correct seams) from low poly geometry to hi. Example workflow (works for me in Maya) and to the point I’m stuck in Houdini. Take hi res 3D scan > do poly reduce (gets low poly) > do auto uv > transfer UV to high poly. now this for me works all the way to attribute transfer (vertex uv) but uv edges (seams) are not transferred. I tried transferring uv_seams edge group (and it works to some point) but just can’t get those clean UV islands as in low poly. I must be missing something simple but I can’t figure it out. thanks for help
-
Hello All, I am using VDBs to combine geometry and I am interested in a way of maintaining specific attributes from the two input geometries. Currently I have two poly objects which are being converted to VDBs and then combined using VDB combine and then converted back to polys using VDB convert. What I want is to be able to identify which polygons on the resulting combined/converted object comes from which input object and also maintain their respective UVs. I have had some success with using the second input of the convertVDB node to transfer attributes. Using this method however, I am only able to maintain some of the objects attributes, not all. I've attached some images and a file to demonstrate my issue. In the attached file I have three objects; Base, Add Sphere and Sub Sphere. All objects contain UVs and an ID attribute (tmp1), they are all converted to VDBs then combined using VDBcombine nodes. Finally the resulting VDB is converted to polys using convertVDB. When both original sphere are input into the second input, the UVs and ID attributes are transferred correctly however the Base object is not. When all three objects are input into the second input of the convertVDB, only the Base and one sphere's attributes are transferred correctly. I have tried several different combinations and methods of making this work to no avail, but it feels like I'm so close if I can get all three objects to transfer the attributes correctly, just not all at the same time. It is possible to use two convertVDB nodes, one with the two spheres in the second input and the second with all three objects in the second input, then deleting the problem polys from either (using the ID attribute) and then merging the two together, but this is not very ideal. In the image on the left you can see the results of the convertVDB using only the two spheres as the second input, the middle image is when using all three objects (base, add_sphere and sub_sphere), and the right is an image of all three input objects showing their UVs. I am new to VDBs so I was hoping someone might have some alternative methods or could point me in the right direction. Thank you all in advance! Cheers, -Mat VDB_attributes.hip

-
Hello guys, i think this is a peculiar problem I have to "fuse" 2 meshes and VDB looks just perfect for the job. The 1st mesh is an orange (alembic) and it have some perfect UVs. What I did is a simple vdb setup to combine the 2 meshes + an attribute transfer to get the uvs from the orange but, unfortunatelly, it looks like some of the polygons are still connected in some parts where it shouldn't be. Does anyone knows a solution for this? I can't share the original scene so I've recreated it in a simple way. The original one have a face to mix with the orange. here's the images + scene file (with abc) in case someone can have a look at it Thx again, Alvaro UVs Transfer Problem.rar
-
Hello dear community, I am just writing a little Python sop that can Unwrap a polycurve like a uvtexture node does on a nurbs curve with [Arc Length Spline] setup. My question is, what is the attribute name of the uv coordinate? I tried uv and uv[1] as its shown on the spreadsheet. Does anybody know the answer? Best wishes, Nicolas