Search the Community
Showing results for tags 'usd'.
-
New USD/LOPs tutorial for anyone interested in asset authoring and composition arcs. Basically an in-depth explanation of what the component builder nodes do under the hood with some tips and tricks sprinkled in.
-
Currently facing issues with file attachement //////////////////////////// OpenUSD Guide for (Student) Games //////////////////////////// Hello everyone! For the several weeks I have been looking into implementing OpenUSD into the pipeline of student games. The information that is currently available is more technical than practical or software-specific, instead of guiding you how to set up a pipeline. To fix this problem, I decided to write my own high-level guide for those who will follow in my footsteps, whether it be student like myself or individuals who have taken an interest in OpenUSD and its capabilities! I will leave out the in-depth research, as most of the information can be found on OpenUSD.org. Disclaimer: I will restrict this guide to Maya and Unreal. Houdini and Blender's approaches to the pipeline will be shortly discussed. This guide is also currently aimed at environment art, due to a lack of availability of other disciplines at the time of writing. //////////////////////////// Before we start, here is a quick introduction on the author of this post. My name is Sikandar Maksoedan, 20, I'm a 3rd year student at Breda University of Applied Sciences specializing in Tech art. I am currently looking for an internship starting September 2025. I am currently working on broadening my skillset in terms of Shaders, VFX and Pipeline optimization. I got interested in USD after my teacher Zoran Arizanovic mentioned the possibilities of the file format during a lecture some time ago, but only really picked it up after looking for a way to transfer a unreal scene to a different DCC while retaining all the data. //////////////////////////// Contents 1. What is OpenUSD (& Why should you care)? 2. How does USD function for Artists? 3. Introduction to Pipeline 4. Practical showcase of Pipeline 5. Closing statements //////////////////////////// 1. What is OpenUSD (& Why should you care)? USD, Universal Scene Description, is a file format that allows for the transfer of entire 3D scenes. This includes data from Geometry to Materials, from Lighting to Cameras, and more within this single file format. It shouldn't be grouped together with OBJ and FBX, it is closer to .MA and .Blend files. USD as a single file can be read in almost any major DCC with most of its features intact. USD allows the referencing of different USD files, allowing multiple people to collaborate on a single project at once. By layering USD files in sublayers, you are able to have your team work in tandem. Your level designer could be moving around props using a proxy mesh while your Prop artist is still modelling. The difference between using USD and a normal approach in team settings would be the latency. By updating a single USD file, all layers referencing this file will adjust their proxy on a quick refresh. Then, why should you as a (Tech) Artist care about USD? The advantages for both teamwork as personal work that USD provides are too big to be ignored. USD is like the PDF of games, a universal format that we won't be able to live without in due time. The scale of these advantages is big enough to have game studios such as Remedy Entertainment switching over already. Within the next few years, USD will be slowly adopted within the games industry. This means being able to work with it will be a skill required, especially for students. For all the advantages of USD, I will redirect you to the OpenUSD website: https://openusd.org/release/intro.html //////////////////////////// 2. How does USD function for Artists? USD for Artist should be kept as simple as possible. As stated before, this article isn't aimed at explaining all the technical details. USD can be used in 3 major ways for Artists 1. As a Container for single assets 2. As a Sublayer for a collection of Containers 3. As a Shot containing a collection of Sublayers Not all 3 have to be used to succesfully implement USD into your pipeline, but having all 3 gives you the most advantages. Lets go over usage 1, as a Container for assets. USD stores data in containers called 'Prims'. These Prims can have Parent-Child relationships with other Prims. Prims can contain Property, which can be divided into Attributes and Relationships Attributes consist of data such as the Vertex coordinates to form a mesh Relationships point to other data, such as which Material needs to be used In the proposed pipeline, you would create your Assets and store them in individual USD files. These USD files would be referenced in this Prim. Now onto usage 2, Sublayers Prims can be stored in Layers. Layers are akin to the scene hierarchy you would have in most DCC. Layers is where the Scene building happens. You can instance a Prim. This instancing references the USD file using it's local path, allowing us to change the Prim itself while keeping the reference. I have chosen to name the layers 'Sublayer', as you can have layers consisting of layers. This would allow you to have seperate layers for seperate parts of a level, each part consisting of more layers. That allows you to disable and enable parts of a level with ease, while also allowing you to for example work on the lighting or set-dressing of the entire level at once. You could also have Sublayers containing the Blockout of a level and work on a reference of that in your own DCC, lowering the latency between departments. Each Layer will be stored as a individual USD file containing reference paths to the lower levels. Usage 3 is last, The Final layer containing information of all the Sublayers is called a shot. Shots are the file you can use to preview all Sublayers and Prims at once and would contain the entire level. With this covered, we can go over to the actual pipeline setup that I propose //////////////////////////// 3. Introduction to Pipeline The USD pipeline that I have tested out for Games is fairly simple. But first, we need to discuss the role that USD plays in the pipeline. USD is practically an asset library in the way we will use it. We are creating assets that will be referenced by other people in their scene. The difference here is that we have automatic references to these assets, and once they are updated all scenes containing the file will also automatically update. Another advantage of the USD pipeline that we can open the files in any DCC to adjust it, whether it be a full scene or a single assets We have 3 hierarchies of files, the Shot, Sublayer and Container. Container will almost always be an Asset, so I will use these terms interchangeably. See Image 1 Containers will be the hierarchy where you will save your work to most of the time. These files are what in a normal pipeline your FBX files would be, as these files contain singular assets. Every asset gets an individual USD file so beware of naming schemes and folder hierarchies! If you want to work on a single USD file, you can. For texturing this can be nice. Most of the time however, you would want to work in a Sublayer. Sublayers will be the hierarchy which you will open most of the time. The layers are what in a normal pipeline a folder would be, whether in Maya or Unreal. Sublayers have the widest usecases. They can be used to store your own work like a .MA file, or as a part of a scene. Ideally you would have a Sublayer replace your .MA file, and use a separate sublayer to build part of your scene. Having multiple sublayers allows you to work on the same scene with other artists, since they are all individual parts of the same Shot Multiple Sublayers can reference the same Containers, and multiple Shots can reference the same Sublayers. Shots will be total sum of Sublayers and Containers. This is the file that will be loaded into your Game Engine. This file only needs to be accessed when adding or removing Sublayers. Proper naming schemes is key when using USD files, as there is little distinction to be made between the 3 types when they are on your disk. naming them with a prefix such as Co_, La_, Sh_ will already bring you a long way. I personally order the files like the following example: ------------------------------- -Level_01 --Shot_Level_01.USD ---Sublayer_Setdressing_01.USD ---Sublayer_Lighting_01.USD ---Sublayer_Buildings_01.USD ---Sublayer_BuildingBlockout_01.USD ---Sublayer_BuildingBlockout_02.USD -Assets --UserScenes ---Sublayer_UserScene_02.USD ---Sublayer_UserScene_02.USD --BuildingKit ---Asset_SM_ModularWall_01.USD ---Asset_SM_ModularWall_02.USD --Foliage ---Asset_SM_Tree_01.USD ---Asset_SM_Bush_01.USD ------------------------------- As you can see, We have seperate folders for our Assets and for the levels For a better overview different assets have been seperated based on types Users have their own scenes that reference specific assets So to quickly sum up what we have gone over up until now: You model assets and save them in Container-level USD files You assemble parts of the scene and save them in Sublayer-level USD files You combine all parts of the scene and save them in the Shot-level USD files Below you can see a more expansive overview of my USD pipeline. See Image 2 As you can see, we divide it up in Shots, Layers and Assets as mentioned above. We model and texture in the Asset stage, we can texture and assemble our scene in the Layers stage, and we can combine our Layers in the Shot stage. We Import the Shot stage into Unreal, but Unreal can both read and write to the USD files to edit the data. I have added OpenUSD viewer to the pipeline as I often use it to verify that my USD changes have actually saved. It also makes it easier to preview individual files and check if they are correct. With this info, we can go on to the practical pipeline example //////////////////////////// 4. Practical showcase of Pipeline The first step in the practical pipeline would be the setup of your Main USD file, the Shot, and its first few Sublayers. In Maya, enable the USD plugin to get started. By using the USD layer editor, we can create several layers and save these. They will each save as a separate USD file. See Step 1 You can easily add Geometry to a layer, but this causes it become a single mesh. See Step 2 A better approach that works for larger setups is using references to other USD files that contain the desired assets, whether it be boxes or horses. See Step 3 We are now saving the horses to a separate layer, allowing us to completely remove the boxes from our sight just like you would in the outliner. As you can see, the material setup and positions get correctly imported into Ue5 when using the Ue5 USD plugin. See Step 4 Changing the position of meshes in Unreal and saving will update the USD file, and refreshing in Maya showcases these changes. See Step 5 Changing your material setup in Maya changes the MaterialX parameters, thus changing it in Ue5 by extension. See Step 6 And that concludes the short practical demonstration. Once I get my hands on some more time and more assets to create a proper demonstration, I will update this guide. This concludes the basic pipeline, I will list some extra resources at the end of this topic. This is just a basic demonstration of the basic concepts, on how we can use different USD files as an assetkit to build larger scenes. Now some highlights as to why we are not using Blender. Blender lacks the simple UI that Maya has where you can easily create USD layers, Blender can still be used in the USD pipeline for individual asset creation, while the assembling currently has to be done in Maya, Houdini or Unreal I have left Houdini out of this pipeline on purpose as Maya is the most user-friendly, and thus easier to use in a student-game pipeline. Houdini also has plenty of documentation online on how their USD workflow and has plenty of support for the features in Solaris. You can check out Project Greylight for a practical example, which you can find on the SideFX website that will be listed below. I personally use Houdini as my main DCC, so I will update this guide later with a proper Houdini pipeline setup. //////////////////////////// 5. Closing statements Well, that marks the end of my short introduction to USD for student games. I have purposefulyl left out Variants and Classes, just to make the key pipeline of USD easier to understand. USD is slowly creeping into the head of students at my school, but sadly none seem too eager to try it out in actual production. With USD finally making it's way into the games industry, we students should be the first to jump on the OpenUSD train and learn how it works before entering the Games industry. I doubt this guide will get much attention on the forum itself, but for future students it would be nice to have some form of starting point. Currently I'm looking for industry people that have used USD daily and can help me improve the pipeline a bit more, and for Internships where I could possibly improve my understanding of Pipeline integrations. I am also looking into replacing GLTF in a custom engine pipeline with USD, giving not so tech savvy artists a chance to help out in these projects by using their preferred DCC. Thank you to anyone who read this through to the end, If you have any feedback to improve my pipeline or see any mistakes then please reach out!
- 1 reply
-
- pipeline
- student project
-
(and 5 more)
Tagged with:
-
Hey, I just went back to the basics to better understand Houdini. In the course "Houdini for the new Artist", Tyler Bay explains Solaris (stage). When I import a scene, I get the error message "Could not open asset", I used a gltf file from sketchfab (ricocilliers). Is this due to my Houdini Apprentice license? What's missing, what's wrong?
- 3 replies
-
- error
- sceneimport
-
(and 3 more)
Tagged with:
-
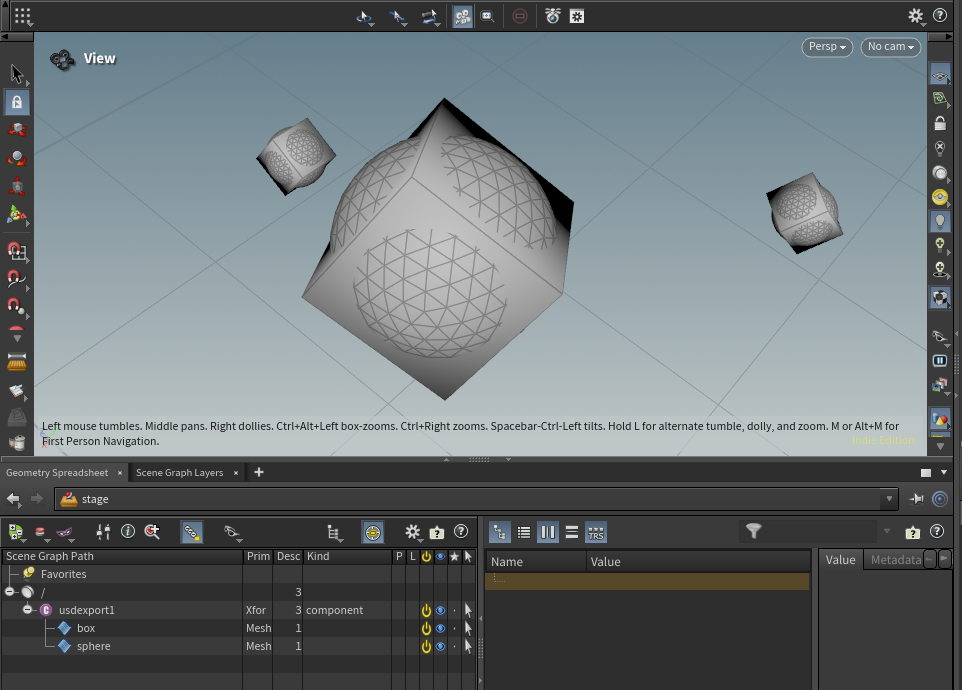
I am applying materials to the USD file objects in Solaris using"name" attributes from groups. Then I can apply individual materials to "sphere" and "box": If I use the "Copy to Points" node it also works, but until I check the "Pack and Instantiate" option. Then I lost my groups, I could only see combined mesh in Solaris. I tried to promote groups after copy but it did not work: copy_instances_usd.hiplc What is the typical workflow for such scenarios? Is it possible to fix this setup, or do I need to export to USD each instanced object separately (box.usd + sphere.usd)?
-
Hello Magicians, I am having some fun learning a USD file format and I want to share my findings. After 20++ years in CG, I finally managed to create a poly plane! I reinvented the wheel trying to create a plane, sphere, and other basic shapes, but it was a good exercise that helped me to understand some aspects of 3D graphics on the lowest level. I put everything together as a tutorial, Creating Procedural Geometry with Python and record it to USD file.
-
I managed to find some time to make this tutorial on building USD hierarchies in SOPs. I couldn't find many resources on things like setting pivots and altering transforms so once I figured it all out I thought I'd share the approach. Hope someone out there finds it useful.
-
[Tutorial] Intro: Hello Folks, I came up with a new workaround to work seamlessly between SOPs and LOPs, the idea about; why we can't consider the USD file as a container of data such as standard bgeo.sc? Let's replace it! So, this idea allows me to write caches on the desk once, instead of writing bgeo.sc and usdc configured layer. This HDA allows you to write one USD file or sequences of USD files and stitch them together. You can write normal geometry, volumes, vdb, particle simulation, polylines, and much more! Installation Guide: Place this HDA in your Houdini Preference Folder `"C:\Users\{USER}\Documents\houdiniXX.X\otls"` Requirements: Houdini 19+ Downloads: https://aymanabolila.gumroad.com/l/USDCacheSOP
-
HI ! We have just started small new studio and we are at the point of choosing proper pipeline for us. we are free from any legacy and are able to build our pipeline from scratch we plan to switch to usd, but not sure what to use - Karma or Arnold. we have experience using both arnold and redshift in the past ....but think about using karma as the best integrated rendering solution (seems like) sidefx says that it is production ready. but does it make sense ? wouldn't we regret ? so maybe someone has already walked this way and could share some opinions ? what is better option to choose ? Thanx in advance fir any info regarding this matter
-
Is there a way to connect the octane shader in Solaris to a collect node in order to be able to switch between renderers? There is no shader output by default
-
Hello wizards, i'm trying to get the camera from the current stage and then get the frustum I'm following the Pixar API, but probably i'm missing something... Here my code: from pxr import Usd, UsdGeom, Sdf node = hou.pwd() stage = node.editableStage() # Add code to modify the stage. # Use drop down menu to select examples. camera=stage.GetPrimAtPath('/cameras/camera1') gfCam = UsdGeom.Camera(camera).GetCamera(1.0) frustum = gfCam.GetFrustum() Problem: GetFrustum() gave me an error, it seems that is not a method of the camera class, but it should... Any idea ?
-
I am trying out Octane in Solaris, but i can't find some of the options that usually live on the obj level, like OpenSubdiv and Tessellations, essentially the object Octane settings. Any idea where are those? Also how can i set the default Octane render settings? Display Options --> Render , is empty (same goes for my HoudiniGL settings, its empty.) Also i had to search in the forums to find the latest OctaneSolarisStudio 2021.1.6.0 for Houdini_19.5.368 its not production ready yet? Sorry lots of questions, i just installed everything and i am trying to establish the basics, like where are all the settings i was using in SOPs
-
Hi evryone, Does somebody have any experiences on crowd simulation export in usd file? I did a basic work around trying with: agent pack but it doesn't work unpack agent works well but to brut force for me If somebody have any idea? I gonna continue to workaround, hoping finding a way, even if not so confident. If any advices can be helpfull. Best Regards Mathieu
-
So it seems the only way to procedurally expand all the variants is using the explore variants LOP. The problem I get when using this is that the file I am exploring variants on which Is brought in using a reference LOP gets an error of not having a save path and it defaults to creating a new usd file for the layer instead of reading the one from the reference LOP. I tried to look inside the network and noticed the reference lop there is what was causing the problems, but it was too complicated for me to fix. I tried just bypassing the reference LOP inside the network which worked but then I get the default prim name "/__variants" set in the python script and I was not able to make any changes to the primName variable without getting invalid null prim error. Please help! Edit: I realize after messing around a bit more that the reference LOP causes the separate USD file to be written out whereas other methods like extracting the variants manually or using a stage manager use write out the same data but inside the final usd layer from the usd rop. So basically I am just wondering how to procedurally get all variant prims to use for point instancing since the explore variants method that is often shown does not appear ideal.
-
I have a scene done entirely in the obj context for which I want to assign shading groups so that I can export it from Houdini and import it in Clarisse as USD and do the lookdev there. When exporting .obj files, just having the shop_materialpath attribute is enough to delineate the shading groups, but that does not work when exporting USD scenes. What should I do to make this work?
-
Houdini Karma USD MaterialX Texture Variations
4n7 posted a topic in Lighting & Rendering + Solaris!
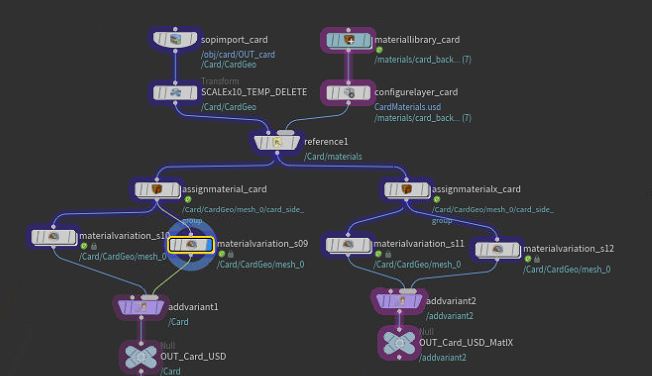
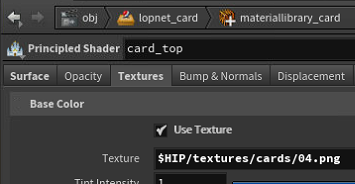
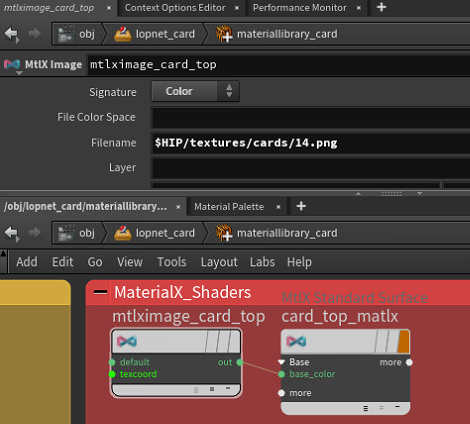
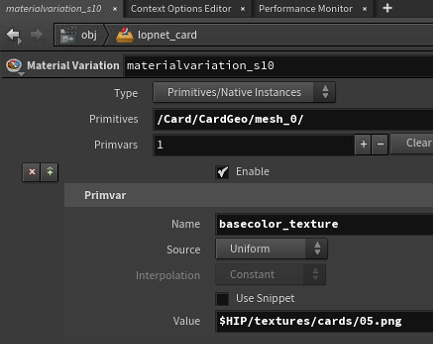
I'm trying to create a deck of cards in USD, Assuming the correct method would be to create a single card and it have 52 variants of texture maps. I can get this in SOPS, and using a Principled Shader, but not with MaterialX So far I can almost get to what I want to do, what I don’t understand is how to change the texture path for MaterialX variants https://www.sidefx.com/docs/houdini/nodes/lop/materialvariation.html If I set up a variant for a basic Principled Shader it works ok as it just changes the texture map path and replaces the basecolor_texture so I get the next card face in sequence The Material Variation node looks like this (it updates the texture on the back of the card too but that's another issue) but MaterialX it doesn't work, I guess because it's another node connecting to that input, how do I reference this? If I hover over the MtlX Standard Surface it gives me base_colorr, base_colorg, base_colorb, hovering over the image node gives me 'file' Thanks for any help, I'm assuming this is some basic part of the way Houdini references the nodes that I don't understand. -
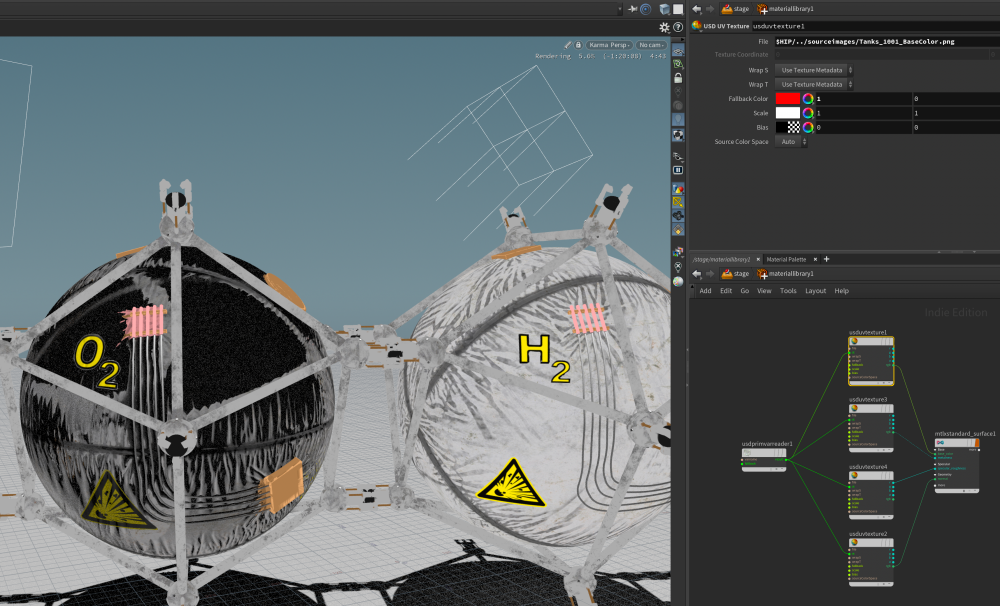
Thanks to help from hoomans on the SideFX houdini forum, I have exported a textured model from Maya 2022 to USD, then imported into Houdini 19 as a LOP network. Unfortunately, the materials have come across with only the base color texture maps as a constant shader. I have to replace these basic shaders with MaterialX shaders, with separate texture maps linked to base color, metalness, specular_roughness, and normal. The attached image shows a MaterialX that I manually rebuilt and applied to to the screen-left spherical tank. Is there a procedural way to search and replace all the basic shaders with MaterialX shaders, and re-wire all the texture maps? Thanks
-
- maya
- houdini 19
-
(and 2 more)
Tagged with:
-
Hi Is it possible to "transfer" the diffuse color information from a USD's materials to @Cd attribute while unpacking the USD?
-
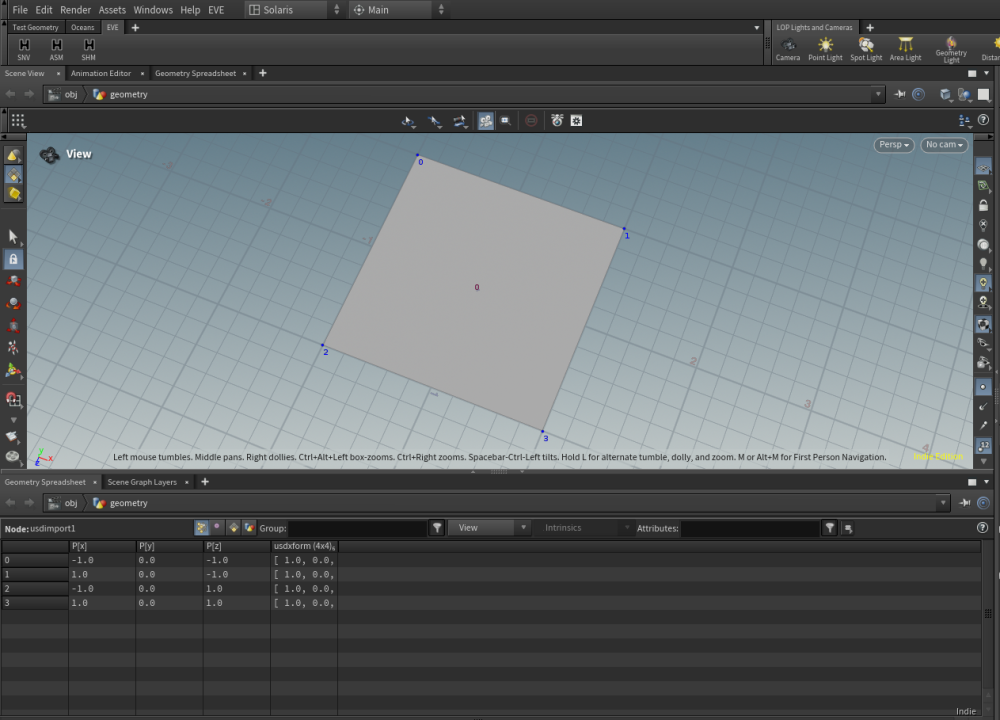
Hi I am trying to generate uv's on a USD scene, but I don't know how I should approach it. I would like to end up with a USD that is the same as what I started with, but with UV's. I can't wrap my head around, how to work with the geometry, without unpacking the USD to SOP level.
-
Hi everyone . Is there any workflow on how to export from houdini a usd sequence to unreal engine Most tutorials out there all focus on exporting a single frame, so any tips on how to export an animation sequence of usd from houdini to unreal engine with all the materials/textures, lights, cameras etc.... I tried using a usd rop node with flatten alyers/flatten stage etc. nothing works in unreal. Most of the time it either imports a single frame at the start, or it imports a single frame in between but it never imports an entire USD sequence
-
Hi, We are currently looking for Houdini TDs at either site: Winnipeg: https://apply.workable.com/tangent-animation/j/E6A47258F2/ Toronto: https://apply.workable.com/tangent-animation/j/4C175DDE3B/ Vancouver https://apply.workable.com/tangent-animation/j/F36699AA07/ We are in the middle of a USD pipeline transition, we have exciting R&D around the Cycles renderer and traditionally did a lot in and with Blender. Checkout our GTC talk for details. I look forward to hearing from you. Cheers.
-
Hi, I'm running into a small problem trying to automate a Daily Tool. Basically I want to be able to get the BBox of my asset to transform them accordingly next to each other for presentation. Only Problem is when I query the Bbox_size or min,max,etc... using the Vex functions(usd_getbbox_size) houdini returns values that are huge (bboxSize = {-6.80565e+38,-6.80565e+38,-6.80565e+38}). Which makes it basically unusable. I don't know wether it's a bug Or I'm using it wrong. Thank you very much in advance! Antonino Here is my vex snippet: //=========== Parameters =============// string parentPath = usd_parentpath(0, @primpath); //----------- String Path Par string wildCardAsset = "/cube1"; //----------- Setting Bbox Par vector bbox_size = usd_getbbox_size(0,wildCardAsset,"Render"); printf("bboxSize = %g",bbox_size); usd_getbboxsize.hipnc
-
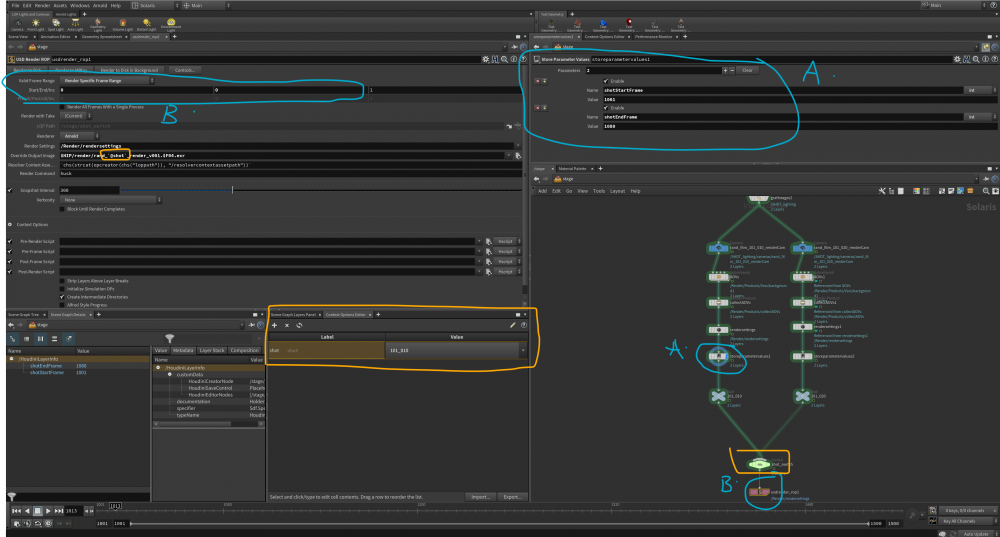
Hey all, I have a whole solaris setup and ready to render, I'm trying to do a slicker multi-shot workflow but I cant seem to get render frame ranges per shot. On the render settings node you cant specify the range, only on the very end USD_ROP node can you specify this. I've tried injecting metadata using 'storeparametervalues' for the start/end frame but I cant seem to use that information down in the USD_ROP (blue). Currently I'm using a switch to switch between my two shots here (orange). I'm relatively new to Houdini so I may just be missing something obvious but in the USD_ROP frame range I've tried: $shotStartFrame /HoudiniLayerInfo.shotEndFrame (this happens when you drag the value from the scene graph) Any help at this stage would be amazing. Thanks all
-
Hi all, I'm not a lighting or shading person. I'm barely a Houdini person, if the truth was told, but I struggle on... I am having a terrible time trying to figure out how to assign random textures to packed geometry in Solaris/Lops/USD/Karma (referred to as SULK from now on, OK?) I have a Crowd scene with some flag waving agents. I want the flags to have a material on them where I can choose a random texture from a set of three textures. With me so far? Excellent. How? I've tried 'editMaterial' node I've tried 'materialVariation' node I've even looked at 'variations' but that's s total mess in there - I'm not going anywhere near that! The flag geometry is packed and has an attribute called 'flagTex' which has a random int value from 1 - 3. When I import the geometry into SULK, that attribute becomes primvar@flagTex So far so mediocre. Now the problem: How do I use that attribute to choose a texture file on the shader? I can do this in Mantra, so I would expect it can be done in SULK, but how? I expected SULK to relieve some of the pain of StyleSheets but in truth it is a lot worse. Please, someone, help me out here before I throw in the towel and ditch SULK. Many thanks. Dan
-
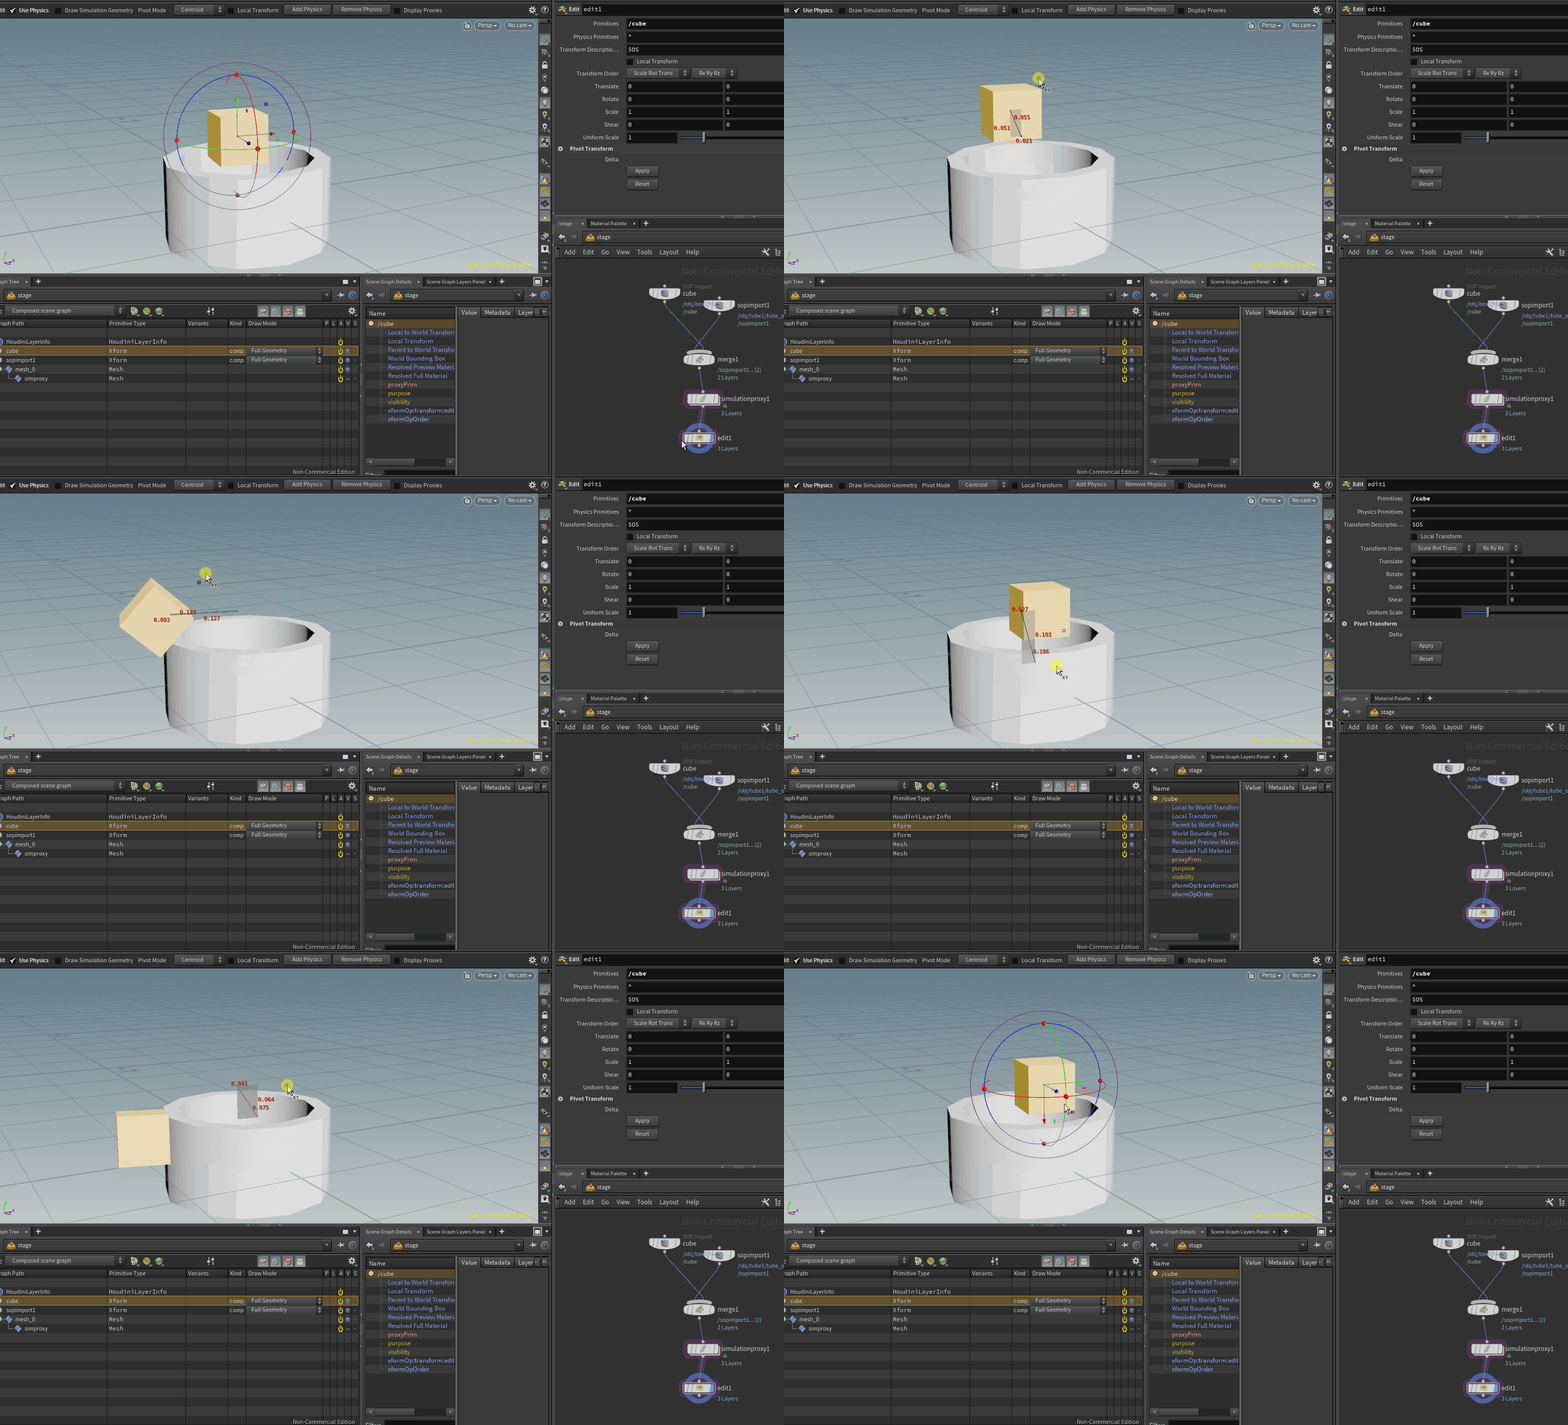
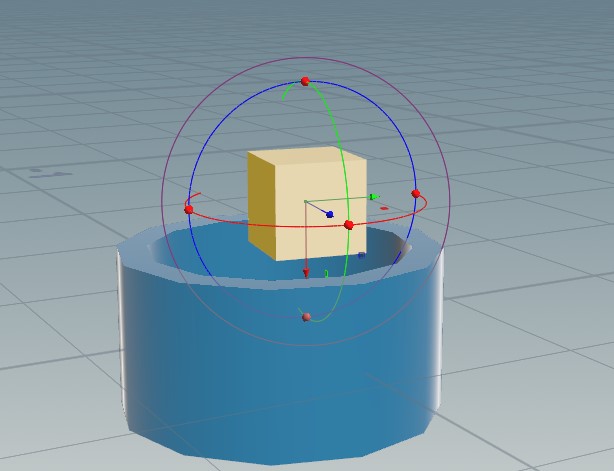
Hi guys, does anyone know how to set up the solaris physics simulation for layout to be able put geometry inside another geometry? I tried to compute again the simulation proxy but it doesn't work. They show in the Solaris that it's possible so I am confused how to do it. Here is a gif image to better describe the situation.
-
Hi guys, I have an animated FBX file of a character with about 870 frames, it has one texture & the FBX file is 12.5mb After bringing that into Houdini 18 & into LOPs then adding a material node & then a USD ROP file the output USD file is 182mb Am I doing something wrong? or is there something I need to turn on in the ROP I tried the USD zip ROP but that just gives me the same file size & I read that the USDZ doesn't actually compress anything. Thanks



.thumb.png.53cdfe90bd95ee292c60abc354f13739.png)
