Search the Community
Showing results for tags 'VEX'.
-
After more than 5 months of unimaginable amount of work, I am proud to release my first in-depth Houdini course on VEX More details in the video description and the website. Active Patreon members will receive additional discounts proportional to their lifetime support (25% of their lifetime support). Message me on Patreon for your discount coupon. Enjoy! 01 - Introduction [Point Clouds] 02 - Introduction [pcopen() vs pcfind() vs nearpoints()] 03 - Introduction 04 - Implementation 05 - pcfilter() Implementation for pcfind() 06 - pgfind() 07 - pcfind_radius() 08 - Excluding the Current Point & Ad-Hoc Groups 09 - Finding Min & Max Neighbour Points [Unique Pair Matching] 10 - Concept 11 - Implementation [Camera Based Occlusion with Variable Pscale] 12 - Concept 13 - Implementation [Uniform Point Distribution Over Polygonal Surfaces [Point Relaxation]] 14 - Concept 15 - Implementation 16 - Decoupling Operators [Convolution Kernels] 17 - Introduction 18 - Border Handling [Connectivity & k-Depth Point Neighbours Using Edges] 19 - Introduction 20 - Concept 21 - Implementation [Connectivity & k-Depth Point Neighbours Using Primitives] 22 - Concept 23 - Implementation [Extending k-Depth Point Neighbours Using Edges] 24 - Introduction 25 - Concept 26 - Implementation [Extending k-Depth Point Neighbours Using Primitives] 27 - Concept 28 - Implementation [smoothstep() [Cubic Hermite Interpolation]] 29 - Concept 30 - Implementation [Shaping Functions] 31 - Introduction 32 - Implementation 33 - Blurring Attributes [Sharpening Attributes Using Unsharp Mask] 34 - Concept 35 - Implementation [Generalizing the Kernel Code to Handle All Attribute Types] 36 - Concept 37 - Implementation [Attribute Gradient] 38 - Introduction 39 - Concept 40 - Implementation [Gradient Ascent & Descent] 41 - Planar Geometry - Introduction 42 - Planar Geometry - Concept 43 - Planar Geometry - Implementation 44 - 3D Geometry [Contour Lines] 45 - Introduction 46 - Concept 47 - Implementation 48 - Heightfields [Geometric Advection - Orthogonalization & Flowlines] 49 - Introduction 50 - Concept 51 - Implementation [Clustering & Quadtrees] 52 - Concept 53 - Implementation [Adaptive Subdivision] 54 - Introduction 55 - Implementation 56 - Hashing [Adaptive Subdivision] 57 - Improving OpenSubdiv Catmull-Clark Subdivision Surfaces Algorithm 58 - Half-Edges [Adaptive Subdivision] [Aggressive Performance Optimizations] 59 - Eliminating Groups 60 - Custom Fusing In VEX 61 - Recreating Proximity Structures In VEX 62 - Get Unshared Edges In VEX 63 - Final Optimizations [Limit Surface Sampling] 64 - Introduction 65 - OpenSubdiv Patches 66 - Moving Points to the Subdivision Limit Surface 67 - Scattering Points on the Subdivision Limit Surface 68 - Generating a Point Cloud on the Subdivision Limit Surface 69 - Pre-Generating a Point Cloud on the Subdivision Limit Surface 70 - Creating Isolines on the Subdivision Limit Surface [Adaptive Subdivision] 71 - Computing Surface Normals from the Subdivision Limit Surface [Custom Subdivision Surfaces] [Splitting Edges [Edge Divide]] 72 - Concept 73 - Converting Edges to Primitives 74 - Creating New Edge Points [Rebuilding Polygons] 75 - Concept 76 - Implementation 77 - Preserving & Interpolating Attributes 78 - Multithreading by Connectivity 79 - C++ vs VEX 80 - Preserving Groups 81 - Final Optimizations [Implementing Bilinear Subdivision] 82 - Introduction 83 - Concept 84 - Modeling Test Geometry 85 - Starting from Edge Divide 86 - Creating New Face Points 87 - Creating New Edge Points [Creating New Closed Polygons] 88 - Concept 89 - Implementation [Creating New Open Polygons] 90 - Concept 91 - Implementation 92 - Preserving Primitive Groups & Interpolating Primitive Attributes [Preserving Vertex Groups & Interpolating Vertex Attributes for Closed Polygons] 93 - Concept 94 - Implementation 95 - Preserving Vertex Groups & Interpolating Vertex Attributes for Open Polygons 96 - Implementing Iterations 97 - Preserving Literal Groups 98 - Creating Neighbour Primitives 99 - Final Changes 100 - Testing On Complex Geometry [Implementing Catmull-Clark Subdivision] 101 - Introduction [Closed Surfaces] 102 - Rules [Gathering Edge & Face Points] 103 - Concept 104 - Implementation [Computing Weights for New Edge Points] 105 - Concept 106 - Implementation [Computing Weights for Original Points] 107 - Concept 108 - Implementation [Attribute Interpolation] 109 - Concept 110 - Implementation [Boundary Interpolation Rules for New Edge Points] 111 - Concept 112 - Implementation [Boundary Interpolation Rules for Original Points] 113 - Concept 114 - Implementation 115 - Open Surfaces - Handling Corner Points 116 - Handling Non-Manifold Topology [Open Polygons] [Computing Weights for Original Points] 117 - Reverse Engineering OpenSubdiv 118 - Implementation [Computing Weights for New Edge Points] 119 - Reverse Engineering OpenSubdiv 120 - Implementation 121 - Handling Open Polygonal Curves [Handling Mixed Topology] 122 - Full Geometry 123 - Sub-Geometry 124 - Testing On Complex Geometry [Performance] 125 - Profiling [Grouping Boundary Edges from Primitive Group] 126 - Concept 127 - Implementation 128 - VEX vs C++ [Caustics] 129 - Introduction 130 - Sea Caustics 131 - Pool Caustics [Enhancing Gradient Ascent, Descent & Contour Lines] 132 - Introduction 133 - Implementation 134 - Tracing Both Directions [Updating Distances Properly] 135 - Concept 136 - Implementation 137 - Looping Streamlines Problem 138 - Adding Trace Parameter [Evenly Spaced Gradient Ascent, Descent & Contour Lines] 139 - Introduction 140 - White Paper 141 - Concept 142 - Constructing the For Loop Network 143 - Improving Seed Points Selection for Tighter Packing 144 - Implementing Separation [Enforcing Separation Using Self Proximity] 145 - Concept 146 - Implementation 147 - Optimization 148 - Final Tweak 149 - Applying to 3D Geometry [Custom Subdivision Surfaces] [Extreme Performance Optimizations] 150 - Introduction 151 - Establishing Baseline for Performance 152 - Updating Attribute Interpolate Nodes 153 - Interpolation vs Copying 154 - Optimizing Input Group 155 - Caching Geometry Data 156 - pointedge vs pointhedge 157 - Getting Primitives from Half Edges 158 - Eliminating Edge Groups 159 - Parallelizing Geometry Creation for New Primitives [Unrolling Loops] 160 - Parallelizing Geometry Creation for New Edge Primitives [Unrolling Loops] 161 - Finalizing the Network 162 - Performance Profiling the Latest Version 163 - Conclusion
- 54 replies
-
- 15
-

-

-
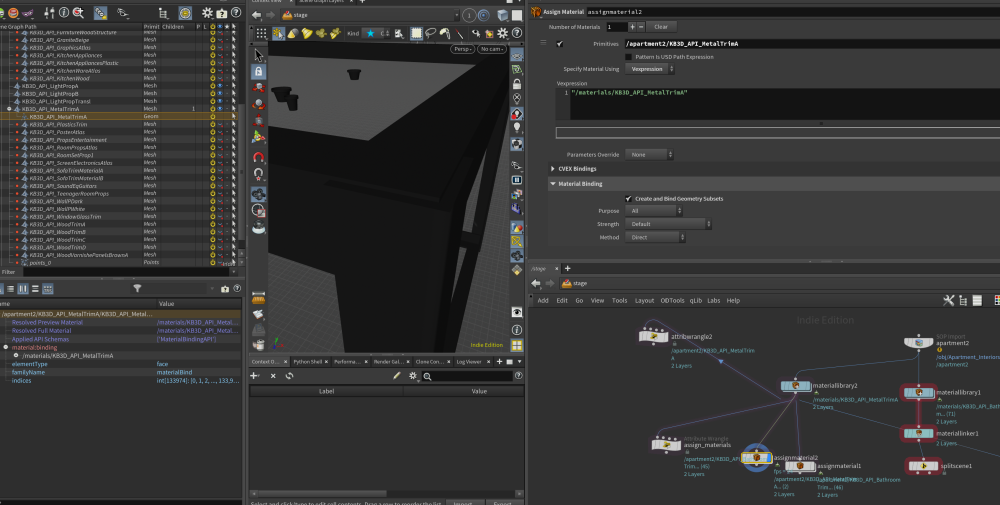
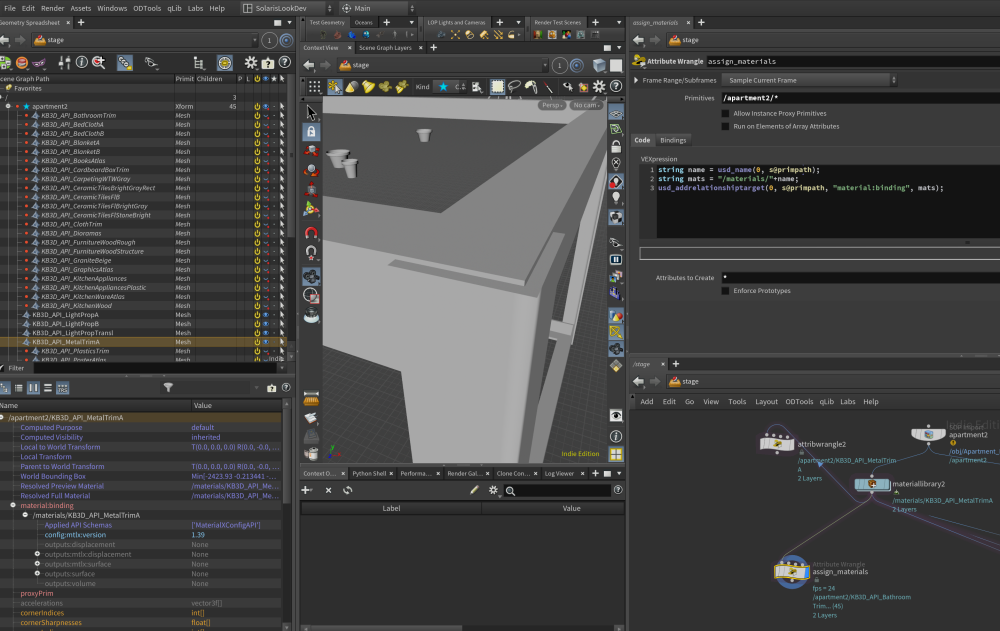
In solaris I have a material library with materials that match the name property of each primitive mesh in the scene graph. I can use use the material assignment node to assign one material to one primative. This works and in the scene graph you can see the material binding. see attached image below: However I want to do this with a wrangle and assign all materals to matching prims. in a wrangle : string name = usd_name(0, s@primpath); string mats = "/materials/"+name; usd_addrelationshiptarget(0, s@primpath, "material:binding", mats); as shown in this tutorial in the scene graph it looks like it has assigned the material relationship but the materail doen't show up in the viewport. If there is an obvious mistake or if there is a beter way to assign all materials with the same names as prims in solaris please let me know. Thanks you for your attention.
-
VM_Promo.mp4 VEX Manager 1.0 Snippet manager and code editing tool for H20.5+ The VEX Manager is a user-friendly tool for managing and editing VEX code as well as saving notes all within Houdini. It simplifies loading, creating, editing, and organizing VEX expressions, making it essential for artists working with VEX scripts. Download it here https://shirmanor.gumroad.com/l/vex_manager_v1
-
- store
- store data
- (and 20 more)
-
Introducing the VEX Manager, a user-friendly tool which is an alternative from the existing Recipes, Gallery or Preset Dropdown Menu within Houdini. This tool is built solely for managing and editing VEX expressions while also storing notes within a light-weight python shelf tool. Simply click the VEX preset title and instantly view your expression outside of your current wrangle, Edit, Create, Load, Group, Save Variations and Apply your VEX expressions or append small saved snippets to different sections of your current wrangles code. You can also load a vexpressions.txt file from anywhere on your PC including a cloud to enable you to bring the snippets anywhere! This out of wrangle workflow makes it a handy companion for artists working with VEX looking for a non destructive and easy to predict process. For more details click the link. https://shirmanor.gumroad.com/l/vex_manager_v1
-
Hello, im a student learning houdini and i wanna know if theres a simple solution for the title. My tree goes Filecache>GroupExpression>Blast>popnet>(insert aging/shrinking solution)>Copy to points>attribute wrangle(Color)>null So the longer a point is "Alive" for the smaller itll get until it "Dies". Thanks for any help!
-
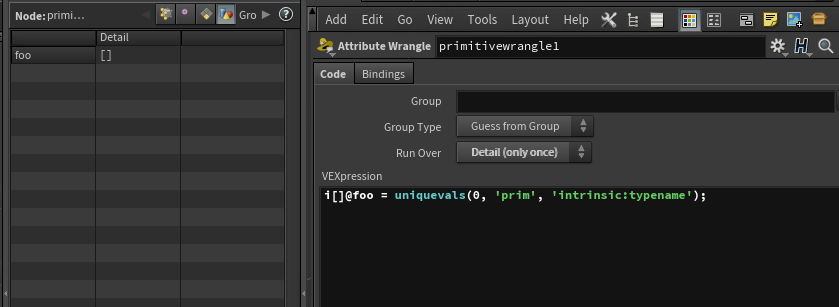
Hey all, I'm attempting to find the number of unique values across the intrinsic:typename attribute for incoming geometry, but I'm having no luck in getting the uniquevals() function to detect any intrinsics. Originally I assumed that this was just a limitation of the function, but I then realized that the docs explicitly state that you're able to provide the name of 'any attribute (or intrinsic) to read.' For context, let's say I've got a polygonal box and a NURBs curve, which both have unique values for their typename. If I try and access those values in a wrangle, I just get an empty array. I've tried setting the attribute class to 'primintrinsic' instead of 'prim', I've tried removing the 'intrinsic:' prefix from the attribute name, and any number of other gotchas that come to mind. I get the same results when trying to use nuniqueval() and uniqueval() as well. It isn't the end of the world since there are ways to do something similar in python, but if anyone's got some secret sauce to get these VEX functions in particular to play nicely with intrinsics, I'd appreciate the help. Thanks in advance.
-
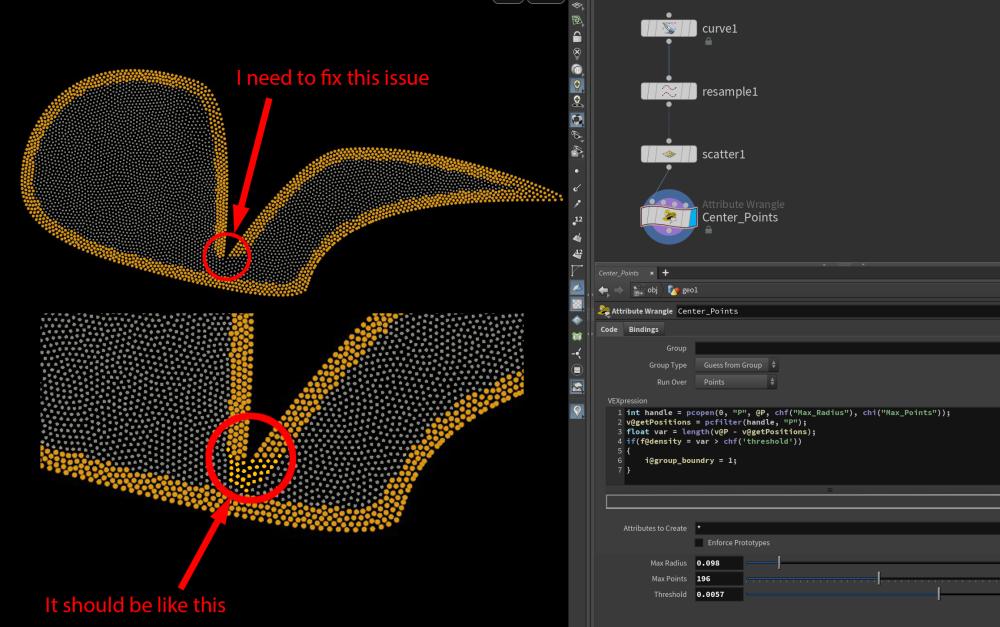
Hi everyone, I'm working with a point cloud and trying to select the boundary (or inverse boundary) points using VEX, similar to the image below. My code works well when the points are not too close to each other, but I encounter issues when the points are very close, like in the image shown. int handle = pcopen(0, "P", @P, chf("Max_Radius"), chi("Max_Points")); v@getPositions = pcfilter(handle, "P"); float var = length(v@P - v@getPositions); if(f@density = var > chf('threshold')) { i@group_boundry = 1; } Does anyone have suggestions on how to address this? Thanks for helping. Select Boundary Points 02.hip
-
My whole end goal is essentially just trying to take a Transform SOP's pivot rotation (visually shown in the viewport as the transform pivot handle) and extract it as a vector. This way I can then apply this rotation pivot vector to future transform SOPs to effectively copy the rotation pivot across. Note that I'm not talking about the rotation of the geometry, I'm talking about the pivot since I've already figured out the geometry rotation successfully. At first this sounds simple but, unless I've gone down the wrong path, it seems to be very difficult. This is because the pivot's rotation is affected by three different parameters in the Transform SOP. When you rotate with the Transform SOP, it has three different vector parms to enter rotation data for: pre-rotate, pivot rotate, and rotate. If you play around with them, you'll realize the node combines them in order like this: pre-rotate --> pivot rotate --> rotate. The resulting rotation is then applied to the geometry/pivot. That's all handy dandy and all. But I for the life of me can't get my VEX to mimic this behavior using matrix math. This is down to that pesky order in which rotations are combined. Currently my logic is to relative reference the 3 rotation parms into a detail wrangle, convert them to matrices, multiply them with eachother in the order explained above, then finally convert the resulting matrix back into a euler vector. But rotating some geo with this new vector shows an incorrect rotation in certain cases (again, all down to the order in which the rots are used). I can tell its incorrect since I'm just doing a direct comparison of the viewport handle I'm calculating (visualized on a Transform SOP) to a second Transform SOP that's being used as my ground truth. Basically after studying transform matrices and how to combine them for rotation calculations I'm getting stuck in this instance and I simply can't figure this out anymore (my brain is too small). But maybe there's just a simpler way to extract the euler rotation of the pivot handle. Can anyone give me any ideas, or even better some simple working solution/VEX for this problem that I can go off of? Much appreciated, thanks everyone.
-
Trying to reproduce this noise pattern from the MPM Advanced Avalanch example (left part of image circled in green) I think the issue might simple be one of scale. This is the vexpression @Cd = abs(float(snoise((@P*0.02+snoise(@P*0.02,5,0.5,1)),5,0.5,1))); What parameter should I be changing to get it working at a smaller scale for my head mesh?
-
Hi) Can I somehow get the maximum(and the minimum) value of an attribute in VEX? I want to use them in a FIT function.
-
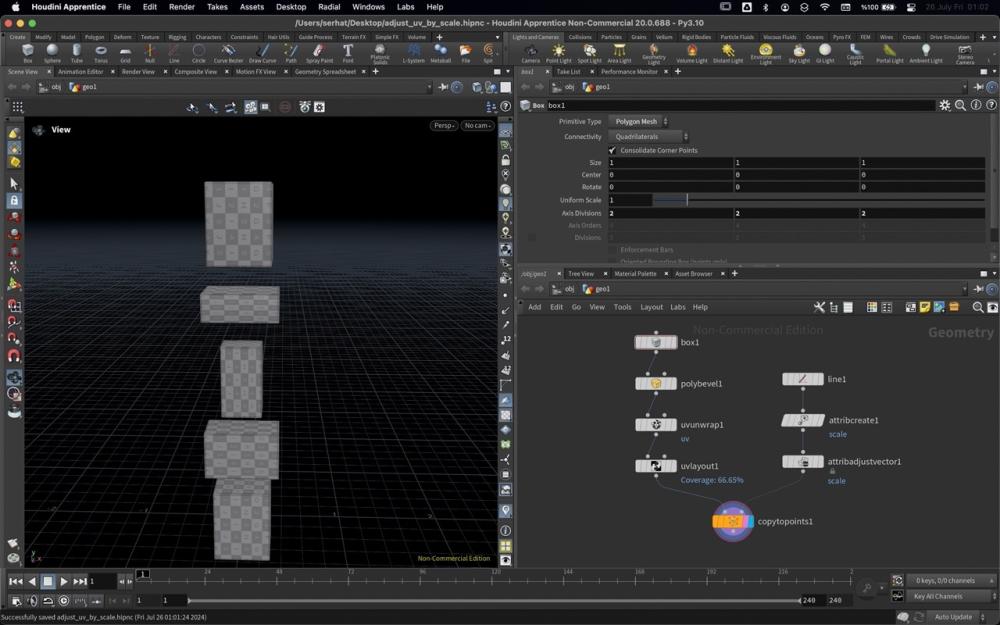
Hi, I have a box with uv on it and bunch of points with different scale attribute on each point. Box size is (1,1,1). After copy to point operation, boxes resizing and uv stretching as expected. My question; is there any way to correct stretched uvs using present scale attribute without running computational heavy operation? adjust_uv_by_scale.hipnc
-
Hi, I have recently created a set of 70+ HDAs called the IPOPs that aim at creating AOVs, Mattes & features for rendering. IPOPs are operator workflows designed to streamline shaders and AOV development in Houdini. With our toolset, artists can easily standardise their networks and access specially developed nodes for various renderers and presets, increasing efficiency and creativity. Get the IPOPs here! Renders in Karma & Mantra. 1. The Standard Library: Set of HDAs that help artists create quick shaders and AOVs and contain useful Utility Nodes such as Fresnel for Karma (CPU & XPU), Mask Falloffs in Shaders etc. The HDA library is constantly updated with new nodes to assist artists in speeding up their workflow and creating a streamlined system thereby increasing efficiency and creativity. 2. The Geometry AOVs: A set of remade common geometry AOVs for artists to quickly generate AOVs, Mattes & Utility Passes for Compositing. 3. The Particles AOVs: A set of remade useful particle AOVs for artists to quickly generate AOVs, Mattes & Utility Passes for Compositing. 4. The Volumes AOVs: A set of remade volume AOVs for artists to enhance their FX using AOVs, Mattes & Utility Passes for Compositing. We have a wide range of Bundles available for various workflows & we support both Houdini Apprentice & Houdini Indie! For any enquiries please email support@chakshuvfx.com I will be posting constant updates and developments here. IPOPs Master bundle: 1. Houdini Apprentice 2. Houdini Indie IPOPs Geometry AOVs bundle: 1. Houdini Apprentice 2. Houdini Indie IPOPs Particles AOVs bundle: 1. Houdini Apprentice 2. Houdini Indie IPOPs Volumes AOvs bundle: 1. Houdini Apprentice 2. Houdini Indie
-
Hi all. I made something a few weeks ago that I thought might be useful, so I somewhat tutorialised it here: http://www.pixelninja.design/manhattan-voronoi-approximation/ Basically it's a method of achieving something close to a Manhattan-distance voronoi diagram. I hope someone out there finds this useful If anyone knows of a better method, or a method of achieving an actual Manhattan voronoi I'd love to hear it! ManhattanApproximation_01.hiplc
-
A noob grains upres question here… I created a massive fracturing grains sim with Vellum at a low-ish resolution, and I'm using the grains' velocities to drive smaller dumber particles. When using the POP Advect by Volume, the particles are pushed around correctly as expected, but when they exist the Velocity field they slow down dramatically almost to a halt. This is because I am using "Treat as Wind" with very high "Air Resistance" values, to counteract the Gravity force. How can I sample the Density of the same volume, and use that to influence the "Air Resistance"? This way the core of the volume will stick to the Velocity, and as we get further away from the core, the Velocity will have less and less influence, with gravity taking over... I spent hours on this yesterday, trying to find a way to bring the volume Density into the DOPNet as a sort of falloff for the POP Advect by Volume node… I even tried transferring the volume density to the Grain source points in SOPs as a float value, hoping I could hook strength data out of them that way, but again, just not luck at all! I’m aware this must be incredibly simple to do, but I just cannot figure it out at all. There doesn’t seem to be any kind of masking options available in the nodes I’m using. One kind Facebook user on the Houdini Artists group told me this VEXpression could be pasted into the POP Advect by Volume node: @airresistance *= fit(length(volumevelocity), 0, value, 0, 1); value = the speed value where you want the resistance to be full. However, this is not referencing density, and so far, isn't working anyway - but I get the idea.... Can anyone advise on the best steps to do this?
-
I'm trying to create a Vector parameter using VEX on an Attribute Wrangle. None of the channel functions, including chv() seem to work. Does anyone know why?
-
I'm leaving this file here in case you want to sort the point order of a triangle sphere. Its not particularly usefull but I was tasked with that challange and thats what I came up with... Hope it helps, and if any of you has a better method feel free to share! sorting_a_triangle_sphere.hip
-
- sort
- point sort
-
(and 3 more)
Tagged with:
-
-
These are some basic ideas that I used when creating the Saliva for movies like Hellboy (2019) and Manikarnika: Queen of Jhansi (2019). The main goal was to be able to Art Direct everything anytime as there were over 14 shots where the Supervisor and Director had very specific notes. Visit my blog for more articles on Houdini Blog: https://sharanvaswani93.wixsite.com/s... Email: sharan.vaswani93@gmail.com
-
Getting closer to a new surreal idea I had in mind for a long time...Walls with Eyes! Here is my initial test for a small section of the wall. hoping to add in more detail and deformations to the rig the wall skin rig. I made the entire model and rig process combined into a single HDA. May need to optimize the HDA further to speed up things. Instead of using deformers to the bend the grids I started off with using curves and a combination of ray intersects and vex to create the eyelids, after creating the initial shape I was able to skin the curves using the Skin SOP, this gave me more control on how I can design the character, without worrying about intersection polygons and normals. The curves also acted as representatives for each loop on the wall and so I was able to control them in wrangles through multiple technics in vex.
-
LookAt Setup in SOPs, VEX, VOPs. Having used the Houdini default tools several times, I wanted to achieve the same effect in SOPs. Here is a detailed post to understand better how the LookAt works and how it can be used in creative ways https://www.sharanvaswani.com/single-post/2020/09/27/Using-VEX-and-SOPs-to-make-a-LookAt-Setup
-
Want to have multiple explosions in your shot? Let's populate them! Why go through the trouble of simulating each Fx when we can just populate a scene with a few! The Populate Toolset is a comprehensive HDA (Houdini Digital Asset) Toolkit designed for intricate control to populate a scene with various caches. The OTL uses a bundle system, so we can switch between a low-resolution proxy cache and a high-resolution render cache anytime. This makes it easy for artists to preview shots, layout simulations and art direct timing as per their needs. How does this Setup Help? Easy Layout: Create quick and easy layouts and previews for your shots without using high config machines and dealing with the laggy viewport. Quick Controls: Get quick controls to art direct your simulation like adjusting scales, rotation and timing. Randomizer: An easy randomizer to get started with. Override Tool: When you need small adjustments just use the override tool to fix it! Gizmos: Gets user friendly preview gizmos that help artists preview scales and placements of cache. Used on Beautiful Hunan: Flight of The Pheonix & Halo (Mini TV Series) Get the HDA and Files on Gumroad: https://chakshuvfx.gumroad.com/l/art-direct-instances
-
Houdini FFX Collection Get it here: Gumroad: https://davidtorno.gumroad.com/l/ffxcollection FFX Collection is a collection of scene builds and techniques for the intermediate users of Houdini. Those looking for quick setups, wanting to get more familiar with VEX use cases, and wanting to get started in Karma and Material X. This collection of “presets” as it were showcases a variety of topics within Houdini. Builds include FLIP, RBD, Vellum, POP, Pyro Solver, SOPs, LOPs, TOPs, Karma, and Material X. All renders use 100% fully procedurally generated textures created with Material X noises. The only exceptions are the test geometry textures which are directly read from their HDA embeded jpg textures. The HDA is a simple drop down list of all fifty builds, of which you choose the one you want and click “Build It” to have the tool generate the entire build for you. By default there is Network box organization to help understand the flow and processes that are occuring. Additionally there are annotated tips, and helpful explainer sticky notes to help inform an techniques used. These annotations are also optional and can be turned off before building the network. For those wanting to dive straight into everything there is to offer, there is a “Build All” button to create all 50 builds. This option will have each build turned off by default, so as to not overload your machine with too many items trying to cook. All builds involve various techniques and useful information. Each “category” is defined by the primary method used for the solution used. Be that by SOP nodes directly, VEX code, VOPs network, or even by simulation type like Vellum, Flip, RBD, or Pyro. Vellum does have a few builds under the VEX category as well. Builds include: FLIP Attraction To Curve Shape FLIP Fill Solid Object FLIP Melt Object FLIP Object Surface Advoidance ForEach Incriment Point Count Per Curve ForEach Poly Reduce Pieces By Volume Attrib ForEach Stacking Random Cubes PyroSolver Geometry Ripples PyroSolver Pyro Color Change Over Time PyroSolver Pyro Color From Texture RBD Activate Pieces RBD Apply Proxy Sim To HiRes Source RBD Attraction To Curve Shape RBD SOP Emit Every X Frames RBD V W Constrained Axis SOPs 8Bit SOPs Cull Random Curve Segments SOPs Dissolve Curve SOPs Dissolve Geo SOPs Echo Curve SOPs Post Shrink RBD Pieces Over Time SOPs Stone Path Vellum Animate Restscale Via Attrib Vellum Basic Fluid Cloth Two Way Coupling Vellum Cloth Flows Along Curve Vellum Define Cloth Ripping Vellum Flag In Wind Vellum Inject Geo Over Time Vellum Paper Whirlwind Vellum Spheres Expanding In Box VEX Blend Mask VEX Cull Back Faces VEX Custom Guides For Vellum Hairs VEX Falloff Radius Around Curve VEX Geo Look At Target VEX Geometry Ripples VEX Guided Infection VEX Per Poly Transform Via Particle Proximity VEX Per Prim Rotation Around Edge VEX Repeat Ramp Values VEX Ring Waves With Falloff VEX Rotating Grid Tiles VEX Sin Cos VEX Sliding Points Along Curve VEX Vellum Dangling Cables VEX Vellum Sim Forces From SOPs VEX Vellum Source Emission Instancing VEX Voronoi Fracture Animated VOP Blend Mask VOP Orientation Along Curve
-
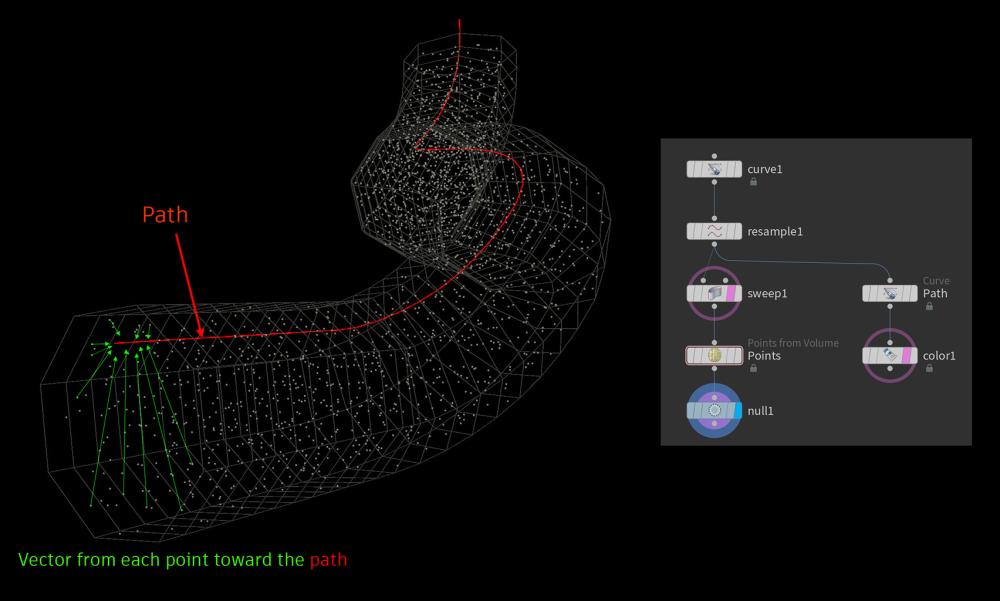
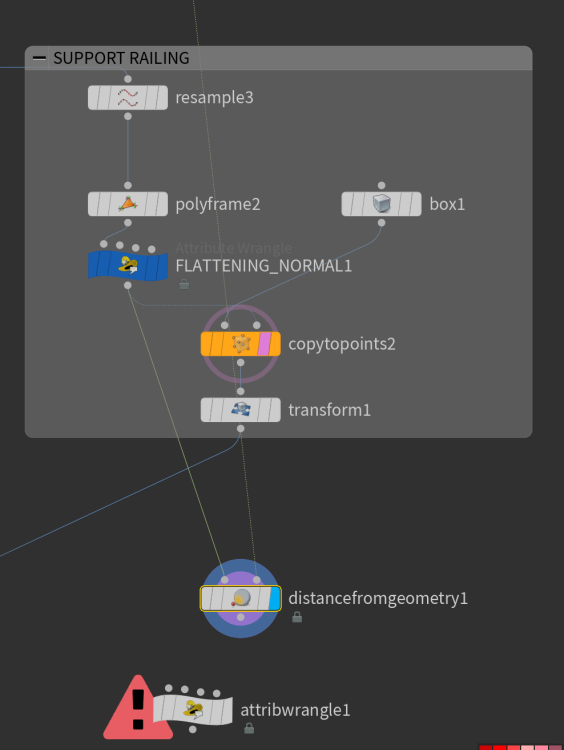
Hi everyone, after using rhino/grasshopper, and blender for a while, I just decided to getting into houdini, so that's my quest. I would need to measure the distance between a curve and an object( the object is a pipe/tube, and a curve is an helix that goes along the tube), then copytopoints a cube with the origin on the curve going towards the tube. In order to stay procedural, I would like to give to the cube, the exact or an avarage distance between the curve and the pipe, like so I can change the radius of the 2 components (tube and curve), and the distance of the cube will follow automatically that distance
- 1 reply
-
- average
- closest point
-
(and 3 more)
Tagged with:

