Search the Community
Showing results for tags 'rendering'.
-
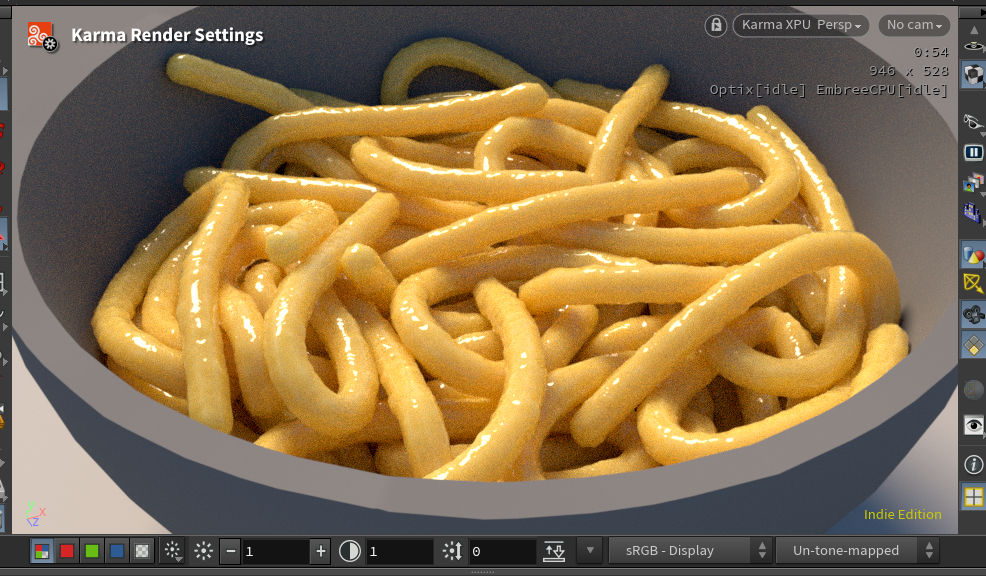
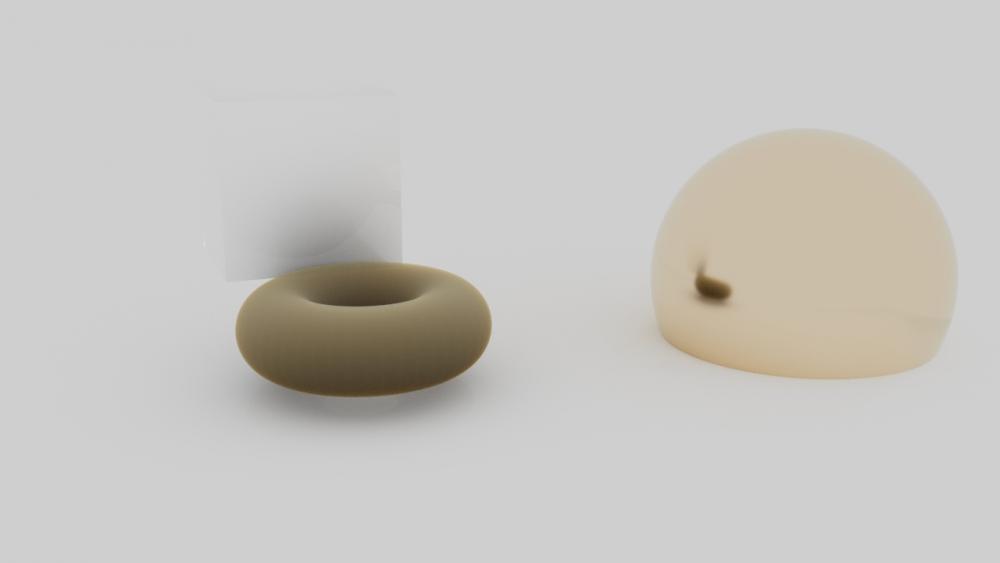
I'm trying to nail the look of pasta (personal project). I believe this is a good reference. This is what I have so far: What do you think about it? Is it working? How to improve? I have limited experience with shading and rendering and lighting. Here i'm using displacement to get the variation in the reflection. Is it a good idea? Is it the way? Or are there smarter/faster solutions? Any kind of feedback is much appreciated. Feel free to play the supervisor here pasta_shader.hiplc
-
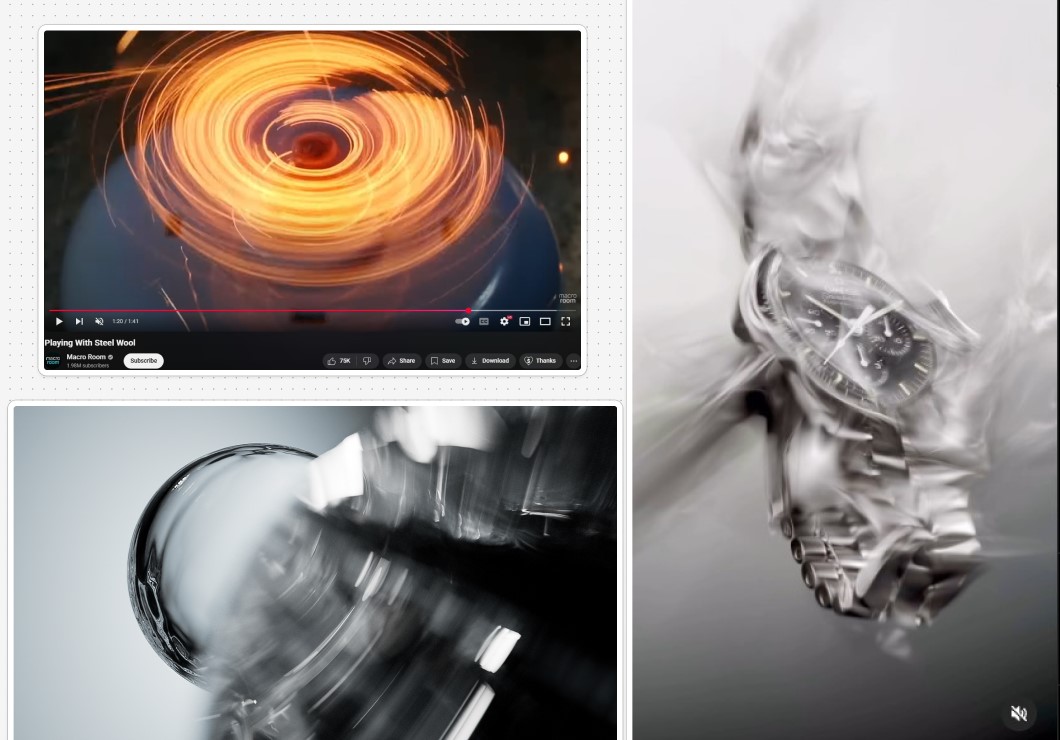
Hi, I would like to create a frozen motion blur effect where the geometry moves very slowly, but a fast-moving version creates smears and long-shutter blur in space, similarly to the watch example below. I would like the motion blur smear to feel optical in nature, so it would be bendy and natural, similar to how deformation blur with high-geo samples works. How do you achieve natural-looking curved motionblur with point or volume data rather than deformation blur? Thanks


-
It's my first time using Houdini and when i go to render view and press render nothing shows up but a black screen and on the top right it just says "generating scene..." I left it for several hours still nothing changed. Device - Nvidia rtx 4070 and ryzen 9 Help !!
-
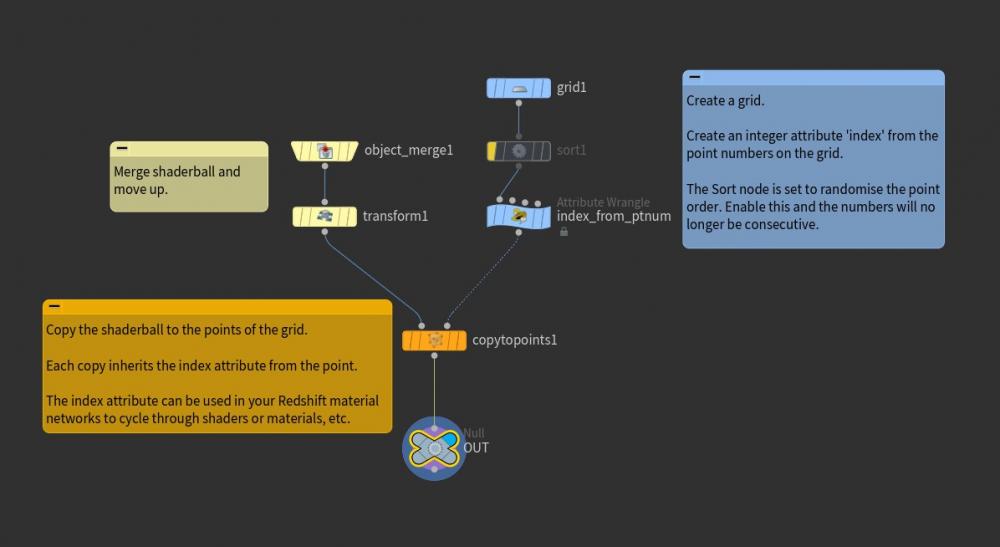
Houdini FFX Collection Get it here: Gumroad: https://davidtorno.gumroad.com/l/ffxcollection FFX Collection is a collection of scene builds and techniques for the intermediate users of Houdini. Those looking for quick setups, wanting to get more familiar with VEX use cases, and wanting to get started in Karma and Material X. This collection of “presets” as it were showcases a variety of topics within Houdini. Builds include FLIP, RBD, Vellum, POP, Pyro Solver, SOPs, LOPs, TOPs, Karma, and Material X. All renders use 100% fully procedurally generated textures created with Material X noises. The only exceptions are the test geometry textures which are directly read from their HDA embeded jpg textures. The HDA is a simple drop down list of all fifty builds, of which you choose the one you want and click “Build It” to have the tool generate the entire build for you. By default there is Network box organization to help understand the flow and processes that are occuring. Additionally there are annotated tips, and helpful explainer sticky notes to help inform an techniques used. These annotations are also optional and can be turned off before building the network. For those wanting to dive straight into everything there is to offer, there is a “Build All” button to create all 50 builds. This option will have each build turned off by default, so as to not overload your machine with too many items trying to cook. All builds involve various techniques and useful information. Each “category” is defined by the primary method used for the solution used. Be that by SOP nodes directly, VEX code, VOPs network, or even by simulation type like Vellum, Flip, RBD, or Pyro. Vellum does have a few builds under the VEX category as well. Builds include: FLIP Attraction To Curve Shape FLIP Fill Solid Object FLIP Melt Object FLIP Object Surface Advoidance ForEach Incriment Point Count Per Curve ForEach Poly Reduce Pieces By Volume Attrib ForEach Stacking Random Cubes PyroSolver Geometry Ripples PyroSolver Pyro Color Change Over Time PyroSolver Pyro Color From Texture RBD Activate Pieces RBD Apply Proxy Sim To HiRes Source RBD Attraction To Curve Shape RBD SOP Emit Every X Frames RBD V W Constrained Axis SOPs 8Bit SOPs Cull Random Curve Segments SOPs Dissolve Curve SOPs Dissolve Geo SOPs Echo Curve SOPs Post Shrink RBD Pieces Over Time SOPs Stone Path Vellum Animate Restscale Via Attrib Vellum Basic Fluid Cloth Two Way Coupling Vellum Cloth Flows Along Curve Vellum Define Cloth Ripping Vellum Flag In Wind Vellum Inject Geo Over Time Vellum Paper Whirlwind Vellum Spheres Expanding In Box VEX Blend Mask VEX Cull Back Faces VEX Custom Guides For Vellum Hairs VEX Falloff Radius Around Curve VEX Geo Look At Target VEX Geometry Ripples VEX Guided Infection VEX Per Poly Transform Via Particle Proximity VEX Per Prim Rotation Around Edge VEX Repeat Ramp Values VEX Ring Waves With Falloff VEX Rotating Grid Tiles VEX Sin Cos VEX Sliding Points Along Curve VEX Vellum Dangling Cables VEX Vellum Sim Forces From SOPs VEX Vellum Source Emission Instancing VEX Voronoi Fracture Animated VOP Blend Mask VOP Orientation Along Curve
-
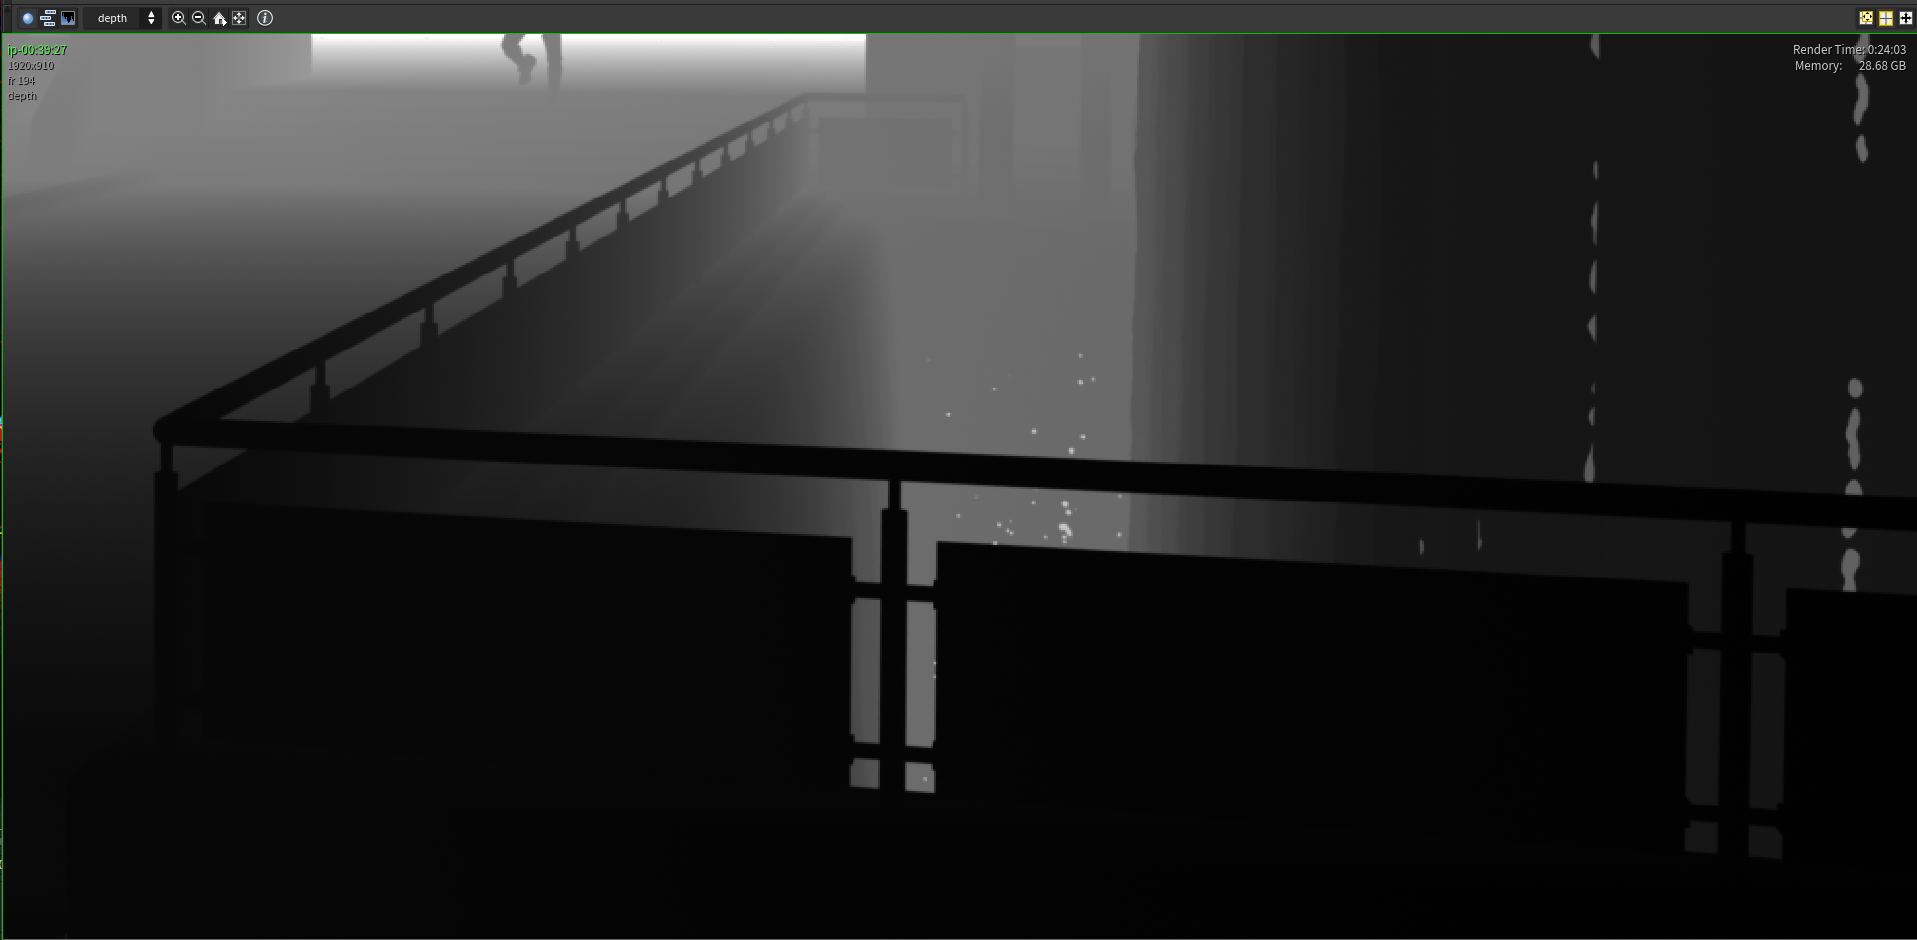
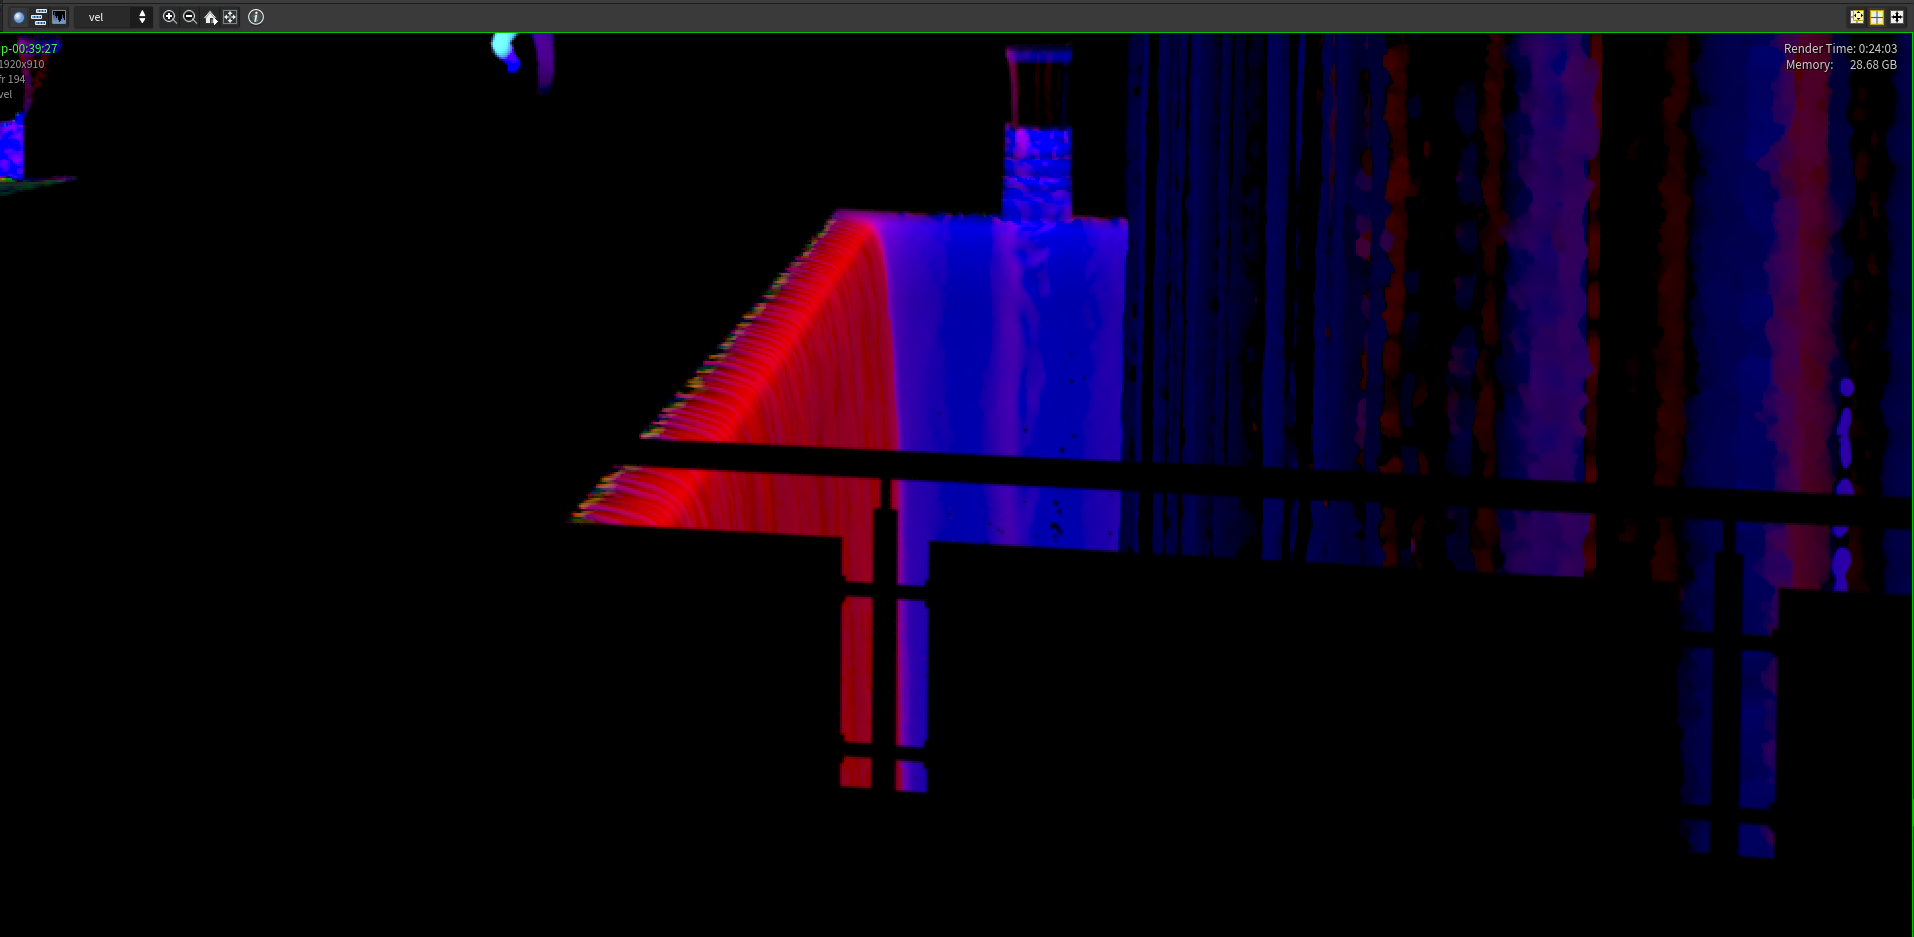
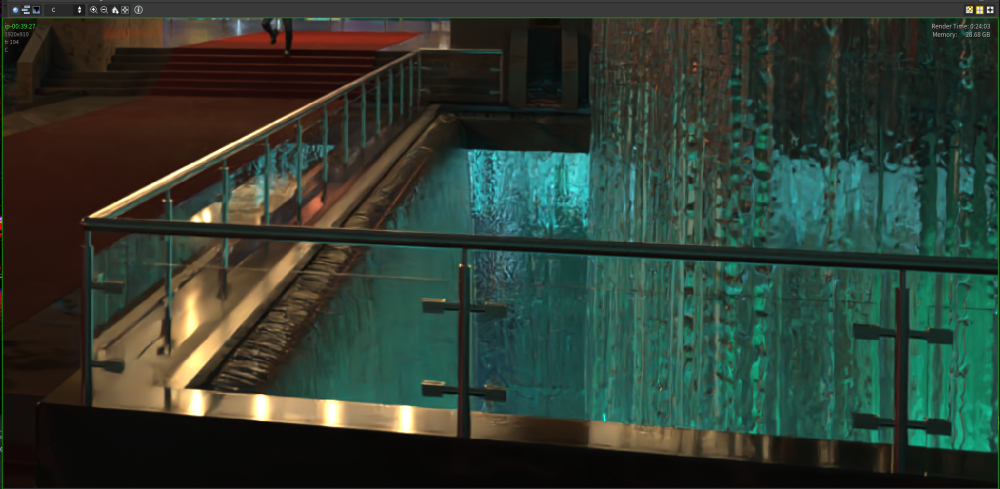
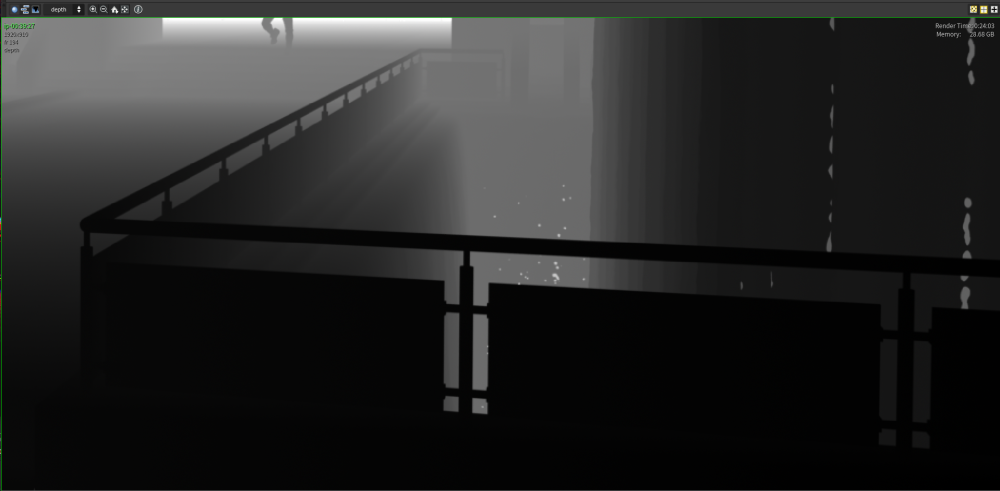
Hello there, So I have a scene in Solaris, and I have set up velocity and depth AOVs. There are objects in the scene with transmissive materials applied to them, however these objects seem to block the AOVs, Is there any way to Let these AOVs pass through transmissive objects? Here are the passes: (Beauty Pass) (Depth Pass) (velocity pass) Thanks!

-
Dear ODForcers, I am using Mtlx in Karma and everything works great except when using a mtlx image node adjusting the texture coordinates does not transform the texture????? Any ideas what is going on? Thanks Nick
-

shaders Layering Shaders With map ? (Mantra)
quentin posted a topic in Lighting & Rendering + Solaris!
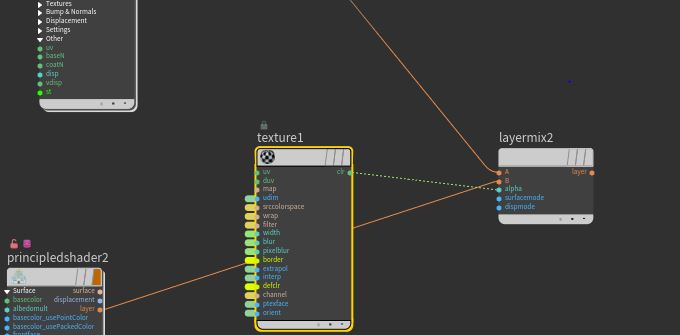
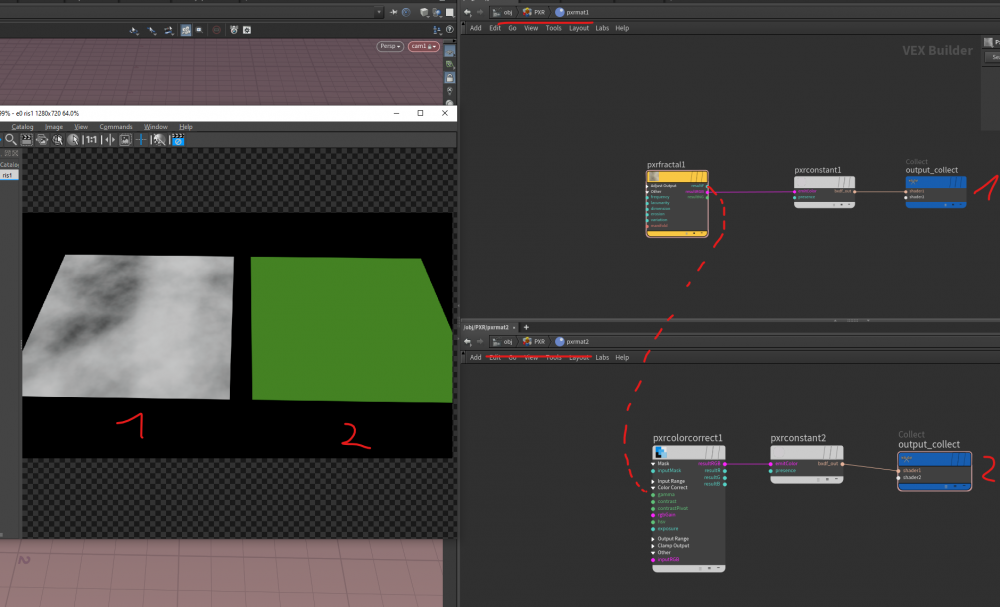
Hi everyone, I'm currently working on a material who mixes 2 shaders and I'm facing a stange issue. How to layering 2 shaders using a map in houdini ? I tried using the layermix and it works but only using a noise as alpha (pluged in alpha) But when i'm trying to use a map there is only the shader 2 who is render the map I want to use is a .pic sequence has alpha and using as mask for wetmap. Does anyone know the right way to use a map as mask for shaders ? maybe I'm not using the layermix correcltly or maybe using a texture node plugged in alpha is not the good way to do it..I don't know. There is not much information about the layermix in Houdini Help... Thans for your help !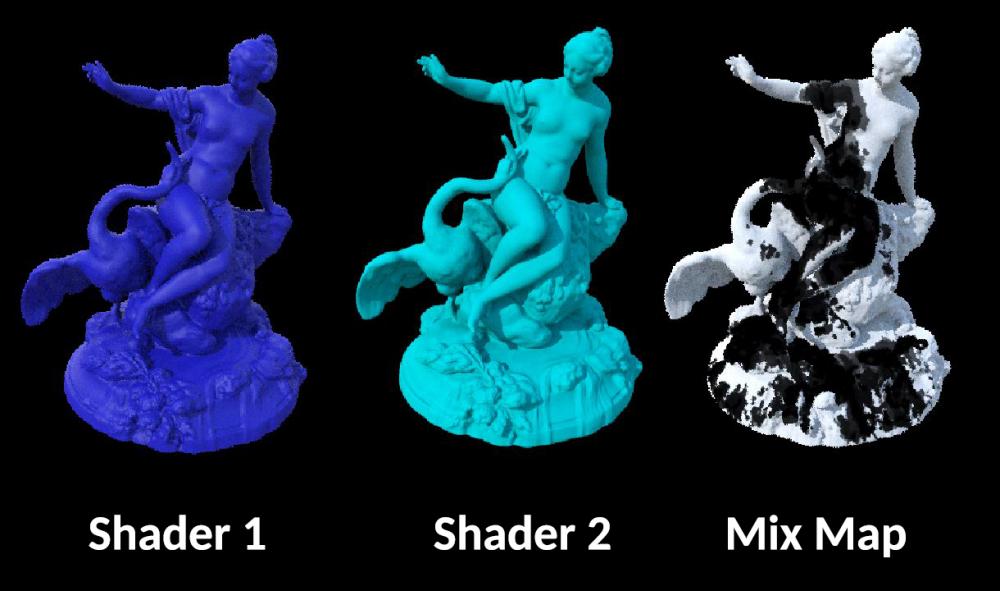
-
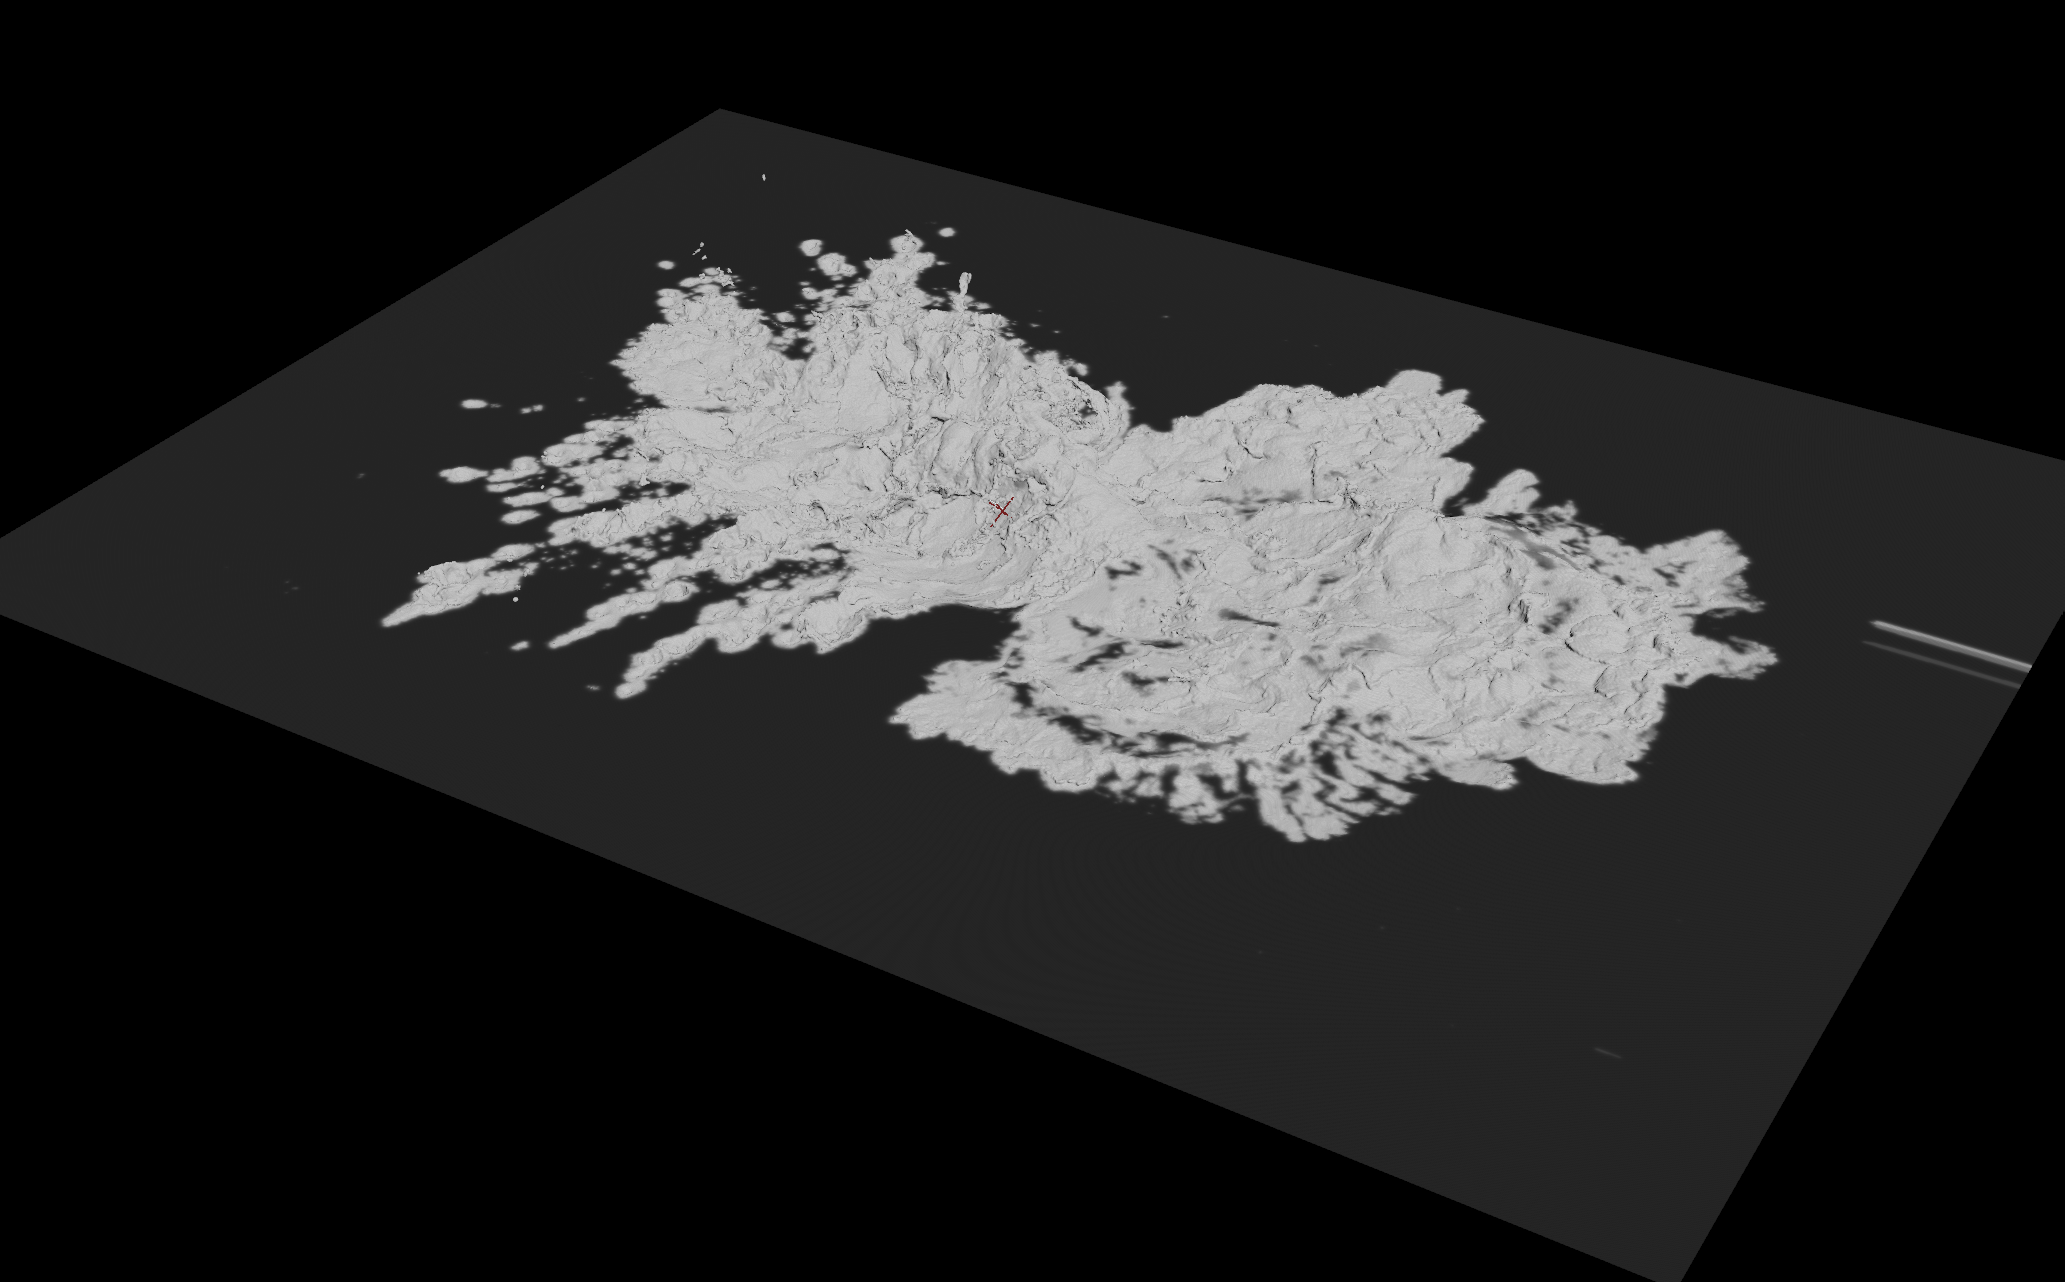
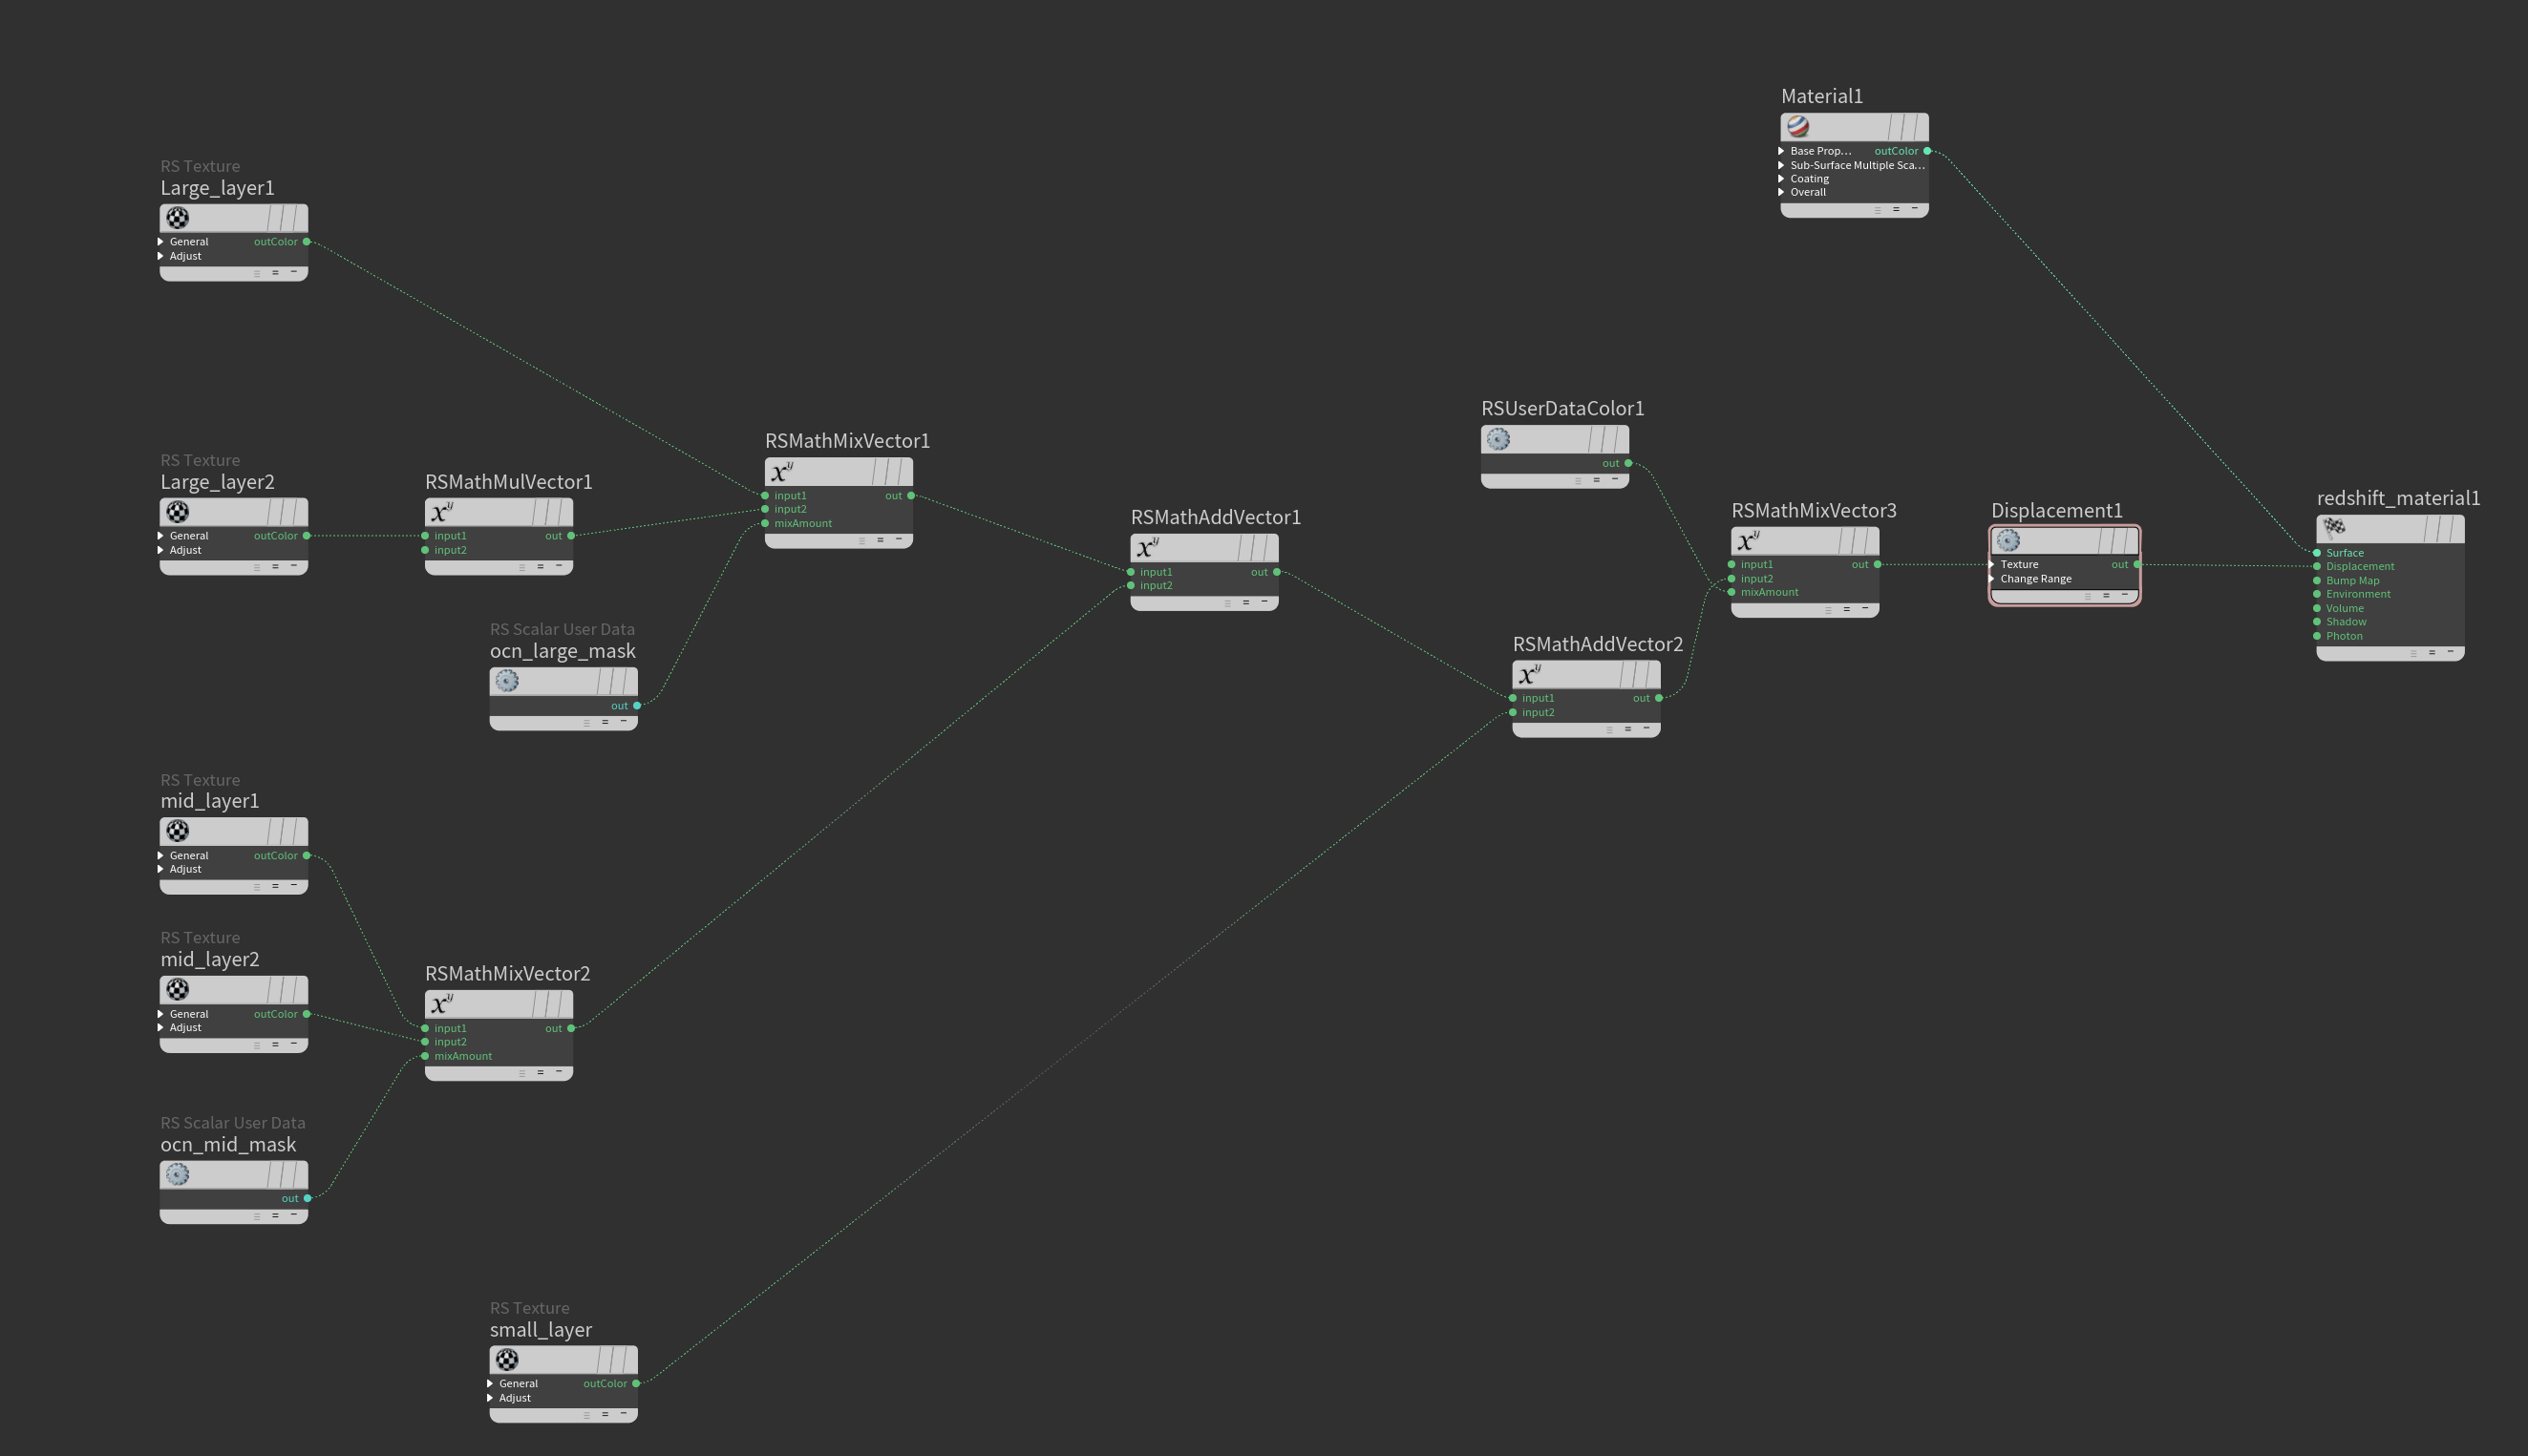
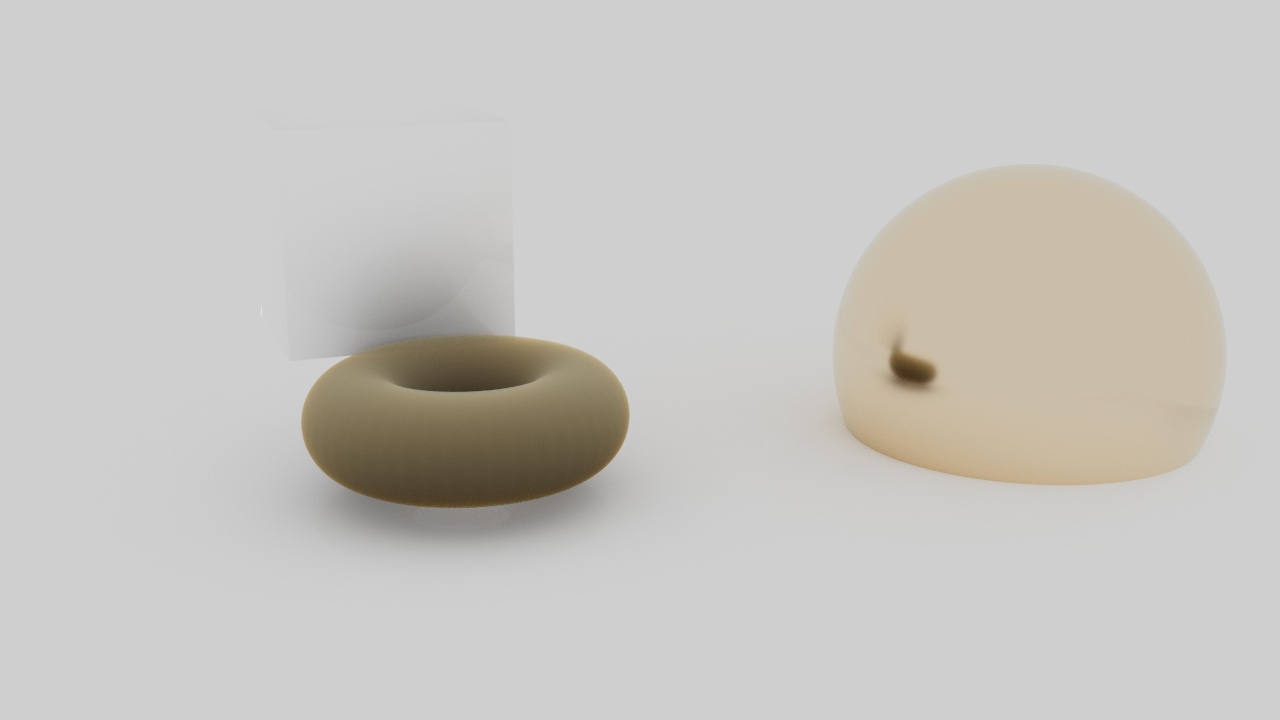
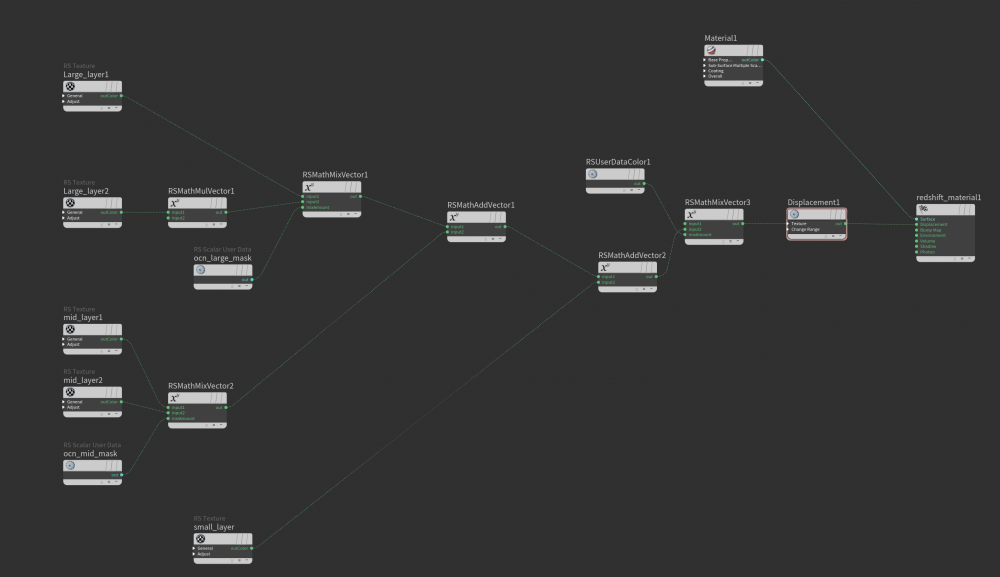
 Hi! I used displacement mask for redshift in Houdini.But there was such a problem.I don't want displacement where I mask and blend into the ocean smoothly. You can see the problem on the edges of the mesh in the first photo.How can i fix this? I shared the displacement mask and material setups below.I will be glad if you help.Thanks in advance.

-
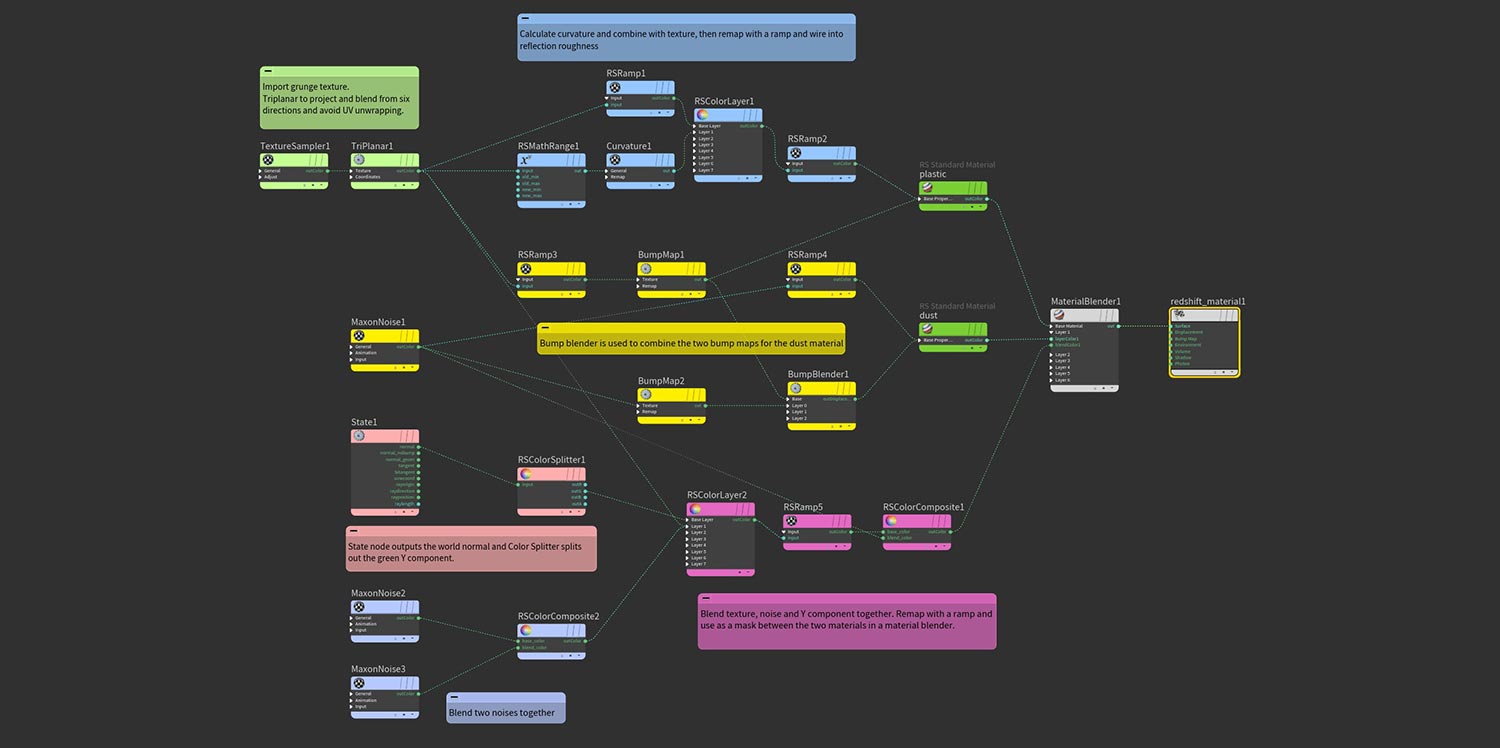
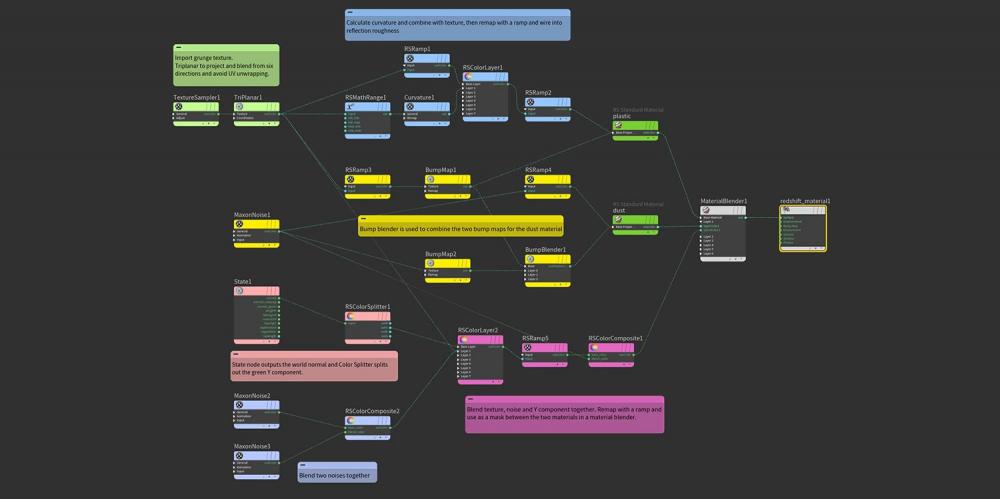
Redshift Essential Materials is set of Houdini presets which have been built as an introduction to the most useful Redshift parameters, features and nodes. Redshift Essential Materials for Houdini A collection of 70 pre-build setups for Houdini which demonstrate Redshift’s most important and useful nodes. Each material includes remarks in the network to explain the nodes. This library is a great way to learn how particular nodes work in combination with objects in your scene, as many of these examples require the use of the Redshift options available on your geo nodes. Product Summary 70 Redshift materials with notes Houdini project files for each setup Dispersion, Absorption and SSS effects Wear & tear, dust & surface techniques UV projection, normals, camera, object & world space Using attributes in materials Render points, splines, particles & hair Create wireframes and sprites Render Volumes & OpenVDB files Example scenes for Utility AOVs Recommended requirements Houdini 19.5 Redshift 3.5.06 and above


-
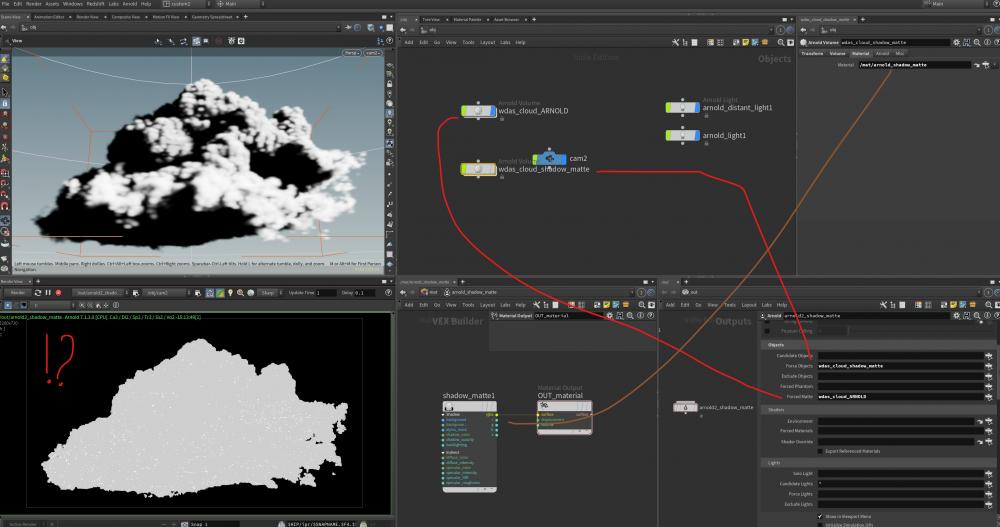
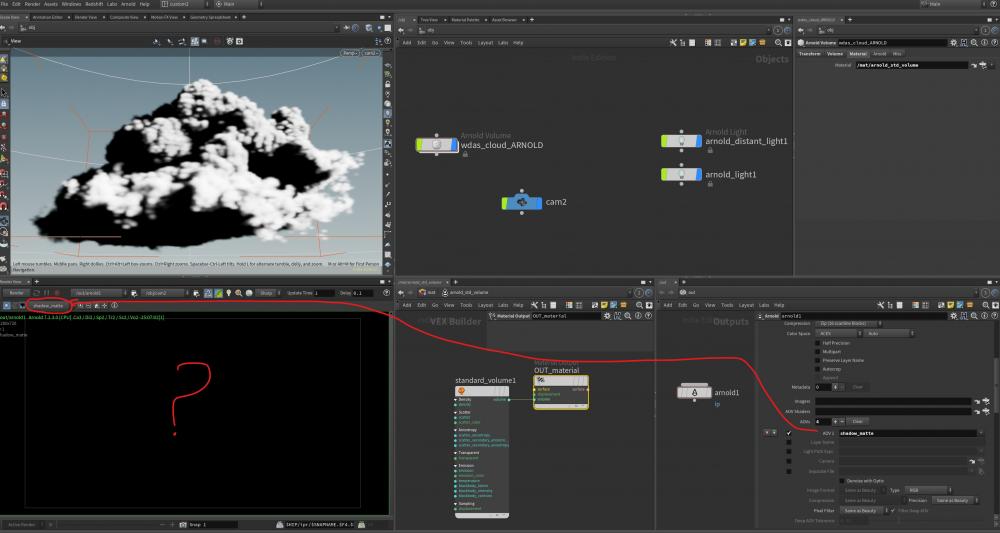
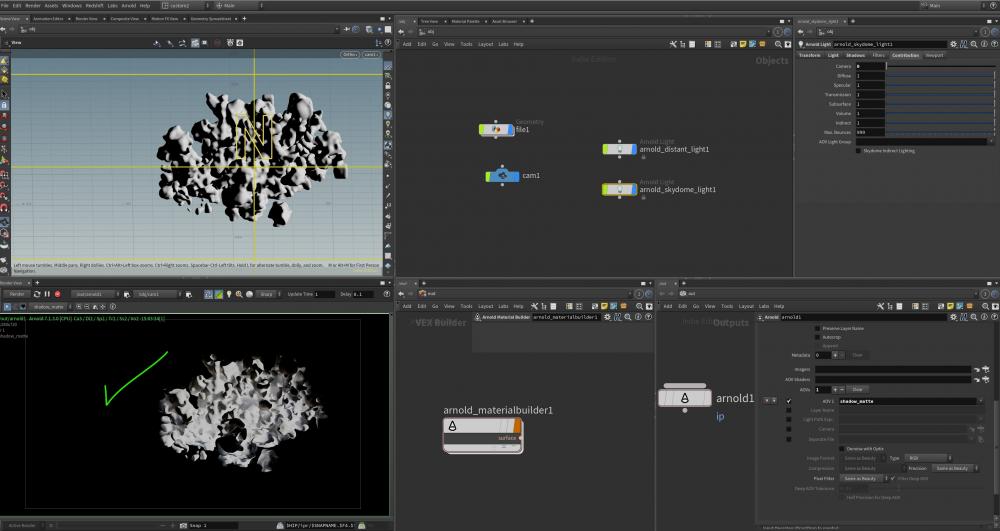
I have attached files. I just can't get any self-shadows on volume. I've rendered the shadow matte testing on a polygonal geometry and it works like a charm, but for the volume (in this case a cloud) I can't get anything at all, using both: - just shadow matte AOV - duplicated volume with shadow matte material Everything works fine for polygons, nothing whatsoever works for volumes when it comes to shadow matte / pass. Am I doing something wrong? I need the self shadows of the volume. The volume (cloud) is from Disney: https://www.disneyanimation.com/data-sets/?drawer=/resources/clouds/ And here are the houdini hip files shadow_matte_polygonal_geometry_works.hiplcshadow_matte_polygonal_geometry_works.hiplc floating.bgeo.sc shadow_matte_volume_does_not_work.hiplc shadow_matte_polygonal_geometry_works.hiplc
-
 Hello there! The task is to go through folders with lots of fbx files (each with several assigned textures and materials) and render out thumbnails of each object. Simple enough. The problem is that I can't find a way to do this without loosing the texture and material data supplied by the FBX Importer SOP node, so the resulting renderings turn out gray, without textures. My approach is to start with a filepattern that gets wired into an HDA processor with a Labs FBX Archive Import inside and the relevant parameters exposed: The FBX Archive Importer neatly connects up all the different materials each of the fbx files has, but this data gets lost when I wire in the ropkarma node afterwards (which makes sense, I guess, as that HDA processor should only output geometry:) Now my question is: how do I get the correctly assigned texture and material information to the karma renderer? I feel like I'm making an obvious mistake but can't figure out how to do it. The only other solution I came up with is baking all the Maps into a single map and then using those baked maps down the line, but this seems overly complicated, time consuming and I lose texture fidelity in the process. How do you go about importing and rendering loads of files with loads of (unknown) numbers of assigned textures? Thankful for anyone pointing me in the right direction. Cheers!
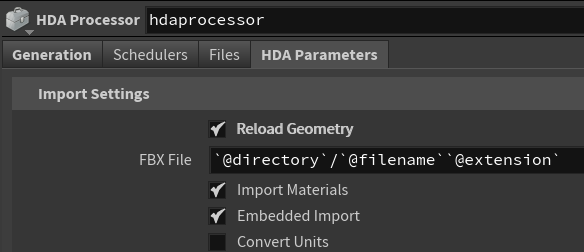
-
 Hey I'm wondering - is it possible to continue "rendering" after you've interrupted a render? Let's say I render out 36 out of 240 frames. Then I "interrupt" the render, and then I want to start it "again" from frame 36 to 240. Is this possible? I mean sure, I can manually set the start frame to be 36, but the last time I tried, the two simulations "together" did not make sense, aka from 1-36 and 36-240... there was like a "Cut" from 36 to 37 to a completely different "Version" of the animation. If you have any questions, be sure to ask. Tried to explain as best as I can.
 -
I am considering buying a dated computer but am uncertain if it is worth it. I plan to use it strictly for rendering using deadline and use my main computer for all of simulations. it uses an amd fx8300 cpu and ddr3 ram 1866. i am unsure if it will be running very slow because of its age and the old architecture it runs on. Might even not be able to run modern OS's. Hoping someone here might be able to offer some insight.
-
 Hi, how can I use the same node between different shading networks. In Maya every node exists on the same level so I can connect it to the multple shaders or as a mask. Coppying node between Material builder or building shaders in one MAT context, is not useful. And whether coppying it uses more RAM or processing power? Global MAT context Separate Material builders
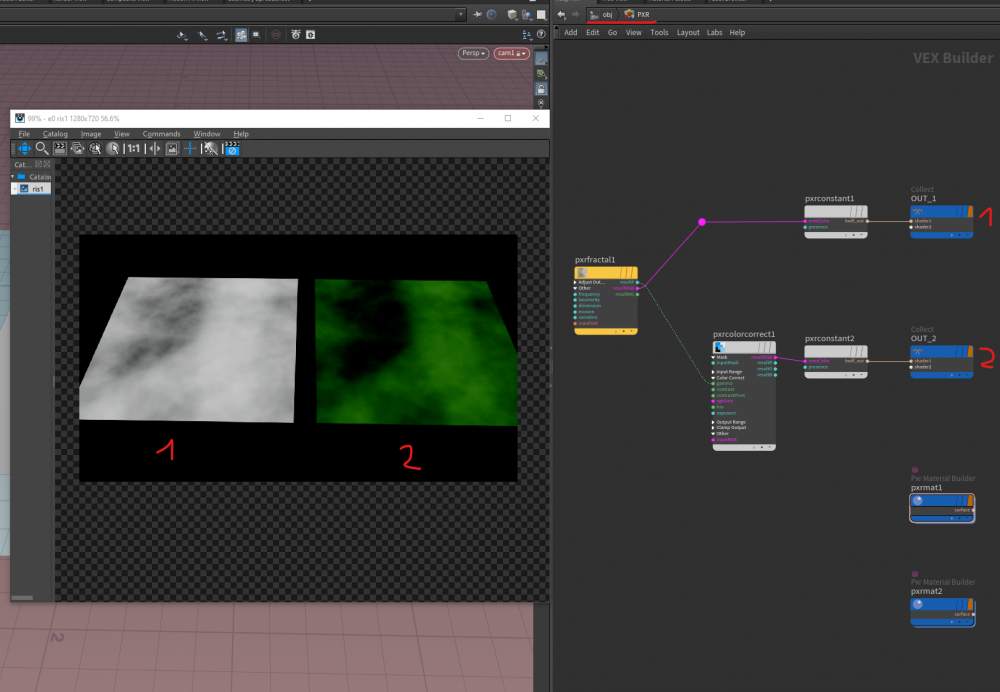
-
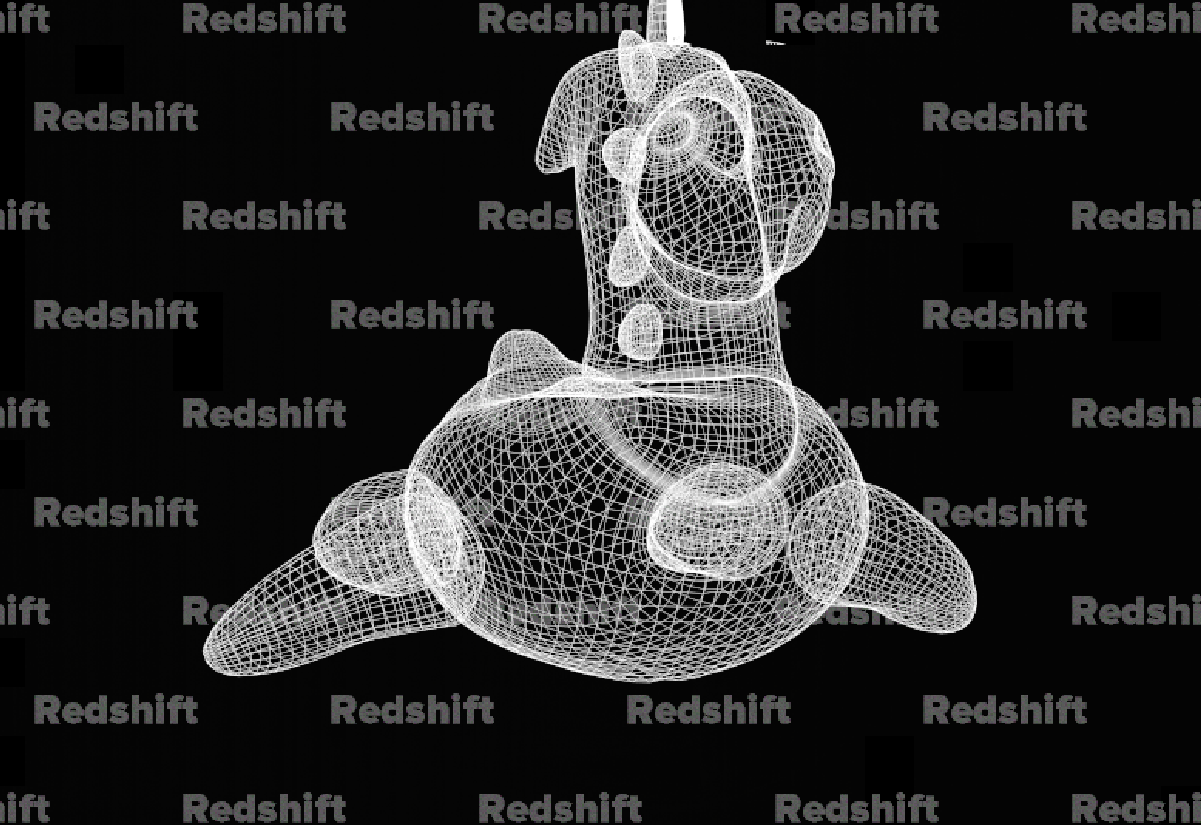
 Hey everyone, basically what I have is this: and what I want is this: Obviously, it looks like I could just move the pig head up in space haha. But I have a more specific case that requires the pig head to be visible through the plane giving the ILLUSION that it's on top of it. Put simply, I want the pig head to always be drawn/rendered on top of the plane, regardless of depth/occlusion. It's really easy to achieve this with compositing, but I'm hoping to pull this off at render time using materials in Mantra. I'm open to some complicated node setups (maybe turning the plane transparent wherever the pig head is behind it???) But hopefully it's just an easy setting that I've missed. Thanks so much in advance!
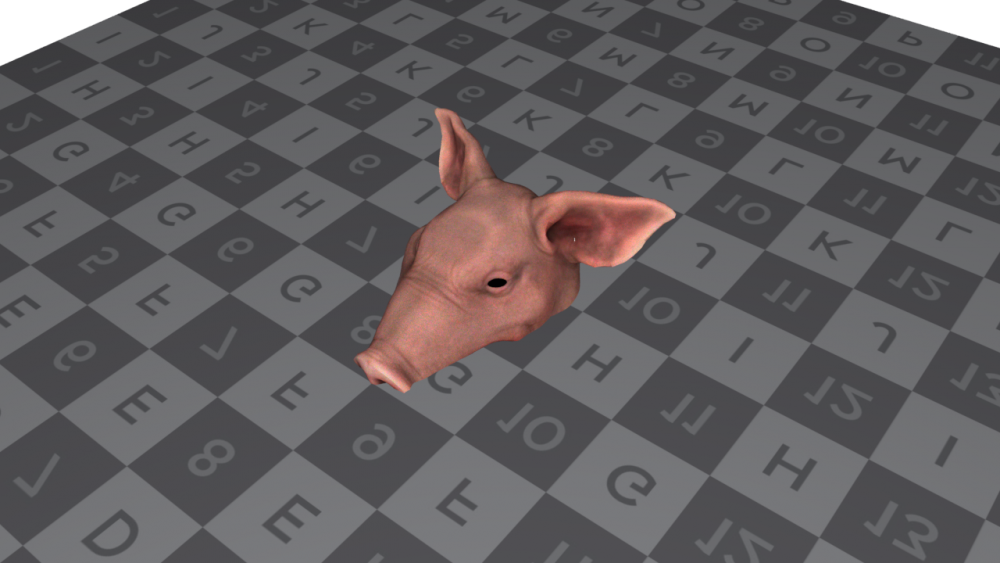

-
Good morning everyone, My current studio is deciding to migrate from Maya for lgt. We have been checking Katana, however, Houdini is already part of our pipeline and I was wondering if moving to Houdini could really improve the workflow comparing to Maya to the point we can consider Houdini instead or Katana. My question is, would you recommend Houdini for a full Arnold base lighting workflow and what would be the benefits or cons against Katana? Thank you,
-
I am new to Redshift. For a very basic scene with three objects, at a resolution of 1280x720, it took 13 minutes to render. I have intel core-i7-8750H, Nvidia GTX1050ti -4GB and 16GB of RAM. This is the output. I have rendered more complex scenes in Keyshot at a resolution of 1350x1350 and it takes 6 minutes max for them on my machine. Please suggest a solution. Here's the houdini file. REDSHIFT ISSUE.hip
-
Hey I am having a problem while rendering my Ocean Surface. Mantra is not displaying anything in the render view. I can see "mantra: Could not obtain vex from op:_auto_/mat/oceansurface " Any Idea what can be the reason of it, It is keep failing the render!!

-
Hi there, I have gone through the forum and I could not find a solution to this problem, so please forgive me if it exists. The sad part is I totally figured this out months ago through trial and error and never saved the file somewhere that I could revisit it apparently ( silly me ! ). So I have made some flat tapered grids that represent disco lights ( light cones but flat ) and have coloured and animated them rotating with sin() and added a camera. Because this is for a 2D style project, there is no shading or lights required. The shader is literally just the Cd attribute plugged into emission with random colours per prim. What I would like to do is use COPS to render my scene as it's way faster to do this for something that has no real lighting. I just cannot figure out how to get : 1) the same view as the camera, but in cops 2) the colour information to show up. It's always cops that trips me up. lol. Any help is greatly appreciated.
-
I've start test Houdini 18 and Arnold 6. the first test was simple splines rendering, 250.000 splines instanced 25 times. it loads a 140MB alembic file. rendered in 6 core Xeon CPU and Nvidia Quadro RTX 5000. (windows 10 pro) the startup for Arnold GPU is slow, it renders faster, so it seems but for clear up the final image it takes for forever or just dropped /crashed, hard to tell on the GPU. the CPU is quite fast but much slower then GPU if it ever would finish. (adaptive sampling was on) As soon as Arnold finishes rendering the scene, it stops and do not refresh any more on parameter changes. so far i am not impressed with the Arnold GPU rendering. here is the same scene Arnold CPU with only direct Lighting. (on my MacBook) some test with Arnold GPU. it performed much better with just direct lighting.
-
I am trying to render out a simple wireframe with depth i.e. the wireframe object fades into the background. Ideally, I want to control the fading threshold in compositing software but I don't have Nuke which is what most tutorials out there are using. Relatively new to render passes, wrote Z depth output into EXR but it is recorded in world units I believe so I find it hard controlling it. I tried using a COP network but can't seem to make it work/don't know how to remap Z depth mask. Any advice on that? Attached file. On a higher level, what is a good option to use for editing multilayer EXR sequences? I typically use Premiere for simple editing but there aren't many EXR tutorials for it? After Effects seems convoluted. Is Nuke my only good option? z-depth-test.hipnc

-
Hi Everyone, I'm trying to setup a TOPs network to cache out sims with multiple parameters being sent to the dop network. Seemingly basic stuff, however nothing I'm doing seems to be working how I think it's going to work. What I've tried: Using a wedge node to set a random attribute and trying to use that attribute in an exterior dop network - caches into a view able geo rop output but all the wedges were the same Rebuilding the pyro sim purely in the tops network - it makes something but when viewed all the frames appear empty Have the source inside the tops and the dop outside - same result as the first
-
Hi guys, I have a tricky question about the Houdini FX vs Core licences. I do understand the differences between the two licences, but on the Side FX website, there is a mention that isn't clear: "Houdini Core is ideal for modelers, lighters, character riggers and animators to use on its own or as a layout and lighting tool for visual effects created in Houdini FX." Does that mean that I can buy a Core and a FX and render a FX scene on a Core licence ? Does the Core version understand the FX scene, load it, and render it without the possibility to edit of course the content ? Any clarification on the subject of what can render a Core version from a FX scene would be great, because it's not the same price...I do need to optimize the cost and i need to know if my core license can render a FX scene without changing the setup. Thank you.
-
Hello there, I have a few problems here: I am trying to make a unlimited ocean scene which I have done without any problems. But now, on the ocean horizon, the water is white for some reason, and I just don't know why it is white, a bug, or I'm just doing something wrong. I tried to make all the bakes in one folder, but it somehow helped, but somehow it did not. I tried to change the parameters in the ocean spectrum, and then bake it again, it helped for some time and then the water was still white. If someone have time, you can take a look on my scene file and the screenshot with the problem. and also, when I try to make a flipbook render, then the flipbook is just rendering the first frame and after that it stops and when I try to render the scene with mantra, then mantra isn't rendering at all... here is a screenshot of the ocean problem and the hip-file: https://drive.google.com/drive/folders/19F8rb7mvUHI_7TNgVI9TzrNU4nlvWcSu?usp=sharing I would really appreciate the help if someone could figure out why it isnt rendering with flipbook and mantra and also the ocean problem.